- ReactJS Tutorial
- ReactJS - Home
- ReactJS - Introduction
- ReactJS - Installation
- ReactJS - Features
- ReactJS - Advantages & Disadvantages
- ReactJS - Architecture
- ReactJS - Creating a React Application
- ReactJS - JSX
- ReactJS - Components
- ReactJS - Nested Components
- ReactJS - Using Newly Created Components
- ReactJS - Component Collection
- ReactJS - Styling
- ReactJS - Properties (props)
- ReactJS - Creating Components using Properties
- ReactJS - props Validation
- ReactJS - Constructor
- ReactJS - Component Life Cycle
- ReactJS - Event management
- ReactJS - Creating an Event−Aware Component
- ReactJS - Introduce Events in Expense Manager APP
- ReactJS - State Management
- ReactJS - State Management API
- ReactJS - Stateless Component
- ReactJS - State Management Using React Hooks
- ReactJS - Component Life Cycle Using React Hooks
- ReactJS - Layout Component
- ReactJS - Pagination
- ReactJS - Material UI
- ReactJS - Http client programming
- ReactJS - Form Programming
- ReactJS - Controlled Component
- ReactJS - Uncontrolled Component
- ReactJS - Formik
- ReactJS - Conditional Rendering
- ReactJS - Lists
- ReactJS - Keys
- ReactJS - Routing
- ReactJS - Redux
- ReactJS - Animation
- ReactJS - Bootstrap
- ReactJS - Map
- ReactJS - Table
- ReactJS - Managing State Using Flux
- ReactJS - Testing
- ReactJS - CLI Commands
- ReactJS - Building and Deployment
- ReactJS - Example
- Hooks
- ReactJS - Introduction to Hooks
- ReactJS - Using useState
- ReactJS - Using useEffect
- ReactJS - Using useContext
- ReactJS - Using useRef
- ReactJS - Using useReducer
- ReactJS - Using useCallback
- ReactJS - Using useMemo
- ReactJS - Custom Hooks
- ReactJS Advanced
- ReactJS - Accessibility
- ReactJS - Code Splitting
- ReactJS - Context
- ReactJS - Error Boundaries
- ReactJS - Forwarding Refs
- ReactJS - Fragments
- ReactJS - Higher Order Components
- ReactJS - Integrating With Other Libraries
- ReactJS - Optimizing Performance
- ReactJS - Profiler API
- ReactJS - Portals
- ReactJS - React Without ES6 ECMAScript
- ReactJS - React Without JSX
- ReactJS - Reconciliation
- ReactJS - Refs and the DOM
- ReactJS - Render Props
- ReactJS - Static Type Checking
- ReactJS - Strict Mode
- ReactJS - Web Components
- Additional Concepts
- ReactJS - Date Picker
- ReactJS - Helmet
- ReactJS - Inline Style
- ReactJS - PropTypes
- ReactJS - BrowserRouter
- ReactJS - DOM
- ReactJS - Carousel
- ReactJS - Icons
- ReactJS - Form Components
- ReactJS - Reference API
- ReactJS Useful Resources
- ReactJS - Quick Guide
- ReactJS - Useful Resources
- ReactJS - Discussion
ReactJS - DOM
To run a react application, it needs to be attached itself to the main document of the web application. React provides a module to access and attach the application to the DOM of the document and the module is ReactDOM (react-dom).
Let us learn how to create a simple react component and attach the component into the document using reactDOM module in this chapter.
ReactDOM usage
react-dom is the core package used to manipulate the DOM of the document. react-dom allows one or more react application to be attached to the document. The react-dom should be imported into the application as shown below −
import * as ReactDOM from 'react-dom';
The react-dom provides two method to manipulate the DOM and they are as follows −
createPortal() − Create a portal in the react application. A portal is a special react node, which enables the main react application to render it's children into the DOM outside of it's own hierarchy of the DOM component.
return ReactDOM.createPortal(
   this.props.children, // child node
   domNode // DOM node outside the root element
);
Let us learn the portals in more details in the upcoming chapters.
flushSync() − Flushes the state changes immediately and updates the DOM. Generally, react creates a virtual dom and then updates the real DOM by analyzing the differences between virtual and real DOM. The update frequency is determined internally by react. flushSync() interrupts and update the changes immediately.
The react-dom provides two submodules, one for server side application and another for client side application. The modules are as follows −
react-dom/server
react-dom/client
ReactDOMServer
Server module will be used to render a react component in the server and the module can be imported as shown below −
import * as ReactDOMServer from 'react-dom/server';
Some of the methods provided by ReactDOMServer are as follows −
renderToPipeableStream() − Render a react component to its initial HTML and returns a pipe stream.
renderToReadableStream() − Render a react component to its initial HTML and returns a readable web stream through promise.
renderToStaticNodeStream() − Render a react component to its initial HTML and returns a readable nodejs stream that outputs a HTML string. It skips extra markup such as data-reactroot and the output will be same as renderToStaticMarkup().
renderToString() − Render a react component to its initial HTML and returns a HTML string.
renderToStaticMarkup() −Same as renderToString() except it skips extra markup such as data-reactroot.
ReactDOMClient
Client module will be extensively used in the front-end development and can be imported into the application as shown below −
import * as ReactDOM from 'react-dom/client';
Some of the methods provided by ReactDOMClient are as follows −
createRoot() − Create a root element to attach and render a react component later. It accepts a html element and returns a react node. The react node is called as root of the application. The returned react node will have two method, render to render a react component and unmount to unmount the react component.
const root = createRoot(container);
root.render(element); // where element = document.getElementById('root-id')
root.umount();
hydrateRoot() − Same as createRoot() but it is used in combination with react-dom/server module to hydrate the react component rendered in the server.
Applying ReactDOMClient
First of all, create a new react application and start it using below command.
create-react-app myapp
cd myapp
npm start
Next, create a react component, Hello under component folder (src/components/Hello.js).
import React from "react";
class Hello extends React.Component {
   constructor(props) {
      super(props)
   }
   render() {
      return (
         <div>Hello, {this.props.name}</div>
      );
   }
}
export default Hello;
Next, open index.html (public/index.html) and add a new container (root2) as shown below −
<!DOCTYPE html>
<html lang="en">
   <head>
      <meta charset="utf-8" />
      <link rel="icon" href="%PUBLIC_URL%/favicon.ico" />
      <meta name="viewport" content="width=device-width, initial-scale=1" />
      <meta name="theme-color" content="#000000" />
      <meta name="description" content="Web site created using create-react-app" />
      <link rel="apple-touch-icon" href="%PUBLIC_URL%/logo192.png" />
      <link rel="manifest" href="%PUBLIC_URL%/manifest.json" />
      <title>React App</title>
   </head>
   <body>
      <noscript>You need to enable JavaScript to run this app.</noscript>
      <div style="padding: 10px;">
         <div id="root"></div>
         <div id="root2"></div>
      </div>
   </body>
</html>
Next, open index.js (src/index.js) and attach our hello component into the root and root2 container as shown below −
import React from 'react';
import ReactDOM from 'react-dom/client';
import './index.css';
import Hello from './Components/Hello';
import reportWebVitals from './reportWebVitals';
const root = ReactDOM.createRoot(document.getElementById('root'));
root.render(
   <React.StrictMode>
      <Hello name="Main root container" />
   </React.StrictMode>
);
const root2 = ReactDOM.createRoot(document.getElementById('root2'));
root2.render(
   <React.StrictMode>
      <Hello name="Another root container" />
   </React.StrictMode>
);
reportWebVitals();`
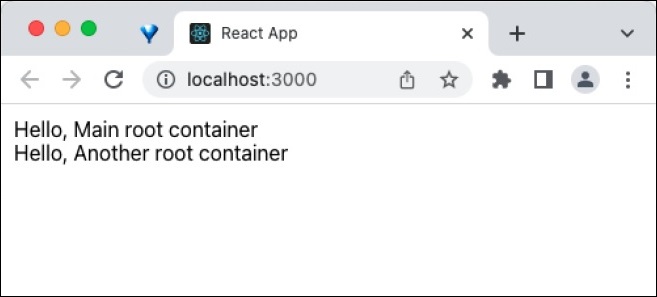
Finally, open the application in the browser and check the result. The react component will be attached to both the root element as shown below −
Summary
ReactDOM provides the ability to create the entry point for the react application by attaching the react component into the HTML document in both client and server environment.