- ReactJS Tutorial
- ReactJS - Home
- ReactJS - Introduction
- ReactJS - Installation
- ReactJS - Features
- ReactJS - Advantages & Disadvantages
- ReactJS - Architecture
- ReactJS - Creating a React Application
- ReactJS - JSX
- ReactJS - Components
- ReactJS - Nested Components
- ReactJS - Using Newly Created Components
- ReactJS - Component Collection
- ReactJS - Styling
- ReactJS - Properties (props)
- ReactJS - Creating Components using Properties
- ReactJS - props Validation
- ReactJS - Constructor
- ReactJS - Component Life Cycle
- ReactJS - Event management
- ReactJS - Creating an Event−Aware Component
- ReactJS - Introduce Events in Expense Manager APP
- ReactJS - State Management
- ReactJS - State Management API
- ReactJS - Stateless Component
- ReactJS - State Management Using React Hooks
- ReactJS - Component Life Cycle Using React Hooks
- ReactJS - Layout Component
- ReactJS - Pagination
- ReactJS - Material UI
- ReactJS - Http client programming
- ReactJS - Form Programming
- ReactJS - Controlled Component
- ReactJS - Uncontrolled Component
- ReactJS - Formik
- ReactJS - Conditional Rendering
- ReactJS - Lists
- ReactJS - Keys
- ReactJS - Routing
- ReactJS - Redux
- ReactJS - Animation
- ReactJS - Bootstrap
- ReactJS - Map
- ReactJS - Table
- ReactJS - Managing State Using Flux
- ReactJS - Testing
- ReactJS - CLI Commands
- ReactJS - Building and Deployment
- ReactJS - Example
- Hooks
- ReactJS - Introduction to Hooks
- ReactJS - Using useState
- ReactJS - Using useEffect
- ReactJS - Using useContext
- ReactJS - Using useRef
- ReactJS - Using useReducer
- ReactJS - Using useCallback
- ReactJS - Using useMemo
- ReactJS - Custom Hooks
- ReactJS Advanced
- ReactJS - Accessibility
- ReactJS - Code Splitting
- ReactJS - Context
- ReactJS - Error Boundaries
- ReactJS - Forwarding Refs
- ReactJS - Fragments
- ReactJS - Higher Order Components
- ReactJS - Integrating With Other Libraries
- ReactJS - Optimizing Performance
- ReactJS - Profiler API
- ReactJS - Portals
- ReactJS - React Without ES6 ECMAScript
- ReactJS - React Without JSX
- ReactJS - Reconciliation
- ReactJS - Refs and the DOM
- ReactJS - Render Props
- ReactJS - Static Type Checking
- ReactJS - Strict Mode
- ReactJS - Web Components
- Additional Concepts
- ReactJS - Date Picker
- ReactJS - Helmet
- ReactJS - Inline Style
- ReactJS - PropTypes
- ReactJS - BrowserRouter
- ReactJS - DOM
- ReactJS - Carousel
- ReactJS - Icons
- ReactJS - Form Components
- ReactJS - Reference API
- ReactJS Useful Resources
- ReactJS - Quick Guide
- ReactJS - Useful Resources
- ReactJS - Discussion
ReactJS - Managing State using Flux
One of the important feature in a front-end application is state management. React has its own state management technique for its component. React state management works in the component level only. A component's state will not be accessed in another component even through the components are in parent / child relationship (nested component). To overcome this problem, there are lot of third party state management libraries such as redux. mobx. etc.,
Flux is one of the technique to manage the state of the application effectively. Flux is introduced by Facebook and using it quite extensively in its web application. Flux uses a unidirectional data flow pattern to provide clear state management. Let us learn what is flux and how to use it in this chapter.
Managing State using Flux
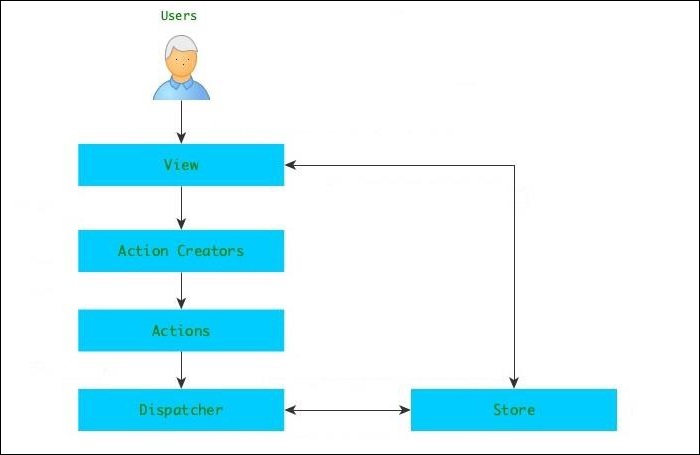
Flux uses unidirectional data flow pattern. It has four distinct parts,
Store − As the name implies, all business data are stored in the store. Store does two process.
Store will update its data on its own by collecting the data from registered dispatcher. Dispatcher provides the store with data and related action.
Once the data is updated, the store emit a change data event to inform the view that the data is changed. View will listen for change event and update its view upon receiving the change event by accessing the updated data from store.
Action − Action are just the representation of the action to be processed with necessary data. View will create a action with necessary data based on the user interaction and send it to dispatcher. For example, the below mentioned payload is created by view (action creator) based on the user interaction to add a user.
{
   actionType: "add",
   data: {
      name: "Peter"
   }
}
Above mentioned action will be passed to dispatcher, which will send the information to all registered store. Store will update the data accordingly and send the change event to all view registered with it.
Dispatcher − Dispatcher receives the actions with proper payload and sent it to all registered stores for further processing.
View − View creates action based on the user interaction and send it to dispatcher. It registers with store to get the changes and once it receives the changes through events, it will update itself with new data.
Few things needs to be initialized for the efficient working of the flux and are as follows −
Dispatcher should be initialized by the application with proper actions and its callback.
Store should be initialized and registered with the dispatcher to receive data updates.
Views should be initialized with the dispatcher and store. Views should be registered to listen for store changes (events).
The workflow of the flux architecture is as follows −
User interact and fires an event in the view.
View handles the event and creates an action based on the user's action.
View send the action to dispatcher.
Dispatcher publish the action to all store registered with it,
Registered store will receive the action with payload. Store will update itself based on the action.
Store will emit change event to the view.
View listening to store changes will update the front end with updated data.
Applying flux
Let us create a new react application to learn how to apply flux concept in this section. First of all, create a new react application and start it using below command.
create-react-app myapp
cd myapp
npm start
Next, install flux package using npm as shown below −
npm install flux --save
Next, open App.css (src/App.css) and remove all CSS classes. Next, create a flux dispatcher, Dispatcher (src/Flux/Dispatcher.js) as shown below −
import {Dispatcher} from "flux";
export default new Dispatcher();
Here, we have created a new dispatcher from the flux package. Next, create actions (and action creator), UserActions (src/Flux/UserActions.js) as shown below −
import dispatcher from "./Dispatcher";
export const USER_ACTIONS = {
   ADD: 'addUser'
};
export function addUser(userName) {
   dispatcher.dispatch({
      type: USER_ACTIONS.ADD,
      value: {
         name: userName
      }
   })
}
Here,
USER_ACTIONS.ADD is a constant used to refer the user's add action.
addUser() is the method used to create action along with user data and dispatch the created action to dispatcher.
Next, create a store, UserStore (src/Flux/UserStore.js) as shown below −
import dispatcher from "./Dispatcher";
import {EventEmitter} from "events";
import * as UserActions from "./UserActions";
class UserStore extends EventEmitter {
   constructor() {
      super();
      this.users = [];
   }
   handleActions(action) {
      switch (action.type) {
         case UserActions.USER_ACTIONS.ADD: {
            this.users.push(action.value);
            this.emit("storeUpdated");
            break;
         }
         default: {
         }
      }
   }
   getUsers() {
      return this.users;
   }
}
const userStore = new userStore();
dispatcher.register(userStore.handleActions.bind(userStore));
export default userStore;
Here,
UserStore is extended from EventEmitter to emit changes.
handleActions retrieves the user details from dispatcher and update itself (this.users).
handleActions emits the store update event to inform the views that the store is updated.
getUsers() method will return the current user list information.
Next, create a user input component, UserInput component to get the new user information as shown below −
import React from "react";
import * as UserActions from "./UserActions";
export default class ButtonComponent extends React.Component {
   constructor(props) {
      super(props);
      this.state = {
         username: ''
      }
   }
   onButtonClick = () => {
      UserActions.addUser(this.state.username)
   };
   render() {
      return (
         <div>
            <input name="username" onChange={(e) => this.setState({username: e.target.value})}/>
            <button onClick={() => this.onButtonClick()}>Add user</button>
         </div>
      );
   }
}
Here,
Create a input element to get new user data from users.
Added a button to submit user information to UserActions's addUser() method
addUser will update user data and send it to dispatcher with proper action type. Dispatcher will call store with action type. Store will update the user list and inform all views registered with it.
Next, create a user list component, UserList component to show the users available in the store as shown below −
import React from "react";
import UserStore from "./UserStore";
export default class UserList extends React.Component {
   constructor(props) {
      super(props);
      this.state = {
         users: UserStore.getUsers()
      }
   }
   componentDidMount() {
      UserStore.on("storeUpdated", this.updateUserList);
   }
   componentWillUnmount() {
      UserStore.removeListener("storeUpdated", this.updateUserList);
   }
   updateUserList = () => {
      this.setState({users: UserStore.getUsers()})
   };
   render() {
      return (
         <ul>{
            this.state.users && this.state.users.length > 0 &&
            this.state.users.map((items) => <li>{items.name}</li>)
         }
         </ul>
      );
   }
}
Here,
componentDidMount registers the store event (storeUpdated) through UserStore.on method.
componentWillUnmount unregister the store event (storeUpdated) through UserStore.removeListener method.
updateUserList get the latest user data from store and update it's own store.
render method renders the user list from it's state (this.state.users).
Next, open App component (src/App.js), and use UserInput and UserList component as shown below −
import './App.css'
import React, { Suspense, lazy } from 'react';
import UserInput from './Flux/UserInput';
import UserList from './Flux/UserList';
function App() {
   return (
      <div className="container">
         <div style={{ padding: "10px" }}>
            <div>
               <UserInput />
               <UserList />
            </div>
         </div>
      </div>
   );
}
export default App;
Here,
UserInput will used to get information from user.
UserList will get the latest user list from store and render it.
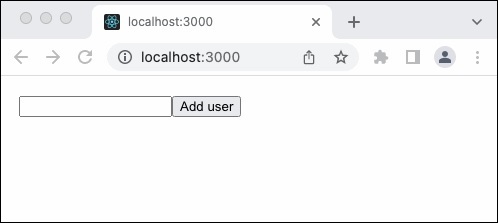
Finally, open the application in the browser and check the final result. Initially, the user list will be empty. Once the user enters username and submit it, the below list will show the updated user list as shown below −
Summary
Flux is simple, unidirectional state management pattern for react application. It helps to reduce the complexity of the react application. It connects views and stores through dispatcher in a transparent manner. React community enhances the flux pattern and released lot of matured state management library (like redux), which are more powerful and easy to use.