- ReactJS Tutorial
- ReactJS - Home
- ReactJS - Introduction
- ReactJS - Installation
- ReactJS - Features
- ReactJS - Advantages & Disadvantages
- ReactJS - Architecture
- ReactJS - Creating a React Application
- ReactJS - JSX
- ReactJS - Components
- ReactJS - Nested Components
- ReactJS - Using Newly Created Components
- ReactJS - Component Collection
- ReactJS - Styling
- ReactJS - Properties (props)
- ReactJS - Creating Components using Properties
- ReactJS - props Validation
- ReactJS - Constructor
- ReactJS - Component Life Cycle
- ReactJS - Event management
- ReactJS - Creating an Event−Aware Component
- ReactJS - Introduce Events in Expense Manager APP
- ReactJS - State Management
- ReactJS - State Management API
- ReactJS - Stateless Component
- ReactJS - State Management Using React Hooks
- ReactJS - Component Life Cycle Using React Hooks
- ReactJS - Layout Component
- ReactJS - Pagination
- ReactJS - Material UI
- ReactJS - Http client programming
- ReactJS - Form Programming
- ReactJS - Controlled Component
- ReactJS - Uncontrolled Component
- ReactJS - Formik
- ReactJS - Conditional Rendering
- ReactJS - Lists
- ReactJS - Keys
- ReactJS - Routing
- ReactJS - Redux
- ReactJS - Animation
- ReactJS - Bootstrap
- ReactJS - Map
- ReactJS - Table
- ReactJS - Managing State Using Flux
- ReactJS - Testing
- ReactJS - CLI Commands
- ReactJS - Building and Deployment
- ReactJS - Example
- Hooks
- ReactJS - Introduction to Hooks
- ReactJS - Using useState
- ReactJS - Using useEffect
- ReactJS - Using useContext
- ReactJS - Using useRef
- ReactJS - Using useReducer
- ReactJS - Using useCallback
- ReactJS - Using useMemo
- ReactJS - Custom Hooks
- ReactJS Advanced
- ReactJS - Accessibility
- ReactJS - Code Splitting
- ReactJS - Context
- ReactJS - Error Boundaries
- ReactJS - Forwarding Refs
- ReactJS - Fragments
- ReactJS - Higher Order Components
- ReactJS - Integrating With Other Libraries
- ReactJS - Optimizing Performance
- ReactJS - Profiler API
- ReactJS - Portals
- ReactJS - React Without ES6 ECMAScript
- ReactJS - React Without JSX
- ReactJS - Reconciliation
- ReactJS - Refs and the DOM
- ReactJS - Render Props
- ReactJS - Static Type Checking
- ReactJS - Strict Mode
- ReactJS - Web Components
- Additional Concepts
- ReactJS - Date Picker
- ReactJS - Helmet
- ReactJS - Inline Style
- ReactJS - PropTypes
- ReactJS - BrowserRouter
- ReactJS - DOM
- ReactJS - Carousel
- ReactJS - Icons
- ReactJS - Form Components
- ReactJS - Reference API
- ReactJS Useful Resources
- ReactJS - Quick Guide
- ReactJS - Useful Resources
- ReactJS - Discussion
ReactJS - renderToString() Method
Rendering React components into HTML is a common operation, particularly when working on server-side rendering (SSR). This becomes possible using the renderToString method.
What is renderToString?
React's renderToString function renders a React component into an HTML string. On the server, it is mostly used to pre-render our React app before providing it to the client as part of the initial server response. This means that our website will load faster and be more search engine friendly.
Syntax
renderToString(reactNode)
Parameters
reactNode − It is a React node to be rendered to HTML. For example <App />.
Return Value
It returns a HTML string.
Examples
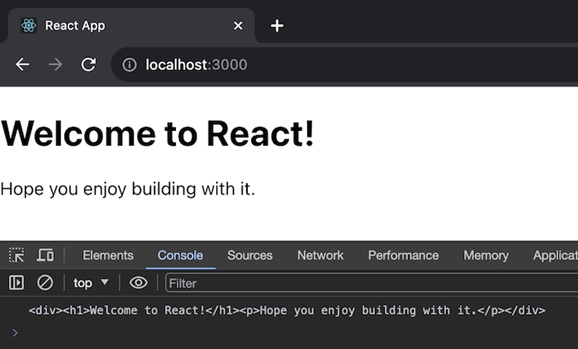
Example − Greetings App
In this code we will create a React component called Greetings to show a simple greeting message. It will use server-side rendering to convert the component into an HTML string and log that string to the console. When executed, we will see the initial HTML representation of the Greetings component with a welcome heading and a message encouraging enjoyment in building with React.
// Import necessary modules
const React = require('react');
const ReactDOMServer = require('react-dom/server');

// Define a component with greetings
const Greetings = () => (
   <div>
      <h1>Welcome to React!</h1>
      <p>Hope you enjoy building with it.</p>
   </div>
);
export default Greetings;

// Render the component to a string
const htmlString2 = ReactDOMServer.renderToString(<Greetings />);

// Log the result
console.log(htmlString2);
Output
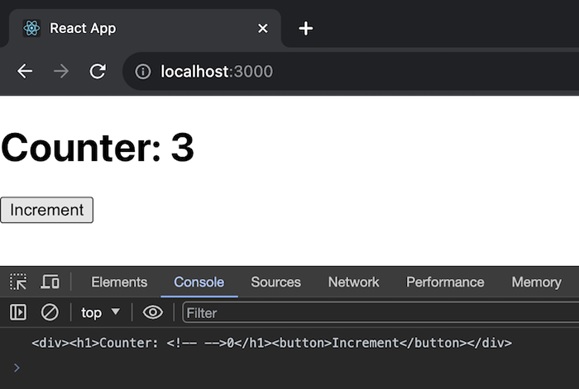
Example − Counter App
In this app we will create a React component (Counter) representing a simple counter with an increment button. It will use server-side rendering to convert the component into an HTML string and log that string to the console. When executed, we will see the initial HTML representation of the Counter component with a count of 0.
// Import necessary modules
const React = require('react');
const ReactDOMServer = require('react-dom/server');

// Define a component with a simple counter
class Counter extends React.Component {
   constructor() {
      super();
      this.state = { count: 0 };
   }
   render() {
      return (
         <div>
            <h1>Counter: {this.state.count}</h1>
            <button onClick={() => this.setState({ count: this.state.count + 1 })}>
               Increment
            </button>
         </div>
      );
   }
}
export default Counter;

// Render the component to a string
const htmlString3 = ReactDOMServer.renderToString(<Counter />);

// Log the result
console.log(htmlString3);
Output
Example − Server and Client
We can use renderToString in two different ways: first is on the Server and second is on the client. So we will discuss these two one by one.
On the Server
So first we will Import the renderToString method from 'react-dom/server'. And use it to render our React app to HTML.
import { renderToString } from 'react-dom/server';
const html = renderToString(<App />);
On the client
We need a separate function, like hydrateRoot, to make the server-generated HTML interactive.
First, verify that our response includes server-rendered HTML and that we have included the scripts required to load our React components and hydrateRoot on the client side.
Server-Side Rendering (Node.js/Express)
import express from 'express';
import React from 'react';
import { renderToString } from 'react-dom/server';
import App from './App'; // Import the main React component

const app = express();
app.get('/', (req, res) => {

   // Server-side rendering
   const html = renderToString(<App />);
   res.send(`
      <!DOCTYPE html>
      <html>
      <head>
         <title>Server-Side Rendering</title>
      </head>
      <body>
         <div id="root">${html}</div>
         <script src="/client.js"></script>
      </body>
      </html>
   `);
});

app.listen(3000, () => {
   console.log('Server is running on http://localhost:3000');
});
Client-Side (client.js)
import React from 'react';
import { hydrateRoot } from 'react-dom'; // Import hydrateRoot
import App from './App'; // Import the main React component

// Find the root element
const rootElement = document.getElementById('root');

// Hydrate the server-rendered HTML
hydrateRoot(rootElement, <App />);
Following this method we can achieve server-side rendering while also making the content interactive on the client side, combining the benefits of both ways.
Limitations
React Suspense is only partially supported by renderToString. If a component waits for data, renderToString sends its fallback as HTML right away.
While it can be used in browsers, it is not recommended for client-side applications. There are better options available for client-side rendering.
Summary
renderToString is a useful React method for changing our components to HTML on the server side, which improves website performance and search engine optimization. Just keep in mind that it may not be the best option for client-side code.
To Continue Learning Please Login