- ReactJS Tutorial
- ReactJS - Home
- ReactJS - Introduction
- ReactJS - Installation
- ReactJS - Features
- ReactJS - Advantages & Disadvantages
- ReactJS - Architecture
- ReactJS - Creating a React Application
- ReactJS - JSX
- ReactJS - Components
- ReactJS - Nested Components
- ReactJS - Using Newly Created Components
- ReactJS - Component Collection
- ReactJS - Styling
- ReactJS - Properties (props)
- ReactJS - Creating Components using Properties
- ReactJS - props Validation
- ReactJS - Constructor
- ReactJS - Component Life Cycle
- ReactJS - Event management
- ReactJS - Creating an Event−Aware Component
- ReactJS - Introduce Events in Expense Manager APP
- ReactJS - State Management
- ReactJS - State Management API
- ReactJS - Stateless Component
- ReactJS - State Management Using React Hooks
- ReactJS - Component Life Cycle Using React Hooks
- ReactJS - Layout Component
- ReactJS - Pagination
- ReactJS - Material UI
- ReactJS - Http client programming
- ReactJS - Form Programming
- ReactJS - Controlled Component
- ReactJS - Uncontrolled Component
- ReactJS - Formik
- ReactJS - Conditional Rendering
- ReactJS - Lists
- ReactJS - Keys
- ReactJS - Routing
- ReactJS - Redux
- ReactJS - Animation
- ReactJS - Bootstrap
- ReactJS - Map
- ReactJS - Table
- ReactJS - Managing State Using Flux
- ReactJS - Testing
- ReactJS - CLI Commands
- ReactJS - Building and Deployment
- ReactJS - Example
- Hooks
- ReactJS - Introduction to Hooks
- ReactJS - Using useState
- ReactJS - Using useEffect
- ReactJS - Using useContext
- ReactJS - Using useRef
- ReactJS - Using useReducer
- ReactJS - Using useCallback
- ReactJS - Using useMemo
- ReactJS - Custom Hooks
- ReactJS Advanced
- ReactJS - Accessibility
- ReactJS - Code Splitting
- ReactJS - Context
- ReactJS - Error Boundaries
- ReactJS - Forwarding Refs
- ReactJS - Fragments
- ReactJS - Higher Order Components
- ReactJS - Integrating With Other Libraries
- ReactJS - Optimizing Performance
- ReactJS - Profiler API
- ReactJS - Portals
- ReactJS - React Without ES6 ECMAScript
- ReactJS - React Without JSX
- ReactJS - Reconciliation
- ReactJS - Refs and the DOM
- ReactJS - Render Props
- ReactJS - Static Type Checking
- ReactJS - Strict Mode
- ReactJS - Web Components
- Additional Concepts
- ReactJS - Date Picker
- ReactJS - Helmet
- ReactJS - Inline Style
- ReactJS - PropTypes
- ReactJS - BrowserRouter
- ReactJS - DOM
- ReactJS - Carousel
- ReactJS - Icons
- ReactJS - Form Components
- ReactJS - Reference API
- ReactJS Useful Resources
- ReactJS - Quick Guide
- ReactJS - Useful Resources
- ReactJS - Discussion
ReactJS - PointerEvent Handler
When we work with React, we might want to respond to user interactions like clicks or touches. PointerEvents help us with that.
In React, we create a function, often called an event handler, to deal with these interactions. This function gets triggered when a user does something with their pointer device, like a mouse or touchpad.
The PointerEvent class represents events generated by different input devices such as mouse, pens, and touchscreens. These events provide information on the pointer, such as its location, device type, pressure, tilt, and other characteristics.
Syntax
<div
   onPointerEnter={e => console.log('onPointerEnter')}
   onPointerMove={e => console.log('onPointerMove')}
   onPointerDown={e => console.log('onPointerDown')}
   onPointerUp={e => console.log('onPointerUp')}
   onPointerLeave={e => console.log('onPointerLeave')}
/>
Parameters
e − It is a React event object.
Properties of PointerEvent
The following are important properties of a PointerEvent −
| Sr.No | Properties & Description |
|---|---|
| 1 | pointerId It is a unique identifier for the pointer causing the event. |
| 2 | width and height These two show the dimensions of the contact area in CSS pixels. |
| 3 | pressure Shows the pressure applied, with 0 and 1 representing the minimum and maximum pressure. |
| 4 | tiltX and tiltY These properties specify the tilt angles of the pointer. |
| 5 | twist Represents the clockwise rotation of the pointer. |
| 6 | pointerType Identifies the type of input device (e.g., mouse, pen, touch). |
| 7 | isPrimary Shows if the pointer is the primary pointer of its type. |
Examples
To get started, let's create a simple React application. To create a react app we should have Node.js and npm installed in case it is not installed previously. Then, run the following commands to build a new React app −
npx create-react-app my-react-app
cd my-react-app
npm start
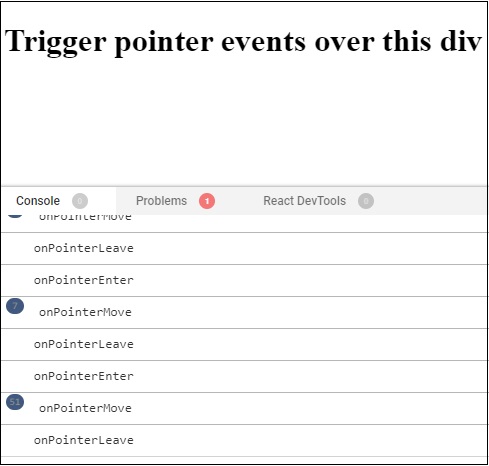
Example − Heading Pointer Event
Let's look at how to use the PointerEvent properties in a React app now. When a pointer event occurs on a <div> element, we will log the following information −
import React from 'react';

function App() {
   return (
      <>
         <h1
            onPointerEnter={e => console.log('onPointerEnter')}
            onPointerMove={e => console.log('onPointerMove')}
            onPointerDown={e => console.log('onPointerDown')}
            onPointerUp={e => console.log('onPointerUp')}
            onPointerLeave={e => console.log('onPointerLeave')}
         >
            Trigger pointer events over this div
         </h1>
      </>
   );
}

export default App;
Output
Example − Change Background Color
In this example we will have a React app that changes the background color of a div element when the user hovers over it. So we will use the useState hook to create a state variable (bgColor) and its updater function (setBgColor). Two functions, handlePointerEnter and handlePointerLeave, are defined to update the background color when the user hovers over or leaves the div. The inline style dynamically adjusts the background color of the div as per the current bgColor state. The text inside the div tells the user to hover over it to change the color. So the code for this app is as follows −
import React, { useState } from 'react';

function App() {
   const [bgColor, setBgColor] = useState('#3498db');
   return (
      <div
         onPointerEnter={() => setBgColor('#e67e22')}
         onPointerLeave={() => setBgColor('#3498db')}
         style={{ border: '2px solid #3498db', padding: '20px', margin: '10px', backgroundColor: bgColor }}
      >
         Hover to change color!
      </div>
   );
}

export default App;
Output
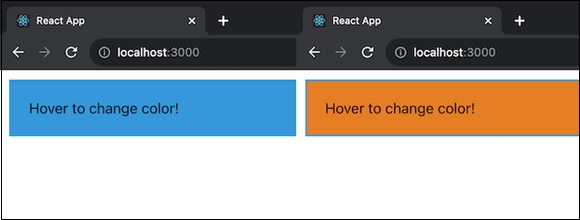
This app gives a basic example of how to use React state and pointer events to create interactive styling changes in a web application.
Example − Double Click to Change Size
Now we will create a simple React app that allows users to change the size of a div element by double-clicking on it. The useState hook is used to create a state variable and its updater function. The initial size is set to 100 pixels. The handleDoubleClick function toggles the size between 100 and 150 pixels when called. The div element uses the onDoubleClick event to listen for double-clicks, triggering the handleDoubleClick function.
import React, { useState } from 'react';

function App() {
   const [size, setSize] = useState(100);
   const handleDoubleClick = () => {
      setSize((prevSize) => (prevSize === 100 ? 150 : 100));
   };
   return (
      <div
         onDoubleClick={handleDoubleClick}
         style={{
            border: '2px solid #2ecc71',
            padding: '20px',
            margin: '10px',
            width: `${size}px`,
            height: `${size}px`,
         }}
      >
         Double click to change size!
      </div>
   );
}

export default App;
Output
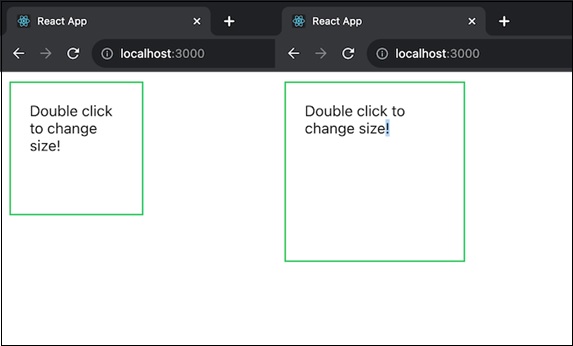
This app gives a basic example of how to use React state and event handling to create interactive behavior in a web application.
Summary
We introduced PointerEvent in the context of a basic React application in this tutorial. We have seen the important properties and an example of how to handle these events. Understanding these events is necessary for developing dynamic and responsive web apps. So we can experiment with these ideas in the React apps to better understand how they function.
To Continue Learning Please Login