- ReactJS Tutorial
- ReactJS - Home
- ReactJS - Introduction
- ReactJS - Installation
- ReactJS - Features
- ReactJS - Advantages & Disadvantages
- ReactJS - Architecture
- ReactJS - Creating a React Application
- ReactJS - JSX
- ReactJS - Components
- ReactJS - Nested Components
- ReactJS - Using Newly Created Components
- ReactJS - Component Collection
- ReactJS - Styling
- ReactJS - Properties (props)
- ReactJS - Creating Components using Properties
- ReactJS - props Validation
- ReactJS - Constructor
- ReactJS - Component Life Cycle
- ReactJS - Event management
- ReactJS - Creating an Event−Aware Component
- ReactJS - Introduce Events in Expense Manager APP
- ReactJS - State Management
- ReactJS - State Management API
- ReactJS - Stateless Component
- ReactJS - State Management Using React Hooks
- ReactJS - Component Life Cycle Using React Hooks
- ReactJS - Layout Component
- ReactJS - Pagination
- ReactJS - Material UI
- ReactJS - Http client programming
- ReactJS - Form Programming
- ReactJS - Controlled Component
- ReactJS - Uncontrolled Component
- ReactJS - Formik
- ReactJS - Conditional Rendering
- ReactJS - Lists
- ReactJS - Keys
- ReactJS - Routing
- ReactJS - Redux
- ReactJS - Animation
- ReactJS - Bootstrap
- ReactJS - Map
- ReactJS - Table
- ReactJS - Managing State Using Flux
- ReactJS - Testing
- ReactJS - CLI Commands
- ReactJS - Building and Deployment
- ReactJS - Example
- Hooks
- ReactJS - Introduction to Hooks
- ReactJS - Using useState
- ReactJS - Using useEffect
- ReactJS - Using useContext
- ReactJS - Using useRef
- ReactJS - Using useReducer
- ReactJS - Using useCallback
- ReactJS - Using useMemo
- ReactJS - Custom Hooks
- ReactJS Advanced
- ReactJS - Accessibility
- ReactJS - Code Splitting
- ReactJS - Context
- ReactJS - Error Boundaries
- ReactJS - Forwarding Refs
- ReactJS - Fragments
- ReactJS - Higher Order Components
- ReactJS - Integrating With Other Libraries
- ReactJS - Optimizing Performance
- ReactJS - Profiler API
- ReactJS - Portals
- ReactJS - React Without ES6 ECMAScript
- ReactJS - React Without JSX
- ReactJS - Reconciliation
- ReactJS - Refs and the DOM
- ReactJS - Render Props
- ReactJS - Static Type Checking
- ReactJS - Strict Mode
- ReactJS - Web Components
- Additional Concepts
- ReactJS - Date Picker
- ReactJS - Helmet
- ReactJS - Inline Style
- ReactJS - PropTypes
- ReactJS - BrowserRouter
- ReactJS - DOM
- ReactJS - Carousel
- ReactJS - Icons
- ReactJS - Form Components
- ReactJS - Reference API
- ReactJS Useful Resources
- ReactJS - Quick Guide
- ReactJS - Useful Resources
- ReactJS - Discussion
ReactJS - MouseEvent Handler
Mouse events are an important aspect of web development, particularly in React. They allow us to build dynamic web apps that respond to user input. We will go over some of the mouse events and their features in the following section. And then we will create a basic React application that logs messages to the console when certain mouse events occur to show these concepts.
React MouseEvent
On HTML elements, we can deal with mouse events like onClick, onMouseEnter, onMouseLeave, onMouseDown, onMouseUp, and onMouseOver in React. When a user interacts with the components with their mouse, several events occur. Let's look at them in the context of a React app.
Syntax
An example of an event handler for mouse events.
<div
   onClick={e => console.log('This is onClick')}
   onMouseDown={e => console.log('This is onMouseDown')}
   onMouseUp={e => console.log('This is onMouseUp')}
   onMouseLeave={e => console.log('This is onMouseLeave')}
   onMouseEnter={e => console.log('This is onMouseEnter')}
   onMouseOver={e => console.log('This is onMouseOver')}
/>
Parameters
e − This is a React event object. We can use this object with various kinds of MouseEvent properties.
MouseEvent Properties
Let's take a quick look at the attributes related with MouseEvent −
| Sr.No | Properties & Description |
|---|---|
| 1 | altKey Returns true if the 'Alt' key was down when the mouse event was fired. |
| 2 | button Indicates the button number that was pressed, if applicable, during the mouse event. |
| 3 | buttons Represents the buttons being pressed when the mouse event occurred. |
| 4 | clientX and clientY Provide the X and Y coordinates of the mouse pointer within the element. |
| 5 | ctrlKey Returns true if the 'Ctrl' key was down during the mouse event. |
| 6 | metaKey Indicates if the 'Meta' key was down when the mouse event happened. |
| 7 | movementX and movementY Show the change in the X and Y coordinates of the mouse pointer since the last mousemove event. |
| 8 | pageX and pageY Give the X and Y coordinates of the mouse pointer relative to the entire document. |
| 9 | relatedTarget Represents the secondary target for the event, if there is one. |
| 10 | screenX and screenY Provide the X and Y coordinates of the mouse pointer in global (screen) coordinates. |
| 11 | shiftKey Returns true if the 'Shift' key was down when the mouse event occurred. |
These properties allow us to access and control mouse event information, which is very important for creating dynamic and responsive user interfaces in React.
Examples
Example − Simple Card Logger
Let's create an app that responds to mouse events when a user interacts with a collection of cards. When the mouse hover over these cards, their events will be changed and show the message on the console. So the code is as follows −
App.js
import React, { useState } from "react";
import "./App.css";

export default function App () {
   return (
      <div>
         <div
            className="card"
            onMouseEnter={e => console.log('Card 1 onMouseEnter')}
            onMouseOver={e => console.log('Card 1 onMouseOver')}
            onMouseDown={e => console.log('Card 1 onMouseDown')}
            onMouseUp={e => console.log('Card 1 onMouseUp')}
            onMouseLeave={e => console.log('Card 1 onMouseLeave')}
         >
            Card 1
         </div>
         <div className="card"
            onMouseEnter={e => console.log('Card 2 onMouseEnter')}
            onMouseOver={e => console.log('Card 2 onMouseOver')}
            onMouseDown={e => console.log('Card 2 onMouseDown')}
            onMouseUp={e => console.log('Card 2 onMouseUp')}
            onMouseLeave={e => console.log('Card 2 onMouseLeave')}
         >
            Card 2
         </div>
      </div>
   );
}
App.css
.App {
   font-family: sans-serif;
   text-align: center;
}
.loader {
   display: flex;
   justify-content: center;
   align-items: center;
   height: 100vh; /* Centers the loader vertically */
}

.card {
   background-color: skyblue;
   padding-left: 120px;
   margin-bottom: 20px;
   width: 200px;
   height: 40px;
}
Output

When different mouse events, such as onMouseEnter, onMouseOver, onMouseDown, onMouseUp, and onMouseLeave, trigger on the cards in the above example, the App component sends messages to the console. These events are used to track and respond to user interactions with cards, such as when the mouse pointer enters, hovers over, clicks, or departs the card.
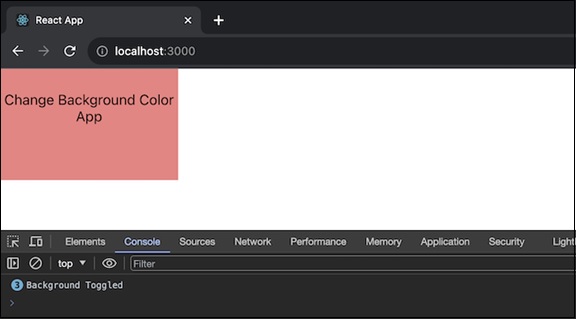
Example − Toggle Background Color on Click
This app will have a <div> element with a clickable area. When we click on the <div>, it will toggle between two background colors: light green and light coral. The app uses state to keep track of the click status and logs a message to the console when the background color is toggled. The cursor is set to a pointer to indicate that the <div> is clickable.
App.js
import React, { useState } from "react";

export default function App() {
   const [isClicked, setClicked] = useState(false);
   const handleClick = () => {
      setClicked(!isClicked);
      console.log('Background Toggled');
   };
   return (
      <div
         onClick={handleClick}
         style={{
            width: "200px",
            height: "100px",
            backgroundColor: isClicked ? "lightcoral" : "lightgreen",
            textAlign: "center",
            paddingTop: "25px",

            // lineHeight: "100px",
            cursor: "pointer",
         }}
         >
         Change Background Color App
      </div>
   );
}
Output
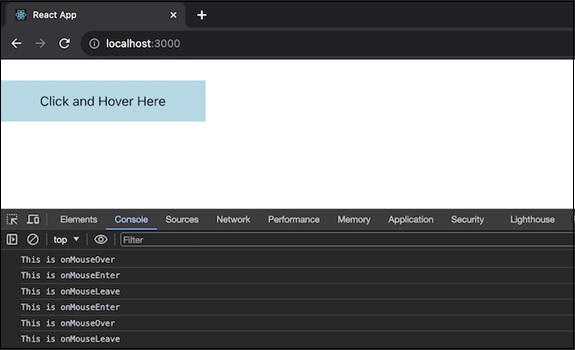
Example − Interactive Button App
Here is another React app using the <div> element with various MouseEvent handlers. So we will create an interactive button-like <div> element. It will log messages to the console when various mouse events occur, like clicking, mouse down, mouse up, mouse leave, mouse enter, and mouse over. The div will have a light blue background, and the cursor changes to a pointer to indicate its interactiveness.
App.js
import React from "react";

export default function App() {
   return (
      <div
         onClick={(e) => console.log('This is onClick')}
         onMouseDown={(e) => console.log('This is onMouseDown')}
         onMouseUp={(e) => console.log('This is onMouseUp')}
         onMouseLeave={(e) => console.log('This is onMouseLeave')}
         onMouseEnter={(e) => console.log('This is onMouseEnter')}
         onMouseOver={(e) => console.log('This is onMouseOver')}
         style={{
            width: "250px",
            height: "50px",
            backgroundColor: "lightblue",
            textAlign: "center",
            lineHeight: "50px",
            marginTop: "25px",
            cursor: "pointer",
         }}
         >
         Click and Hover Here
      </div>
   );
}
Output
Summary
So understanding mouse events and associated attributes is important for developing dynamic web apps with React. We can design attractive user experiences that respond to user interactions by using these events. React gives us the features we need to create hover effects, handle button clicks, and monitor mouse movements.
To Continue Learning Please Login