- ReactJS Tutorial
- ReactJS - Home
- ReactJS - Introduction
- ReactJS - Installation
- ReactJS - Features
- ReactJS - Advantages & Disadvantages
- ReactJS - Architecture
- ReactJS - Creating a React Application
- ReactJS - JSX
- ReactJS - Components
- ReactJS - Nested Components
- ReactJS - Using Newly Created Components
- ReactJS - Component Collection
- ReactJS - Styling
- ReactJS - Properties (props)
- ReactJS - Creating Components using Properties
- ReactJS - props Validation
- ReactJS - Constructor
- ReactJS - Component Life Cycle
- ReactJS - Event management
- ReactJS - Creating an Event−Aware Component
- ReactJS - Introduce Events in Expense Manager APP
- ReactJS - State Management
- ReactJS - State Management API
- ReactJS - Stateless Component
- ReactJS - State Management Using React Hooks
- ReactJS - Component Life Cycle Using React Hooks
- ReactJS - Layout Component
- ReactJS - Pagination
- ReactJS - Material UI
- ReactJS - Http client programming
- ReactJS - Form Programming
- ReactJS - Controlled Component
- ReactJS - Uncontrolled Component
- ReactJS - Formik
- ReactJS - Conditional Rendering
- ReactJS - Lists
- ReactJS - Keys
- ReactJS - Routing
- ReactJS - Redux
- ReactJS - Animation
- ReactJS - Bootstrap
- ReactJS - Map
- ReactJS - Table
- ReactJS - Managing State Using Flux
- ReactJS - Testing
- ReactJS - CLI Commands
- ReactJS - Building and Deployment
- ReactJS - Example
- Hooks
- ReactJS - Introduction to Hooks
- ReactJS - Using useState
- ReactJS - Using useEffect
- ReactJS - Using useContext
- ReactJS - Using useRef
- ReactJS - Using useReducer
- ReactJS - Using useCallback
- ReactJS - Using useMemo
- ReactJS - Custom Hooks
- ReactJS Advanced
- ReactJS - Accessibility
- ReactJS - Code Splitting
- ReactJS - Context
- ReactJS - Error Boundaries
- ReactJS - Forwarding Refs
- ReactJS - Fragments
- ReactJS - Higher Order Components
- ReactJS - Integrating With Other Libraries
- ReactJS - Optimizing Performance
- ReactJS - Profiler API
- ReactJS - Portals
- ReactJS - React Without ES6 ECMAScript
- ReactJS - React Without JSX
- ReactJS - Reconciliation
- ReactJS - Refs and the DOM
- ReactJS - Render Props
- ReactJS - Static Type Checking
- ReactJS - Strict Mode
- ReactJS - Web Components
- Additional Concepts
- ReactJS - Date Picker
- ReactJS - Helmet
- ReactJS - Inline Style
- ReactJS - PropTypes
- ReactJS - BrowserRouter
- ReactJS - DOM
- ReactJS - Carousel
- ReactJS - Icons
- ReactJS - Form Components
- ReactJS - Reference API
- ReactJS Useful Resources
- ReactJS - Quick Guide
- ReactJS - Useful Resources
- ReactJS - Discussion
ReactJS - createElement() Function
createElement is a key React function that allows developers to create elements without using JSX. It is a great tool for creating user interfaces since it provides a systematic method for designing React elements.
Elements are the building blocks of the user interface in React, representing UI components on a web page. While JSX is a common syntax for creating these elements, createElement provides a different way.
Syntax
const element = createElement(type, props, ...children);
Parameters
type − This is the type of our React component. It can be a tag name like div or span, or a React component.
props − These are the properties of our element. It must be an object or null. Ref and key are special and won’t be available as element.props.ref and element.props.key.
…children − We can have zero or more child nodes. They can be any React nodes, like elements, strings, numbers, portals, empty nodes, and arrays of nodes.
Return Value
The function returns a React element object with the following properties −
type − The type we specified.
props − The properties we passed without ref and key.
ref − The ref we passed, or null if it was not present.
key − The key we passed, converted to a string, or null if it was not present.
Examples
Example 1
Let us create a small React app using createElement to display a simple list of items. Create a new React app using Create React App. And now we can replace the content of src/App.js with the following code −
import React, { createElement } from 'react';
import './App.css';

function App() {
   // Data for our list
   const items = ['Item 1', 'Item 2', 'Item 3', 'Item 4'];

   // Create a list using createElement
   const list = createElement(
      'ul',
      null,
      items.map((item, index) =>
         createElement('li', { key: index }, item)
      )
   );

   // Render the list in the component
   return (
      <div className="App">
         <h1>Simple List App</h1>
         {list}
      </div>
   );
}

export default App;
Output
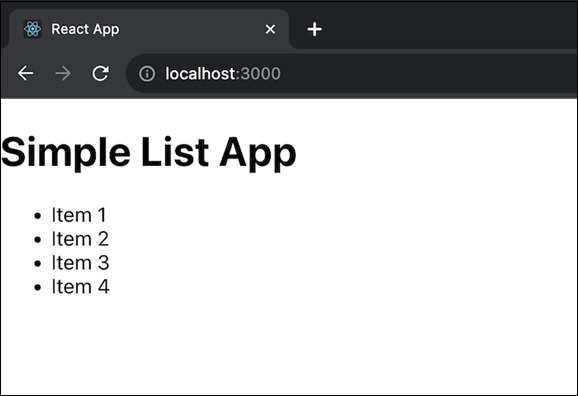
After running the application we will be able to see a simple React app displaying a list of items.
This example shows how to use createElement to dynamically create a list. Each item in the list is produced with the appropriate tag and properties using createElement. While this is a simple example, it shows how we can use createElement to build elements programmatically.
Example 2
Let us create another React app using the createElement method. This time, we will create a simple card component. The code for the app is as follows −
import React, { createElement } from 'react';
import './App.css';

function App() {
   // Data for our cards
   const cards = [
      { title: 'Card 1', content: 'Content for Card 1' },
      { title: 'Card 2', content: 'Content for Card 2' },
      { title: 'Card 3', content: 'Content for Card 3' },
      { title: 'Card 4', content: 'Content for Card 4' },
   ];

   // Create cards using createElement
   const cardElements = cards.map((card, index) =>
      createElement('div', { key: index, className: 'card' },
         createElement('h2', null, card.title),
         createElement('p', null, card.content)
      )
   );

   // Render the cards in the component
   return (
      <div className="App">
         <h1>My Card App using createElement</h1>
         {cardElements}
      </div>
   );
}

export default App;
Output
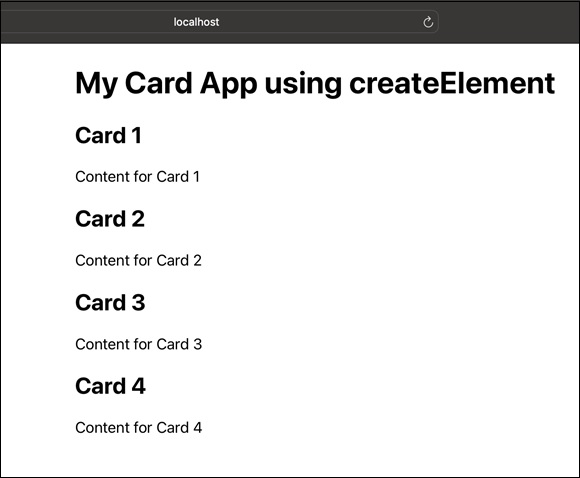
In this example, we have created a basic card component with a title and some content. To construct div elements for each card, as well as nested h2 and p elements for the title and content, the createElement function is used. The component then renders the cardElements array.
Example 3
Let us create one more React app using the createElement method. In this app, we will create a simple Navigation menu. The code for the app is as follows −
So we will create this menu with links using the createElement method. The navItems array contains objects with text and link properties for each navigation item. The navLinks array is created using createElement to generate elements with appropriate attributes.
import React, { createElement } from 'react';
import './App.css';

function App() {
   // Data for our navigation items
   const navItems = [
      { text: 'Home', link: '/' },
      { text: 'About', link: '/about' },
      { text: 'Services', link: '/services' },
      { text: 'Contact', link: '/contact' },
   ];

   // Create navigation links using createElement
   const navLinks = navItems.map((item, index) => (

      // Adding a space after each navigation item
      <>
         {createElement('a', { key: index, href: item.link, className: 'nav-link' }, item.text)}

      </>
   ));

   // Render the navigation menu in the component
   return (
      <div className="App">
         <h1>Simple Navigation Menu</h1>
         <nav>
            {createElement('ul', { className: 'nav-list' }, navLinks)}
         </nav>
      </div>
   );
}

export default App;
Output
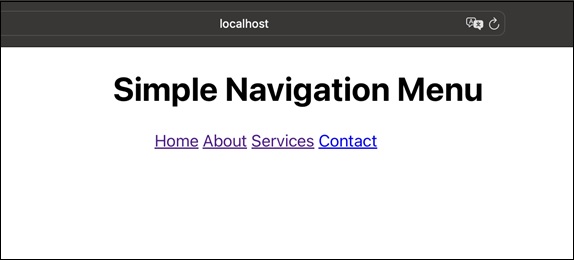
So this is how our navigation menu looks. There are links for Home, About, Services and Contact. We can use this concept in our web application to navigate from one page to another page via the link provided.
Summary
The createElement function helps us to make dynamic and interactive parts of a website by creating React elements in a special way. This makes React applications more flexible and able to do different things. In this article, we learnt about how to use createElement, what things we can put in it, and why it is important for building things with React.
To Continue Learning Please Login