- ReactJS Tutorial
- ReactJS - Home
- ReactJS - Introduction
- ReactJS - Installation
- ReactJS - Features
- ReactJS - Advantages & Disadvantages
- ReactJS - Architecture
- ReactJS - Creating a React Application
- ReactJS - JSX
- ReactJS - Components
- ReactJS - Nested Components
- ReactJS - Using Newly Created Components
- ReactJS - Component Collection
- ReactJS - Styling
- ReactJS - Properties (props)
- ReactJS - Creating Components using Properties
- ReactJS - props Validation
- ReactJS - Constructor
- ReactJS - Component Life Cycle
- ReactJS - Event management
- ReactJS - Creating an Event−Aware Component
- ReactJS - Introduce Events in Expense Manager APP
- ReactJS - State Management
- ReactJS - State Management API
- ReactJS - Stateless Component
- ReactJS - State Management Using React Hooks
- ReactJS - Component Life Cycle Using React Hooks
- ReactJS - Layout Component
- ReactJS - Pagination
- ReactJS - Material UI
- ReactJS - Http client programming
- ReactJS - Form Programming
- ReactJS - Controlled Component
- ReactJS - Uncontrolled Component
- ReactJS - Formik
- ReactJS - Conditional Rendering
- ReactJS - Lists
- ReactJS - Keys
- ReactJS - Routing
- ReactJS - Redux
- ReactJS - Animation
- ReactJS - Bootstrap
- ReactJS - Map
- ReactJS - Table
- ReactJS - Managing State Using Flux
- ReactJS - Testing
- ReactJS - CLI Commands
- ReactJS - Building and Deployment
- ReactJS - Example
- Hooks
- ReactJS - Introduction to Hooks
- ReactJS - Using useState
- ReactJS - Using useEffect
- ReactJS - Using useContext
- ReactJS - Using useRef
- ReactJS - Using useReducer
- ReactJS - Using useCallback
- ReactJS - Using useMemo
- ReactJS - Custom Hooks
- ReactJS Advanced
- ReactJS - Accessibility
- ReactJS - Code Splitting
- ReactJS - Context
- ReactJS - Error Boundaries
- ReactJS - Forwarding Refs
- ReactJS - Fragments
- ReactJS - Higher Order Components
- ReactJS - Integrating With Other Libraries
- ReactJS - Optimizing Performance
- ReactJS - Profiler API
- ReactJS - Portals
- ReactJS - React Without ES6 ECMAScript
- ReactJS - React Without JSX
- ReactJS - Reconciliation
- ReactJS - Refs and the DOM
- ReactJS - Render Props
- ReactJS - Static Type Checking
- ReactJS - Strict Mode
- ReactJS - Web Components
- Additional Concepts
- ReactJS - Date Picker
- ReactJS - Helmet
- ReactJS - Inline Style
- ReactJS - PropTypes
- ReactJS - BrowserRouter
- ReactJS - DOM
- ReactJS - Carousel
- ReactJS - Icons
- ReactJS - Form Components
- ReactJS - Reference API
- ReactJS Useful Resources
- ReactJS - Quick Guide
- ReactJS - Useful Resources
- ReactJS - Discussion
ReactJS - ClipboardEvent Handler
ClipboardEvent handler functions are used to respond to events within a web application such as copying, cutting, and pasting text. These functions are linked to particular events that occur when we perform these activities.
Let us break down how we can create and use a ClipboardEvent handler function in React −
Create a React Component
First, we need to create a React component where we want to implement the clipboard event handling. This component should extend React.Component or use the functional component syntax.
Define the Event Handler Function
Inside our component, we will define a function to handle the clipboard event. In the example, I named it handleCopy, and it takes an event parameter.
handleCopy = (event) => {
   // logic to handle the copy event come here
   console.log('Text copied:', window.getSelection().toString());
}

<div onCopy={this.handleCopy}>
   This is some sample text.
</div>
Syntax
<input
   onCopy={e => console.log('onCopy event done')}
   onCut={e => console.log('onCut event done')}
   onPaste={e => console.log('onPaste event done')}
/>
The ClipboardEvent interface contains events that provide information on clipboard changes, such as cut, copy, and paste.
Events
These handlers correspond to specific events −
onCopy − It is triggered when our text or data is copied to the clipboard.
onCut − It is triggered when our text or data is cut from the clipboard.
onPaste − It is triggered when the text or data is pasted from the clipboard.
Use Cases
Clipboard event handlers are normally used in online applications to offer easy-to-use features like −
Notifying users when they copy, cut, or paste text.
Changing how copy, cut, and paste operations behave.
Clipboard data access and processing for numerous application uses.
Examples
Here are some examples to use these event handlers in a React application −
Example − Text Editor with Clipboard Functionality
In this sample app, we have created a small React component called App. We have defined three event handler functions within this component : handleCopy, handleCut, and handlePaste. Each of these functions records data about the clipboard event, such as the text copied, clipped, or pasted.
Using the onCopy, onCut, and onPaste properties, we attach these event handlers to an input element. When we copy, cut, or paste in the input field, the related event handler sends the information to the console.
import React from 'react';

function App() {

   // Define event handler functions
   const handleCopy = (e) => {
      console.log('Text copied to clipboard: ', e.clipboardData.getData('text'));
   };
   const handleCut = (e) => {
      console.log('Text cut to clipboard: ', e.clipboardData.getData('text'));
   };
   const handlePaste = (e) => {
      console.log('Text pasted from clipboard: ', e.clipboardData.getData('text'));
   };
   return (
      <div>
         {/* Attach the event handlers */}
         <input onCopy={handleCopy} onCut={handleCut} onPaste={handlePaste} />

         <p>Try copying, cutting, or pasting text in the input field.</p>
      </div>
   );
}

export default App;
Output
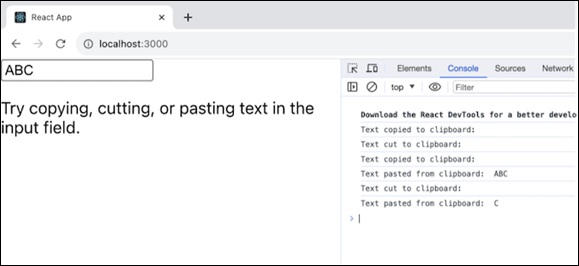
When we run this React application, it will display a simple user interface with an input field. So we can enter text into the input area by copying, cutting, or pasting it. When we do this, the related event handlers which are handleCopy, handleCut, and handlePaste, are called, and the text involved in the clipboard operation is logged to the console.
Example − Text Editor with Clipboard Functionality
This is a React application named "Shopping List." It provides a simple interface for users to manage a list of items they want to buy. Here is the key component of the app −
import React, { useState } from 'react';

function ShoppingList() {
   const [items, setItems] = useState([]);
   const addItem = (item) => {
      setItems([...items, { name: item, purchased: false }]);
   };
   const markPurchased = (index) => {
      const updatedItems = [...items];
      updatedItems[index].purchased = !updatedItems[index].purchased;
      setItems(updatedItems);
   };
   const handleCopyList = () => {
      const listString = JSON.stringify(items);
      navigator.clipboard.writeText(listString);
   };
   const handlePasteList = async () => {
      const pastedText = await navigator.clipboard.readText();
      try {
         const pastedItems = JSON.parse(pastedText);
         setItems(pastedItems);
      } catch (error) {
         // Handle error
      }
   };
   return (
      <div>
         <h2>Shopping List</h2>
         <ul>
            {items.map((item, index) => (
               <li key={index}>
                  <input type="checkbox" checked={item.purchased} onChange={() => markPurchased(index)} />
                  {item.name}
               </li>
            ))}
         </ul>
         <div>
            <input type="text" placeholder="Add Item" onKeyDown={(e) => e.key === 'Enter' && addItem(e.target.value)} />
            <button onClick={handleCopyList}>Share List</button>
            <button onClick={handlePasteList}>Import List</button>
         </div>
      </div>
   );
}

export default ShoppingList;
Output
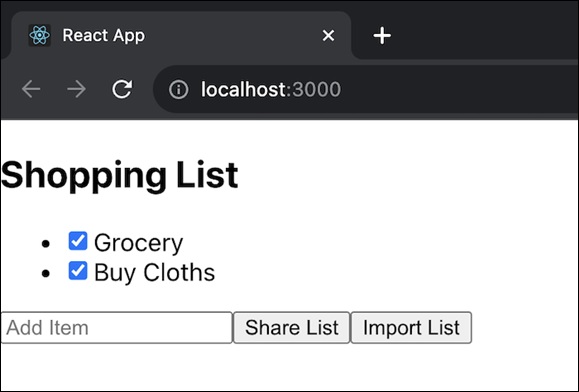
Overall, this application gives a simple way for users to manage their shopping list, mark items as purchased, add new items, and share or import lists with others.
Example − Password Generator with Clipboard Functionality
This is a simple React application named "Password Generator." Its purpose is to generate a random password based on the selected length and allow the user to copy the generated password to the clipboard. Here is the code for the app −
import React, { useState } from 'react';

function PasswordGenerator() {
   const [password, setPassword] = useState('');
   const [passwordLength, setPasswordLength] = useState(16);
   const generatePassword = () => {
      const characters = 'abcdefghijklmnopqrstuvwxyzABCDEFGHIJKLMNOPQRSTUVWXYZ0123456789!@#$%^&*()_+{}:<>?/';
      let result = '';
      for (let i = 0; i < passwordLength; i++) {
         result += characters.charAt(Math.floor(Math.random() * characters.length));
      }
      setPassword(result);
   };
   const handleCopy = () => {
      navigator.clipboard.writeText(password);
   };
   return (
      <div>
         <h2>Password Generator</h2>
         <input type="number" value={passwordLength} onChange={(e) => setPasswordLength(Number(e.target.value))} />
         <button onClick={generatePassword}>Generate Password</button>
         <p>{password}</p>
         <button onClick={handleCopy}>Copy to Clipboard</button>
      </div>
   );
}

export default PasswordGenerator;
Output
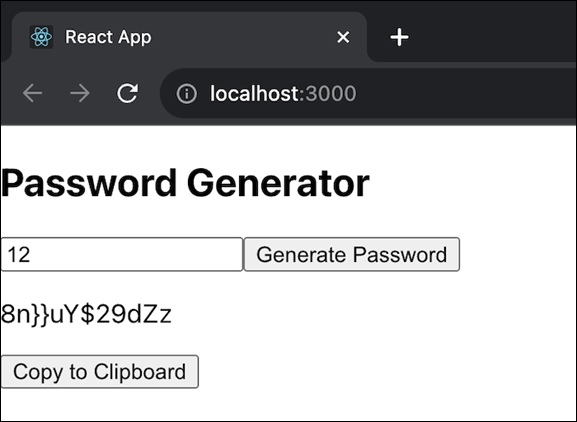
Overall this application gives a simple and user-friendly way to generate secure passwords with the ability to copy them to the clipboard for easy use. Users can also customize the password length according to their security requirements.
Summary
Overall, ClipboardEvent handlers are critical for improving the user experience in online applications by allowing clipboard actions to be changed and analyzed. They are specially useful in situations where unique clipboard event processing is required.
To Continue Learning Please Login