- GWT Tutorial
- GWT - Home
- GWT - Overview
- GWT - Environment Setup
- GWT - Applications
- GWT - Create Application
- GWT - Deploy Application
- GWT - Style with CSS
- GWT - Basic Widgets
- GWT - Form Widgets
- GWT - Complex widgets
- GWT - Layout Panels
- GWT - Event Handling
- GWT - Custom Widgets
- GWT - UIBinder
- GWT - RPC Communication
- GWT - JUnit Integration
- GWT - Debugging Application
- GWT - Internationalization
- GWT - History Class
- GWT - Bookmark Support
- GWT - Logging Framework
- GWT Useful Resources
- GWT - Questions and Answers
- GWT - Quick Guide
- GWT - Useful Resources
- GWT - Discussion
GWT - DialogBox Widget
Introduction
The DialogBox widget represents a form of popup that has a caption area at the top and can be dragged by the user. Unlike a PopupPanel, calls to PopupPanel.setWidth(String) and PopupPanel.setHeight(String) will set the width and height of the dialog box itself, even if a widget has not been added as yet.
Class Declaration
Following is the declaration for com.google.gwt.user.client.ui.DialogBox class −
public class DialogBox
   extends DecoratedPopupPanel
      implements HasHTML, HasSafeHtml, MouseListener
Class Constructors
| Sr.No. | Constructor & Description |
|---|---|
| 1 |
DialogBox() Creates an empty dialog box. |
| 2 |
DialogBox(boolean autoHide) Creates an empty dialog box, specifying its auto-hide property. |
| 3 |
DialogBox(boolean autoHide, boolean modal) Creates an empty dialog box, specifying its auto-hide and modal properties. |
Class Methods
| Sr.No. | Function name & Description |
|---|---|
| 1 |
protected void beginDragging(MouseDownEvent event) Called on mouse down in the caption area, begins the dragging loop by turning on event capture. |
| 2 |
protected void continueDragging(MouseMoveEvent event) Called on mouse move in the caption area, continues dragging if it was started by beginDragging(com.google.gwt.event .dom.client.MouseDownEvent). |
| 3 |
protected void doAttachChildren() If a widget contains one or more child widgets that are not in the logical widget hierarchy (the child is physically connected only on the DOM level), it must override this method and call Widget.on Attach() for each of its child widgets. |
| 4 |
protected void doDetachChildren() If a widget contains one or more child widgets that are not in the logical widget hierarchy (the child is physically connected only on the DOM level), it must override this method and call Widget.onDetach() for each of its child widgets. |
| 5 |
protected void endDragging(MouseUpEvent event) Called on mouse up in the caption area, ends dragging by ending event capture. |
| 6 |
DialogBox.Caption getCaption() Provides access to the dialog's caption. |
| 7 |
java.lang.String getHTML() Gets this object's contents as HTML. |
| 8 |
java.lang.String getText() Gets this object's text. |
| 9 |
void hide() Hides the popup and detaches it from the page. |
| 10 |
void onBrowserEvent(Event event) Fired whenever a browser event is received. |
| 11 |
protected void onEnsureDebugId(java.lang.String baseID) Affected Elements: -caption = text at the top of the DialogBox. -content = the container around the content. |
| 12 |
void on Mouse Down(Widget sender, int x, int y) Deprecated. Use begin Dragging (com.google.gwt.event.dom. client.Mouse Down Event) and get Caption() instead |
| 13 |
void on Mouse Enter(Widget sender) Deprecated. Use Has Mouse Over Handlers. add Mouse Over Handler (com.google.gwt.event.dom. client.Mouse Over Handler) instead |
| 14 |
void onMouseLeave(Widget sender) Deprecated. Use Has Mouse Out Handlers.add Mouse Out Handler (com.google.gwt.event.dom. client.Mouse Out Handler) instead |
| 15 |
void onMouseMove(Widget sender, int x, int y) Deprecated. Use continueDragging(com.google.gwt.event.dom. client.MouseMoveEvent) and getCaption() instead |
| 16 |
void onMouseUp(Widget sender, int x, int y) Deprecated. Use endDragging(com.google.gwt.event.dom. client.MouseUpEvent) and getCaption() instead |
| 17 |
protected void onPreviewNativeEvent(Event.NativePreviewEvent event) |
| 18 |
void setHTML(SafeHtml html) Sets the html string inside the caption. |
| 19 |
void setHTML(java.lang.String html) Sets the html string inside the caption. |
| 20 |
void setText(java.lang.String text) Sets the text inside the caption. |
| 21 |
void show() Shows the popup and attach it to the page. |
Methods Inherited
This class inherits methods from the following classes −
com.google.gwt.user.client.ui.UIObject
com.google.gwt.user.client.ui.Widget
com.google.gwt.user.client.ui.Panel
com.google.gwt.user.client.ui.SimplePanel
com.google.gwt.user.client.ui.PopupPanel
com.google.gwt.user.client.ui.DecoratedPopupPanel
java.lang.Object
DialogBox Widget Example
This example will take you through simple steps to show usage of a DialogBox Widget in GWT. Follow the following steps to update the GWT application we created in GWT - Create Application chapter −
| Step | Description |
|---|---|
| 1 | Create a project with a name HelloWorld under a package com.tutorialspoint as explained in the GWT - Create Application chapter. |
| 2 | Modify HelloWorld.gwt.xml, HelloWorld.css, HelloWorld.html and HelloWorld.java as explained below. Keep rest of the files unchanged. |
| 3 | Compile and run the application to verify the result of the implemented logic. |
Following is the content of the modified module descriptor src/com.tutorialspoint/HelloWorld.gwt.xml.
<?xml version = "1.0" encoding = "UTF-8"?>
<module rename-to = 'helloworld'>
   <!-- Inherit the core Web Toolkit stuff.                        -->
   <inherits name = 'com.google.gwt.user.User'/>

   <!-- Inherit the default GWT style sheet.                       -->
   <inherits name = 'com.google.gwt.user.theme.clean.Clean'/>

   <!-- Specify the app entry point class.                         -->
   <entry-point class = 'com.tutorialspoint.client.HelloWorld'/>

   <!-- Specify the paths for translatable code                    -->
   <source path = 'client'/>
   <source path = 'shared'/>

</module>
Following is the content of the modified Style Sheet file war/HelloWorld.css.
body {
   text-align: center;
   font-family: verdana, sans-serif;
}

h1 {
   font-size: 2em;
   font-weight: bold;
   color: #777777;
   margin: 40px 0px 70px;
   text-align: center;
}

.gwt-DialogBox .Caption {
   background: #e3e8f3 url(images/hborder.png) repeat-x 0px -2003px;
   padding: 4px 4px 4px 8px;
   cursor: default;
   border-bottom: 1px solid #bbbbbb;
   border-top: 5px solid #d0e4f6;
}

.gwt-DialogBox .dialogContent {
}

.gwt-DialogBox .dialogMiddleCenter {
   padding: 3px;
   background: white;
}

.gwt-DialogBox .dialogBottomCenter {
   background: url(images/hborder.png) repeat-x 0px -4px;
   -background: url(images/hborder_ie6.png) repeat-x 0px -4px;
}

.gwt-DialogBox .dialogMiddleLeft {
   background: url(images/vborder.png) repeat-y;
}

.gwt-DialogBox .dialogMiddleRight {
   background: url(images/vborder.png) repeat-y -4px 0px;
   -background: url(images/vborder_ie6.png) repeat-y -4px 0px;
}

.gwt-DialogBox .dialogTopLeftInner {
   width: 5px;
   zoom: 1;
}

.gwt-DialogBox .dialogTopRightInner {
   width: 8px;
   zoom: 1;
}

.gwt-DialogBox .dialogBottomLeftInner {
   width: 5px;
   height: 8px;
   zoom: 1;
}

.gwt-DialogBox .dialogBottomRightInner {
   width: 5px;
   height: 8px;
   zoom: 1;
}

.gwt-DialogBox .dialogTopLeft {
   background: url(images/corner.png) no-repeat -13px 0px;
   -background: url(images/corner_ie6.png) no-repeat -13px 0px;
}

.gwt-DialogBox .dialogTopRight {
   background: url(images/corner.png) no-repeat -18px 0px;
   -background: url(images/corner_ie6.png) no-repeat -18px 0px;
}

.gwt-DialogBox .dialogBottomLeft {
   background: url(images/corner.png) no-repeat 0px -15px;
   -background: url(images/corner_ie6.png) no-repeat 0px -15px;
}

.gwt-DialogBox .dialogBottomRight {
   background: url(images/corner.png) no-repeat -5px -15px;
   -background: url(images/corner_ie6.png) no-repeat -5px -15px;
}

html>body .gwt-DialogBox {
}

* html .gwt-DialogBox .dialogTopLeftInner {
   width: 5px;
   overflow: hidden;
}

* html .gwt-DialogBox .dialogTopRightInner {
   width: 8px;
   overflow: hidden;
}

* html .gwt-DialogBox .dialogBottomLeftInner {
   width: 5px;
   height: 8px;
   overflow: hidden;
}

* html .gwt-DialogBox .dialogBottomRightInner {
   width: 8px;
   height: 8px;
   overflow: hidden;
}
Following is the content of the modified HTML host file war/HelloWorld.html.
<html>
   <head>
      <title>Hello World</title>
      <link rel = "stylesheet" href = "HelloWorld.css"/>
      <script language = "javascript" src = "helloworld/helloworld.nocache.js">
      </script>
   </head>

   <body>
      <h1>DialogBox Widget Demonstration</h1>
      <div id = "gwtContainer"></div>
   </body>
</html>
Let us have following content of Java file src/com.tutorialspoint/HelloWorld.java which will demonstrate use of DialogBox widget.
package com.tutorialspoint.client;

import com.google.gwt.core.client.EntryPoint;
import com.google.gwt.event.dom.client.ClickEvent;
import com.google.gwt.event.dom.client.ClickHandler;
import com.google.gwt.user.client.Window;
import com.google.gwt.user.client.ui.Button;
import com.google.gwt.user.client.ui.DialogBox;
import com.google.gwt.user.client.ui.HasHorizontalAlignment;
import com.google.gwt.user.client.ui.Label;
import com.google.gwt.user.client.ui.RootPanel;
import com.google.gwt.user.client.ui.VerticalPanel;

public class HelloWorld implements EntryPoint {

   private static class MyDialog extends DialogBox {

      public MyDialog() {
         // Set the dialog box's caption.
         setText("My First Dialog");

         // Enable animation.
         setAnimationEnabled(true);

         // Enable glass background.
         setGlassEnabled(true);

         // DialogBox is a SimplePanel, so you have to set its widget
         // property to whatever you want its contents to be.
         Button ok = new Button("OK");
         ok.addClickHandler(new ClickHandler() {
            public void onClick(ClickEvent event) {
               MyDialog.this.hide();
            }
         });

         Label label = new Label("This is a simple dialog box.");

         VerticalPanel panel = new VerticalPanel();
         panel.setHeight("100");
         panel.setWidth("300");
         panel.setSpacing(10);
         panel.setHorizontalAlignment(HasHorizontalAlignment.ALIGN_CENTER);
         panel.add(label);
         panel.add(ok);

         setWidget(panel);
      }
   }

   public void onModuleLoad() {
      Button b = new Button("Click me");
      b.addClickHandler(new ClickHandler() {
         @Override
         public void onClick(ClickEvent event) {
            // Instantiate the dialog box and show it.
            MyDialog myDialog = new MyDialog();

            int left = Window.getClientWidth()/ 2;
            int top = Window.getClientHeight()/ 2;
            myDialog.setPopupPosition(left, top);
            myDialog.show();
         }
      });

      RootPanel.get().add(b);
   }
}
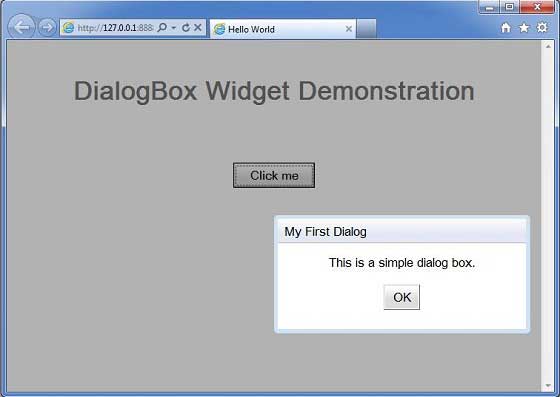
Once you are ready with all the changes done, let us compile and run the application in development mode as we did in GWT - Create Application chapter. If everything is fine with your application, this will produce following result −
To Continue Learning Please Login