- Continuous Integration Tutorial
- CI - Home
- CI - Overview
- CI - Software
- CI - Reducing Risks
- CI - Version Control
- CI - Features
- CI - Requirements
- CI - Building a Solution
- CI - Build Scripts
- CI - Building On the Server
- CI - Checking in Source Code
- CI - Creating a Project in TeamCity
- CI - Defining Tasks
- CI - Build Failure Notifications
- CI - Documentation and Feedback
- CI - Testing
- CI - Inspection
- CI - Database
- CI - Deployment
- CI - Best Practices
- Continuous Integration Resources
- CI - Quick Guide
- CI - Useful Resources
- CI - Discussion
Continuous Integration - Version Control
Version control systems, also known as source control, source code management systems, or revision control systems, are a mechanism for keeping multiple versions of your files, so that when you modify a file you can still access the previous revisions.
The first popular version control system was a proprietary UNIX tool called SCCS (Source Code Control System) which dates back to the 1970s. This was superseded by RCS, the Revision Control System, and later CVS, Concurrent Versions System.
Now the most popular version control system used are Subversion and Git. Let’s first look at why we need to use a versioning control system and next let’s look at putting our source code in Git source code repository system.
Purpose of the Version Control System
One reason that we use the term version control in preference to source control is that version control isn’t just for source code. Every single artifact related to the creation of your software should be under version control.
Developers should use it for source code − By default all source code needs to be stored in the versioning control system
Related artefacts − Every system would be having related artefacts to the source code such as database scripts, build and deployment scripts, documentation, libraries and configuration files for your application, your compiler and collection of tools, and so on. All of these compliment the entire development and deployment process and also needs to be stored in the versioning control system.
By storing all the information for the application in source control, it becomes easier to re-create the testing and production environments that your application runs on. This should include configuration information for your application’s software stack and the operating systems that comprise the environment, DNS Zone Files, Firewall Configuration, and so forth.
At the bare minimum, you need everything required to re-create your application’s binaries and the environments in which they run. The objective is to have everything that can possibly change at any point in the life of the project stored in a controlled manner. This allows you to recover an exact snapshot of the state of the entire system, from development environment to production environment, at any point in the project’s history.
It is even helpful to keep the configuration files for the development team’s development environments in version control since it makes it easy for everyone on the team to use the same settings. Analysts should store requirements documents. Testers should keep their test scripts and procedures in version control. Project managers should save their release plans, progress charts, and risk logs here.
In short, every member of the team should store any document or file related to the project in version control.
Working with Git for Source Code Versioning Control System
This section will now focus on how Git can be used as a versioning control system. It will focus on how you can upload your code to the versioning control system and manage changes in it.
Our Demo Application
For the purpose of this entire tutorial we are going to look at a simple Web ASP.Net application which will be used for the entire Continuous Integration Process. We don’t need to focus on the entire code details for this exercise, just having an overview of what the project does is sufficient for understanding the entire continuous integration process. This .Net application was built using the Visual Studio Integrated Development Environment.
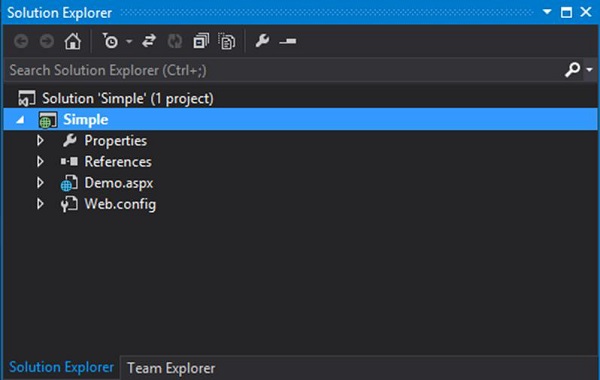
The following screenshot is the structure of the solution in the Visual Studio environment. It is a very simple Web application which has the main code in the Demo.aspx file.
The code in the Demo.aspx file is shown in the following program −
<html xmlns = "http://www.w3.org/1999/xhtml">
   <head runat = "server">
      <title>TutorialsPoint</title>
   </head>

   <body>
      <form id = "form1" runat="server">
         <div><%Response.Write("Continuous Integration"); %></div>
      </form>
   </body>

</html>
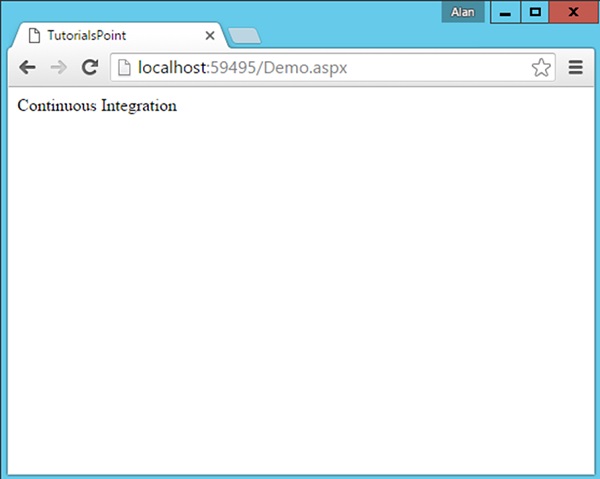
The code is very simple and just outputs the string “Continuous Integration” to the browser.
When you run the project in Google Chrome, the output will be as shown in the following screenshot.
Moving Source Code to Git
We are going to show how to move the source code to Git from the command line interface, so that the knowledge of how Git can be used is clearer to the end user.
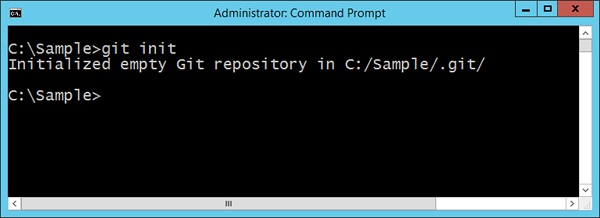
Step 1 − Initialize the Git Repository. Go to the command prompt, go to your project folder and issue the command git init. This command will add the necessary Git files to the project folder, so that it can be recognized by Git when it needs to be uploaded to the repository.
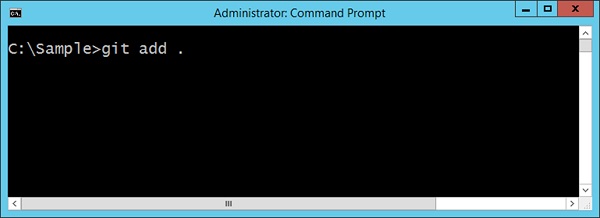
Step 2 − Adding your files which need to be added to the Git repository. This can be done by issuing the git add command. The dot option tells Git that all files in the project folder need to be added to the Git repository.
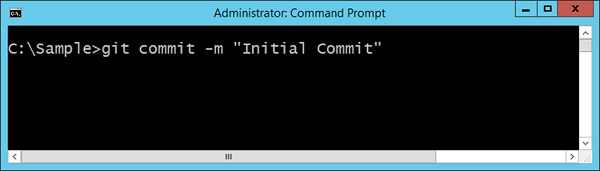
Step 3 − The final step is to commit the project files to the Git repository. This step is required to ensure all files are now a part of Git. The command to be issued is given in the following screenshot. The –m option is to provide a comment to the upload of files.
Your solution is now available in Git.