- VersionOne - Home
- VersionOne - Introduction
- VersionOne - Features
- VersionOne - Free Trial Access
- VersionOne - Login
- VersionOne - Dashboard
- VersionOne - Invite Users
- VersionOne - Add a Project
- VersionOne - Portfolio Planner
- VersionOne - Product Planner
- VersionOne - Backlog
- VersionOne - Story
- VersionOne - Edit Story
- VersionOne - Defects
- VersionOne - Edit Defects
- VersionOne - Release Planner
- VersionOne - Sprint Planning
- VersionOne - Sprint Scheduling
- VersionOne - Detail Planning
- VersionOne - Issues
- VersionOne - Task
- VersionOne - Templates
- VersionOne - Import Data
- VersionOne - Team Rooms
- VersionOne - Storyboard
- VersionOne - Testboard
- VersionOne - Taskboard
- VersionOne - Filters
- VersionOne - Search
- VersionOne - Conversation
- VersionOne - Collaboration
- VersionOne - Notification
- VersionOne - Estimably
VersionOne - Sprint Scheduling
The first step in the Iteration/Sprint planning process Iteration/Sprint Scheduling. In this step, the team selects the amount of work it can deliver from the prioritized backlog. The Team makes use of the historical velocity as a guide reference to commit the work. This helps the team determine how much to schedule in each sprint.
To access Sprint Scheduling, from the main menu, select Team Planner → Sprint Scheduling.
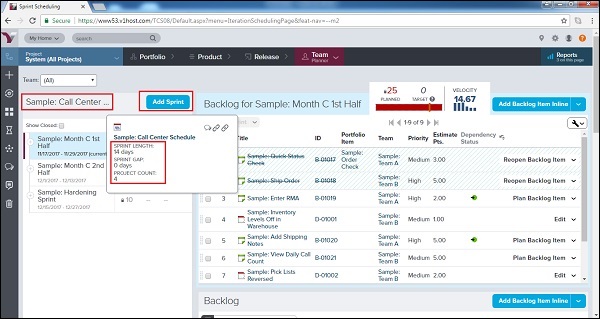
Add a Sprint
It is the job of a Project Owner or Scrum Master to add a sprint. Sprint is added well before the start date and it clearly mentions the start and end dates to achieve the committed goals. Follow these steps to add a sprint into the project −
Navigate to the Sprint Scheduling. It opens the Sprint Scheduling page.
Select the Project in Project Navigator. It selects the project where sprint has to add.
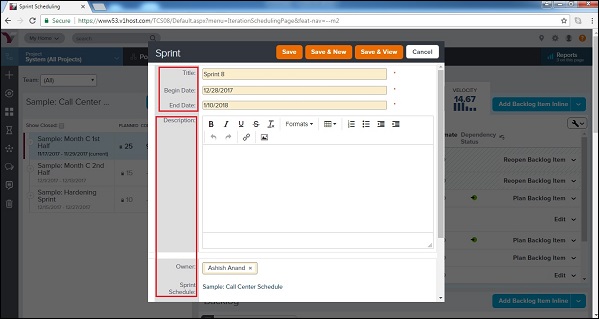
After that, click on the Add Sprint button present at the left side as shown in the screenshot below. It opens the Add Sprint form.
Enter the required and optional fields.
Required Fields − Title, Begin Date and End Date. The End Date should be a future date.
Optional Field − Description, Owner, Target Estimate Points, Change Comments.
After that, click on the Save button. It adds the new sprint into the project.
The following screenshot shows how to add sprint −
A user can start adding items into sprint by dragging from the right and dropping at the left.
View & Edit Sprint Details
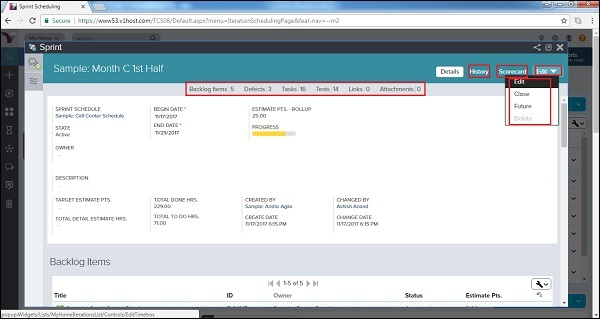
From the Sprint Detail page, a user can view all the information associated with sprint and edit the information if required. While editing the sprint details, a user can edit all the details of the sprint including title, priority, date and description. Following are the important steps to view & edit the details −
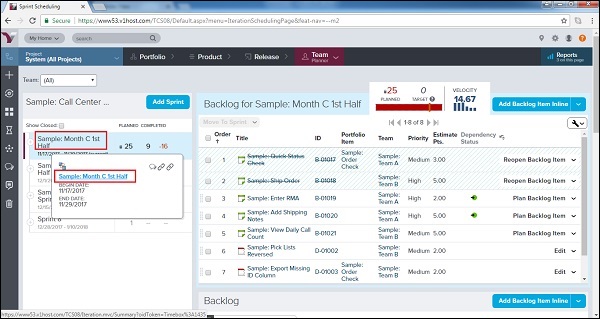
To access the Sprint Detail page, navigate to Sprint Scheduling and hover over on the Sprint Name at the left side.
It displays the sprint name and the limited details into additional pop-up. Click on the Sprint Name in the pop-up as shown in the screenshot below −
It displays the Sprint Details page. It has different links like Backlog, Defect, Tasks, Tests, Link and Attachment to view the respective details.
The Following functionalities can be used in the details page −
| If a user wants to... | Do this... |
|---|---|
| Access the Sprint Scorecard | Click the Scorecard tab. |
| View the sprint change history | Click the History tab. |
| Close the sprint | Select Close from the Edit dropdown button. |
| Change the state of the sprint to Future | Select Future from the Edit dropdown button. |
| Delete the sprint | Select Delete from the Edit dropdown button. If the Delete button is not available, it means that the sprint still contains items. |
The following screenshot displays the different functionalities of the Sprint Detail Page −