- VersionOne - Home
- VersionOne - Introduction
- VersionOne - Features
- VersionOne - Free Trial Access
- VersionOne - Login
- VersionOne - Dashboard
- VersionOne - Invite Users
- VersionOne - Add a Project
- VersionOne - Portfolio Planner
- VersionOne - Product Planner
- VersionOne - Backlog
- VersionOne - Story
- VersionOne - Edit Story
- VersionOne - Defects
- VersionOne - Edit Defects
- VersionOne - Release Planner
- VersionOne - Sprint Planning
- VersionOne - Sprint Scheduling
- VersionOne - Detail Planning
- VersionOne - Issues
- VersionOne - Task
- VersionOne - Templates
- VersionOne - Import Data
- VersionOne - Team Rooms
- VersionOne - Storyboard
- VersionOne - Testboard
- VersionOne - Taskboard
- VersionOne - Filters
- VersionOne - Search
- VersionOne - Conversation
- VersionOne - Collaboration
- VersionOne - Notification
- VersionOne - Estimably
VersionOne - Defects
In STLC, a user can create defects to plan and track fixes. Defects are work items of the Backlog. Similar to stories/backlog items, a user can estimate points to defects that factor into the team's velocity. A user can break it into tasks and acceptance tests to allocate the work required to complete and deliver it.
Defects are flagged as red symbol to identify and differentiate from other backlog items.
Add a Defect
Defect can be added by all the team members having project access. There are many ways to log a defect into VersionOne. In this chapter, we will discuss how to add a defect.
Option 1
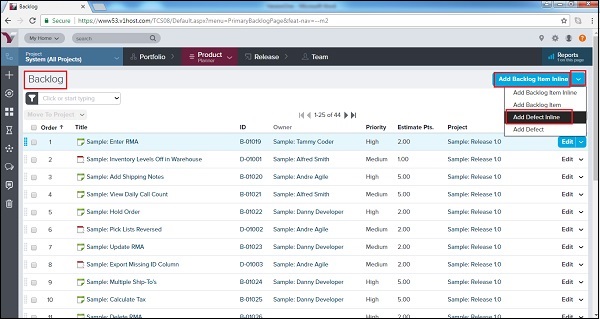
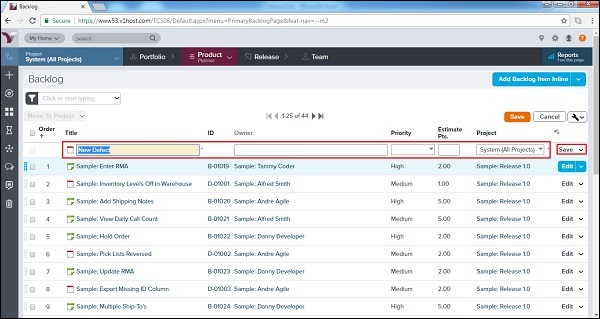
Go to Product Planner→ Backlog to open the backlog page.
Click on Add Backlog Item Inline dropdown present at top right. It displays all available options.
Click on Add Defect Inline option.
It will quickly add a top row where user needs to enter detail and click on Save button.
The following screenshot displays how to add a defect inline −
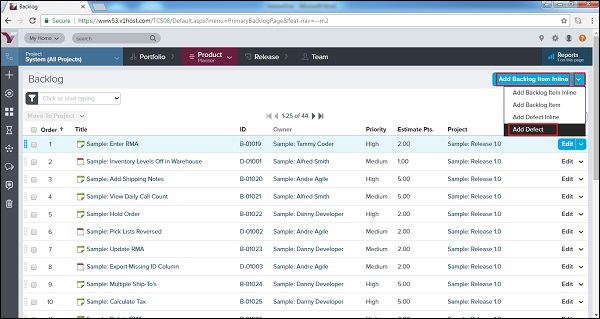
Option 2
Go to Product Planner → Backlog
Click on the Add Backlog Item Inline dropdown present at the top right.
Click on the Add Defect option.
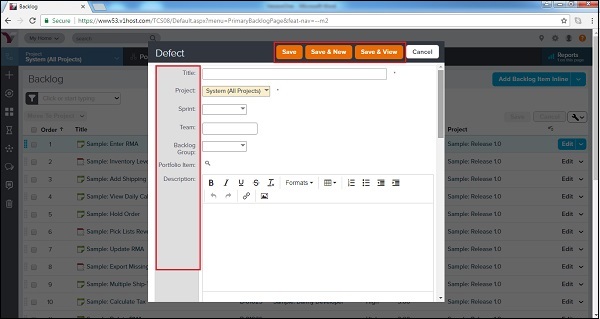
A new window opens along with the different fields to enter details about the defect.
Once the details are entered, a user clicks on the Save/Save & View/Save & New button.
The following screenshot displays how to add a defect −
The following screenshot displays the Defect Details page −
Option 3
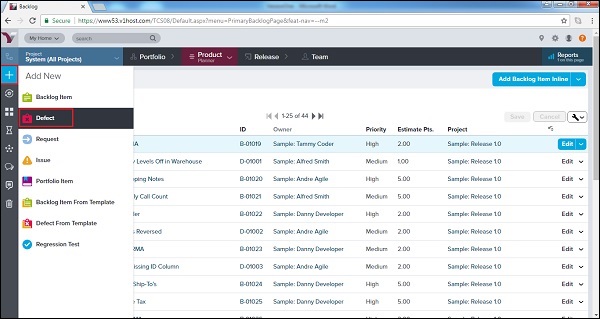
Click on the + icon at the sidebar menu. It opens the Add New options.
Click on the Defect option as shown in the following screenshot −
A new window opens along with the different fields to enter the details about the defect.
Once the details are entered, a user clicks on the Save/Save & View/Save & New button to save the defect
Access Defect Details
Once the defect is logged, a user can view the details. In this section, we will discuss how to view the details of a defect.
To view the defect details, click on Title or ID anywhere it appears in VersionOne. It opens the details of the defect in a pop-up window.
Conversations and Activity Stream are present at the left side of the page.
At the top right, the Action Menu is present.
The Relationship Links are present at the top bar.
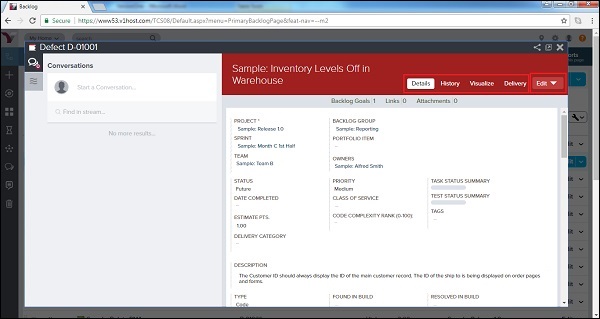
The main page consists of the defect details.
The following screenshot shows the Defect Details page −

From the Defect Details page, the following high-level tasks can be performed using the tabs at the top right of the grid.
| If a user wants to... | Do this... |
|---|---|
| View all defect details | Click the Details tab. |
| View the change history for a story | Click the History tab. |
| View a graphical representation of the story's relationships to other workitems | Click the Visualize tab. |
| Edit defect details | Click the Dropdown arrow to select Edit tab to open the Defect Edit window. User can also open this dropdown menu to perform many other actions (Add Task, Add Test, Copy, Sign Me Up, Block, Split, Quick Close, Close, Delete and Watch Defect). |
Following screenshot shows the tab of high level tasks −
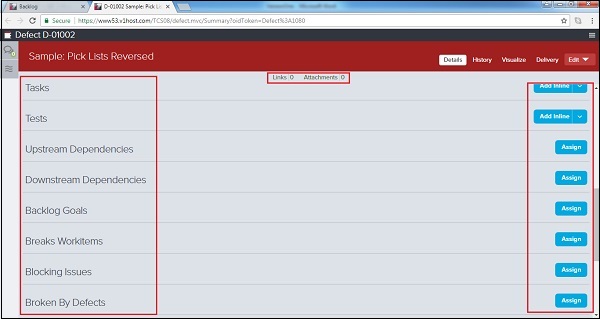
Manage Defect Details
At the bottom of the Defect Details page, a user can perform the following functions by clicking the Add or Assign buttons. To remove any item, a user can click Remove from the selected story.
| If a user wants to... | Do this... |
|---|---|
| Add a new task | Go to Tasks and click Add Inline. |
| Add a new test | Go to Tests and click Add Inline. |
| Assign upstream dependencies from available backlog | Go to Upstream Dependencies and clickAssign. |
| Assign downstream dependencies from available backlog | Go to Downstream Dependencies and click Assign. |
| Identify (select) issue(s) that have been resolved | Go to Issues Resolved and click Assign. |
| Select an existing issue to assign as a blocking issue | Go to Blocking Issues and click Assign. |
| Select existing backlog items that are affected by the defect | Go to Breaks Workitems and clickAssign. |
| Select an existing request | Go to Requests and click Assign. |
| Select an existing defect that breaks the selected story | Go to Broken By Defects and clickAssign. |
| Designate the most current build(s) affected by the defect | Go to Last Affected Build Runs and clickAssign. |
| Add a new link to remote documentation | Go to Links and click Add. |
| Add a new file attachment | Go to Attachments and click Add. |
The following screenshot displays how to manage story details −