
 Data Structure
 Networking
 RDBMS
RDBMS Operating System
 Java
Java MS Excel
 iOS
iOS HTML
HTML CSS
CSS Android
 Python
 C Programming
 C++
C++ C#
C# MongoDB
 MySQL
MySQL Javascript
 PHP
PHP
- Selected Reading
- UPSC IAS Exams Notes
- Developer's Best Practices
- Questions and Answers
- Effective Resume Writing
- HR Interview Questions
- Computer Glossary
- Who is Who
Using Images in Snack
Sometimes, the task is to pick the images from the mobile device and then show these images in Apps. For this ImagePicker from expo-image-picker can be used. In this article, the React native and javascript code is shown with two different examples where in the first example, the React Native component "Image" is used to select the image, resize and display it. In another example, the method to select the image from the computer or mobile device is shown and then rendering it on the screen of the device.
Example 1: Resizing and Showing the Image by using React Native.
Algorithm
Step 1 ? Import View and Image from 'react-native'.
Step 2 ? Make the App.js and write the code for using the local image after uploading it to the asset folder of the project.
Step 3 ? Check the image size by clicking the image name. Specify the same width and height in the style portion while displaying the original size image.
Step 4 ? To increase the image size equally in all directions, multiply the imagesize by the same value.
Step 5 ? To decrease the image size equally in all directions, divide the imagesize by the same value.
Step 6 ? Adding the same value to width and height also works for the image size changing equally in all directions.
The important file used in the project is
App.js
Asset Folder contains the image "bluestar.jpg". The original size of the image appears when the filename of the image is clicked. For example is shows like this? 136*112 f or bluestar.jpg.
App.js : This is the main javascript file for this project.
Example
import React from 'react';
import {View , Image} from 'react-native';

//displaying and controlling the size of the image

export default class App extends React.Component {
   render() {
      return (
         <View>
            <Image source = {require('./assets/bluestar.jpg')}
            style = {{ width: 112, height: 136}}/>
            <Image source = {require('./assets/bluestar.jpg')}
            style = {{ width: 112*2, height: 136*2}}/>
            <Image source = {require('./assets/bluestar.jpg')}
            style = {{ width: 112/2, height: 136/2}}/>
            <Image source = {require('./assets/bluestar.jpg')}
            style = {{ width: 112+50, height: 136+50}}/>

         </View>
      );
   }
}
Viewing The Result - Example 1
The result can be seen online. As the user types in the code the Web view is selected by default and the result appears instantly.

Img: Image resizing and showing in the Web view in Snack
Example 2: Using ImagePicker to pick an image from the device and then display it.
Algorithm
Step 1 ? Import Image, View, StyleSheet and Button from 'react-native'. Import ImagePicker from 'expo-image-picker'.
Step 2 ? Make the App.js and write the code using MediaLibrary.requestPermissionsAsync() and ImagePicker.launchImageLibraryAsync() functions
Step 3 ? Make a button to click and pick the image from the computer/Mobile device.
Step 4 ? Define the image style and then show the image.
The Important file used in the project is
App.js
App.js : This is the main javascript file for this project.
Example
import * as React from 'react';
import { Image, View, StyleSheet, Button } from 'react-native';
import * as ImagePicker from 'expo-image-picker';

export default class SelectImageAndShow extends React.Component {
   state = {
      theimage: null
   }

   getPermissionAsync = async () => {
      const { status } = await MediaLibrary.requestPermissionsAsync();
   }

   picktheImage = async () => {
      let resultimg = await ImagePicker.launchImageLibraryAsync({
         mediaTypes: ImagePicker.MediaTypeOptions.All,
         allowsEditing: true,
         aspect: [4, 3],
         quality: 1
      });

       if (!resultimg.cancelled) {
         this.setState({ theimage: resultimg.uri });
      }
   }

   render() {
      const { theimage } = this.state;
      return (
         <View style={styles.thespace}>

            <View style={{width:"90%", justifyContent:"center", margin:20 }}>
            <Button title="Select the image from your device" color="#A42585"width="50%"onPress={this.picktheImage}/>
            </View>

            {theimage && <Image style={{ justifyContent:"center", width: 300, height: 300, margin:20}} source={{ uri: theimage }}/>}

         </View>
      );
   }
}

const styles = StyleSheet.create({
   thespace: {
      flex: 1,
      justifyContent: 'center',
      backgroundColor: '#000',
   },
});
Viewing The Result - Example 2
The result can be seen online. As the user types in the code the Web view is selected by default and the result appears instantly. When the user clicks the button, the folder to select pictures from the computer is opened up. When the user selects the image it gets displayed on the screen. If the user is using the app on mobile device, the ImagePicker gives the option to select the picture from the mobile. The results in both cases are shown here.
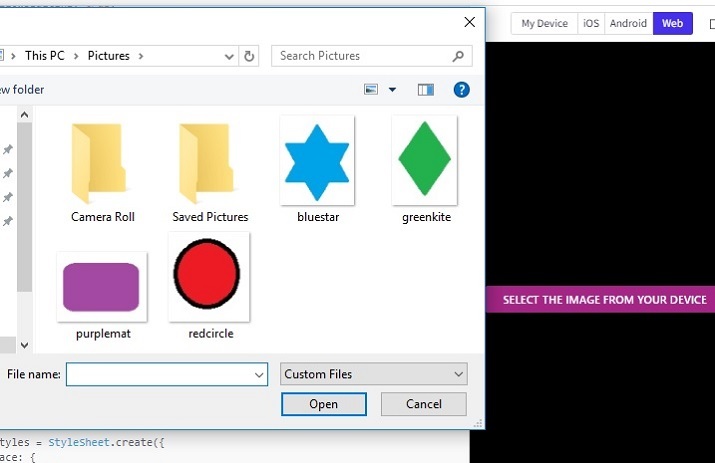
Fig: Showing the option of selecting pictures from the computer using Web view.
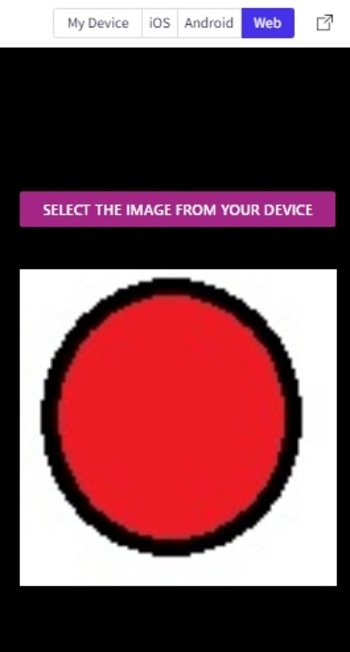
Fig: Showing the image after selecting it from the computer using Web view.
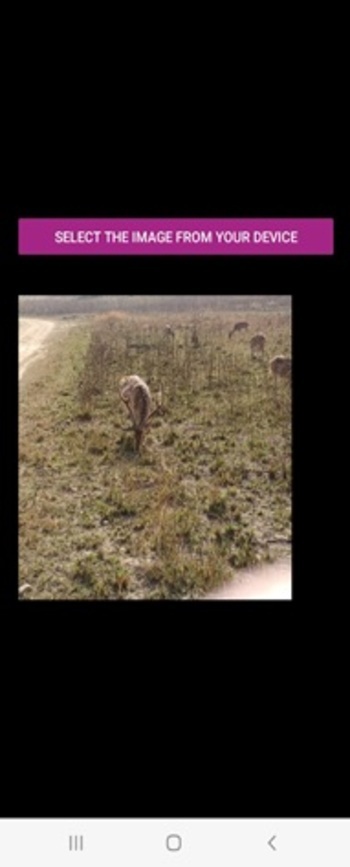
Img: Showing the image on personal mobile device after selecting it from the mobile.
In this article, using two different examples, the way to show an Image of Expo Snack is given. First, the method is given for storing the image locally in the project and then the process of fetching the Image and showing this is given. The method of selecting the Images from computer and mobile device and then performing the action of displaying it on the screen is also specified in example 2. Also the output on online web view and on the personal mobile device are shown.

1K+ Views
