
Article Categories
- All Categories
-
 Data Structure
-
 Networking
-
 RDBMS
RDBMS
-
 Operating System
-
 Java
Java
-
 MS Excel
-
 iOS
iOS
-
 HTML
HTML
-
 CSS
CSS
-
 Android
-
 Python
-
 C Programming
-
 C++
C++
-
 C#
C#
-
 MongoDB
-
 MySQL
MySQL
-
 Javascript
-
 PHP
PHP
Using The Audio in Snack
Audio is a common component of mobile apps. Audio can be used in apps in many ways. Audio can be selected from the mobile, it can be used from any online link, or can be included in the project itself as local audio. Expo-av can be used in all these cases for integrating sound into mobile apps. In this article, the React native and javascript code is shown with three different examples where in the first example, an audio file is browsed from the device. In the second example, the audio is taken from an online link and mixed with the audio of a locally stored audio file. In the third example, the playing and stopping of the audio are demonstrated.
Algorithm-1
Step 1 ? Import View, Text, TouchableOpacity, StyleSheet from 'react-native'. Also import Audio from 'expo-av? and DocumentPicker from 'expo-document-picker'
Step 2 ? Creation of a file(App.js).
Step 3 ? Create a function selectAudioFunc. Now call the DocumentPicker.getDocumentAsync function and fetch the music file from the device.
Step 4 ? Make a new function and name it as playyAudioo() and write the code to play the picked audiofile.
Step 5 ? Use TouchableOpacity and call the playyAudioo() by clicking it.
Step 6 ? Check the results.
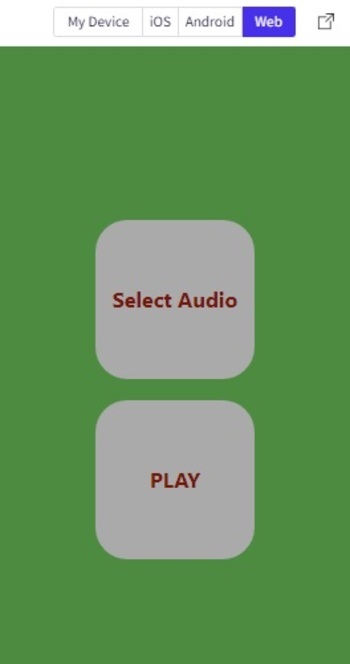
Example 1: Selecting audio files from the device to play.
The important file used in the project is
App.js
Example
import {useState} from 'react';
import { TouchableOpacity, StyleSheet,View, Text } from 'react-native';
import { Audio } from 'expo-av';
import * as DocumentPicker from 'expo-document-picker';


export default function AudioExampleOne() {
   var [myaudio, settAud] = useState([]);

   selectAudioFunct= async ()=> {
      settAud(
         await DocumentPicker.getDocumentAsync({
            type: 'audio/*',
            copyToCacheDirectory: true,
         })
      );
   }

   playyAudioo= async ()=> {
      const myAudioSrc = myaudio.uri;
      const audioObj = new Audio.Sound();
      audioObj.setOnPlaybackStatusUpdate();
      await audioObj.loadAsync({ uri: myAudioSrc });
      await audioObj.playAsync();
   }

   return (
      <View style={styles.mainSpace}>
         <View style={{ flexDirection: 'row', justifyContent: 'center' }}>
            <TouchableOpacity
               onPress={() => selectAudioFunct()
               }
               style={styles.BtnStyleIt}>
               <View >
                  <Text style={styles.BtnTxt1}>Select Audio</Text>
               </View>
            </TouchableOpacity>
         </View>

         <View style={{ flexDirection: 'row', justifyContent: 'center' }}>
            <TouchableOpacity
            onPress={() =>
               playyAudioo()
               }
               style={styles.BtnStyleIt}>
               <View>
                  <Text style={styles.BtnTxt1}>PLAY</Text>
               </View>
            </TouchableOpacity>
         </View>
      </View>
   );
}

const styles = StyleSheet.create({
   mainSpace: {
      flex: 1,
      backgroundColor: '#4d8b40',
      alignItems: 'center',
      justifyContent: 'center',
   },

   BtnStyleIt: {
      margin: 10,
      width: 150,
      height: 150,
      borderRadius: 30,
      backgroundColor: '#aaa',
      alignItems: 'center',
      justifyContent: 'center',
   },

   BtnTxt1: {
      color: '#76150A',
      fontSize: 20,
      fontWeight: "bold",
      textAlign: 'center'
   },
});
Output
The result can be seen online.
Algorithm-2
Step 1 ? Import View, Text, Button from 'react-native'.
Step 2 ? Make the App.js and write the code.
Step 3 ? Make a new function and name it as theonlineSong. Fetch a song from an audio link to get the music file to test this.
Step 4 ? Make a new function and name it thelocalfile to pick any file for audio stored locally in the same project.
Step 5 ? Use Button from react-native to make buttons and call the above-given function code from these.
Step 6 ? Check the results.
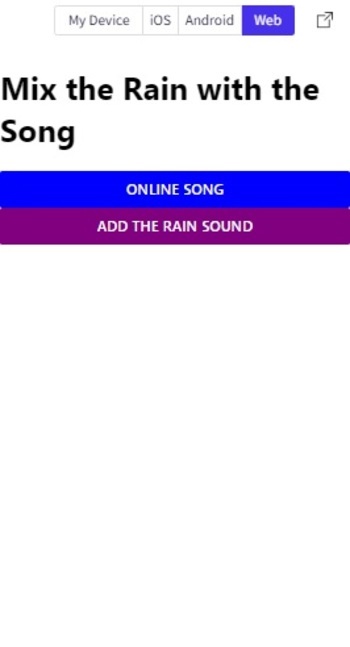
Example 2: Mixing online and local audio files.
The Important file used in the project is
App.js
Example
import{Component}from'react';
import{View,Text,Button,StyleSheet}from'react-native';
import{Audio}from'expo-av';

exportdefaultclassAudioExampleTwoextendsComponent{

   theonlineSong=async()=>{
   awaitAudio.Sound.createAsync(
   {uri:'<any_audio_file_link.mp3>'},
   //Foregthislinkwasusedfordemo
   //{uri:'https://pwdown.info/112168/06.%20Ek%20Aisi%20Ghazal.mp3'},
   {shouldPlay:true},);}
   thelocalfile=async()=>{
      awaitAudio.Sound.createAsync(
      {uri:require("./raining.mp3")},
      {shouldPlay:true,isLooping:true},
   );}

   render(){
      return(
         <View>
            <Viewstyle={{paddingTop:20}}>
            <Textstyle={{
               fontWeight:'bold',
               fontSize:30,marginBottom:20}}
               >
               MixtheRainwiththeSong
            </Text>

            <Button
               style={{paddingTop:20}}
               title='OnlineSong'
               color='blue'
               onPress={this.theonlineSong}
               >
            </Button>
            <Button
               style={{paddingTop:20}}
               title='AddtheRainSound'
               color='purple'
               onPress={this.thelocalfile}
               >
            </Button>
         </View>
         </View>
      );
   }
}
Output
The result can be seen online.
Algorithm-3
Step 1 ? Import View, Text ,Button from 'react-native'. Also, import Audio from 'expo-av?. Also import import useState, useEffect from 'react'.
Step 2 ? Make the App.js and write the code.
Step 3 ? Use Audio.Sound() to create a new sound object and use loadAsync(require<filename with path>) on that to load the required sound file.
Step 4 ? Try to play and stop the file based on the flag condition.
Step 5 ? Use the Button from react-native to make a button and change the color of the button on reversing the flag condition.
Step 6 ? Check the results.
Example 3: Starting and stopping the audio.
The Important file used in the project is
App.js
Example
import {useState,useEffect} from 'react';
import {View, Text, Button } from 'react-native';
import { Audio } from 'expo-av';

export default function AudioExampleThree() {
   const [audioFlag, setaudioFlag] = useState(false)
   const [rain] = useState(new Audio.Sound());

   useEffect(()=>{
      (async () => {
         console.log('Audio Flag', audioFlag)
         if (audioFlag) {
            await rain.loadAsync(require("./raining.mp3"))
            try {
               await rain.playAsync()
            } catch (e) {
               console.log(e)
            }
         } else {
            await rain.stopAsync()
            await rain.unloadAsync()
         }
      })()
   },[audioFlag, rain])

   return (
      <View style={{ justifyContent:"center", alignItems : "center"}}>
         <Text style={{marginTop: 50, marginBottom: 50, fontSize:28}}>Rain Sound </Text>
         <Buttoncolor={audioFlag ? '#d61676' : '#24dd4d'} title={'PLAY AUDIO | STOP AUDIO'} onPress={()=>setaudioFlag(!audioFlag)} />
      </View>
   );
}
Output
The result can be seen online.

In this article, using three different examples, the ways to play audio from different sources are shown on Expo Snack. First, the method is given for choosing any audio file from the device and then playing it. Then the method of using an online audio file and mixing it with a local sound effect is demonstrated. In the last example, playing

418 Views
