- Time Series - Home
- Time Series - Introduction
- Time Series - Programming Languages
- Time Series - Python Libraries
- Data Processing & Visualization
- Time Series - Modeling
- Time Series - Parameter Calibration
- Time Series - Naive Methods
- Time Series - Auto Regression
- Time Series - Moving Average
- Time Series - ARIMA
- Time Series - Variations of ARIMA
- Time Series - Exponential Smoothing
- Time Series - Walk Forward Validation
- Time Series - Prophet Model
- Time Series - LSTM Model
- Time Series - Error Metrics
- Time Series - Applications
- Time Series - Further Scope
- Time Series Useful Resources
- Time Series - Quick Guide
- Time Series - Useful Resources
- Time Series - Discussion
Time Series - Quick Guide
Time Series - Introduction
A time series is a sequence of observations over a certain period. A univariate time series consists of the values taken by a single variable at periodic time instances over a period, and a multivariate time series consists of the values taken by multiple variables at the same periodic time instances over a period. The simplest example of a time series that all of us come across on a day to day basis is the change in temperature throughout the day or week or month or year.
The analysis of temporal data is capable of giving us useful insights on how a variable changes over time, or how it depends on the change in the values of other variable(s). This relationship of a variable on its previous values and/or other variables can be analyzed for time series forecasting and has numerous applications in artificial intelligence.
Time Series - Programming Languages
A basic understanding of any programming language is essential for a user to work with or develop machine learning problems. A list of preferred programming languages for anyone who wants to work on machine learning is given below −
Python
It is a high-level interpreted programming language, fast and easy to code. Python can follow either procedural or object-oriented programming paradigms. The presence of a variety of libraries makes implementation of complicated procedures simpler. In this tutorial, we will be coding in Python and the corresponding libraries useful for time series modelling will be discussed in the upcoming chapters.
R
Similar to Python, R is an interpreted multi-paradigm language, which supports statistical computing and graphics. The variety of packages makes it easier to implement machine learning modelling in R.
Java
It is an interpreted object-oriented programming language, which is widely famous for a large range of package availability and sophisticated data visualization techniques.
C/C++
These are compiled languages, and two of the oldest programming languages. These languages are often preferred to incorporate ML capabilities in the already existing applications as they allow you to customize the implementation of ML algorithms easily.
MATLAB
MATrix LABoratory is a multi-paradigm language which gives functioning to work with matrices. It allows mathematical operations for complex problems. It is primarily used for numerical operations but some packages also allow the graphical multi-domain simulation and model-based design.
Other preferred programming languages for machine learning problems include JavaScript, LISP, Prolog, SQL, Scala, Julia, SAS etc.
Time Series - Python Libraries
Python has an established popularity among individuals who perform machine learning because of its easy-to-write and easy-to-understand code structure as well as a wide variety of open source libraries. A few of such open source libraries that we will be using in the coming chapters have been introduced below.
NumPy
Numerical Python is a library used for scientific computing. It works on an N-dimensional array object and provides basic mathematical functionality such as size, shape, mean, standard deviation, minimum, maximum as well as some more complex functions such as linear algebraic functions and Fourier transform. You will learn more about these as we move ahead in this tutorial.
Pandas
This library provides highly efficient and easy-to-use data structures such as series, dataframes and panels. It has enhanced Pythons functionality from mere data collection and preparation to data analysis. The two libraries, Pandas and NumPy, make any operation on small to very large dataset very simple. To know more about these functions, follow this tutorial.
SciPy
Science Python is a library used for scientific and technical computing. It provides functionalities for optimization, signal and image processing, integration, interpolation and linear algebra. This library comes handy while performing machine learning. We will discuss these functionalities as we move ahead in this tutorial.
Scikit Learn
This library is a SciPy Toolkit widely used for statistical modelling, machine learning and deep learning, as it contains various customizable regression, classification and clustering models. It works well with Numpy, Pandas and other libraries which makes it easier to use.
Statsmodels
Like Scikit Learn, this library is used for statistical data exploration and statistical modelling. It also operates well with other Python libraries.
Matplotlib
This library is used for data visualization in various formats such as line plot, bar graph, heat maps, scatter plots, histogram etc. It contains all the graph related functionalities required from plotting to labelling. We will discuss these functionalities as we move ahead in this tutorial.
These libraries are very essential to start with machine learning with any sort of data.
Beside the ones discussed above, another library especially significant to deal with time series is −
Datetime
This library, with its two modules − datetime and calendar, provides all necessary datetime functionality for reading, formatting and manipulating time.
We shall be using these libraries in the coming chapters.
Time Series - Data Processing and Visualization
Time Series is a sequence of observations indexed in equi-spaced time intervals. Hence, the order and continuity should be maintained in any time series.
The dataset we will be using is a multi-variate time series having hourly data for approximately one year, for air quality in a significantly polluted Italian city. The dataset can be downloaded from the link given below − https://archive.ics.uci.edu/ml/datasets/air+quality.
It is necessary to make sure that −
The time series is equally spaced, and
There are no redundant values or gaps in it.
In case the time series is not continuous, we can upsample or downsample it.
Showing df.head()
In [122]:
import pandas
In [123]:
df = pandas.read_csv("AirQualityUCI.csv", sep = ";", decimal = ",")
df = df.iloc[ : , 0:14]
In [124]:
len(df)
Out[124]:
9471
In [125]:
df.head()
Out[125]:

For preprocessing the time series, we make sure there are no NaN(NULL) values in the dataset; if there are, we can replace them with either 0 or average or preceding or succeeding values. Replacing is a preferred choice over dropping so that the continuity of the time series is maintained. However, in our dataset the last few values seem to be NULL and hence dropping will not affect the continuity.
Dropping NaN(Not-a-Number)
In [126]:
df.isna().sum()
Out[126]:
Date             114
Time             114
CO(GT)           114
PT08.S1(CO)      114
NMHC(GT)         114
C6H6(GT)         114
PT08.S2(NMHC)    114
NOx(GT)          114
PT08.S3(NOx)     114
NO2(GT)          114
PT08.S4(NO2)     114
PT08.S5(O3)      114
T                114
RH               114
dtype: int64
In [127]:
df = df[df['Date'].notnull()]
In [128]:
df.isna().sum()
Out[128]:
Date             0
Time             0
CO(GT)           0
PT08.S1(CO)      0
NMHC(GT)         0
C6H6(GT)         0
PT08.S2(NMHC)    0
NOx(GT)          0
PT08.S3(NOx)     0
NO2(GT)          0
PT08.S4(NO2)     0
PT08.S5(O3)      0
T                0
RH               0
dtype: int64
Time Series are usually plotted as line graphs against time. For that we will now combine the date and time column and convert it into a datetime object from strings. This can be accomplished using the datetime library.
Converting to datetime object
In [129]:
df['DateTime'] = (df.Date) + ' ' + (df.Time)
print (type(df.DateTime[0]))
<class 'str'>
In [130]:
import datetime

df.DateTime = df.DateTime.apply(lambda x: datetime.datetime.strptime(x, '%d/%m/%Y %H.%M.%S'))
print (type(df.DateTime[0]))
<class 'pandas._libs.tslibs.timestamps.Timestamp'>
Let us see how some variables like temperature changes with change in time.
Showing plots
In [131]:
df.index = df.DateTime
In [132]:
import matplotlib.pyplot as plt
plt.plot(df['T'])
Out[132]:
[<matplotlib.lines.Line2D at 0x1eaad67f780>]
In [208]:
plt.plot(df['C6H6(GT)'])
Out[208]:
[<matplotlib.lines.Line2D at 0x1eaaeedff28>]
Box-plots are another useful kind of graphs that allow you to condense a lot of information about a dataset into a single graph. It shows the mean, 25% and 75% quartile and outliers of one or multiple variables. In the case when number of outliers is few and is very distant from the mean, we can eliminate the outliers by setting them to mean value or 75% quartile value.
Showing Boxplots
In [134]:
plt.boxplot(df[['T','C6H6(GT)']].values)
Out[134]:
{'whiskers': [<matplotlib.lines.Line2D at 0x1eaac16de80>,
   <matplotlib.lines.Line2D at 0x1eaac16d908>,
   <matplotlib.lines.Line2D at 0x1eaac177a58>,
   <matplotlib.lines.Line2D at 0x1eaac177cf8>],
   'caps': [<matplotlib.lines.Line2D at 0x1eaac16d2b0>,
   <matplotlib.lines.Line2D at 0x1eaac16d588>,
   <matplotlib.lines.Line2D at 0x1eaac1a69e8>,
   <matplotlib.lines.Line2D at 0x1eaac1a64a8>],
   'boxes': [<matplotlib.lines.Line2D at 0x1eaac16dc50>,
   <matplotlib.lines.Line2D at 0x1eaac1779b0>],
   'medians': [<matplotlib.lines.Line2D at 0x1eaac16d4a8>,
   <matplotlib.lines.Line2D at 0x1eaac1a6c50>],
   'fliers': [<matplotlib.lines.Line2D at 0x1eaac177dd8>,
   <matplotlib.lines.Line2D at 0x1eaac1a6c18>],'means': []
}
Time Series - Modeling
Introduction
A time series has 4 components as given below −
Level − It is the mean value around which the series varies.
Trend − It is the increasing or decreasing behavior of a variable with time.
Seasonality − It is the cyclic behavior of time series.
Noise − It is the error in the observations added due to environmental factors.
Time Series Modeling Techniques
To capture these components, there are a number of popular time series modelling techniques. This section gives a brief introduction of each technique, however we will discuss about them in detail in the upcoming chapters −
Nave Methods
These are simple estimation techniques, such as the predicted value is given the value equal to mean of preceding values of the time dependent variable, or previous actual value. These are used for comparison with sophisticated modelling techniques.
Auto Regression
Auto regression predicts the values of future time periods as a function of values at previous time periods. Predictions of auto regression may fit the data better than that of nave methods, but it may not be able to account for seasonality.
ARIMA Model
An auto-regressive integrated moving-average models the value of a variable as a linear function of previous values and residual errors at previous time steps of a stationary timeseries. However, the real world data may be non-stationary and have seasonality, thus Seasonal-ARIMA and Fractional-ARIMA were developed. ARIMA works on univariate time series, to handle multiple variables VARIMA was introduced.
Exponential Smoothing
It models the value of a variable as an exponential weighted linear function of previous values. This statistical model can handle trend and seasonality as well.
LSTM
Long Short-Term Memory model (LSTM) is a recurrent neural network which is used for time series to account for long term dependencies. It can be trained with large amount of data to capture the trends in multi-variate time series.
The said modelling techniques are used for time series regression. In the coming chapters, let us now explore all these one by one.
Time Series - Parameter Calibration
Introduction
Any statistical or machine learning model has some parameters which greatly influence how the data is modeled. For example, ARIMA has p, d, q values. These parameters are to be decided such that the error between actual values and modeled values is minimum. Parameter calibration is said to be the most crucial and time-consuming task of model fitting. Hence, it is very essential for us to choose optimal parameters.
Methods for Calibration of Parameters
There are various ways to calibrate parameters. This section talks about some of them in detail.
Hit-and-try
One common way of calibrating models is hand calibration, where you start by visualizing the time-series and intuitively try some parameter values and change them over and over until you achieve a good enough fit. It requires a good understanding of the model we are trying. For ARIMA model, hand calibration is done with the help of auto-correlation plot for p parameter, partial auto-correlation plot for q parameter and ADF-test to confirm the stationarity of time-series and setting d parameter. We will discuss all these in detail in the coming chapters.
Grid Search
Another way of calibrating models is by grid search, which essentially means you try building a model for all possible combinations of parameters and select the one with minimum error. This is time-consuming and hence is useful when number of parameters to be calibrated and range of values they take are fewer as this involves multiple nested for loops.
Genetic Algorithm
Genetic algorithm works on the biological principle that a good solution will eventually evolve to the most optimal solution. It uses biological operations of mutation, cross-over and selection to finally reach to an optimal solution.
For further knowledge you can read about other parameter optimization techniques like Bayesian optimization and Swarm optimization.
Time Series - Nave Methods
Introduction
Nave Methods such as assuming the predicted value at time t to be the actual value of the variable at time t-1 or rolling mean of series, are used to weigh how well do the statistical models and machine learning models can perform and emphasize their need.
In this chapter, let us try these models on one of the features of our time-series data.
First we shall see the mean of the temperature feature of our data and the deviation around it. It is also useful to see maximum and minimum temperature values. We can use the functionalities of numpy library here.
Showing statistics
In [135]:
import numpy
print (
   'Mean: ',numpy.mean(df['T']), ';
   Standard Deviation: ',numpy.std(df['T']),';
   \nMaximum Temperature: ',max(df['T']),';
   Minimum Temperature: ',min(df['T'])
)
We have the statistics for all 9357 observations across equi-spaced timeline which are useful for us to understand the data.
Now we will try the first nave method, setting the predicted value at present time equal to actual value at previous time and calculate the root mean squared error(RMSE) for it to quantify the performance of this method.
Showing 1st nave method
In [136]:
df['T']
df['T_t-1'] = df['T'].shift(1)
In [137]:
df_naive = df[['T','T_t-1']][1:]
In [138]:
from sklearn import metrics
from math import sqrt

true = df_naive['T']
prediction = df_naive['T_t-1']
error = sqrt(metrics.mean_squared_error(true,prediction))
print ('RMSE for Naive Method 1: ', error)
RMSE for Naive Method 1: 12.901140576492974
Let us see the next nave method, where predicted value at present time is equated to the mean of the time periods preceding it. We will calculate the RMSE for this method too.
Showing 2nd nave method
In [139]:
df['T_rm'] = df['T'].rolling(3).mean().shift(1)
df_naive = df[['T','T_rm']].dropna()
In [140]:
true = df_naive['T']
prediction = df_naive['T_rm']
error = sqrt(metrics.mean_squared_error(true,prediction))
print ('RMSE for Naive Method 2: ', error)
RMSE for Naive Method 2: 14.957633272839242
Here, you can experiment with various number of previous time periods also called lags you want to consider, which is kept as 3 here. In this data it can be seen that as you increase the number of lags and error increases. If lag is kept 1, it becomes same as the nave method used earlier.
Points to Note
You can write a very simple function for calculating root mean squared error. Here, we have used the mean squared error function from the package sklearn and then taken its square root.
In pandas df[column_name] can also be written as df.column_name, however for this dataset df.T will not work the same as df[T] because df.T is the function for transposing a dataframe. So use only df[T] or consider renaming this column before using the other syntax.
Time Series - Auto Regression
For a stationary time series, an auto regression models sees the value of a variable at time t as a linear function of values p time steps preceding it. Mathematically it can be written as −
$$y_{t} = \:C+\:\phi_{1}y_{t-1}\:+\:\phi_{2}Y_{t-2}+...+\phi_{p}y_{t-p}+\epsilon_{t}$$
Where,p is the auto-regressive trend parameter
$\epsilon_{t}$ is white noise, and
$y_{t-1}, y_{t-2}\:\: ...y_{t-p}$ denote the value of variable at previous time periods.
The value of p can be calibrated using various methods. One way of finding the apt value of p is plotting the auto-correlation plot.
Note − We should separate the data into train and test at 8:2 ratio of total data available prior to doing any analysis on the data because test data is only to find out the accuracy of our model and assumption is, it is not available to us until after predictions have been made. In case of time series, sequence of data points is very essential so one should keep in mind not to lose the order during splitting of data.
An auto-correlation plot or a correlogram shows the relation of a variable with itself at prior time steps. It makes use of Pearsons correlation and shows the correlations within 95% confidence interval. Lets see how it looks like for temperature variable of our data.
Showing ACP
In [141]:
split = len(df) - int(0.2*len(df))
train, test = df['T'][0:split], df['T'][split:]
In [142]:
from statsmodels.graphics.tsaplots import plot_acf

plot_acf(train, lags = 100)
plt.show()
All the lag values lying outside the shaded blue region are assumed to have a csorrelation.
Time Series - Moving Average
For a stationary time series, a moving average model sees the value of a variable at time t as a linear function of residual errors from q time steps preceding it. The residual error is calculated by comparing the value at the time t to moving average of the values preceding.
Mathematically it can be written as −
$$y_{t} = c\:+\:\epsilon_{t}\:+\:\theta_{1}\:\epsilon_{t-1}\:+\:\theta_{2}\:\epsilon_{t-2}\:+\:...+:\theta_{q}\:\epsilon_{t-q}\:$$
Whereq is the moving-average trend parameter
$\epsilon_{t}$ is white noise, and
$\epsilon_{t-1}, \epsilon_{t-2}...\epsilon_{t-q}$ are the error terms at previous time periods.
Value of q can be calibrated using various methods. One way of finding the apt value of q is plotting the partial auto-correlation plot.
A partial auto-correlation plot shows the relation of a variable with itself at prior time steps with indirect correlations removed, unlike auto-correlation plot which shows direct as well as indirect correlations, lets see how it looks like for temperature variable of our data.
Showing PACP
In [143]:
from statsmodels.graphics.tsaplots import plot_pacf

plot_pacf(train, lags = 100)
plt.show()
A partial auto-correlation is read in the same way as a correlogram.
Time Series - ARIMA
We have already understood that for a stationary time series a variable at time t is a linear function of prior observations or residual errors. Hence it is time for us to combine the two and have an Auto-regressive moving average (ARMA) model.
However, at times the time series is not stationary, i.e the statistical properties of a series like mean, variance changes over time. And the statistical models we have studied so far assume the time series to be stationary, therefore, we can include a pre-processing step of differencing the time series to make it stationary. Now, it is important for us to find out whether the time series we are dealing with is stationary or not.
Various methods to find the stationarity of a time series are looking for seasonality or trend in the plot of time series, checking the difference in mean and variance for various time periods, Augmented Dickey-Fuller (ADF) test, KPSS test, Hursts exponent etc.
Let us see whether the temperature variable of our dataset is a stationary time series or not using ADF test.
In [74]:
from statsmodels.tsa.stattools import adfuller

result = adfuller(train)
print('ADF Statistic: %f' % result[0])
print('p-value: %f' % result[1])
print('Critical Values:')
for key, value In result[4].items()
   print('\t%s: %.3f' % (key, value))
ADF Statistic: -10.406056
p-value: 0.000000
Critical Values:
1%: -3.431
5%: -2.862
10%: -2.567
Now that we have run the ADF test, let us interpret the result. First we will compare the ADF Statistic with the critical values, a lower critical value tells us the series is most likely non-stationary. Next, we see the p-value. A p-value greater than 0.05 also suggests that the time series is non-stationary.
Alternatively, p-value less than or equal to 0.05, or ADF Statistic less than critical values suggest the time series is stationary.
Hence, the time series we are dealing with is already stationary. In case of stationary time series, we set the d parameter as 0.
We can also confirm the stationarity of time series using Hurst exponent.
In [75]:
import hurst

H, c,data = hurst.compute_Hc(train)
print("H = {:.4f}, c = {:.4f}".format(H,c))
H = 0.1660, c = 5.0740
The value of H<0.5 shows anti-persistent behavior, and H>0.5 shows persistent behavior or a trending series. H=0.5 shows random walk/Brownian motion. The value of H<0.5, confirming that our series is stationary.
For non-stationary time series, we set d parameter as 1. Also, the value of the auto-regressive trend parameter p and the moving average trend parameter q, is calculated on the stationary time series i.e by plotting ACP and PACP after differencing the time series.
ARIMA Model, which is characterized by 3 parameter, (p,d,q) are now clear to us, so let us model our time series and predict the future values of temperature.
In [156]:
from statsmodels.tsa.arima_model import ARIMA

model = ARIMA(train.values, order=(5, 0, 2))
model_fit = model.fit(disp=False)
In [157]:
predictions = model_fit.predict(len(test))
test_ = pandas.DataFrame(test)
test_['predictions'] = predictions[0:1871]
In [158]:
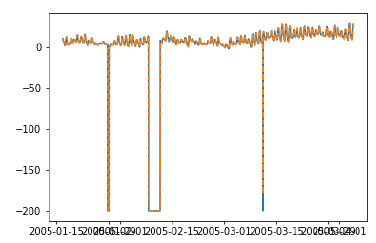
plt.plot(df['T'])
plt.plot(test_.predictions)
plt.show()
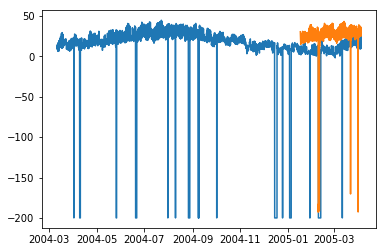
In [167]:
error = sqrt(metrics.mean_squared_error(test.values,predictions[0:1871]))
print ('Test RMSE for ARIMA: ', error)
Test RMSE for ARIMA: 43.21252940234892
Time Series - Variations of ARIMA
In the previous chapter, we have now seen how ARIMA model works, and its limitations that it cannot handle seasonal data or multivariate time series and hence, new models were introduced to include these features.
A glimpse of these new models is given here −
Vector Auto-Regression (VAR)
It is a generalized version of auto regression model for multivariate stationary time series. It is characterized by p parameter.
Vector Moving Average (VMA)
It is a generalized version of moving average model for multivariate stationary time series. It is characterized by q parameter.
Vector Auto Regression Moving Average (VARMA)
It is the combination of VAR and VMA and a generalized version of ARMA model for multivariate stationary time series. It is characterized by p and q parameters. Much like, ARMA is capable of acting like an AR model by setting q parameter as 0 and as a MA model by setting p parameter as 0, VARMA is also capable of acting like an VAR model by setting q parameter as 0 and as a VMA model by setting p parameter as 0.
In [209]:
df_multi = df[['T', 'C6H6(GT)']]
split = len(df) - int(0.2*len(df))
train_multi, test_multi = df_multi[0:split], df_multi[split:]
In [211]:
from statsmodels.tsa.statespace.varmax import VARMAX

model = VARMAX(train_multi, order = (2,1))
model_fit = model.fit()
c:\users\naveksha\appdata\local\programs\python\python37\lib\site-packages\statsmodels\tsa\statespace\varmax.py:152:
   EstimationWarning: Estimation of VARMA(p,q) models is not generically robust,
   due especially to identification issues.
   EstimationWarning)
c:\users\naveksha\appdata\local\programs\python\python37\lib\site-packages\statsmodels\tsa\base\tsa_model.py:171:
   ValueWarning: No frequency information was provided, so inferred frequency H will be used.
  % freq, ValueWarning)
c:\users\naveksha\appdata\local\programs\python\python37\lib\site-packages\statsmodels\base\model.py:508:
   ConvergenceWarning: Maximum Likelihood optimization failed to converge. Check mle_retvals
  "Check mle_retvals", ConvergenceWarning)
In [213]:
predictions_multi = model_fit.forecast( steps=len(test_multi))
c:\users\naveksha\appdata\local\programs\python\python37\lib\site-packages\statsmodels\tsa\base\tsa_model.py:320:
   FutureWarning: Creating a DatetimeIndex by passing range endpoints is deprecated.  Use `pandas.date_range` instead.
   freq = base_index.freq)
c:\users\naveksha\appdata\local\programs\python\python37\lib\site-packages\statsmodels\tsa\statespace\varmax.py:152:
   EstimationWarning: Estimation of VARMA(p,q) models is not generically robust, due especially to identification issues.
   EstimationWarning)
In [231]:
plt.plot(train_multi['T'])
plt.plot(test_multi['T'])
plt.plot(predictions_multi.iloc[:,0:1], '--')
plt.show()

plt.plot(train_multi['C6H6(GT)'])
plt.plot(test_multi['C6H6(GT)'])
plt.plot(predictions_multi.iloc[:,1:2], '--')
plt.show()
The above code shows how VARMA model can be used to model multivariate time series, although this model may not be best suited on our data.
VARMA with Exogenous Variables (VARMAX)
It is an extension of VARMA model where extra variables called covariates are used to model the primary variable we are interested it.
Seasonal Auto Regressive Integrated Moving Average (SARIMA)
This is the extension of ARIMA model to deal with seasonal data. It divides the data into seasonal and non-seasonal components and models them in a similar fashion. It is characterized by 7 parameters, for non-seasonal part (p,d,q) parameters same as for ARIMA model and for seasonal part (P,D,Q,m) parameters where m is the number of seasonal periods and P,D,Q are similar to parameters of ARIMA model. These parameters can be calibrated using grid search or genetic algorithm.
SARIMA with Exogenous Variables (SARIMAX)
This is the extension of SARIMA model to include exogenous variables which help us to model the variable we are interested in.
It may be useful to do a co-relation analysis on variables before putting them as exogenous variables.
In [251]:
from scipy.stats.stats import pearsonr
x = train_multi['T'].values
y = train_multi['C6H6(GT)'].values

corr , p = pearsonr(x,y)
print ('Corelation Coefficient =', corr,'\nP-Value =',p)
Corelation Coefficient = 0.9701173437269858
P-Value = 0.0
Pearsons Correlation shows a linear relation between 2 variables, to interpret the results, we first look at the p-value, if it is less that 0.05 then the value of coefficient is significant, else the value of coefficient is not significant. For significant p-value, a positive value of correlation coefficient indicates positive correlation, and a negative value indicates a negative correlation.
Hence, for our data, temperature and C6H6 seem to have a highly positive correlation. Therefore, we will
In [297]:
from statsmodels.tsa.statespace.sarimax import SARIMAX

model = SARIMAX(x, exog = y, order = (2, 0, 2), seasonal_order = (2, 0, 1, 1), enforce_stationarity=False, enforce_invertibility = False)
model_fit = model.fit(disp = False)
c:\users\naveksha\appdata\local\programs\python\python37\lib\site-packages\statsmodels\base\model.py:508:
   ConvergenceWarning: Maximum Likelihood optimization failed to converge. Check mle_retvals
   "Check mle_retvals", ConvergenceWarning)
In [298]:
y_ = test_multi['C6H6(GT)'].values
predicted = model_fit.predict(exog=y_)
test_multi_ = pandas.DataFrame(test)
test_multi_['predictions'] = predicted[0:1871]
In [299]:
plt.plot(train_multi['T'])
plt.plot(test_multi_['T'])
plt.plot(test_multi_.predictions, '--')
Out[299]:
[<matplotlib.lines.Line2D at 0x1eab0191c18>]
The predictions here seem to take larger variations now as opposed to univariate ARIMA modelling.
Needless to say, SARIMAX can be used as an ARX, MAX, ARMAX or ARIMAX model by setting only the corresponding parameters to non-zero values.
Fractional Auto Regressive Integrated Moving Average (FARIMA)
At times, it may happen that our series is not stationary, yet differencing with d parameter taking the value 1 may over-difference it. So, we need to difference the time series using a fractional value.
In the world of data science there is no one superior model, the model that works on your data depends greatly on your dataset. Knowledge of various models allows us to choose one that work on our data and experimenting with that model to achieve the best results. And results should be seen as plot as well as error metrics, at times a small error may also be bad, hence, plotting and visualizing the results is essential.
In the next chapter, we will be looking at another statistical model, exponential smoothing.
Time Series - Exponential Smoothing
In this chapter, we will talk about the techniques involved in exponential smoothing of time series.
Simple Exponential Smoothing
Exponential Smoothing is a technique for smoothing univariate time-series by assigning exponentially decreasing weights to data over a time period.
Mathematically, the value of variable at time t+1 given value at time t, y_(t+1|t) is defined as −
$$y_{t+1|t}\:=\:\alpha y_{t}\:+\:\alpha\lgroup1 -\alpha\rgroup y_{t-1}\:+\alpha\lgroup1-\alpha\rgroup^{2}\:y_{t-2}\:+\:...+y_{1}$$
where,$0\leq\alpha \leq1$ is the smoothing parameter, and
$y_{1},....,y_{t}$ are previous values of network traffic at times 1, 2, 3, ,t.
This is a simple method to model a time series with no clear trend or seasonality. But exponential smoothing can also be used for time series with trend and seasonality.
Triple Exponential Smoothing
Triple Exponential Smoothing (TES) or Holt's Winter method, applies exponential smoothing three times - level smoothing $l_{t}$, trend smoothing $b_{t}$, and seasonal smoothing $S_{t}$, with $\alpha$, $\beta^{*}$ and $\gamma$ as smoothing parameters with m as the frequency of the seasonality, i.e. the number of seasons in a year.
According to the nature of the seasonal component, TES has two categories −
Holt-Winter's Additive Method − When the seasonality is additive in nature.
Holt-Winters Multiplicative Method − When the seasonality is multiplicative in nature.
For non-seasonal time series, we only have trend smoothing and level smoothing, which is called Holts Linear Trend Method.
Lets try applying triple exponential smoothing on our data.
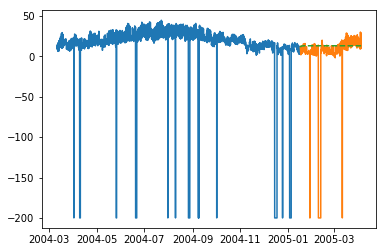
In [316]:
from statsmodels.tsa.holtwinters import ExponentialSmoothing

model = ExponentialSmoothing(train.values, trend= )
model_fit = model.fit()
In [322]:
predictions_ = model_fit.predict(len(test))
In [325]:
plt.plot(test.values)
plt.plot(predictions_[1:1871])
Out[325]:
[<matplotlib.lines.Line2D at 0x1eab00f1cf8>]
Here, we have trained the model once with training set and then we keep on making predictions. A more realistic approach is to re-train the model after one or more time step(s). As we get the prediction for time t+1 from training data til time t, the next prediction for time t+2 can be made using the training data til time t+1 as the actual value at t+1 will be known then. This methodology of making predictions for one or more future steps and then re-training the model is called rolling forecast or walk forward validation.
Time Series - Walk Forward Validation
In time series modelling, the predictions over time become less and less accurate and hence it is a more realistic approach to re-train the model with actual data as it gets available for further predictions. Since training of statistical models are not time consuming, walk-forward validation is the most preferred solution to get most accurate results.
Let us apply one step walk forward validation on our data and compare it with the results we got earlier.
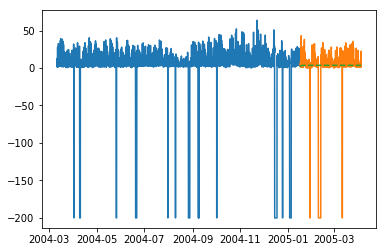
In [333]:
prediction = []
data = train.values
for t In test.values:
   model = (ExponentialSmoothing(data).fit())
   y = model.predict()
   prediction.append(y[0])
   data = numpy.append(data, t)
In [335]:
test_ = pandas.DataFrame(test)
test_['predictionswf'] = prediction
In [341]:
plt.plot(test_['T'])
plt.plot(test_.predictionswf, '--')
plt.show()
In [340]:
error = sqrt(metrics.mean_squared_error(test.values,prediction))
print ('Test RMSE for Triple Exponential Smoothing with Walk-Forward Validation: ', error)
Test RMSE for Triple Exponential Smoothing with Walk-Forward Validation:  11.787532205759442
We can see that our model performs significantly better now. In fact, the trend is followed so closely that on the plot predictions are overlapping with the actual values. You can try applying walk-forward validation on ARIMA models too.
Time Series - Prophet Model
In 2017, Facebook open sourced the prophet model which was capable of modelling the time series with strong multiple seasonalities at day level, week level, year level etc. and trend. It has intuitive parameters that a not-so-expert data scientist can tune for better forecasts. At its core, it is an additive regressive model which can detect change points to model the time series.
Prophet decomposes the time series into components of trend $g_{t}$, seasonality $S_{t}$ and holidays $h_{t}$.
$$y_{t}=g_{t}+s_{t}+h_{t}+\epsilon_{t}$$
Where, $\epsilon_{t}$ is the error term.
Similar packages for time series forecasting such as causal impact and anomaly detection were introduced in R by google and twitter respectively.
Time Series - LSTM Model
Now, we are familiar with statistical modelling on time series, but machine learning is all the rage right now, so it is essential to be familiar with some machine learning models as well. We shall start with the most popular model in time series domain − Long Short-term Memory model.
LSTM is a class of recurrent neural network. So before we can jump to LSTM, it is essential to understand neural networks and recurrent neural networks.
Neural Networks
An artificial neural network is a layered structure of connected neurons, inspired by biological neural networks. It is not one algorithm but combinations of various algorithms which allows us to do complex operations on data.
Recurrent Neural Networks
It is a class of neural networks tailored to deal with temporal data. The neurons of RNN have a cell state/memory, and input is processed according to this internal state, which is achieved with the help of loops with in the neural network. There are recurring module(s) of tanh layers in RNNs that allow them to retain information. However, not for a long time, which is why we need LSTM models.
LSTM
It is special kind of recurrent neural network that is capable of learning long term dependencies in data. This is achieved because the recurring module of the model has a combination of four layers interacting with each other.
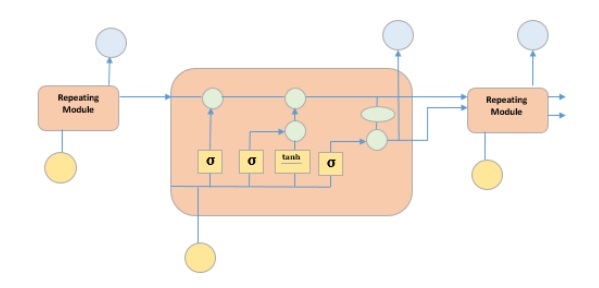
The picture above depicts four neural network layers in yellow boxes, point wise operators in green circles, input in yellow circles and cell state in blue circles. An LSTM module has a cell state and three gates which provides them with the power to selectively learn, unlearn or retain information from each of the units. The cell state in LSTM helps the information to flow through the units without being altered by allowing only a few linear interactions. Each unit has an input, output and a forget gate which can add or remove the information to the cell state. The forget gate decides which information from the previous cell state should be forgotten for which it uses a sigmoid function. The input gate controls the information flow to the current cell state using a point-wise multiplication operation of sigmoid and tanh respectively. Finally, the output gate decides which information should be passed on to the next hidden state
Now that we have understood the internal working of LSTM model, let us implement it. To understand the implementation of LSTM, we will start with a simple example − a straight line. Let us see, if LSTM can learn the relationship of a straight line and predict it.
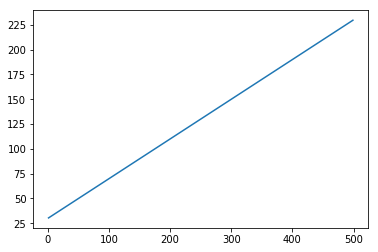
First let us create the dataset depicting a straight line.
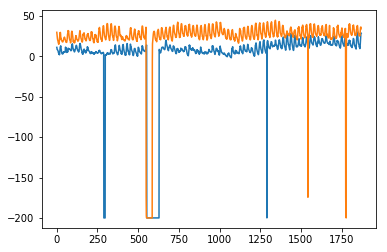
In [402]:
x = numpy.arange (1,500,1)
y = 0.4 * x + 30
plt.plot(x,y)
Out[402]:
[<matplotlib.lines.Line2D at 0x1eab9d3ee10>]
In [403]:
trainx, testx = x[0:int(0.8*(len(x)))], x[int(0.8*(len(x))):]
trainy, testy = y[0:int(0.8*(len(y)))], y[int(0.8*(len(y))):]
train = numpy.array(list(zip(trainx,trainy)))
test = numpy.array(list(zip(trainx,trainy)))
Now that the data has been created and split into train and test. Lets convert the time series data into the form of supervised learning data according to the value of look-back period, which is essentially the number of lags which are seen to predict the value at time t.
So a time series like this −
time variable_x
t1  x1
t2  x2
 :   :
 :   :
T   xT
When look-back period is 1, is converted to −
x1   x2
x2   x3
 :    :
 :    :
xT-1 xT
In [404]:
def create_dataset(n_X, look_back):
   dataX, dataY = [], []
   for i in range(len(n_X)-look_back):
      a = n_X[i:(i+look_back), ]
      dataX.append(a)
      dataY.append(n_X[i + look_back, ])
   return numpy.array(dataX), numpy.array(dataY)
In [405]:
look_back = 1
trainx,trainy = create_dataset(train, look_back)
testx,testy = create_dataset(test, look_back)

trainx = numpy.reshape(trainx, (trainx.shape[0], 1, 2))
testx = numpy.reshape(testx, (testx.shape[0], 1, 2))
Now we will train our model.
Small batches of training data are shown to network, one run of when entire training data is shown to the model in batches and error is calculated is called an epoch. The epochs are to be run til the time the error is reducing.
In [ ]:
from keras.models import Sequential
from keras.layers import LSTM, Dense

model = Sequential()
model.add(LSTM(256, return_sequences = True, input_shape = (trainx.shape[1], 2)))
model.add(LSTM(128,input_shape = (trainx.shape[1], 2)))
model.add(Dense(2))
model.compile(loss = 'mean_squared_error', optimizer = 'adam')
model.fit(trainx, trainy, epochs = 2000, batch_size = 10, verbose = 2, shuffle = False)
model.save_weights('LSTMBasic1.h5')
In [407]:
model.load_weights('LSTMBasic1.h5')
predict = model.predict(testx)
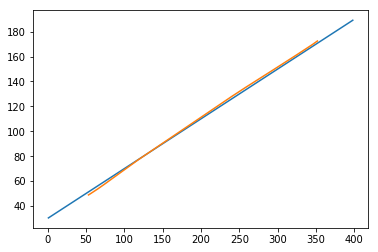
Now lets see what our predictions look like.
In [408]:
plt.plot(testx.reshape(398,2)[:,0:1], testx.reshape(398,2)[:,1:2])
plt.plot(predict[:,0:1], predict[:,1:2])
Out[408]:
[<matplotlib.lines.Line2D at 0x1eac792f048>]
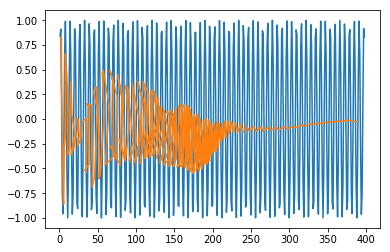
Now, we should try and model a sine or cosine wave in a similar fashion. You can run the code given below and play with the model parameters to see how the results change.
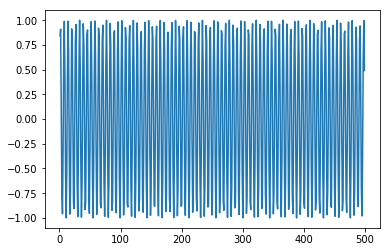
In [409]:
x = numpy.arange (1,500,1)
y = numpy.sin(x)
plt.plot(x,y)
Out[409]:
[<matplotlib.lines.Line2D at 0x1eac7a0b3c8>]
In [410]:
trainx, testx = x[0:int(0.8*(len(x)))], x[int(0.8*(len(x))):]
trainy, testy = y[0:int(0.8*(len(y)))], y[int(0.8*(len(y))):]
train = numpy.array(list(zip(trainx,trainy)))
test = numpy.array(list(zip(trainx,trainy)))
In [411]:
look_back = 1
trainx,trainy = create_dataset(train, look_back)
testx,testy = create_dataset(test, look_back)
trainx = numpy.reshape(trainx, (trainx.shape[0], 1, 2))
testx = numpy.reshape(testx, (testx.shape[0], 1, 2))
In [ ]:
model = Sequential()
model.add(LSTM(512, return_sequences = True, input_shape = (trainx.shape[1], 2)))
model.add(LSTM(256,input_shape = (trainx.shape[1], 2)))
model.add(Dense(2))
model.compile(loss = 'mean_squared_error', optimizer = 'adam')
model.fit(trainx, trainy, epochs = 2000, batch_size = 10, verbose = 2, shuffle = False)
model.save_weights('LSTMBasic2.h5')
In [413]:
model.load_weights('LSTMBasic2.h5')
predict = model.predict(testx)
In [415]:
plt.plot(trainx.reshape(398,2)[:,0:1], trainx.reshape(398,2)[:,1:2])
plt.plot(predict[:,0:1], predict[:,1:2])
Out [415]:
[<matplotlib.lines.Line2D at 0x1eac7a1f550>]
Now you are ready to move on to any dataset.
Time Series - Error Metrics
It is important for us to quantify the performance of a model to use it as a feedback and comparison. In this tutorial we have used one of the most popular error metric root mean squared error. There are various other error metrics available. This chapter discusses them in brief.
Mean Square Error
It is the average of square of difference between the predicted values and true values. Sklearn provides it as a function. It has the same units as the true and predicted values squared and is always positive.
$$MSE = \frac{1}{n} \displaystyle\sum\limits_{t=1}^n \lgroup y'_{t}\:-y_{t}\rgroup^{2}$$
Where $y'_{t}$ is the predicted value,
$y_{t}$ is the actual value, and
n is the total number of values in test set.
It is clear from the equation that MSE is more penalizing for larger errors, or the outliers.
Root Mean Square Error
It is the square root of the mean square error. It is also always positive and is in the range of the data.
$$RMSE = \sqrt{\frac{1}{n} \displaystyle\sum\limits_{t=1}^n \lgroup y'_{t}-y_{t}\rgroup ^2}$$
Where, $y'_{t}$ is predicted value
$y_{t}$ is actual value, and
n is total number of values in test set.
It is in the power of unity and hence is more interpretable as compared to MSE. RMSE is also more penalizing for larger errors. We have used RMSE metric in our tutorial.
Mean Absolute Error
It is the average of absolute difference between predicted values and true values. It has the same units as predicted and true value and is always positive.
$$MAE = \frac{1}{n}\displaystyle\sum\limits_{t=1}^{t=n} | y'{t}-y_{t}\lvert$$
Where, $y'_{t}$ is predicted value,
$y_{t}$ is actual value, and
n is total number of values in test set.
Mean Percentage Error
It is the percentage of average of absolute difference between predicted values and true values, divided by the true value.
$$MAPE = \frac{1}{n}\displaystyle\sum\limits_{t=1}^n\frac{y'_{t}-y_{t}}{y_{t}}*100\: \%$$
Where, $y'_{t}$ is predicted value,
$y_{t}$ is actual value and n is total number of values in test set.
However, the disadvantage of using this error is that the positive error and negative errors can offset each other. Hence mean absolute percentage error is used.
Mean Absolute Percentage Error
It is the percentage of average of absolute difference between predicted values and true values, divided by the true value.
$$MAPE = \frac{1}{n}\displaystyle\sum\limits_{t=1}^n\frac{|y'_{t}-y_{t}\lvert}{y_{t}}*100\: \%$$
Where $y'_{t}$ is predicted value
$y_{t}$ is actual value, and
n is total number of values in test set.
Time Series - Applications
We discussed time series analysis in this tutorial, which has given us the understanding that time series models first recognize the trend and seasonality from the existing observations and then forecast a value based on this trend and seasonality. Such analysis is useful in various fields such as −
Financial Analysis − It includes sales forecasting, inventory analysis, stock market analysis, price estimation.
Weather Analysis − It includes temperature estimation, climate change, seasonal shift recognition, weather forecasting.
Network Data Analysis − It includes network usage prediction, anomaly or intrusion detection, predictive maintenance.
Healthcare Analysis − It includes census prediction, insurance benefits prediction, patient monitoring.
Time Series - Further Scope
Machine learning deals with various kinds of problems. In fact, almost all fields have a scope to be automatized or improved with the help of machine learning. A few such problems on which a great deal of work is being done are given below.
Time Series Data
This is the data which changes according to time, and hence time plays a crucial role in it, which we largely discussed in this tutorial.
Non-Time Series Data
It is the data independent of time, and a major percentage of ML problems are on nontime series data. For simplicity, we shall categorize it further as −
Numerical Data − Computers, unlike humans, only understand numbers, so all kinds of data ultimately is converted to numerical data for machine learning, for example, image data is converted to (r,b,g) values, characters are converted to ASCII codes or words are indexed to numbers, speech data is converted to mfcc files containing numerical data.
Image Data − Computer vision has revolutionized the world of computers, it has various application in the field of medicine, satellite imaging etc.
Text Data − Natural Language Processing (NLP) is used for text classification, paraphrase detection and language summarization. This is what makes Google and Facebook smart.
Speech Data − Speech Processing involves speech recognition and sentiment understanding. It plays a crucial role in imparting computers the human-like qualities.
