- SharePoint - Home
- SharePoint - Overview
- SharePoint - Types
- SharePoint - Capabilities
- SharePoint - Setup Environment
- SharePoint - Create Site Collection
- SharePoint - APIs
- SharePoint - Central Administration
- SharePoint - App Model
- SharePoint - Integration Options
- SharePoint - Development Tools
- SharePoint - List Functionality
- Additional List Functionality
- SharePoint - Custom List
- SharePoint - Libraries
- SharePoint - Web Part
- Site Column & Content Types
- SharePoint - Data
- SharePoint - Server Object Model
- SharePoint - Client Object Model
- SharePoint - REST APIs
- SharePoint - Features & Elements
- SharePoint - Feature\Event Receiver
- SharePoint - Azure Platform
- SharePoint - Packaging & Deploying
- SharePoint - Sandbox Solutions
- SharePoint - Apps
SharePoint - Server Object Model
In this chapter, we will take a look at the SharePoint Server Object Model. You use the SharePoint Server Object Model when you are writing code that will run inside the context of SharePoint. Some common examples would be the code-behind in a page or a web part, event handlers behind a feature or a list, timer jobs etc.
Features of Server Object Model
Following are the key features of Server Object Model
You can use the Server Object Model if you are programming an ASP.NET application inside the same application pool that is used by SharePoint.
Server Object Model can be used if you are developing a client application such as console or Windows forms or a WPF app that will run on a SharePoint server.
You cannot use the Server Object Model to connect remotely to a SharePoint Server.
When you want to use the Server Object Model, you refer to the Microsoft.SharePoint assembly. There are other assemblies, which make up the Server Object Model, but Microsoft.SharePoint is the main one.
The core types that you will use most commonly map to the components that you use as an end user, so things like site collections, sites, list, libraries, and list items are represented by the types SPSite, SPWeb, SPList, SPDocumentLibrary, and SPListItem.
The type and the Server Object Model that represents a site collection is SPSite and the type that represents a SharePoint site in the Server Object Model is SPWeb. Therefore, when you go from the end user terms to the developer terms, you will just have to do that mental mapping.
Now when you first start using SharePoint, it can be confusing because site is so overloaded and it means opposite things in the end user and developer vocabularies, not to mention the web vocabulary.
Let us have a look at a simple example of Server Object Model.
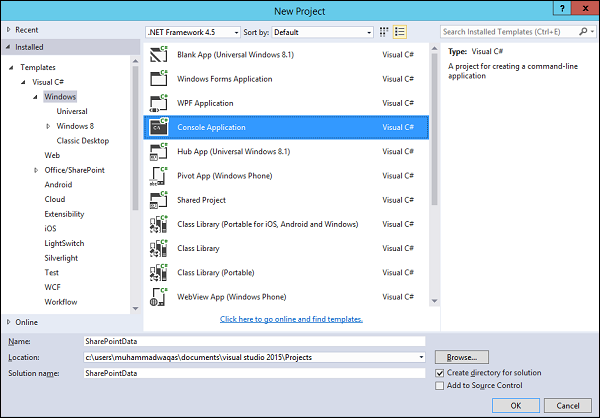
Step 1 − Open Visual Studio and create a new project from File → New → Project menu option.
Step 2 − Select Windows from Templates → Visual C# in the left pane and choose Console Application in the middle pane. Enter the name of your project and click OK.
Step 3 − Once the project is created, right-click the project in Solution Explorer and select Add → References.
Step 4 − Select Assemblies → Extensions in the left pane and check Microsoft.SharePoint in middle pane and click Ok button.
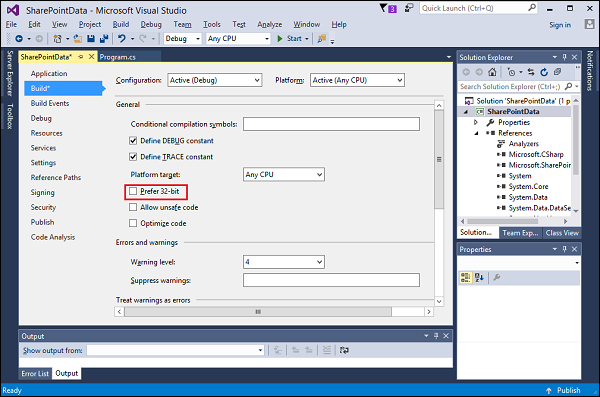
Now right-click again the project in Solution Explorer and select Properties.

Step 5 − Click the Build Tab in the left pane and uncheck the Prefer 32-bit option.
Step 6 − Now go back to the Program.cs file and replace it with the following code.
using Microsoft.SharePoint;
using System;
using System.Collections.Generic;
using System.Linq;
using System.Text;
using System.Threading.Tasks;

namespace SharePointData {
   class Program {
      static void Main(string[] args) {
         using (var site = new SPSite("http://waqasserver/sites/demo")) {
            var web = site.RootWeb;
            Console.WriteLine(web.Title);
            var lists = web.Lists;

            foreach (SPList list in lists) {
               Console.WriteLine("\t" + list.Title);
            }
            Console.ReadLine();
         }
      }
   }
}
Note − In the above code first created a new SPSite object. This is a disposable object, so it is created within a using statement. The SPSite constructor takes in the URL to the site collection, which will be different in your case.
The var web = site.RootWeb will get the root of the site collection.
We can get the lists using web.Lists and print the title of the list items.
When the above code is compiled and executed, you will see the following output −
SharePoint Tutorials
   appdata
   Authors
   Composed Looks
   Contacts
   Course Documents
   Courses
   Documents
   List Template Gallery
   Master Page Gallery
   Site Assets
   Site Pages
   Solution Gallery
   Style Library
   Theme Gallery
   User Information List
   Web Part Gallery
You can see that these titles are Solutions Gallery, the Style Library, Form Templates. These are lists that are used internally by SharePoint. Therefore, instead of displaying all the lists, maybe you only want to show the lists that the users would normally see.
Hence, instead of getting the entire list collection, we want to get all the lists that are not hidden. We can do that using a link query as given below.
using Microsoft.SharePoint;
using System;
using System.Collections.Generic;
using System.Linq;
using System.Text;
using System.Threading.Tasks;

namespace ServerObjectModel {
   class Program {
      static void Main(string[] args) {
         using (var site = new SPSite("http://waqasserver/sites/demo")) {
            var web = site.RootWeb;
            Console.WriteLine(web.Title);
            var lists = from SPList list in web.Lists
            where list.Hidden == false
            select list;

            foreach (SPList list in lists) {
               Console.WriteLine("\t" + list.Title);
            }
            Console.ReadLine();
         }
      }
   }
}
When the above code is compiled and executed, you will see the following output −
SharePoint Tutorials
   Authors
   Contacts
   Course Documents
   Courses
   Documents
   Site Assets
   Site Pages
   Style Library
You can see that this will give us back all the lists that are not hidden.
Let us have a look at another simple example in which we will also display some information about the list items.
using Microsoft.SharePoint;
using System;
using System.Collections.Generic;
using System.Linq;
using System.Text;
using System.Threading.Tasks;

namespace ServerObjectModel {
   class Program {
      static void Main(string[] args) {
         using (var site = new SPSite("http://waqasserver/sites/demo")) {
            var web = site.RootWeb;
            Console.WriteLine(web.Title);
            var lists = from SPList list in web.Lists
            where list.Hidden == false
            select list;

            foreach (SPList list in lists) {
               Console.WriteLine("\t" + list.Title);
               var items = list.Items.OfType<SPListItem>().Take(5);
               var isDocLib = list is SPDocumentLibrary;

               foreach (SPListItem item in items) {
                  var value = isDocLib ? item.Name : item.Title;
                  Console.WriteLine("\t\t" + value);
               }
            }
            Console.ReadLine();
         }
      }
   }
}
When the above code is compiled and executed, you will see the following output −
SharePoint Tutorials
   Authors
      Muhammad Waqas
      Mark Upston
      Allan Bommer
      Andy Onian
   Contacts
      Waqas
      Upston
      Bommer
   Course Documents
      Sample1.docx
      Sample2.docx
      Sample3.docx
   Courses
      SharePoint Tutorials
      C# Tutorials
      ASP.Net Tutorials
      NHibernate Tutorials
   Documents
   Site Assets
   Site Pages
      Home.aspx
      How To Use This Library.aspx
   Style Library
List Data
When you first create a list, it always has a title column. This Title column gives access, by default, to the List Item context or edit control block menu.
Since, every list starts with a column- Title, the SPListItem type exposes that as a property. For the columns that are not common to every single list, you can access them via the indexer on SpListItem type.
You can pass a couple of pieces of information to the indexer, but the most common one is the Column. The end users in the list settings can change this name. You do not want to use this name because again, it can change.
The second is the InternalName, which is set at the point this list is created and it never changes. This is the name you want to use when you are accessing the column value.
Let us have a look at simple example in which we will retrieve the Authors list as shown below −
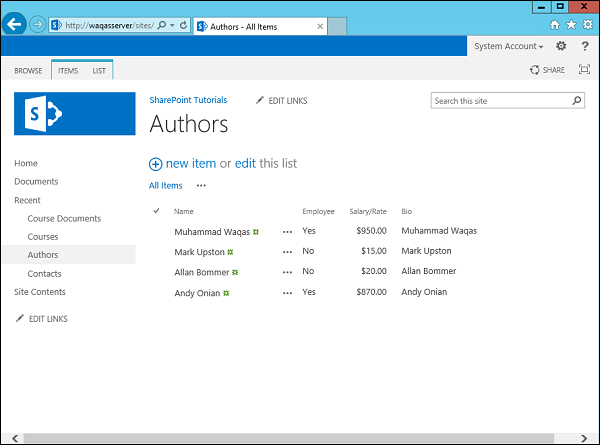
In this example, we will get the Authors list and then raise the Salary/Rate by some value. Therefore, for Salary/Rate column we will be using the InternalName.
Step 1 − Go to the Server Explorer; right-click SharePoint Connections and select Add Connection... Specify the URL and click OK.

Step 2 − Expand SharePoint Tutorials → List Libraries → Lists → Authors → Fields → Salary/Rate field. Right-click Salary/Rate and select Properties. You will see the InternalName in the Properties window.

Step 3 − Given below is a simple example of retrieving the Authors based on Salary/Rate and raise their Salary/Rate.
using Microsoft.SharePoint;
using System;
using System.Collections.Generic;
using System.Linq;
using System.Text;
using System.Threading.Tasks;

namespace ServerObjectModel {
   class Program {
      static void Main(string[] args) {
         using (var site = new SPSite("http://waqasserver/sites/demo")) {
            var web = site.RootWeb;
            var list = web.Lists.TryGetList("Authors");
            if (list == null)
            return;
            var items = list.Items;
            ShowItems(items);
            RaiseRates(items);
            Console.WriteLine("\nAfter Raise\n");
            ShowItems(items);
            Console.ReadKey();
         }
      }
      static void RaiseRates(SPListItemCollection items) {
         foreach (SPListItem item in items) {
            var employee = Convert.ToBoolean(item["Employee"]);
            var rate = Convert.ToDouble(item["Salary_x002f_Rate"]);
            var newRate = employee ? rate + 1 : rate + 0.1;
            item["Salary_x002f_Rate"] = newRate;
            item.Update();
         }
      }
      static void ShowItems(SPListItemCollection items) {
         foreach (SPListItem item in items) {
            Console.WriteLine("Salary or rate for {0} is {1:c}", item.Title,
            item["Salary_x002f_Rate"]);
         }
      }
   }
}
In the above code you can see that we have two methods −
One is retrieving the list which is called ShowItems and
The other method is raising the Rates which is called RaiseRates().
When the above code is compiled and executed, you will see the following output −
Salary or rate for Muhammad Waqas is $950.00
Salary or rate for Mark Upston is $15.00
Salary or rate for Allan Bommer is $20.00
Salary or rate for Andy Onian is $870.00

After Raise

Salary or rate for Muhammad Waqas is $951.00
Salary or rate for Mark Upston is $15.10
Salary or rate for Allan Bommer is $20.10
Salary or rate for Andy Onian is $871.00
CAML Queries
In the above examples, we have always iterated through the items using a foreach loop many times iterating through all of the items and we have always brought back all of the columns or at least all the columns have been accessible.
It is really analogues to doing a select* from table name in a SQL query.
We can address this issue by using what are called CAML queries. When doing a CAML query you have two options −
If you want to query just a single list, you can use the SPQuery object.
If you want to query multiple lists in a site collection, then you can use the SPSiteDataQuery.
Generally, when you are doing the SPSiteDataQuery, you are querying all the lists of a specific type.
For example, I want to query all of the contact lists etc. SPSiteDataQuery allows you to determine the scope, so you can indicate that you want to query the entire site collection, an individual site, or the site and all of its children.
The syntax for CAML queries is basically described in XML format and it takes a little bit of time to get used to constructing these kinds of queries.
Let us have a look at a simple example of CAML Queries. Here, we will create a CAML query to query the data in our Authors list.
using Microsoft.SharePoint;
using System;
using System.Collections.Generic;
using System.Linq;
using System.Text;
using System.Threading.Tasks;

namespace ServerObjectModel {
   class Program {
      static void Main(string[] args) {
         using (var site = new SPSite("http://waqasserver/sites/demo")) {
            var web = site.RootWeb;
            var list = web.Lists.TryGetList("Authors");
            if (list == null)
            return;
            var items = QueryItems(list);
            ShowItems(items);

            //RaiseRates(items);
            //Console.WriteLine("\nAfter Raise\n");
            //ShowItems(items);
            Console.ReadKey();
         }
      }
      static SPListItemCollection QueryItems(SPList list) {
         var query = new SPQuery();

         query.ViewFields =
            "<FieldRef Name='Title' />" +
            "<FieldRef Name='Employee' />" +
            "<FieldRef Name='Salary_x002f_Rate' />";

         query.Query =
            "<OrderBy>" +
            " <FieldRef Name='Salary_x002f_Rate' />" +
            "</OrderBy>" +
            "<Where>" +
            " <Eq>" +
            " <FieldRef Name='Employee' />" +
            " <Value Type='Boolean'>False</Value>" +
            " </Eq>" +
            "</Where>";
         return list.GetItems(query);
      }
      static void RaiseRates(SPListItemCollection items) {
         foreach (SPListItem item in items) {
            var employee = Convert.ToBoolean(item["Employee"]);
            var rate = Convert.ToDouble(item["Salary_x002f_Rate"]);
            var newRate = employee ? rate + 1 : rate + 0.1;
            item["Salary_x002f_Rate"] = newRate;
            item.Update();
         }
      }
      static void ShowItems(SPListItemCollection items) {
         foreach (SPListItem item in items) {
            Console.WriteLine("Salary or rate for {0} is {1:c}",
            item.Title,
            item["Salary_x002f_Rate"]);
         }
      }
   }
}
We have used a CAML query to get some of the items. In the QueryItems method, you can see that we have retrieved only those items which are not Employee.
Salary or rate for Mark Upston is $15.10
Salary or rate for Allan Bommer is $20.10
