- SharePoint - Home
- SharePoint - Overview
- SharePoint - Types
- SharePoint - Capabilities
- SharePoint - Setup Environment
- SharePoint - Create Site Collection
- SharePoint - APIs
- SharePoint - Central Administration
- SharePoint - App Model
- SharePoint - Integration Options
- SharePoint - Development Tools
- SharePoint - List Functionality
- Additional List Functionality
- SharePoint - Custom List
- SharePoint - Libraries
- SharePoint - Web Part
- Site Column & Content Types
- SharePoint - Data
- SharePoint - Server Object Model
- SharePoint - Client Object Model
- SharePoint - REST APIs
- SharePoint - Features & Elements
- SharePoint - Feature\Event Receiver
- SharePoint - Azure Platform
- SharePoint - Packaging & Deploying
- SharePoint - Sandbox Solutions
- SharePoint - Apps
SharePoint - Features & Elements
In this chapter, we will take a look at features and elements. Features are in some ways the component model in SharePoint. They allow you to define logical units of functionality.
For example, you might want to have the ability within a site −
To create a list with a specific schema,
Have a page that will show the data from that list, and then
Have a link or a menu option somewhere within the site to navigate to that page.
You could create a feature, which defines that logical grouping of functionality. The individual pieces of functionality are defined by elements.
So there would be an element which −
Creates the list and sets the schema.
Provisions the page into your SharePoint site, and
Creates the menu option or the link.
The feature defines the unit and then the elements define the individual pieces of functionality inside of that unit. We discussed about the three kinds of elements −
A list instance to create a list.
A module to provision a page.
A custom action to create a menu option or a link.
However, there are many other kinds of elements that can be created within SharePoint. Another important concept to understand about features is that of activation and deactivation.
For example, if an end user wants the above-mentioned functionality to be added to his site, he would activate the corresponding feature that would create the list, add the menu option or link, and provision the page into their site. Later he could deactivate the feature to remove the functionality.
It is important to note that on deactivation of a feature, some elements are automatically removed. For example, SharePoint would automatically remove the menu option or link, which is defined by a custom action.
Others are not removed automatically. Therefore, in our case, the list instance and the page would not be removed automatically.
Hence, as a developer, you need to understand what elements get removed automatically and which ones do not. If you want to remove the ones that do not get removed automatically, you can write in code in a feature receiver.
Let us look at the working with features and elements. We will start with the end users view of features.
Step 1 − Open your SharePoint site.
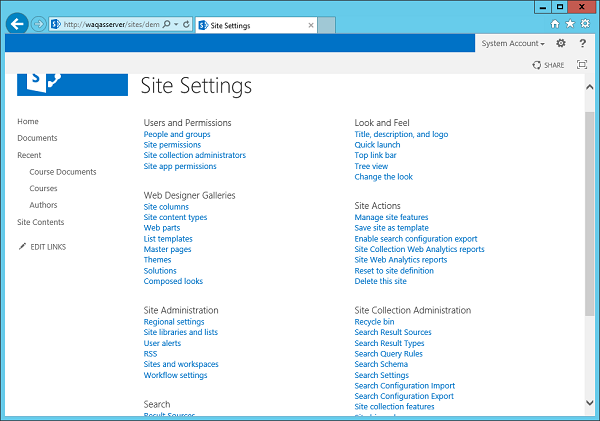
Step 2 − To go to the Site settings, you have two links that enable you to manage features.
The first link Manage Site features is under Site Actions, which enables you to manage site scope features.
The other link Site collection features under Site Collection Administration, which enables you to manage site collection scope features.
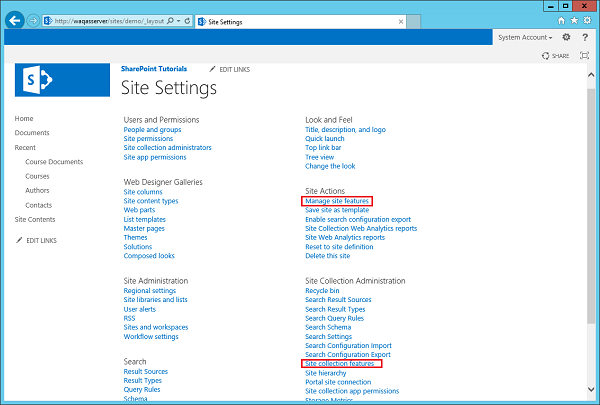
Step 3 − If you click on either of these links, you will be taken to a page, which shows the currently active and inactive features. For each of the features, you have an option to activate or deactivate the feature.
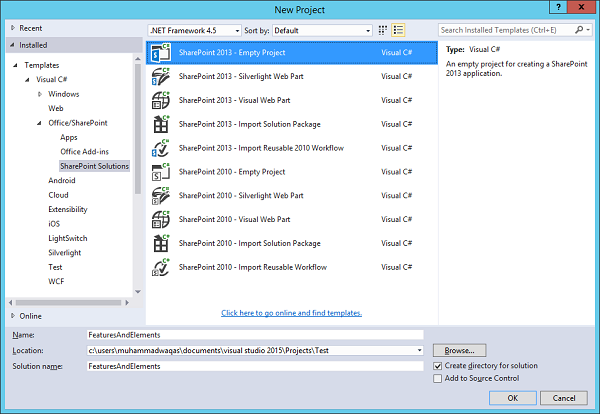
Let us look at a simple example by creating a new SharePoint Solutions Empty Project.
Step 1 − Let us call this FeaturesAndElements and click OK.
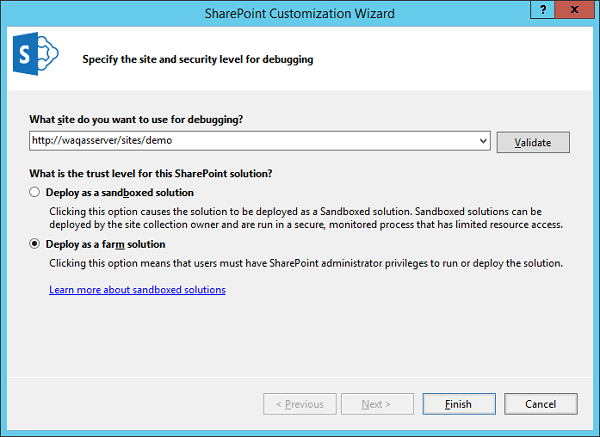
Step 2 − Specify the site you want to use and select the Deploy as a farm solution option and then click Finish.
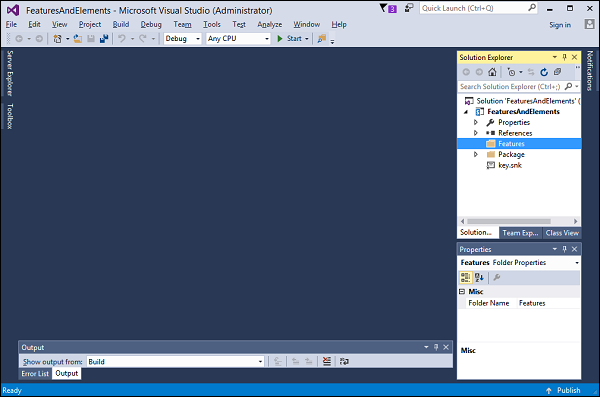
The first thing we want to create is the feature. In the Solution Explorer, you can see a Features folder, which is currently empty.
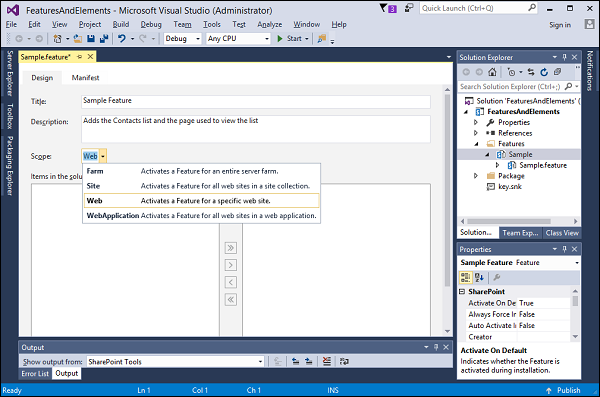
Step 3 − Right-click on the Features folder and choose Add Feature. It creates a Feature named Feature1, and it opens up the Feature designer. The default Title is the title of project, plus the title of the feature.
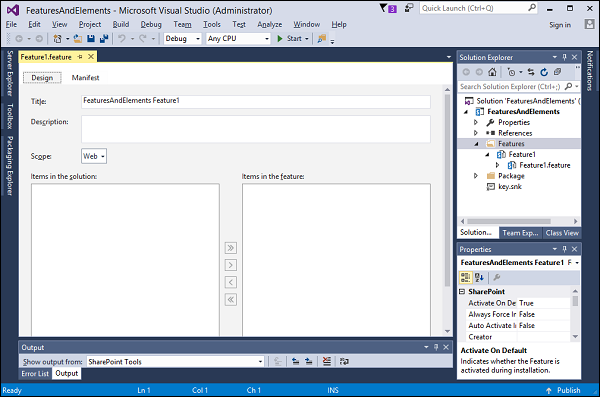
Step 4 − Rename the feature from Feature1 to Sample.
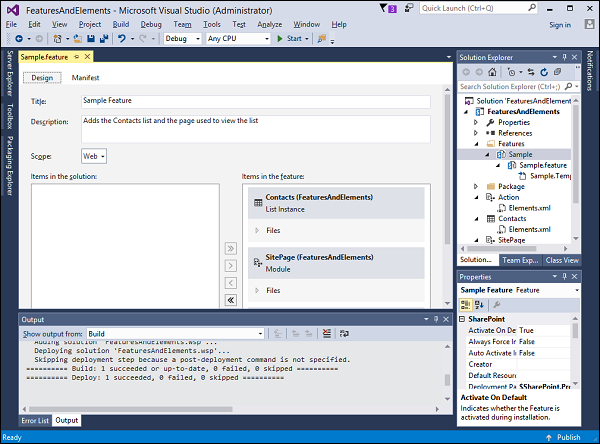
Title and Description are what the user sees in the page where they activate and deactivate the features.
Set the Title to Sample Feature and the Description to Adds the Contacts list and the page is used to view the list. The other thing we need to set is the Scope of the feature, which is the activation scope.
It can be Farm, a WebApplication, a Site collection or a Site. In this case, we are going to provision a list and a page. Since, both live in a SharePoint site, so we will pick Web here.
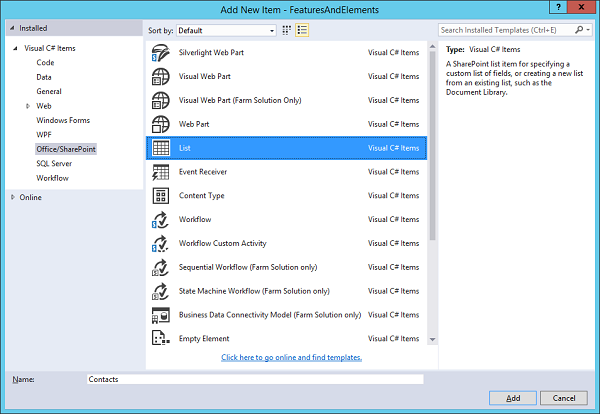
Step 5 − Let us start adding features in our elements. The first element will be the list and we will create a contacts list. Right-click on your project and choose Add → New Item...
Step 6 − Select List in the middle pane and enter Contacts in the name field. Click Add.
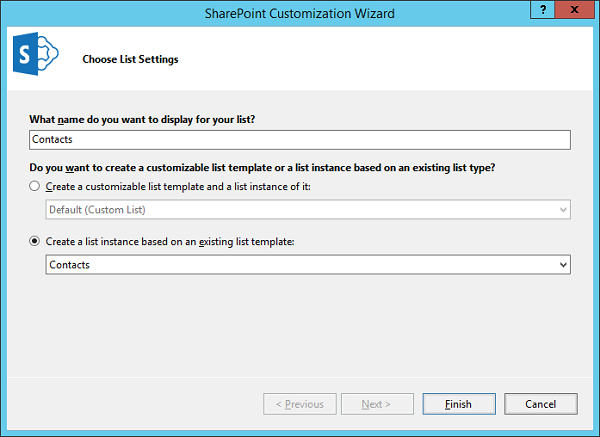
Step 7 − You will see the List Creation Wizard. Create a list called Contacts based on the Contacts list. Click Finish to create the list or at least create the element, which will eventually create the list.
Given below is the screenshot of the list designer.
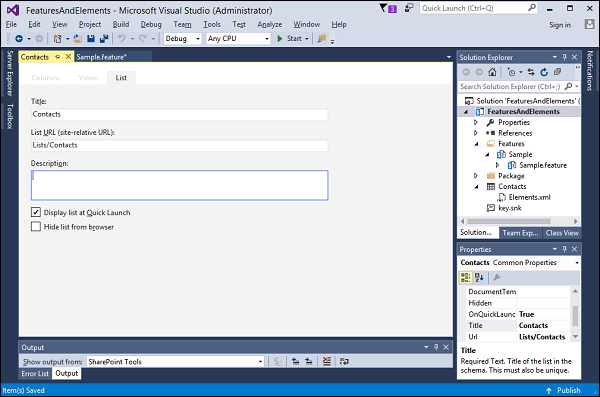
Step 8 − This designer is just an XML editor. Open the file Elements.xml under Contacts and add the following data.
<?xml version = "1.0" encoding = "utf-8"?>

<Elements xmlns = "http://schemas.microsoft.com/sharepoint/">
   <ListInstance Title = "Contacts" OnQuickLaunch = "TRUE" TemplateType = "105"
      FeatureId = "00bfea71-7e6d-4186-9ba8-c047ac750105"
      Url = "Lists/Contacts" Description = "">
      <Data>
         <Rows>

            <Row>
               <Field Name = "ID">1</Field>
               <Field Name = "Last Name">Anders</Field>
               <Field Name = "First Name">Maria</Field>
               <Field Name = "Company">Alfreds Futerkiste</Field>
               <Field Name = "Business Phone">030-0074321</Field>
            </Row>

            <Row>
               <Field Name = "ID">2</Field>
               <Field Name = "Last Name">Hardy</Field>
               <Field Name = "First Name">Thomas</Field>
               <Field Name = "Company">Around the Horn</Field>
               <Field Name = "Business Phone">(171) 555-7788</Field>
            </Row>

            <Row>
               <Field Name = "ID">3</Field>
               <Field Name = "Last Name">Lebihan</Field>
               <Field Name = "First Name">Laurence</Field>
               <Field Name = "Company">Bon app'</Field>
               <Field Name = "Business Phone">91.24.45.40</Field>
            </Row>

            <Row>
               <Field Name = "ID">4</Field>
               <Field Name = "Last Name">Ashworth</Field>
               <Field Name = "First Name">Victoria</Field>
               <Field Name = "Company">B's Beverages</Field>
               <Field Name = "Business Phone">(171) 555-1212</Field>
            </Row>

            <Row>
               <Field Name = "ID">5</Field>
               <Field Name = "Last Name">Mendel</Field>
               <Field Name = "First Name">Roland</Field>
               <Field Name = "Company">Ernst Handel</Field>
               <Field Name = "Business Phone">7675-3425</Field>
            </Row>

         </Rows>
      </Data>
   </ListInstance>
</Elements>
Note the following −
Inside the ListInstance element, we have an element called Data and it has some rows inside it.
ListInstance will have attributes Contacts, whether or not we show in the quick launch.
We want a list based on contact template. Here, TemplateType is set to 105. This is not a random number but a number with a meaning.
Each of the default kinds of list you can have in SharePoint such as an Announcements list, a Task list, a Contacts list and so on, has a number associated with it. Therefore, if you change 105 to 107, you will get a different kind of list.
FeatureId is the guide associated with the definition of contacts list.
Step 9 − Now we want to have a page, which shows data from this list. Right-click on your project and choose Add → New Item... Choose Module in the middle pane, enter SitePage in the name field, and click Add.
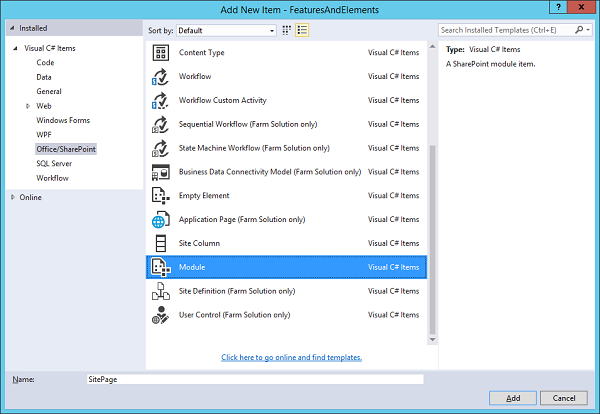
You will see a node called SitePage, which has two files, Elements.xml and Sample.txt file. We do not want to provision this sample.txt file, but we want to provision a SitePage.
Step 10 − Rename the text file to Contacts.aspx and replace the following code −
<%@ Assembly Name = "Microsoft.SharePoint, Version = 14.0.0.0, Culture = neutral,
   PublicKeyToken = 71e9bce111e9429c" %>

<%@ Page MasterPageFile = "~masterurl/default.master"
   meta:progid = "SharePoint.WebPartPage.Document" %>

<%@ Register TagPrefix = "SharePoint"
   Namespace = "Microsoft.SharePoint.WebControls"
   Assembly = "Microsoft.SharePoint, Version = 14.0.0.0, Culture = neutral,
   PublicKeyToken = 71e9bce111e9429c" %>

<asp:Content ID = "Content2" runat = "server" ContentPlaceHolderID = "PlaceHolderMain">
   <SharePoint:SPDataSource runat = "server"
      ID = "ContactsDataSource" DataSourceMode = "List"
      UseInternalName = "false">
      <SelectParameters>
         <asp:Parameter Name = "ListName" DefaultValue = "Contacts" />
      </SelectParameters>
   </SharePoint:SPDataSource>

   <SharePoint:SPGridView runat = "server"
      ID = "ContactsGridView" DataSourceID = "ContactsDataSource"
      AutoGenerateColumns = "false" RowStyle-BackColor = "#DDDDDD"
      AlternatingRowStyle-BackColor = "#EEEEEE">
      <Columns>
         <asp:BoundField HeaderText = "Company"
            HeaderStyle-HorizontalAlign = "Left" DataField = "Company" />
         <asp:BoundField HeaderText = "First Name"
            HeaderStyle-HorizontalAlign = "Left" DataField = "First Name" />
         <asp:BoundField HeaderText = "Last Name"
            HeaderStyle-HorizontalAlign = "Left" DataField = "Last Name" />
         <asp:BoundField HeaderText = "Phone"
            HeaderStyle-HorizontalAlign = "Left" DataField = "Business Phone" />
      </Columns>
   </SharePoint:SPGridView>
</asp:Content>

<asp:Content ID = "PageTitle" ContentPlaceHolderID = "PlaceHolderPageTitle"
   runat = "server">
   Contacts
</asp:Content>

<asp:Content ID = "PageTitleInTitleArea"
   ContentPlaceHolderID = "PlaceHolderPageTitleInTitleArea" runat = "server" >
   Contacts
</asp:Content>
The SitePage has an SP.DataSource file, which we will use to make the Contacts list data, something we can bind to in our page. The SP.GridView will show the Contacts information.
That is our SitePage and now let us look at the Feature.
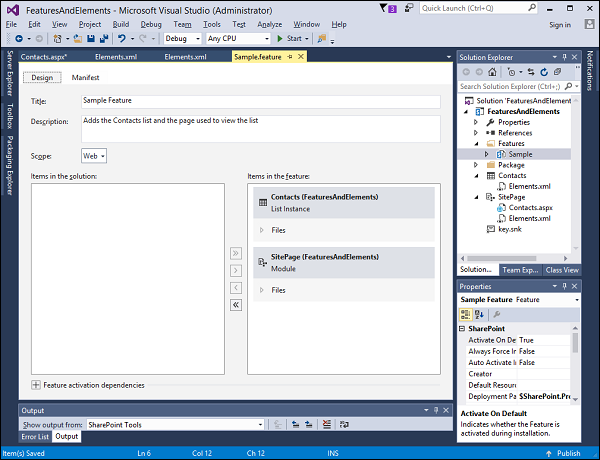
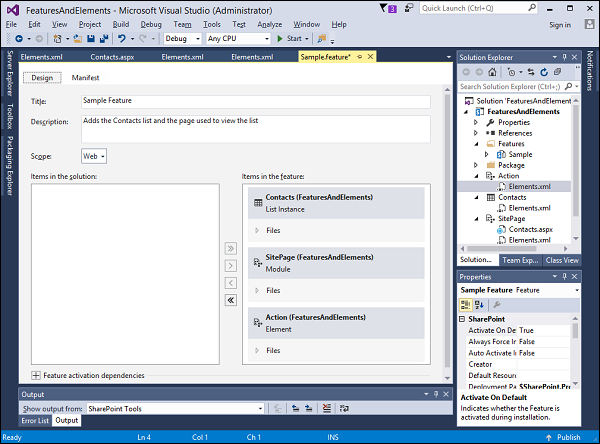
Notice, in Items in the Feature, Contacts list instance and Module provision on our SitePage have been added as elements.
Visual Studio understands that elements on their own cannot do anything. Elements need to be a part of a Feature. Hence, when you add an element, you need to add it into the feature.
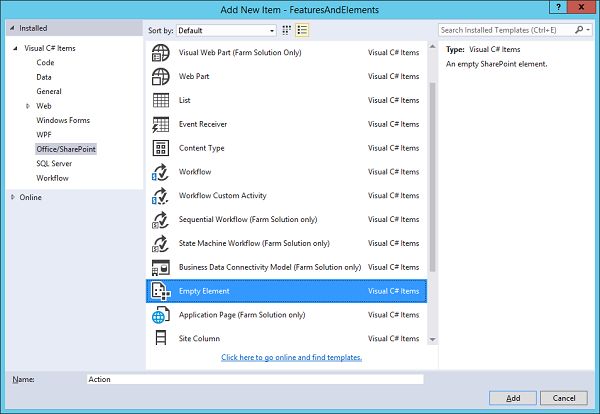
Step 11 − Go to your project and right-click, and choose Add → New Item...
Here we want to add a CustomAction, so select Empty Element in the middle pane, call this Action and then click Add.
If you come back to your Feature, you can see that the element has now been added to Feature as shown in the screenshot given below.
Step 12 − Come back to Elements.xml under Action and replace the following code −
<?xml version = "1.0" encoding = "utf-8"?>

<Elements xmlns = "http://schemas.microsoft.com/sharepoint/">
   <CustomAction
      Id = "SiteActionsToolbar"
      GroupId = "SiteActions"
      Location = "Microsoft.SharePoint.StandardMenu"
      Sequence = "100"
      Title = "Contacts"
      Description = "A page showing some sample data">
      <UrlAction Url = "~site/SitePages/Contacts.aspx"/>
   </CustomAction>
</Elements>
Now if you want to add a link or a menu option, you need to define where you are going to add it and it is a combination of the Location and GroupId, which define them. This combination of values indicates that the menu option should be added to the SiteActions menu.
There are many other combinations of values, which add the link or the menu in other places within our SharePoint site. This is something you would have to research to find out what is the proper combination of values that you need when you want to add a menu option somewhere within SharePoint.
Step 13 − Double click on the Feature, you will see the Feature designer. Feature designer is a fancy editor of the Feature Manifest, which is an XML document.
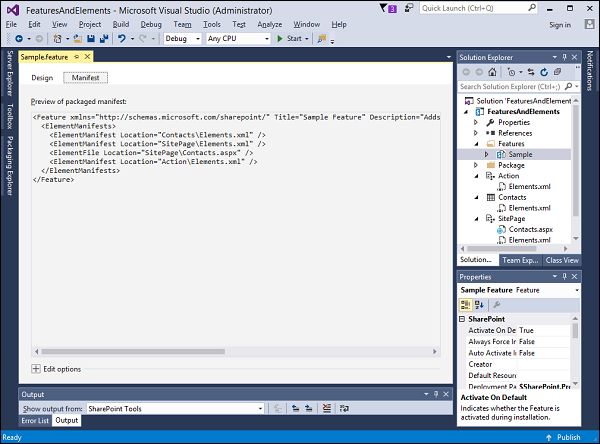
Important points −
The feature defines the logical grouping of elements. Here, our Feature is referring to our three Element manifests that we have just created.
When you activate the Feature, SharePoint will look at the individual Element manifest and add the list, the page, and the link into our SharePoint site.
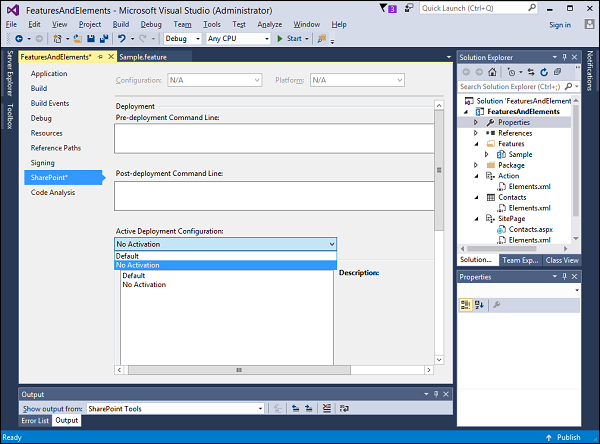
When you deploy using Visual Studio, it automatically activates any Features in your project. Since, we want to go through the process of activating the Feature, we are going to tell Visual Studio not to do that.
Step 14 − Go to the Project Properties by going to the SharePoint tab. Change the Deployment Configuration to No Activation.
Let us test this.
Step 15 − Right-click on your project in Solution Explorer and choose Deploy. It will package up all the stuff in your project and deploy it out to your SharePoint Development Farm.
Once it is deployed successfully, you will see it in the Output window.
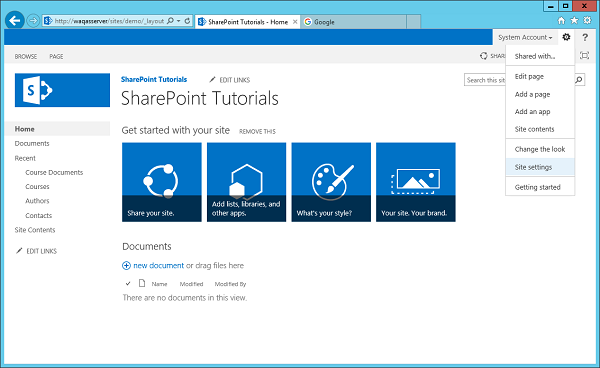
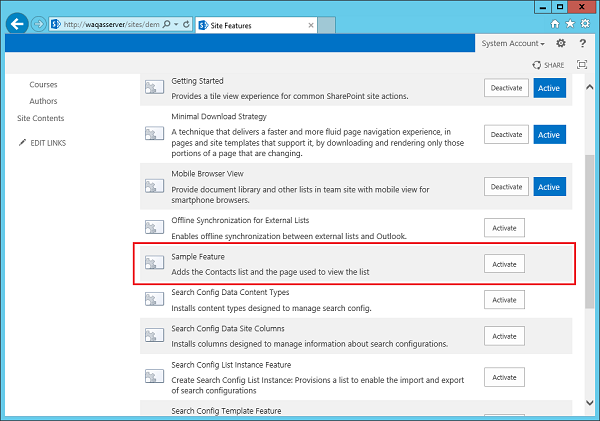
Step 16 − Go to the SharePoint site and Refresh it. Go to the Site Settings → Site Actions.
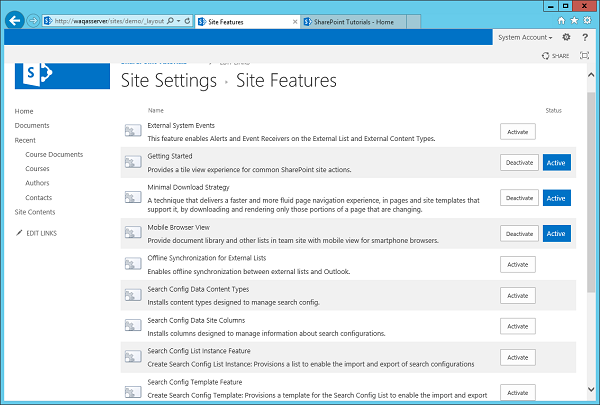
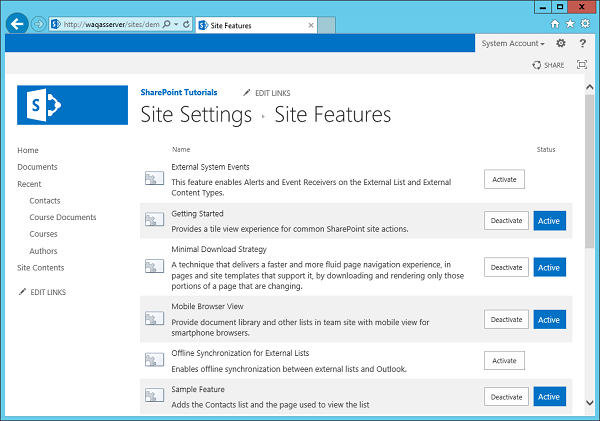
Step 17 − Select the Manage site features because your Custom Feature was Web scoped and you will see your Sample Feature. You can see that this feature has not been activated, so let us go ahead and activate it.
You will see the Contacts list in the left pane.
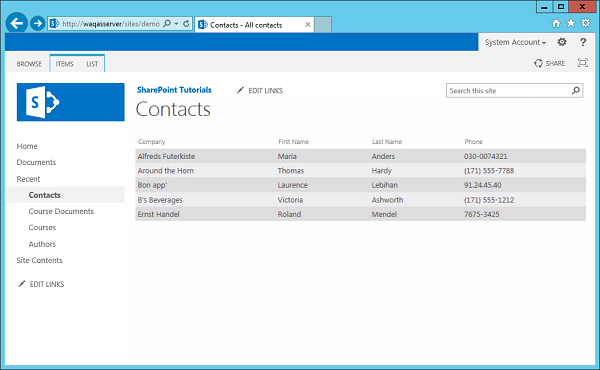
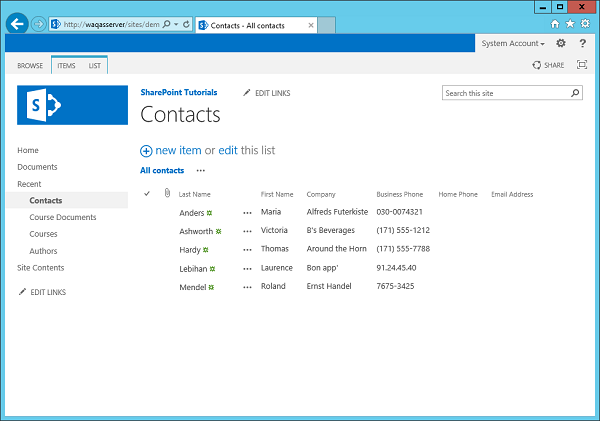
Step 18 − Click Contact and the data that we had in the list will be displayed.
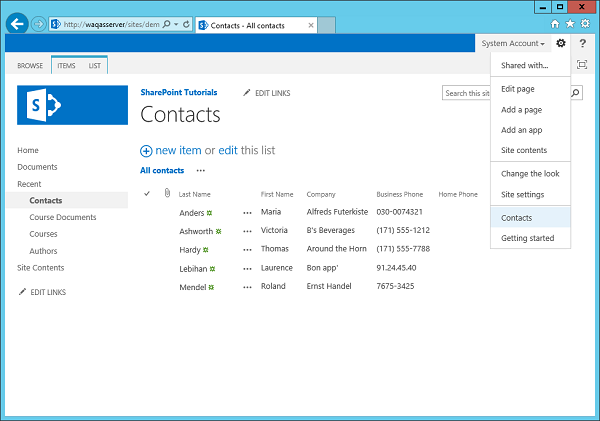
Step 19 − Go to Site actions menu. There is an option to navigate to the Contacts page. That is our CustomAction.
Step 20 − If you click Contacts, then you will see your SitePage, showing the data from the Contacts list.