- SharePoint - Home
- SharePoint - Overview
- SharePoint - Types
- SharePoint - Capabilities
- SharePoint - Setup Environment
- SharePoint - Create Site Collection
- SharePoint - APIs
- SharePoint - Central Administration
- SharePoint - App Model
- SharePoint - Integration Options
- SharePoint - Development Tools
- SharePoint - List Functionality
- Additional List Functionality
- SharePoint - Custom List
- SharePoint - Libraries
- SharePoint - Web Part
- Site Column & Content Types
- SharePoint - Data
- SharePoint - Server Object Model
- SharePoint - Client Object Model
- SharePoint - REST APIs
- SharePoint - Features & Elements
- SharePoint - Feature\Event Receiver
- SharePoint - Azure Platform
- SharePoint - Packaging & Deploying
- SharePoint - Sandbox Solutions
- SharePoint - Apps
SharePoint - Additional List Functionality
SharePoint provides a lot of functionality for lists. It provides storage for the list data, the ability to customize the list schema, and the ability to view, add, edit, and delete list items etc. There are a lot more functionality available like creating views on list data, simple validation at both the field and list level, content approval, item versioning etc.
Views
Let us start working with Views on list data. Here we are back in the Authors list, and as you notice, that we have added only four items. With only four items, it is not hard to garner any information we need out of its data.
As the number of items grows, say from 4 to 50 to 100, to maybe 500, it becomes increasingly more difficult to just glance at the list and quickly get the information that we need. To address this issue, SharePoint enables you to create multiple Views on lists, so that we can filter out information we do not need, such as −
- We can sort the field values.
- We can group information.
- We can get totals.
- We can also have different ways to present the information.
For most lists, when you create them, you get one View by default. It is called the All Items View and that is the view we have seen in the example given above.
Now let us have a look at how we can create custom views. Just as with the creation of the list schema, SharePoint gives us a couple of different ways we can use to create views. One way is to start with an existing view and change the sorting and filtering of different columns. We can get the data the way you want it to look, and then save it as a new view.
You will notice that if we go to the other column headers, most of them give us a little drop-down menu we can access as shown below for Salary/Rate header.
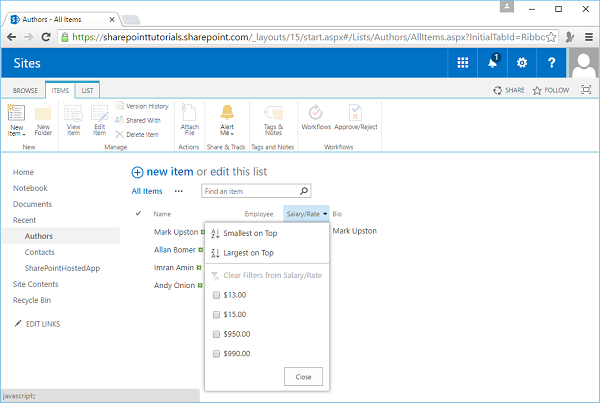
Go to the other column header- Bio. It does not have a dropdown list as it contains multiple lines of text. The other columns have this option. It gives us the ability to sort the information, or to filter it.
Let us create a filter here that only shows Employees.
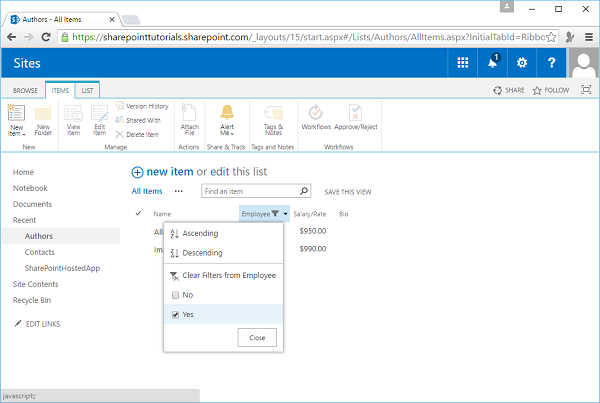
Once we add that filter, notice there is a little icon in the column header that indicates that these field values have been filtered. Let us sort it in descending order.
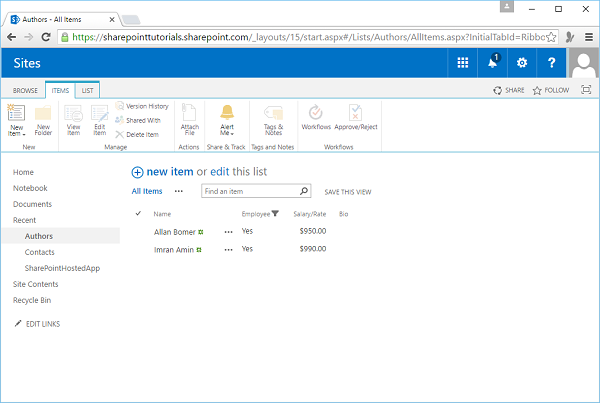
So now we have a new view of the data i.e. the descending order view.
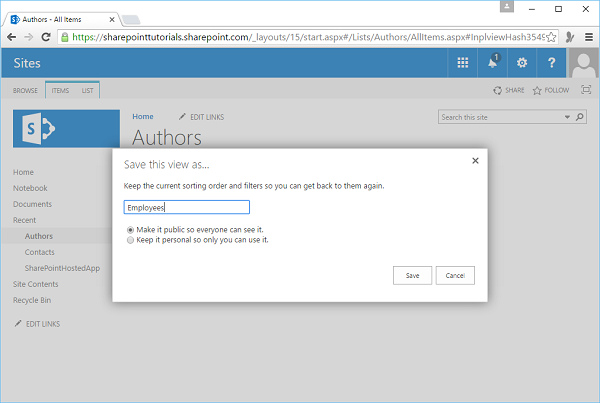
Now the filtering and sorting is not preserved. Therefore, we need to save the descending order view for future.
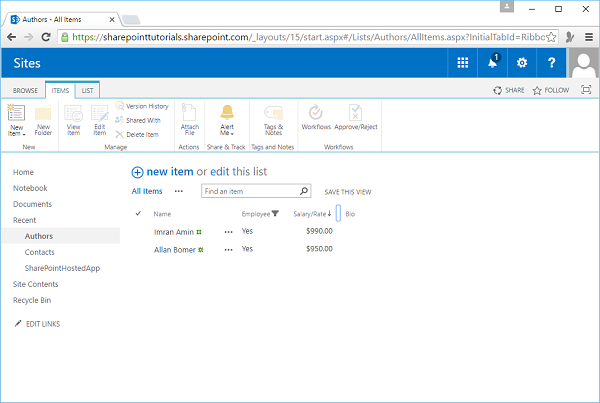
If we just navigate back to the Authors list, then we will see All Items. If we want to have a view that is only Employees, sorted by Salary/Rate descending, click SAVE THIS VIEW option.
We will call this view the Employees view. Select from the options given whether this view should be available to all users or just to me. Click Save.
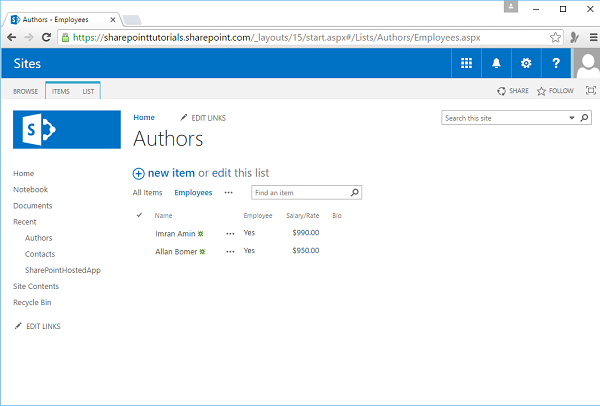
So now we have the two different views, All Items view and Employees view, we can switch between these views using the links at the top of the List view as shown in the screenshot given below.
Validation
We will be adding simple validation rules to fields and items in a SharePoint list. Now when we created the Authors list, we added some validation rules using the properties of the different field types.
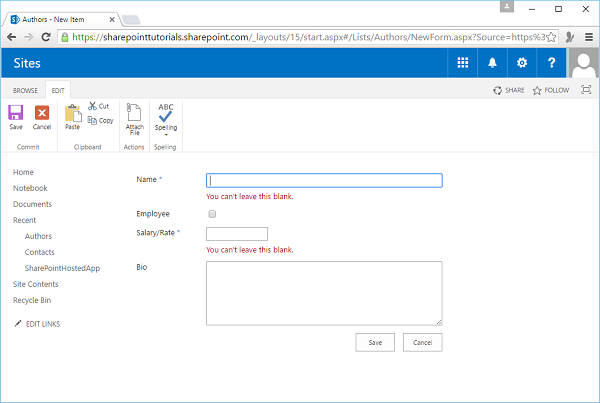
Click New Item from the Authors list. Now, click Save.
When you click Save, you will get two errors. This is because we have indicated that Name and Salary/Rate are required fields.
Enter the name and Salary/Rate as Aamir Jameel and 1500 respectively. Click Save.
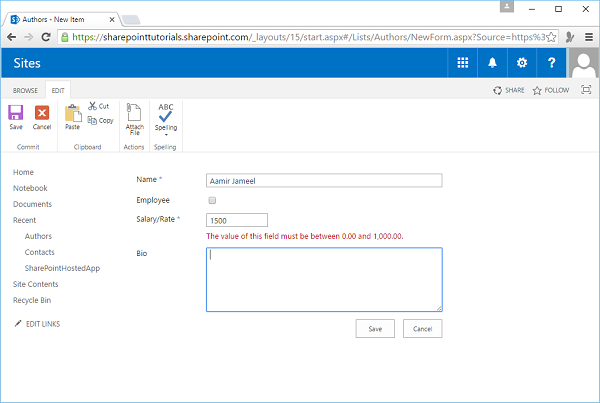
As you can see we still have an issue with Salary/Rate, because when we created the field we indicated that its value should be between 0 and 1000, and 1500 does not satisfy that requirement. Click Cancel.
Go to the List tab on the Ribbon and then click List Settings. Click Name. As you can see in the screenshot given below, it a required field,
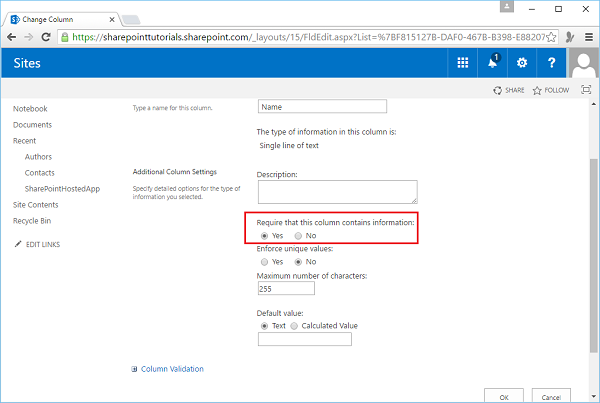
Now go back, click Salary/Rate, and scroll down. You will see that it is also a required field.
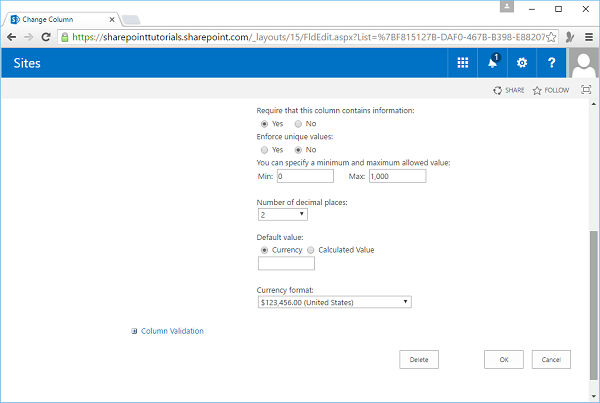
Here we have also set the valid range of values. So, it is all good if the field type has these properties, but what do you do if it does not? Well, we can add in some simple custom validation. So if we scroll down to the bottom, you can see there is an area for column validation. Let us expand that. Here we can specify a formula and then give a message if the value entered by the user does not satisfy that formula.
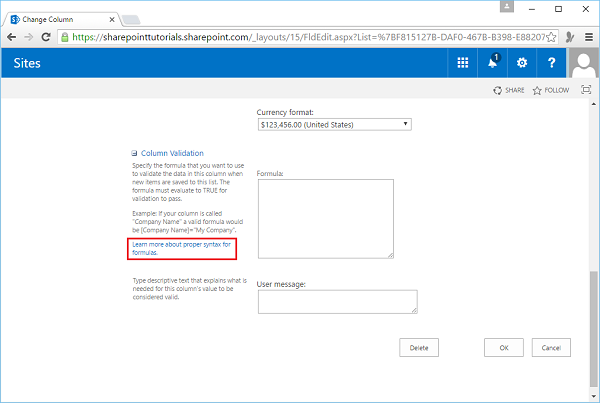
If you are not familiar with building formulas in SharePoint, there is a link which gives you help on how to do that.

Now the validation that we want to add is that if you are not an employee, then your Salary/Rate indicates your hourly rate and we want to say that the maximum value for the rate is $50.00. So here, the validation depends on both the value of the Employee field and of the Salary/Rate field. Therefore, instead of adding the validation to either of those fields, we are going to add it to the item and then the way we indicate the item validation is by going to the List Settings.

Click Validation Settings and set the formula as shown below.
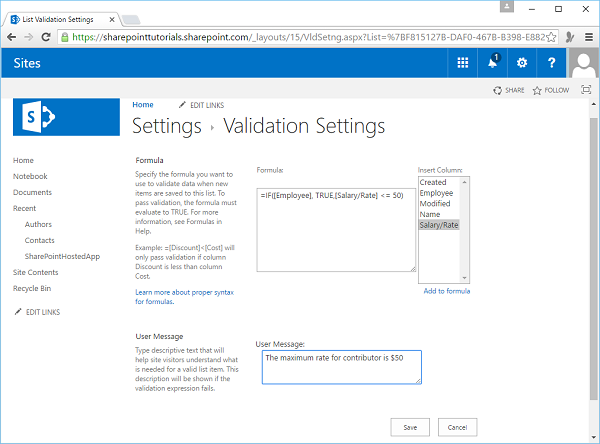
So the condition is going to be pretty simple, first, are you an employee? So if you are an employee, then we already set the valid range of salary values between 0 and 1000. Therefore, only True value is returned. If you are not an employee, then we will check if the Salary/Rate is less than or equal to 50.
If this formula returns True, then the item is considered valid. If it returns false, it is invalid. Lastly, we add the error message, The maximum rate for a contributor is $50.
This completes the Validation Settings. Click Save.
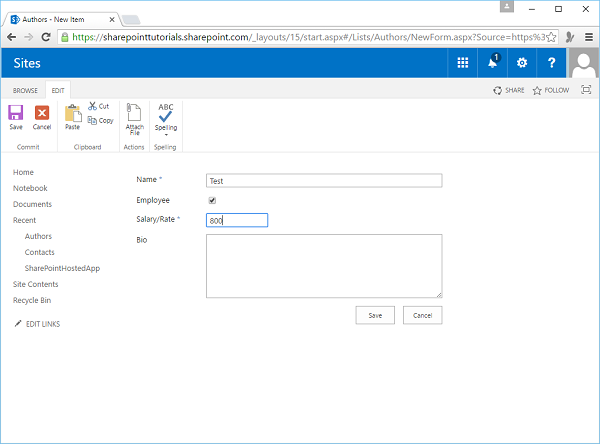
Now go back to the Authors list and add a new item. We will name this as Test, check the Employee check box(as we are testing for an employee), enter Salary/Rate as 800 and then click Save.
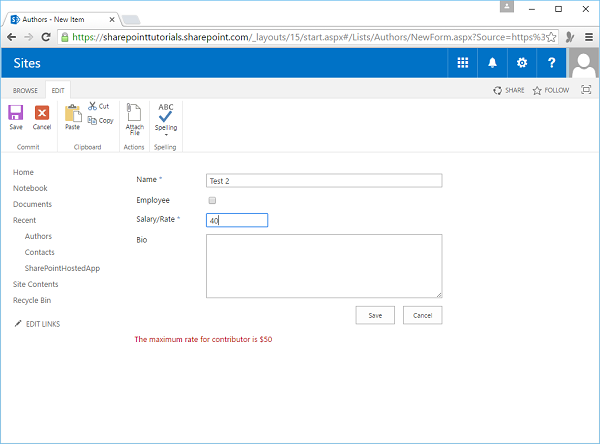
The data was saved. There was no error. Now let us enter different conditions. Go to Authors List. We will name this as Test 2.

Now do not select the Employee checkbox as now we are assuming that the person is a contributor. Enter Salary/Rate is 800 and then click Save.
You will see an error message. Therefore, let us change the Salary/Rate to a valid value.
Enter 40 in the Salary/Rate field.
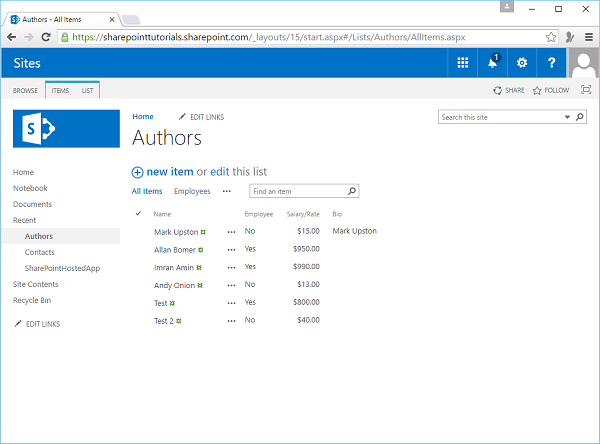
Click Save.
You will see that the data is saved properly and is updated in the list as shown in the following screenshot.
Lookup Fields
We will take a look at list relations and lookup fields. We will create a new list to hold information about courses.
Step 1 − Go to Site Contents → add an app' → Custom List.
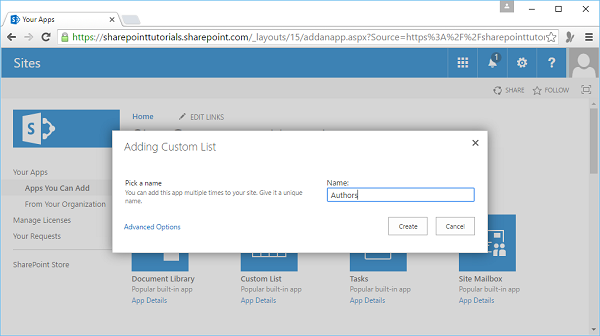
Step 2 − Specify the list Courses and then click Create. Open the Courses list. There is only one column called Title, which will represent title of the course.

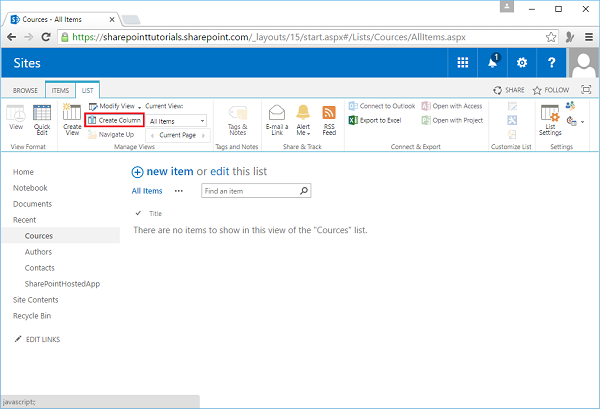
Step 3 − Create a second column, which will hold the name of the author. Go to LIST on the Ribbon. Click Create Column.
Step 4 − Name this column as Author. We can just have a single line of text where the user enters the author name. However, we already have the author names in the Authors list, so instead we will present the user a dropdown list, where they can select the author. Hence, instead of creating a Single Line of Text field, we will create a Lookup field.
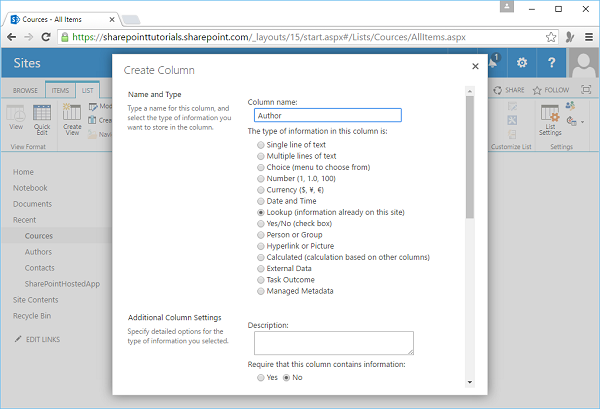
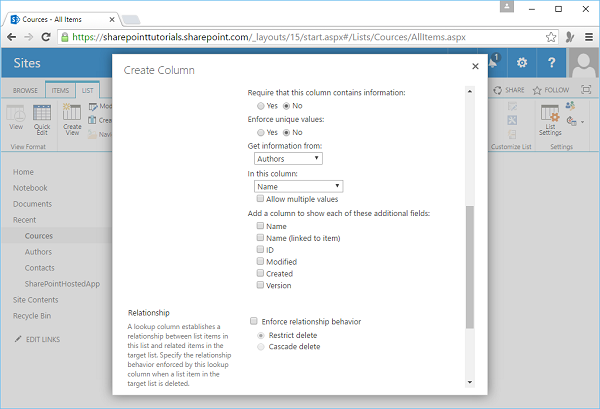
Step 5 − Next, we need to specify which field from which list we would be showing to the user. SharePoint has set the appropriate values by default, but if we want to change the list, we can select if from the dropdown list. When it is done, click OK.
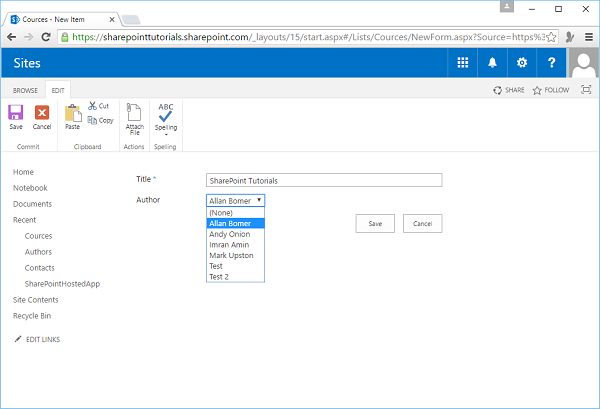
Step 6 − This course is SharePoint Tutorials and you can see that we have a dropdown list for Author.
List Data Storage
The data for lists is stored in rows and columns. For every content database, there is one table, which stores the data for lists. You can relate the lists together, enforce relational integrity and validate.
People quite often assume that many capabilities of a relational database exist with lists and a set of lists becomes almost like a relational database, but this is not the case.
You need to think of lists more like a set of Excel worksheets where you can have one worksheet linked with another worksheet, and you can enforce validation on columns or cells through some simple form. Hence, a set of lists in SharePoint is not like a relational database.
