- OpenCV Python - Home
- OpenCV Python - Overview
- OpenCV Python - Environment
- OpenCV Python - Reading Image
- OpenCV Python - Write Image
- OpenCV Python - Using Matplotlib
- OpenCV Python - Image Properties
- OpenCV Python - Bitwise Operations
- OpenCV Python - Shapes and Text
- OpenCV Python - Mouse Events
- OpenCV Python - Add Trackbar
- OpenCV Python - Resize and Rotate
- OpenCV Python - Image Threshold
- OpenCV Python - Image Filtering
- OpenCV Python - Edge Detection
- OpenCV Python - Histogram
- OpenCV Python - Color Spaces
- OpenCV Python - Transformations
- OpenCV Python - Image Contours
- OpenCV Python - Template Matching
- OpenCV Python - Image Pyramids
- OpenCV Python - Image Addition
- OpenCV Python - Image Blending
- OpenCV Python - Fourier Transform
- OpenCV Python - Capture Videos
- OpenCV Python - Play Videos
- OpenCV Python - Images From Video
- OpenCV Python - Video from Images
- OpenCV Python - Face Detection
- OpenCV Python - Meanshift/Camshift
- OpenCV Python - Feature Detection
- OpenCV Python - Feature Matching
- OpenCV Python - Digit Recognition
- OpenCV Python Resources
- OpenCV Python - Quick Guide
- OpenCV Python - Resources
- OpenCV Python - Discussion
OpenCV Python - Resize and Rotate an Image
In this chapter, we will learn how to resize and rotate an image with the help of OpenCVPython.
Resize an Image
It is possible to scale up or down an image with the use of cv2.resize() function.
The resize() function is used as follows −
resize(src, dsize, dst, fx, fy, interpolation)
In general, interpolation is a process of estimating values between known data points.
When graphical data contains a gap, but data is available on either side of the gap or at a few specific points within the gap. Interpolation allows us to estimate the values within the gap.
In the above resize() function, interpolation flags determine the type of interpolation used for calculating size of destination image.
Types of Interpolation
The types of interpolation are as follows −
INTER_NEAREST − A nearest-neighbor interpolation.
INTER_LINEAR − A bilinear interpolation (used by default)
INTER_AREA − Resampling using pixel area relation. It is a preferred method for image decimation but when the image is zoomed, it is similar to the INTER_NEAREST method.
INTER_CUBIC − A bicubic interpolation over 4x4 pixel neighborhood
INTER_LANCZOS4 − A Lanczos interpolation over 8x8 pixel neighborhood
Preferable interpolation methods are cv2.INTER_AREA for shrinking and cv2.INTER_CUBIC (slow) & cv2.INTER_LINEAR for zooming.
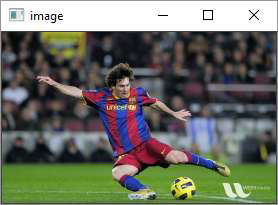
Example
Following code resizes the messi.jpg image to half its original height and width.
import numpy as np
import cv2
img = cv2.imread('messi.JPG',1)
height, width = img.shape[:2]
res = cv2.resize(img,(int(width/2), int(height/2)), interpolation =
cv2.INTER_AREA)

cv2.imshow('image',res)
cv2.waitKey(0)
cv2.destroyAllWindows()
Output
Rotate an image
OpenCV uses affine transformation functions for operations on images such as translation and rotation. The affine transformation is a transformation that can be expressed in the form of a matrix multiplication (linear transformation) followed by a vector addition (translation).
The cv2 module provides two functions cv2.warpAffine and cv2.warpPerspective, with which you can have all kinds of transformations. cv2.warpAffine takes a 2x3 transformation matrix while cv2.warpPerspective takes a 3x3 transformation matrix as input.
To find this transformation matrix for rotation, OpenCV provides a function, cv2.getRotationMatrix2D, which is as follows −
getRotationMatrix2D(center, angle, scale)
We then apply the warpAffine function to the matrix returned by getRotationMatrix2D() function to obtain rotated image.
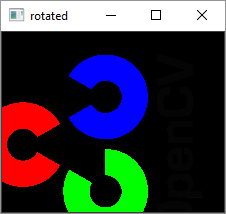
Following program rotates the original image by 90 degrees without changing the dimensions −
Example
import numpy as np
import cv2
img = cv2.imread('OpenCV_Logo.png',1)
h, w = img.shape[:2]

center = (w / 2, h / 2)
mat = cv2.getRotationMatrix2D(center, 90, 1)
rotimg = cv2.warpAffine(img, mat, (h, w))
cv2.imshow('original',img)
cv2.imshow('rotated', rotimg)
cv2.waitKey(0)
cv2.destroyAllWindows()
Output
Original Image

Rotated Image