
Article Categories
- All Categories
-
 Data Structure
-
 Networking
-
 RDBMS
RDBMS
-
 Operating System
-
 Java
Java
-
 MS Excel
-
 iOS
iOS
-
 HTML
HTML
-
 CSS
CSS
-
 Android
-
 Python
-
 C Programming
-
 C++
C++
-
 C#
C#
-
 MongoDB
-
 MySQL
MySQL
-
 Javascript
-
 PHP
PHP
-
 Economics & Finance
How to Quickly Remove Watermark in Excel?
Microsoft Excel is a powerful tool used by millions worldwide for data analysis, organization, financial modeling, and more. Annoyingly, sometimes we may encounter watermarks embedded in our spreadsheets that hinder clarity and professionalism. In this article, we will explore creative methods to quickly remove watermarks from our Excel sheets without the need for complex software.
In the digital world, protecting documents and data from unauthorized usage is crucial. One commonly used method is adding watermarks to files. Furthermore, we will provide with effective techniques on how to remove watermarks from our Excel spreadsheets. A watermark can be defined as an identifiable pattern or text overlay embedded onto a document or image. It serves multiple purposes depending on its application but generally aims to prevent misuse or plagiarism by clearly indicating ownership or restricted access.
Benefits of Using Watermarks
-
Enhanced Security: Adding a watermark reinforces document integrity by discouraging unauthorized copying or dissemination without permission.
Visual Identification: By prominently displaying information like "Confidential," "Sample," and "Draft" it helps viewers recognize the status of the presented content at first glance.
Branding Opportunities: Businesses can utilize easily recognizable logos as watermarks, promoting brand awareness among recipients while preserving file authenticity.
Copyright Protection: Unique identifiers such as signatures may be incorporated into documents through watermarked overlays, safeguarding proprietary content from intellectual property theft.
Example 1: Using Header and Footer Option
Step 1
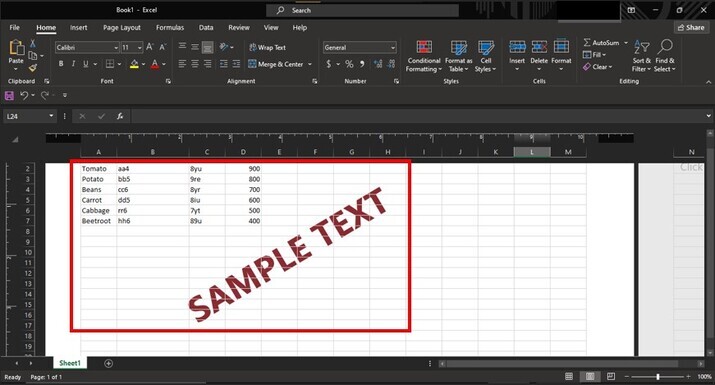
Open the Excel spreadsheet containing the watermark.
Step 2
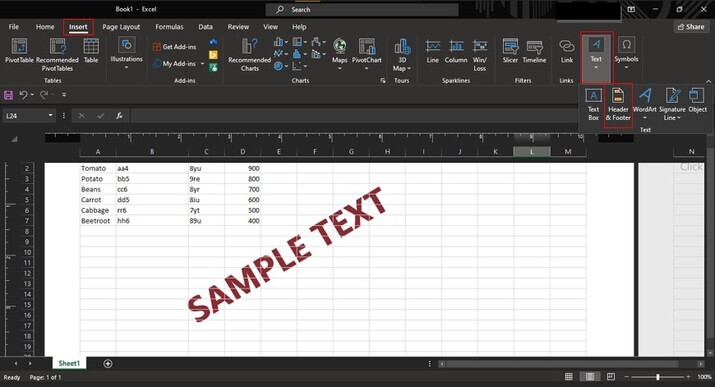
Click the "Insert" tab from the excel toolbar and then click on the "Text" icon. By the drop down select the "Header and Footer" option.
Step 3
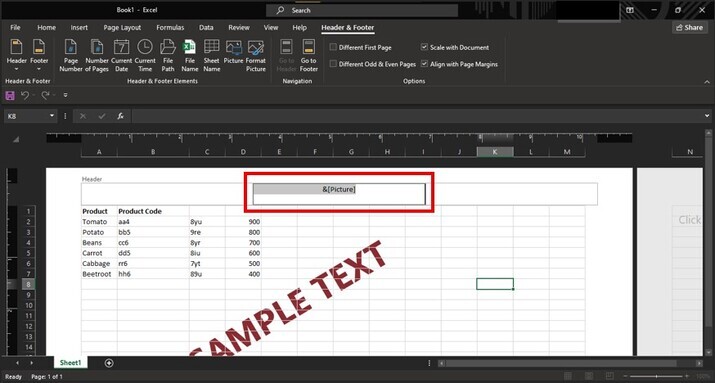
After selecting the "Header and footer field. Three boxes will be opened and the depending on the place in which the watermark is placed. "&[Picture]" will present in any of the three boxes.
Step 4
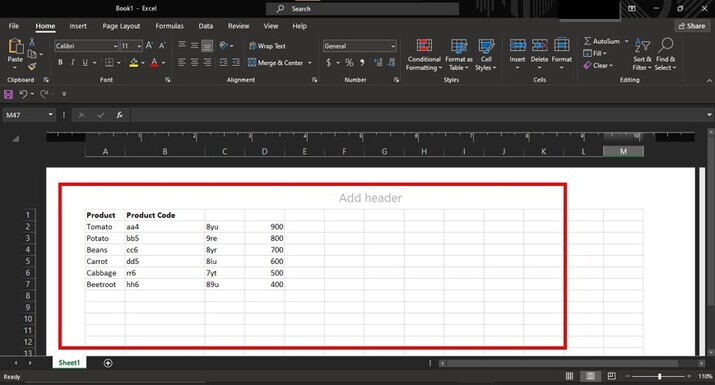
After removing the "&[picture]", the watermark will be removed from the Excel sheet. This case is most applicable only if the watermark is added using the "WordArt" option.
Example 2: Utilizing Visual Basic for Application (VBA) Macro
Step 1
If the above methods fail or we are dealing with intricate watermarks, using Visual Basic for Applications (VBA) macros becomes handy. This method requires some basic knowledge of VBA programming. Press ALT + F11 to open the Visual Basic Editor.
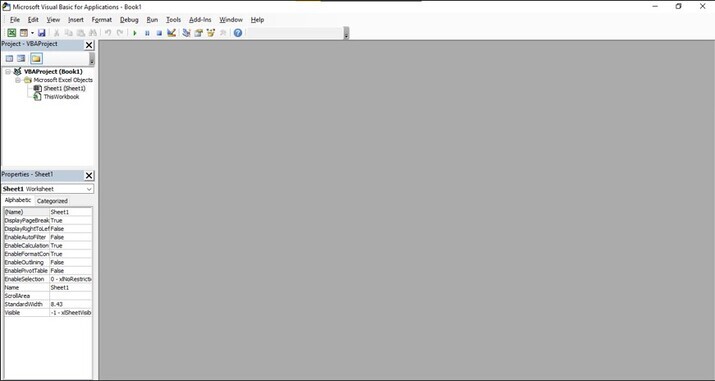
Step 2
Select 'Insert' from the top menu and choose 'Module'.
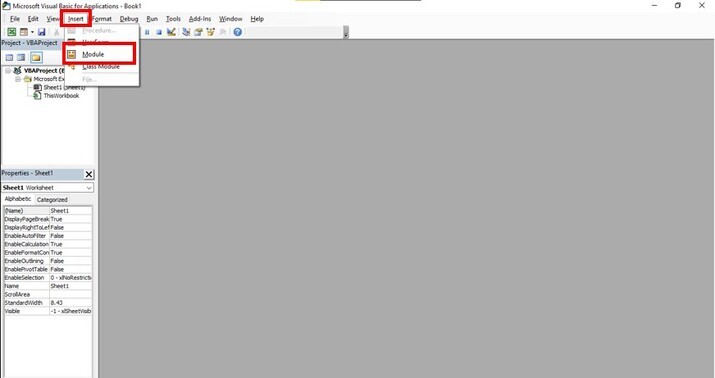
Step 3
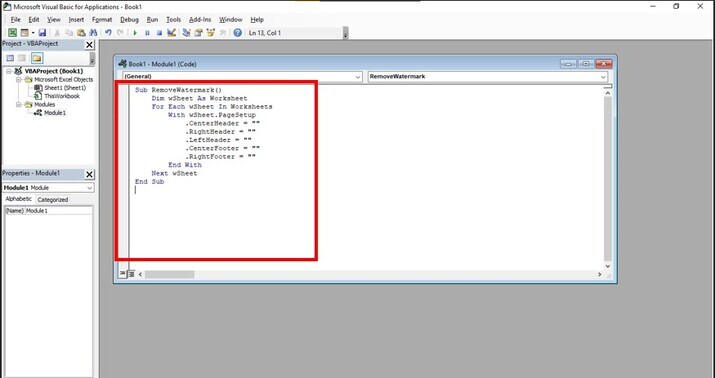
In the newly created module window, paste this code:
Sub RemoveWatermark()
    Dim wSheet As Worksheet
    For Each wSheet In Worksheets
        With wSheet.PageSetup
            .CenterHeader = ""
            .RightHeader = ""
            .LeftHeader = ""
            .CenterFooter = ""
            .RightFooter = ""
        End With
    Next wSheet
End Sub
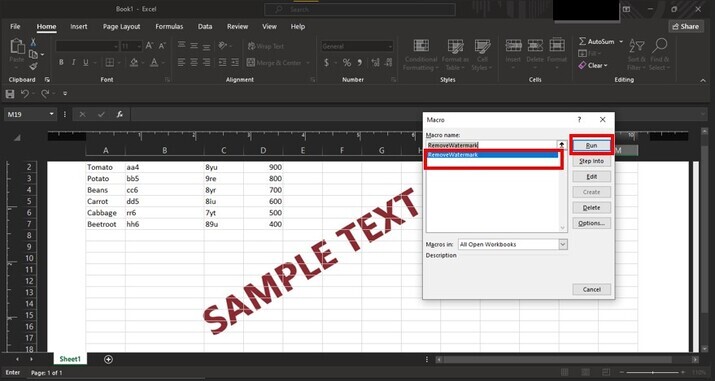
Step 4
Close the Visual Basic Editor.
Step 5
Run the macro by pressing ALT + F8, selecting 'RemoveWatermark', and clicking on 'Run'.
Conclusion
Whether we need a clear spreadsheet for professional presentations or just want to eliminate unwanted distractions from our personal projects, removing watermarks in Excel can significantly enhance readability and aesthetics. Remember to save a copy of the original file before attempting any methods discussed to ensure safety against accidental data loss. Nonetheless, armed with these creative techniques, we will quickly regain control over our Excel sheets without compromising quality or resorting to expensive third?party tools.

740 Views
