
Article Categories
- All Categories
-
 Data Structure
-
 Networking
-
 RDBMS
RDBMS
-
 Operating System
-
 Java
Java
-
 MS Excel
-
 iOS
iOS
-
 HTML
HTML
-
 CSS
CSS
-
 Android
-
 Python
-
 C Programming
-
 C++
C++
-
 C#
C#
-
 MongoDB
-
 MySQL
MySQL
-
 Javascript
-
 PHP
PHP
-
 Economics & Finance
How to Prevent a Certain Worksheet from being Deleted in Excel?
Let us assume that we are working in an excel sheet. Now there are chances that we need to share our excel sheet with other people. Now the data in our excel sheet is very precious and any carelessness with the data can lead us into trouble. So there should always be some protection associated with our excel so that we can prevent it from being deleted. We don?t want our viewers to make unnecessary changes to our excel sheet which can create a problem to others. Excel provides many built in functionalities which we can use to protect our data from getting changed or deleted.
So read this article to learn how to prevent a certain worksheet from being deleted in excel.
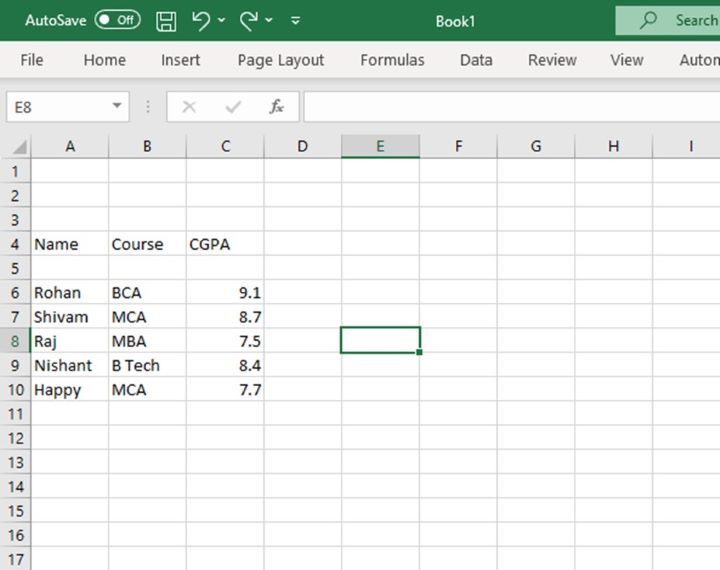
Data Example
Now to illustrate this problem we will take an example of a simple dataset. The dataset comprises a list of some students with their course and obtained CGPA.
Methods to Prevent a Certain Worksheet from Deleted in Excel
As in the above screenshot it is clear that data is associated with students. There are many methods by which we can protect our worksheet from getting deleted. In this tutorial we are going to present 3 very common and best ways by which we can protect our worksheet from getting deleted. The methods which we can use protect this data are as follows :
Using Password to Prevent the Worksheet from getting Deleted
This is one of the very simple methods which we can use to protect our worksheet from getting deleted in excel. We can set a password for our excel sheet. If anybody wants to make any change in the excel sheet, the person has to ask for the password. To use this method following are the steps :
Go to the Review tab. There you will find the option for Protect Sheet.
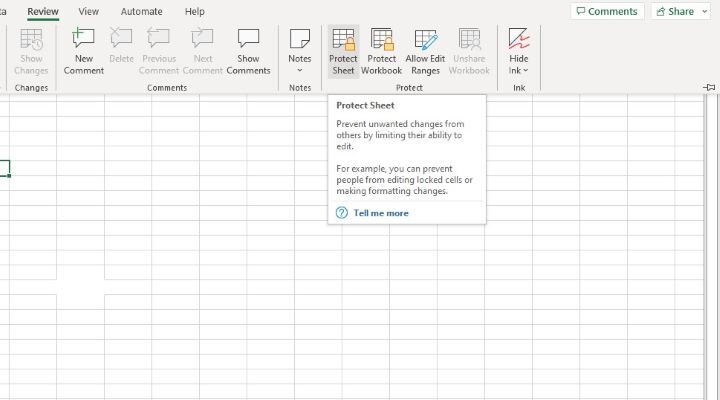
Click on the Protect sheet option.
A new dialog box will open which will ask to set the password.
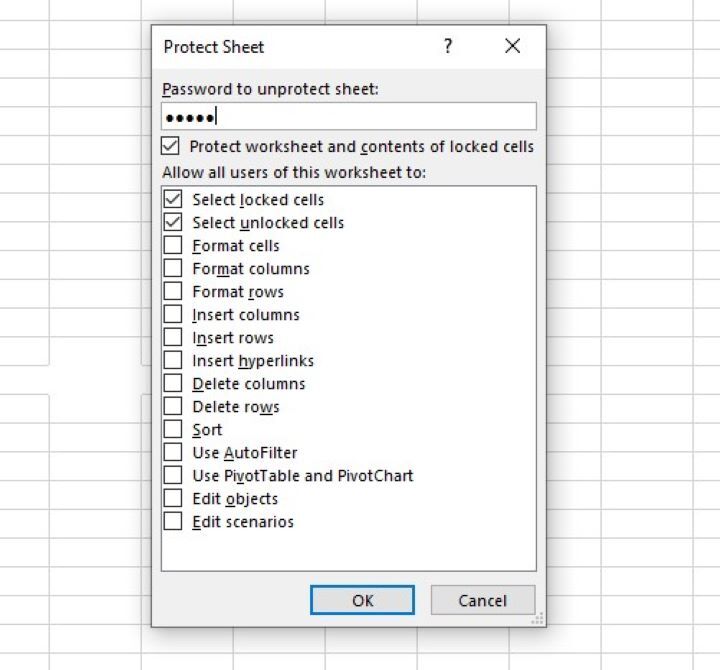
Set the password in the Password to unprotect sheet. Then press the OK button.
After doing this a new dialog box will open which will ask to reconfirm the password.
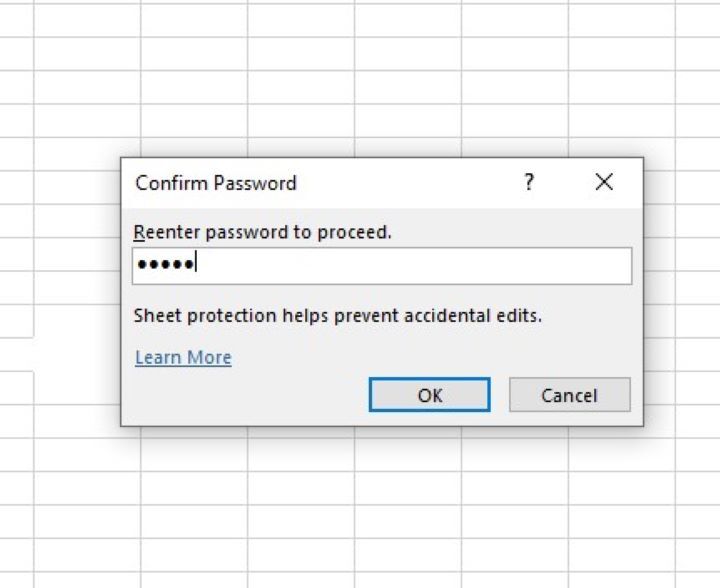
Then click OK button.
Thus our excel sheet gets protected with the password.
Activation of Read?Only mode to prevent the Worksheet from getting Deleted
As we have seen how to protect our worksheet using the password. This is another simple method by which we can prevent out worksheet from getting deleted. In this the mode of the worksheet is changed to Read Only mode. To perform this method, following are the steps :
Go to the File tab at the top left corner.
After this select the Info option.
After Clicking on the Info option, many options will be visible. So choose the option Always open Read Only from Protect Workbook.
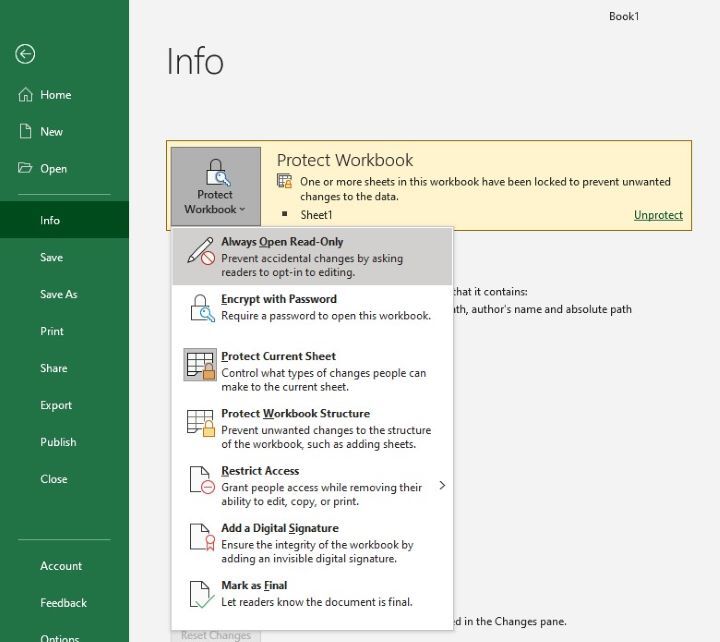
With this simple technique, the worksheet has become Read Only. That means now our worksheet can only be read. No changes can be done on the worksheet. Thus we prevent our worksheet from getting deleted.
Using VBA code to Prevent Worksheet from getting Deleted
In the above methods we have seen how easily we can protect our worksheet. Now there is yet another powerful tool which we can use to protect our worksheet. This tool is called VBA. VBA stands for Visual Basic for Application. It is a very user friendly programming language which is used for microsoft applications such as excel, access. Thus we can use VBA code to prevent our worksheet from getting deleted. To use this method following are the steps :
Point the cursor to the bottom of the worksheet i.e. on the sheet section.
Right click on the sheet.
After that many options will be visible. Click on View Code option.
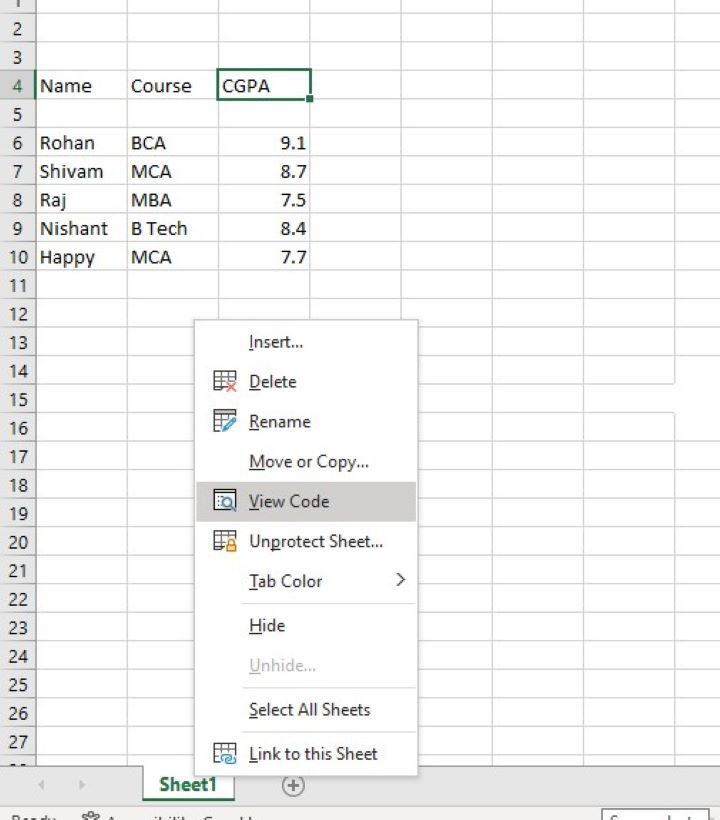
Our Microsoft Visual Basic for Application window will open.
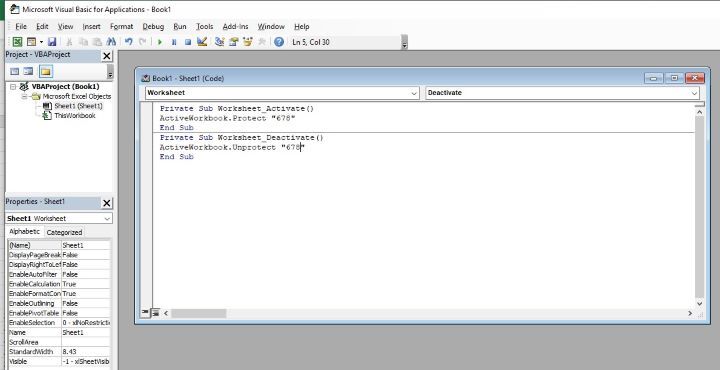
So after this, in the new window we have to choose our sheet.
After choosing the sheet run the VBA code as follows :
Private Sub Worksheet_Activate()
ActiveWorkbook.Protect "678"
End Sub
Private Sub Worksheet_Deactivate()
ActiveWorkbook.Unprotect "678"
End Sub
As here we can see that we have used the password ?678?. You can use any password of your choice.
Now, after we have set the password, close the Microsoft Visual Basic for Application window by pressing Alt+q.
Now to check if our sheet is protected, go to another sheet and shift back to the previous sheet to activate the vba code
Now after this again right click on the sheet tab. Here we will see that the delete option is in grey colour which means that the viewer does not have permission to delete.
Thus we have successfully learnt how to use VBA code to prevent our worksheet from getting deleted.
Important Point to Remember
Now since we seen that to protect our worksheet. We also need to know how to unprotect our worksheet. Unprotecting a worksheet is also very simple. To do this following are the steps :
Go to the review tab.
Select Unprotect sheet.
There is yet another method by which we can unprotect our sheet. Following are the steps:
File ?> Info ?> Protect workbook ?> Structure?> Password?> OK
Thus follow any one of the above method to unprotect our worksheet.
Conclusion
So in this article, I hope you have learnt how to prevent the worksheet from getting deleted. Here we have learnt 3 methods which are as follows:
Using password to prevent the worksheet from getting deleted.
Activation of Read?Only mode to prevent the worksheet from getting deleted.
Using VBA code to prevent worksheets from getting deleted.
These 3 methods are very simple to implement. So use them and we will be happy if you can share with us some new methods by which we can prevent the worksheet from getting deleted. You can drop down your suggestions, queries, any new idea in the comment section below.

2K+ Views
