
Article Categories
- All Categories
-
 Data Structure
-
 Networking
-
 RDBMS
RDBMS
-
 Operating System
-
 Java
Java
-
 MS Excel
-
 iOS
iOS
-
 HTML
HTML
-
 CSS
CSS
-
 Android
-
 Python
-
 C Programming
-
 C++
C++
-
 C#
C#
-
 MongoDB
-
 MySQL
MySQL
-
 Javascript
-
 PHP
PHP
-
 Economics & Finance
How to Import Multiple File Names into Cells in Excel?
Harnessing the potential of Microsoft Excel's numerous functions can bolster your data management efforts in a variety of ways. Often enough there arises the need to import multiple filenames into respective cells within an excel worksheet as part and parcel of better organizing and analyzing information repositories. Be it for creating a comprehensive file directory or plainly listing down filenames as needed; applying pertinent methods from an extensive array available via excel allows one to complete this action quite effortlessly. Hence through this article, we aim to elucidate sundry techniques that exist for facilitating imports supportive towards streamlining data/file handling procedures with utmost efficiency.
As you become proficient in these distinct methods, you'll have the potential to smoothly transfer file names into Excel with minimum effort needed on your part, erasing all possibility of errors resulting from manual input. Database creation becomes more comprehensive while searching is made more efficient with filename libraries alongside an easy facilitation for co-workers' participation. So why not delve deeply into what Excel's arsenal has got when it comes down to hands-on techniques enabling us to import numerous file names into spreadsheet cells.
Approach 1: Using VBA (Visual Basic for Applications) to Import File Names
VBA, which is an influential programming language integrated into Excel, presents the opportunity to automate tasks and enlarge the functionality of this software. Its usage allows you to import various file names into Excel cells expeditiously with just a small number of code lines. Let us delve into the method ?
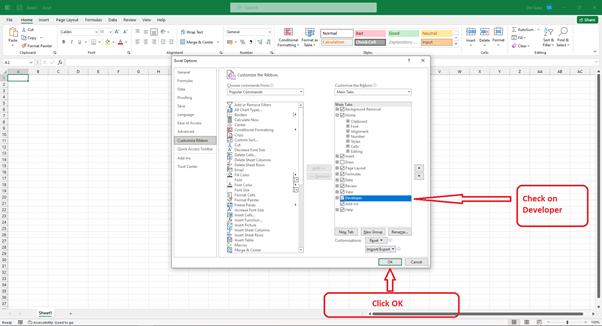
To enable VBA in excel follow this instruction
Right Click on Ribbon Bar and select Customize the Ribbon option

Check Developer box and click on OK
Step 1 ? To open the Visual Basic Editor in Excel simply press "Alt+F11" on your keyboard. Alternatively you can also navigate to the Developer tab in the ribbon and select the Visual Basic option.

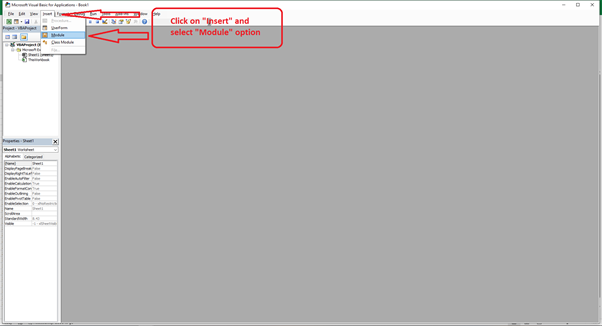
Step 2 ? To insert a new module. You can click on "Insert" in the Visual Basic Editor and then select "Module".
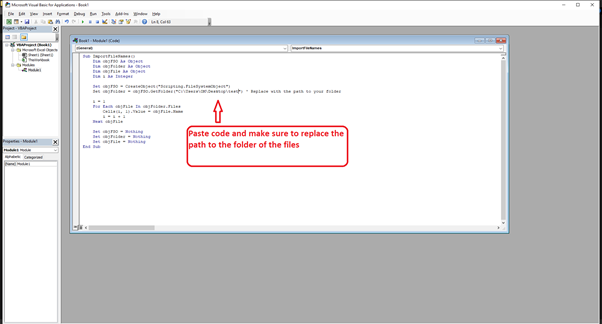
Step 3 ? In the module, paste the following VBA code ?
Sub ImportFileNames()
   Dim objFSO As Object
   Dim objFolder As Object
   Dim objFile As Object
   Dim i As Integer

   Set objFSO = CreateObject("Scripting.FileSystemObject")
   Set objFolder = objFSO.GetFolder("C:\Path\To\Your\Folder") ' Replace with the path to your folder

   i = 1
   For Each objFile In objFolder.Files
      Cells(i, 1).Value = objFile.Name
      i = i + 1
   Next objFile

   Set objFSO = Nothing
   Set objFolder = Nothing
   Set objFile = Nothing
End Sub
Step 4 ? Replace "C:\Path\To\Your\Folder" in the code with the actual path to the folder containing your files.
Step 5 ? Close the Visual Basic Editor.
Step 6 ? Press "Alt+F8" to open the "Macro" dialog box or go to "Macro" tab.
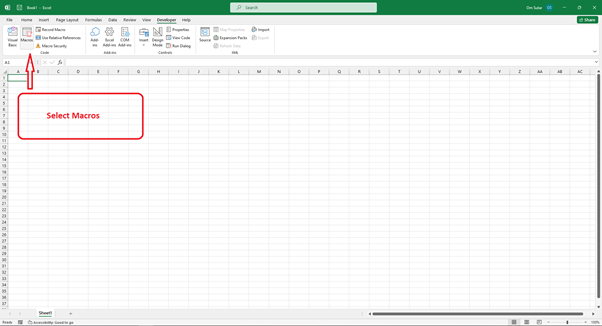
Step 7 ? Select the "ImportFileNames" macro and click "Run" to execute the code.
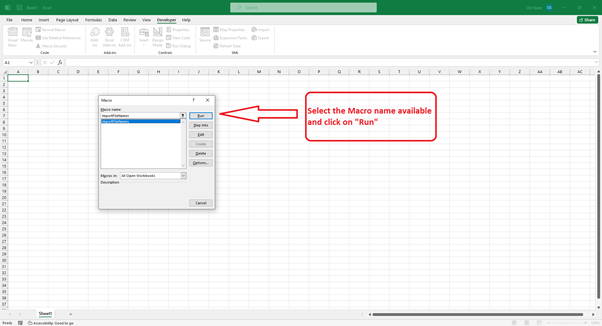
The file names from the specified folder will be imported into column A starting from cell A1.

Approach 2: Using Power Query to Import File Names by using "Transform Data"
In Excel there exists an incredibly robust data transformation and retrieval tool called Power Query. By utilizing this powerful feature users can seamlessly import file names from a selected folder. Now lets' delve into the steps to accomplish this ?
Step 1 ? Please choose a cell in which you would like to import the file names.

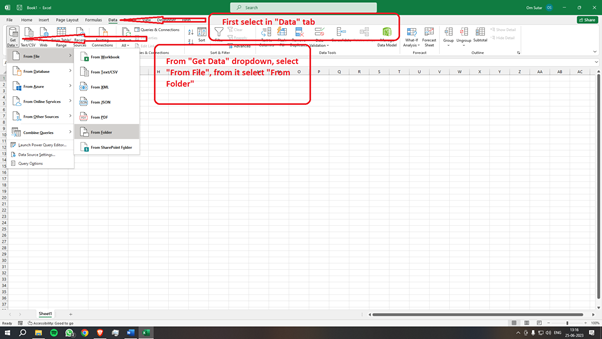
Step 2 ? To access the requested data. Kindly navigate to the "Data" tab. Next. Select the option "Get Data" followed by "From File". Finally. Choose the option "From Folder".
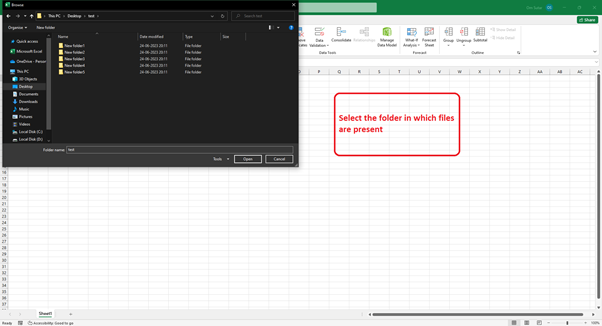
Step 3 ? Please access the "Folder" dialog box and locate the folder that contains your files. Proceed to click on "OK" once you have made your selection.
Step 4 ? To import the desired files. Simply navigate to the "Navigator" window and select them. If you wish to select multiple files hold down the "Ctrl" key while making your selections.
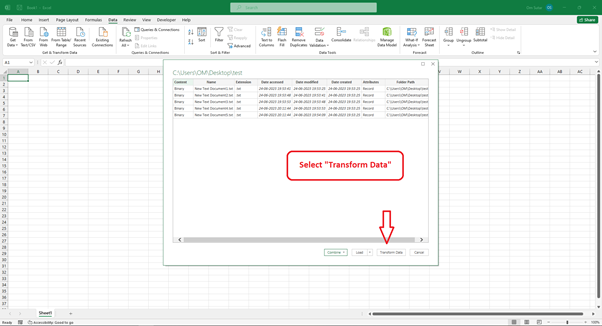
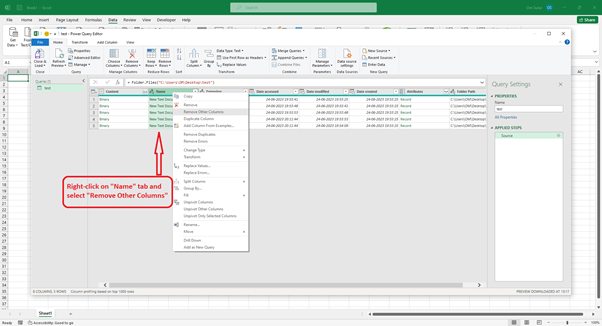
Step 5 ? To access the Power Query Editor kindly click on the "Transform Data" button.
Step 6 ? In the Power Query Editor, right click on the "Name" column header and select option remove other columns.
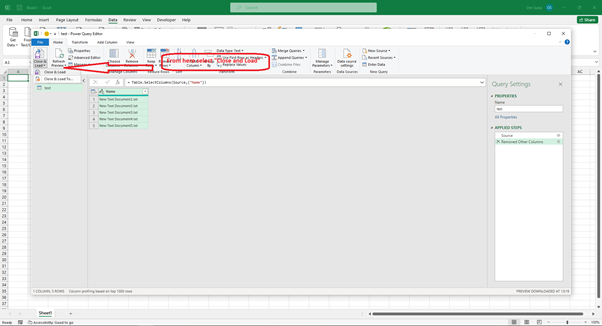
Step 7 ? Close the Power Query Editor by clicking on "Close & Load" or "Close & Load To" to import the file names into Excel cells.
The file names will be visible in a unique format for columns.

Approach 3: Using Power Query to Import File Names by using "Load"
In the realm of Excel, Power Query is an exceptionally robust tool employed for data transformation and retrieval. Impressive capabilities include the ability to import file names from a specified folder. To master this functionality, kindly follow these stepwise instructions ?
Step 1 ? Choose a cell where you wish to import the file names.

Step 2 ? Please navigate to the "Data" tab and kindly select the option "Get Data". Subsequently click on the option "From File" followed by "From Folder".

Step 3 ? To locate the folder that contains your files. Please open the "Folder" dialog box and select it. After selecting the appropriate folder. Kindly proceed by clicking "OK".

Step 4 ? To import the desired files. Kindly navigate to the "Navigator" window. Once there. You may select multiple files by holding down the "Ctrl" key.
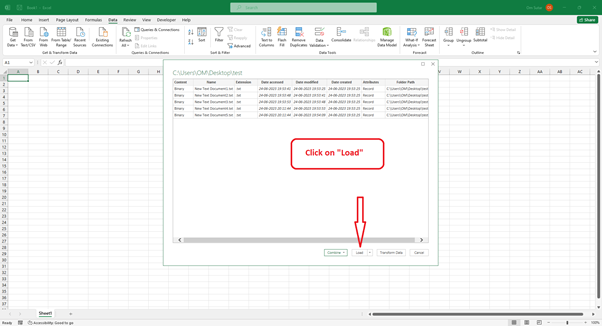
Step 5 ? Click on "Load" to open the Power Query.
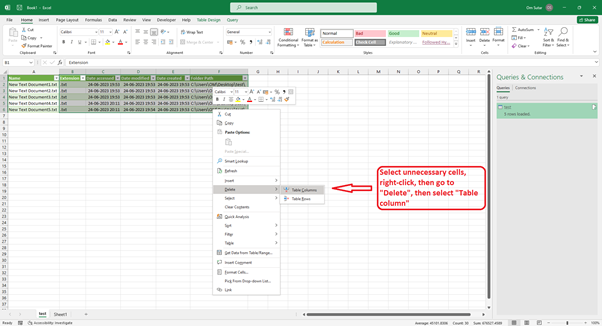
Step 6 ? Now you?ll get all information about file or any folder. Select unnecessary cells, right-click, go to "Delete" and select "Table Columns"
The file names will be visible in a unique format for columns.

Approach 4: Using Power Query to Import File Names by using "Combine"
Power Query, an impressive data transformation and retrieval tool in Excel, offers the capability to effortlessly import file names from a specific folder. Allow me to demonstrate how this can be achieved ?
Step 1 ? Please select a cell in which you would like to import the file names.

Step 2 ? To access the desired information kindly navigate to the "Data" tab and select "Get Data". This will be followed by clicking on "From File" and then proceeding to choose "From Folder".

Step 3 ? In the "Folder" dialog box, browse and select the folder containing your files. Click "OK".

Step 4 ? To import the desired files. Kindly navigate to the "Navigator" window. You have the option to select multiple files by holding down the "Ctrl" key.
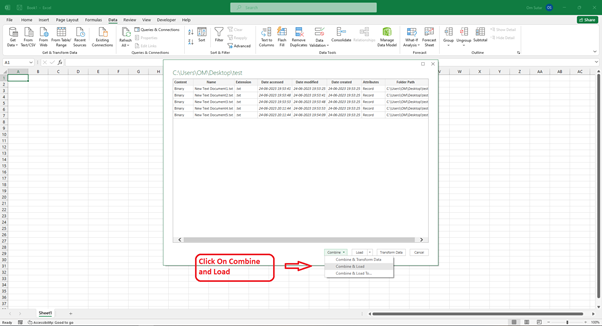
Step 5 ? Click on "Combine" to and go to "Combine and Load" open the Power Query.
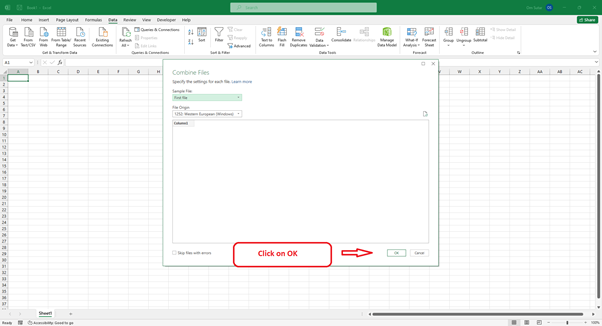
Step 6 ? On this window click on OK
Step 7 ? Now you?ll get all the information about the file or any folder. Select unnecessary cells, right-click, go to "Delete" and select "Table Columns"

The file names will be visible in unique format for column.

Conclusion
This article explored different methods for importing multiple file names into Excel cells. You can automate the process and save time when working with large numbers of files by utilizing either VBA or Power Query. With the VBA approach. You have the flexibility to write custom code for importing file names. On the other hand, Power Query offers a more user-friendly interface for retrieving file names from a folder. Incorporate these techniques into your Excel workflows to efficiently manage file names and improve data organization.

843 Views
