
Article Categories
- All Categories
-
 Data Structure
-
 Networking
-
 RDBMS
RDBMS
-
 Operating System
-
 Java
Java
-
 MS Excel
-
 iOS
iOS
-
 HTML
HTML
-
 CSS
CSS
-
 Android
-
 Python
-
 C Programming
-
 C++
C++
-
 C#
C#
-
 MongoDB
-
 MySQL
MySQL
-
 Javascript
-
 PHP
PHP
-
 Economics & Finance
How to Import Multiple Text Files to Multiple Sheets in Excel?
The efficiency of Microsoft Excel in managing and analyzing vast amounts of data is highly regarded. However the process of importing several text files into separate sheets within Excel may seem daunting at first glance. Fortunately there is a straightforward and powerful solution available within Excel itself that achieves this seamlessly. This article provides a step by step exploration of techniques for importing multiple text files into different sheets in order to enhance organizational structure and facilitate effective analysis of your data set.
Once you have mastered these methods you will be better equipped to import data from multiple text files into Excel thereby saving both your time and effort when dealing with extensive datasets. Regardless of whether you are working with data from various sources or need to consolidate information from multiple text files Excels versatile import capabilities will empower you to streamline your workflow. Let's dive into the world of importing text files in Excel and discover the practical techniques that will enhance your data management skills.
Using VBA Macro to Import Multiple Text Files
If you are familiar with Excel VBA (Visual Basic for Applications), you can leverage its programming capabilities to import multiple text files into separate sheets. This approach provides flexibility and customization options for handling specific requirements.
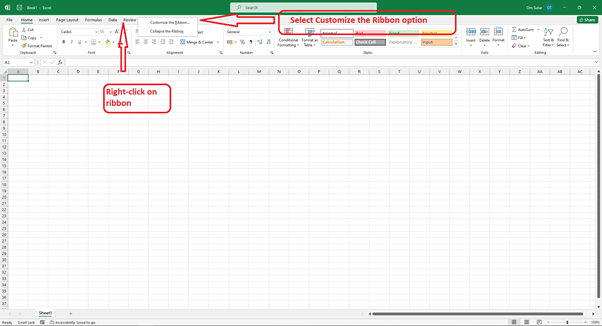
To enable VBA in excel follow this instruction
Right Click on Ribbon Bar and select Customize the Ribbon option.
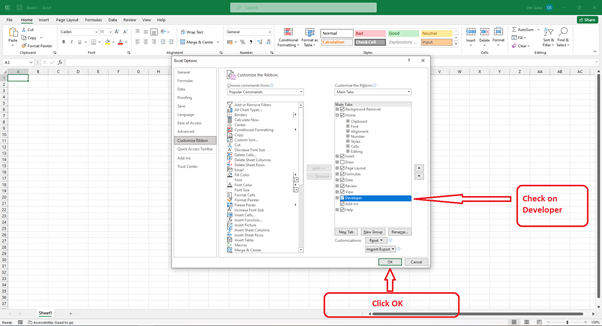
Check Developer box and click on OK.
Approach 1: Using VBA Macro to Import Multiple Text Files by selecting folder containing all required text files
If you are familiar with Excel VBA (Visual Basic for Applications), you can leverage its programming capabilities to import multiple text files into separate sheets. This approach provides flexibility and customization options for handling specific requirements.
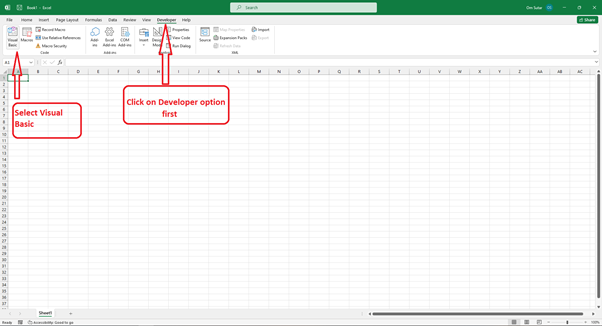
Step 1 ? To open the Visual Basic Editor in Excel. You can either press "Alt+F11" or navigate to the Developer tab in the ribbon and select the Visual Basic option.

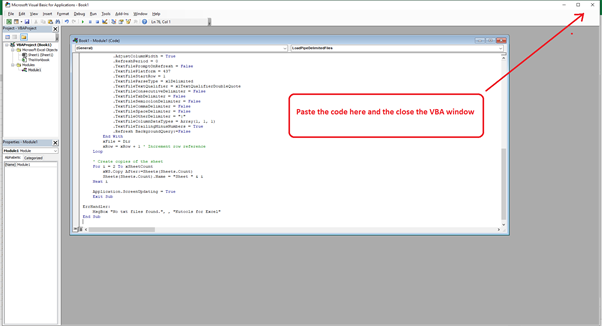
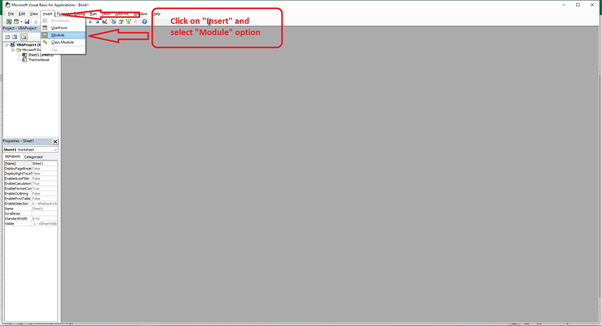
Step 2 ? In the Visual Basic Editor, click on "Insert" and select "Module" to insert a new module.

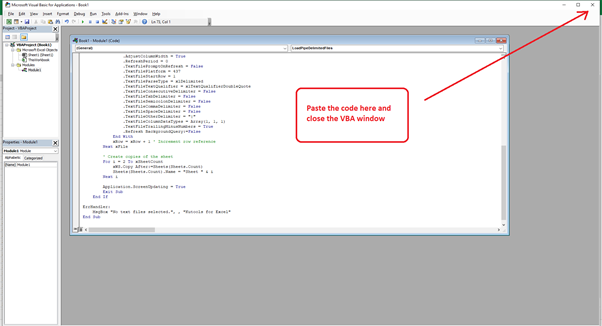
Step 3 ? In the module, paste the following VBA code ?
Sub LoadPipeDelimitedFiles()
   'UpdatebyExtendoffice20181010
   Dim xStrPath As String
   Dim xFileDialog As FileDialog
   Dim xFile As String
   Dim xSheetCount As Long
   Dim xWS As Worksheet
   Dim xRow As Long ' Added variable for row reference

   On Error GoTo ErrHandler
   Set xFileDialog = Application.FileDialog(msoFileDialogFolderPicker)
   xFileDialog.AllowMultiSelect = True
   xFileDialog.Title = "Select a folder [Kutools for Excel]"
   If xFileDialog.Show = -1 Then
      xStrPath = xFileDialog.SelectedItems(1)
   End If
   If xStrPath = "" Then Exit Sub

   ' Ask the user for the number of copies
   xSheetCount = InputBox("Enter the number of sheets:", "Number of Copies")
   If Not IsNumeric(xSheetCount) Or xSheetCount < 1 Then
      MsgBox "Invalid number of copies. Please enter a positive number.", vbExclamation, "Invalid Input"
      Exit Sub
   End If

   Application.ScreenUpdating = False
   Set xWS = Sheets.Add(After:=Sheets(Sheets.Count))
   xWS.Name = "Sheet 1"
   xRow = 1 ' Start with row 1

   xFile = Dir(xStrPath & "\*.txt*")
   Do While xFile <> ""
      With xWS.QueryTables.Add(Connection:="TEXT;" & xStrPath & "" & xFile, Destination:=xWS.Cells(xRow, 1)) ' Update destination range
         .Name = "a" & xSheetCount
         .FieldNames = True
         .RowNumbers = False
         .FillAdjacentFormulas = False
         .PreserveFormatting = True
         .RefreshOnFileOpen = False
         .RefreshStyle = xlInsertDeleteCells
         .SavePassword = False
         .SaveData = True
         .AdjustColumnWidth = True
         .RefreshPeriod = 0
         .TextFilePromptOnRefresh = False
         .TextFilePlatform = 437
         .TextFileStartRow = 1
         .TextFileParseType = xlDelimited
         .TextFileTextQualifier = xlTextQualifierDoubleQuote
         .TextFileConsecutiveDelimiter = False
         .TextFileTabDelimiter = False
         .TextFileSemicolonDelimiter = False
         .TextFileCommaDelimiter = False
         .TextFileSpaceDelimiter = False
         .TextFileOtherDelimiter = "|"
         .TextFileColumnDataTypes = Array(1, 1, 1)
         .TextFileTrailingMinusNumbers = True
         .Refresh BackgroundQuery:=False
      End With
      xFile = Dir
      xRow = xRow + 1 ' Increment row reference
   Loop

   ' Create copies of the sheet
   For i = 2 To xSheetCount
      xWS.Copy After:=Sheets(Sheets.Count)
      Sheets(Sheets.Count).Name = "Sheet " & i
   Next i

   Application.ScreenUpdating = True
   Exit Sub

ErrHandler:
   MsgBox "No txt files found.", , "Kutools for Excel"
End Sub
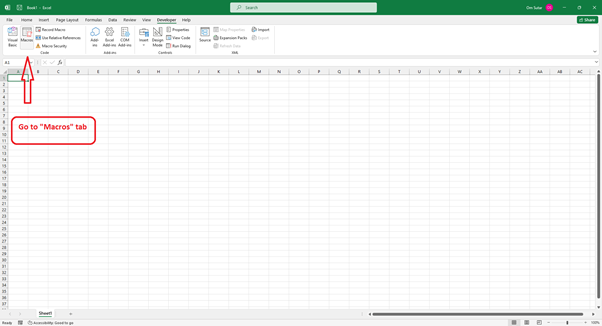
Step 4 ? Select "Macro" tab.

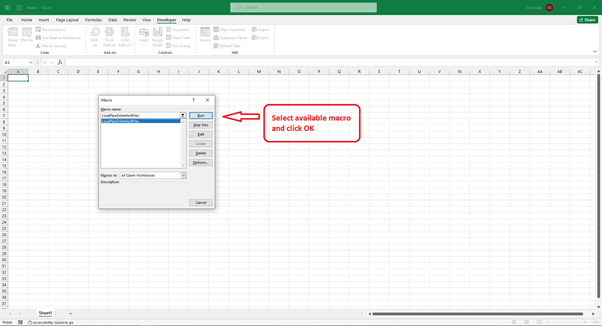
Step 5 ? Select available Macro and click on RUN.

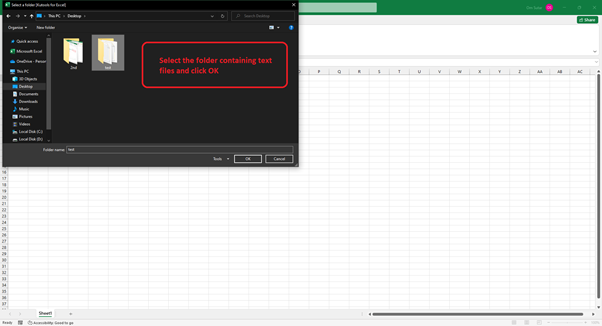
Step 6 ? It?ll open window to select folder containing text files.
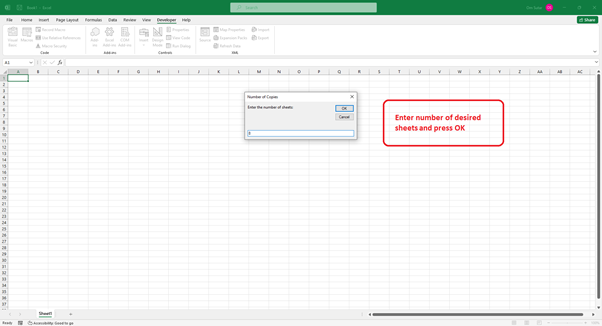
Step 7 ? It?ll ask the number of sheets you need. Enter desired number and click OK.
Excel will import the data from the text files into separate sheets.

Approach 2: Using VBA Macro to Import Multiple Text Files by selecting files you want
Step 1 ? To open the Visual Basic Editor in Excel you can press "Alt+F11". Alternatively. You can open the Developer tab in the ribbon and select the Visual Basic option.
Step 2 ? In the Visual Basic Editor, click on "Insert" and select "Module" to insert a new module.
Step 3 ? In the module, paste the following VBA code ?
Sub LoadPipeDelimitedFiles()
   'UpdatebyExtendoffice20181010
   Dim xFileDialog As FileDialog
   Dim xFile As Variant
   Dim xSheetCount As Long
   Dim xWS As Worksheet
   Dim xRow As Long ' Added variable for row reference
   Dim i As Long ' Added variable for loop counter

   On Error GoTo ErrHandler
   Set xFileDialog = Application.FileDialog(msoFileDialogFilePicker)
   xFileDialog.AllowMultiSelect = True
   xFileDialog.Title = "Select text files [Kutools for Excel]"
   xFileDialog.Filters.Clear
   xFileDialog.Filters.Add "Text Files", "*.txt"

   If xFileDialog.Show = -1 Then
      xSheetCount = InputBox("Enter the number of sheets:", "Number of Copies")
      If Not IsNumeric(xSheetCount) Or xSheetCount < 1 Then
         MsgBox "Invalid number of copies. Please enter a positive number.", vbExclamation, "Invalid Input"
         Exit Sub
      End If

      Application.ScreenUpdating = False
      Set xWS = Sheets.Add(After:=Sheets(Sheets.Count))
      xWS.Name = "Sheet 1"
      xRow = 1 ' Start with row 1

      For Each xFile In xFileDialog.SelectedItems
         With xWS.QueryTables.Add(Connection:="TEXT;" & xFile, Destination:=xWS.Cells(xRow, 1)) ' Update destination range
            .Name = "a" & xSheetCount
            .FieldNames = True
            .RowNumbers = False
            .FillAdjacentFormulas = False
            .PreserveFormatting = True
            .RefreshOnFileOpen = False
            .RefreshStyle = xlInsertDeleteCells
            .SavePassword = False
            .SaveData = True
            .AdjustColumnWidth = True
            .RefreshPeriod = 0
            .TextFilePromptOnRefresh = False
            .TextFilePlatform = 437
            .TextFileStartRow = 1
            .TextFileParseType = xlDelimited
            .TextFileTextQualifier = xlTextQualifierDoubleQuote
            .TextFileConsecutiveDelimiter = False
            .TextFileTabDelimiter = False
            .TextFileSemicolonDelimiter = False
            .TextFileCommaDelimiter = False
            .TextFileSpaceDelimiter = False
            .TextFileOtherDelimiter = "|"
            .TextFileColumnDataTypes = Array(1, 1, 1)
            .TextFileTrailingMinusNumbers = True
            .Refresh BackgroundQuery:=False
         End With
         xRow = xRow + 1 ' Increment row reference
      Next xFile

      ' Create copies of the sheet
      For i = 2 To xSheetCount
         xWS.Copy After:=Sheets(Sheets.Count)
         Sheets(Sheets.Count).Name = "Sheet " & i
      Next i

      Application.ScreenUpdating = True
      Exit Sub
   End If

ErrHandler:
   MsgBox "No text files selected.", , "Kutools for Excel"
End Sub
Step 4 ? Select "Macro" tab.
Step 5 ? Select available Macro and click on RUN.
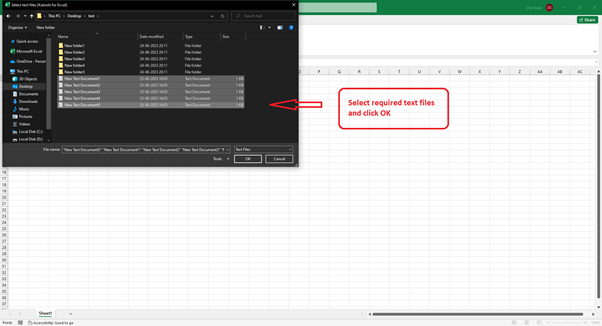
Step 6 ? It?ll open window to text files. Choose multiple text files by pressing ?ctrl? and clicking file you want, then press OK.
Step 7 ? It?ll ask the number of sheets you need. Enter desired number and click OK.

Excel will import the data from the text files into separate sheets.

Conclusion
Importing multiple text files into multiple sheets in Excel is a highly effective feature that greatly improves your capability to efficiently manage and analyze data. In this article. We have examined two methods to successfully accomplish this task. The first approach utilized Excel's Power Query Editor, allowing you to import and transform data from multiple text files effortlessly. The second approach involved using VBA macros to automate the import process, providing customization options for specific requirements.
Incorporate these techniques into your Excel workflow to streamline the import of text files, saving time and improving data management capabilities. Excel's versatile import capabilities empower you to work with data from various sources seamlessly, facilitating data analysis and decision-making processes.

2K+ Views
