
Article Categories
- All Categories
-
 Data Structure
-
 Networking
-
 RDBMS
RDBMS
-
 Operating System
-
 Java
Java
-
 MS Excel
-
 iOS
iOS
-
 HTML
HTML
-
 CSS
CSS
-
 Android
-
 Python
-
 C Programming
-
 C++
C++
-
 C#
C#
-
 MongoDB
-
 MySQL
MySQL
-
 Javascript
-
 PHP
PHP
-
 Economics & Finance
How To Easily And Quickly Transpose Range And Stack Data In Excel?
Transposing and stacking data are important chores when dealing with spreadsheets because they allow you to rearrange and restructure your data for better analysis and display. Excel has strong features for converting rows to columns and vice versa, as well as stacking numerous sets of data into a single column or row.
In this article, we will look at numerous ways to transpose and stack data in Excel, taking into account different contexts and Excel versions. So, let's get started and see how to easily and rapidly transpose and stack data in Excel!
Easily And Quickly Transpose Range And Stack Data
Here, we will first create a VBA module and then run it to complete the task. So let us see a simple process to learn how you can easily and quickly transpose ranges and stack data in Excel.
Step 1
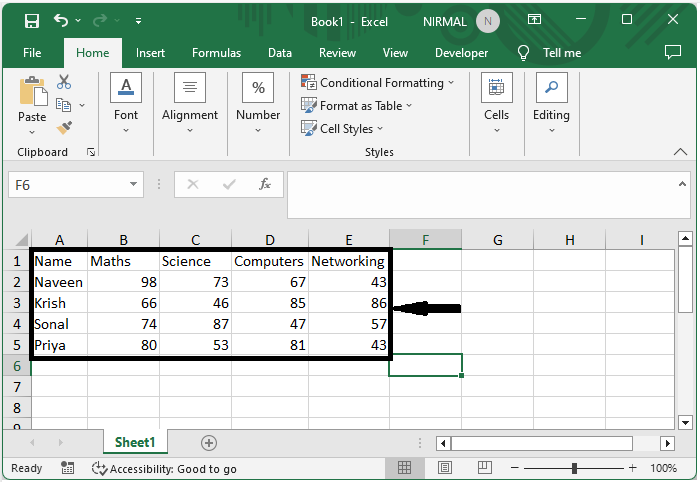
Consider an Excel sheet where you have range data similar to the below image.
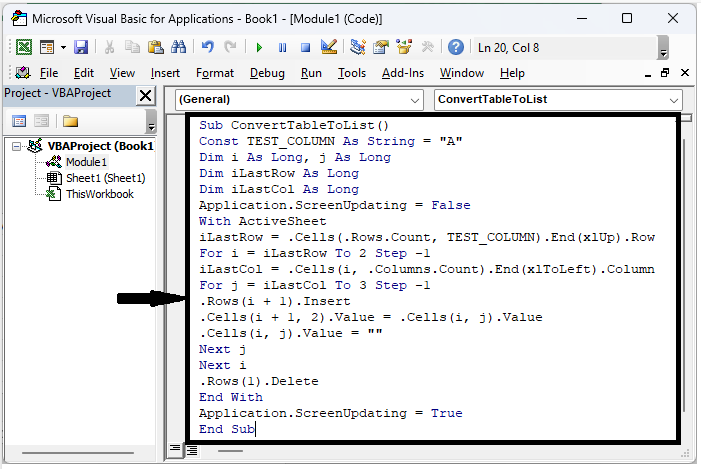
First select the range of cells then right?click on the sheet name and select "View Code" to open the VBA application. Then, click on "Insert" and select "Module.
Select cells > Right click > View code > Insert > Module.
Step 2
Then copy the below code into the text box.
Code
Sub ConvertTableToList()
Const TEST_COLUMN As String = "A"
Dim i As Long, j As Long
Dim iLastRow As Long
Dim iLastCol As Long
Application.ScreenUpdating = False
With ActiveSheet
iLastRow = .Cells(.Rows.Count, TEST_COLUMN).End(xlUp).Row
For i = iLastRow To 2 Step ?1
iLastCol = .Cells(i, .Columns.Count).End(xlToLeft).Column
For j = iLastCol To 3 Step ?1
.Rows(i + 1).Insert
.Cells(i + 1, 2).Value = .Cells(i, j).Value
.Cells(i, j).Value = ""
Next j
Next i
.Rows(1).Delete
End With
Application.ScreenUpdating = True
End Sub
Step 3
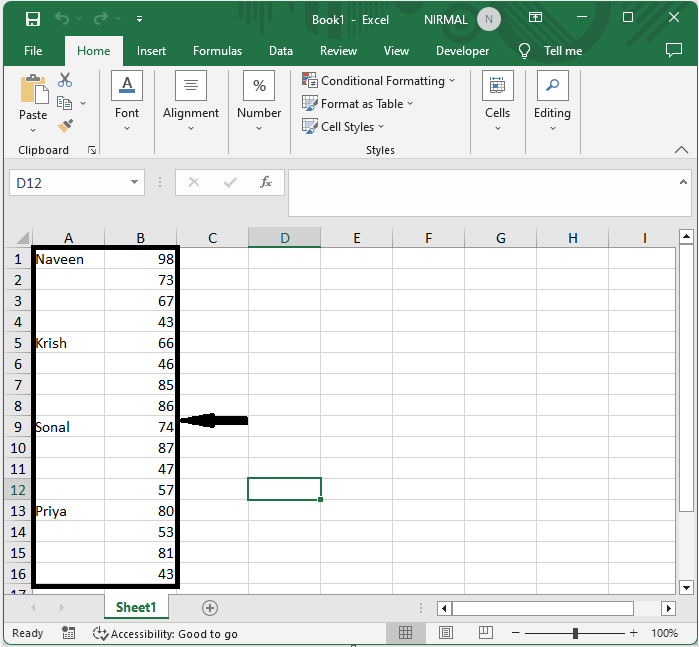
Then click F5 to run the code to complete the task.
Conclusion
In this tutorial, we have used a simple example to demonstrate how you can easily and quickly transpose and stack data in Excel to highlight a particular set of data.

315 Views
