
Article Categories
- All Categories
-
 Data Structure
-
 Networking
-
 RDBMS
RDBMS
-
 Operating System
-
 Java
Java
-
 MS Excel
-
 iOS
iOS
-
 HTML
HTML
-
 CSS
CSS
-
 Android
-
 Python
-
 C Programming
-
 C++
C++
-
 C#
C#
-
 MongoDB
-
 MySQL
MySQL
-
 Javascript
-
 PHP
PHP
-
 Economics & Finance
How To Display Selection Pane In Microsoft Excel?
A variety of tools and capabilities are available in Microsoft Excel, a robust spreadsheet programme, to help you with your data management and analytical activities. The Selection Pane is one of these capabilities, allowing you to arrange, manage, and regulate the visibility of objects inside your Excel spreadsheet. The Selection Pane offers a handy way to pick and operate with numerous objects that you have added to your Excel worksheet, such as shapes, charts, photos, and other objects. The Selection Pane may significantly streamline your editing and formatting process, whether you're creating a complex spreadsheet or working with numerous layers of data.
You will be shown step?by?step instructions on how to display the Selection Pane in Microsoft Excel in this article. You may use this helpful feature to efficiently manage the items in your workbook and optimise your workflow by following these instructions to access and use it. The locate and choose command will allow us to finish the operation. Please make sure you have Microsoft Excel installed on your computer and have a basic knowledge of its interface and functions before we start. Let's get started and learn how to use Microsoft Excel's Selection Pane!
Display Selection Pane In Microsoft Excel
Here we will display the selection pane using find and select. So let us see a simple process to know how you can display the selection pane in Microsoft Excel.
Step 1
Consider any Excel sheet.
First, click on "Find and select under "Home" and click on "Selection Pane" to complete the task.
Home > Find and Select > Selection pane.
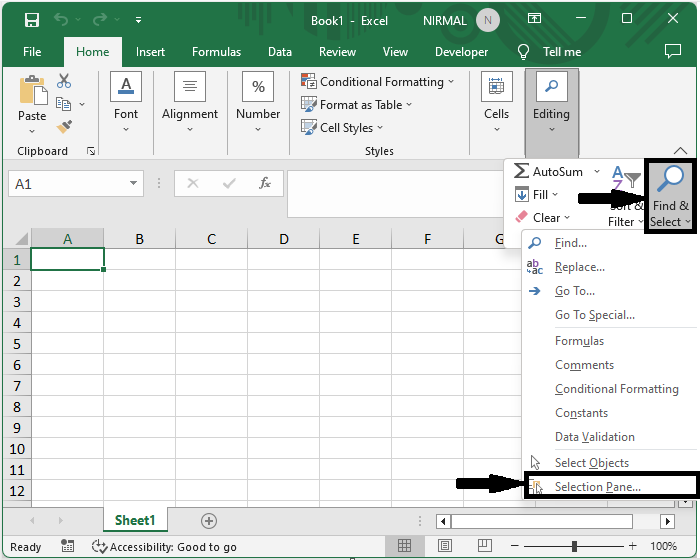
This is how you can display the selection pane in Excel.
Conclusion
In this tutorial, we have used a simple example to demonstrate how you can use the Selection Pane in Microsoft Excel to highlight a particular set of data.

1K+ Views
