
Article Categories
- All Categories
-
 Data Structure
-
 Networking
-
 RDBMS
RDBMS
-
 Operating System
-
 Java
Java
-
 MS Excel
-
 iOS
iOS
-
 HTML
HTML
-
 CSS
CSS
-
 Android
-
 Python
-
 C Programming
-
 C++
C++
-
 C#
C#
-
 MongoDB
-
 MySQL
MySQL
-
 Javascript
-
 PHP
PHP
-
 Economics & Finance
How to Export Excel Data (Selection or Sheets) to Text Files
To export Excel data to text files in Excel, you can utilize VBA macros. By following a few simple steps, you can create a macro that exports either a selected range or entire sheets to a text file. The macro converts the data in the cells into a text format, loops through each cell, and builds the text data. It then prompts the user to choose a file name and location for saving the text file. Once saved, a message is displayed to confirm the successful export. With this method, you can easily export Excel data to text files for further analysis or sharing.
Steps to Export Excel Data to Text Files
Here are the steps of how you can do it:
Step 1
Open the Excel file in which you want to export excel data to text files.
Press Alt + F11 to open the Visual Basic Editor in Excel.
Insert a new module by clicking on "Insert" and selecting "Module."
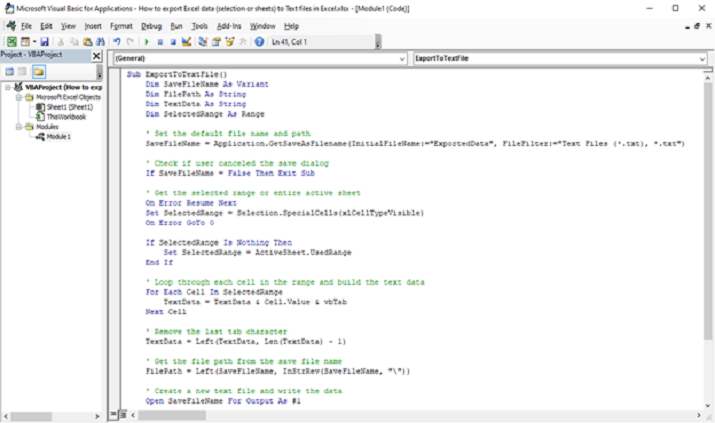
In the module window, paste the following code:
Sub ExportToTextFile()
    Dim SaveFileName As Variant
    Dim FilePath As String
    Dim TextData As String
    Dim SelectedRange As Range

    ' Set the default file name and path
    SaveFileName = Application.GetSaveAsFilename(InitialFileName:="ExportedData",
FileFilter:="Text Files (*.txt), *.txt")

    ' Check if user canceled the save dialog
    If SaveFileName = False Then Exit Sub

    ' Get the selected range or entire active sheet
    On Error Resume Next
    Set SelectedRange = Selection.SpecialCells(xlCellTypeVisible)
    On Error GoTo 0

    If SelectedRange Is Nothing Then
        Set SelectedRange = ActiveSheet.UsedRange
    End If

    ' Loop through each cell in the range and build the text data
    For Each Cell In SelectedRange
        TextData = TextData & Cell.Value & vbTab
    Next Cell

    ' Remove the last tab character
    TextData = Left(TextData, Len(TextData) - 1)

    ' Get the file path from the save file name
    FilePath = Left(SaveFileName, InStrRev(SaveFileName, ""))

    ' Create a new text file and write the data
    Open SaveFileName For Output As #1
    Print #1, TextData
    Close #1

    ' Show a message when the export is completed
    MsgBox "Data exported to " & SaveFileName, vbInformation
End Sub
Step 2
Save the module and close the VBA editor.
Now, you can use the macro to export data to a text file.
Select the range of cells you want to export, or make sure the active sheet contains the data you want to export.
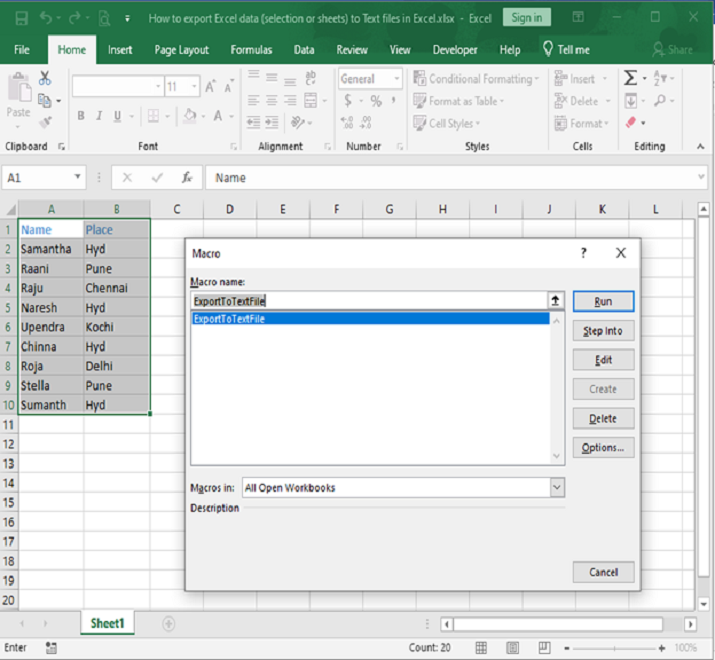
Step 3
Press "Alt + F8" to open the macro dialog box.
Select the "ExportToTextFile" macro from the list and click "Run"
Step 4
Choose a file name and location to save the text file.

Conclusion
To export Excel data to text files in Excel, you can use VBA macros. By inserting the provided code into a module in the VBA editor, you can create a macro called "ExportToTextFile." This macro allows you to select a range or export the entire active sheet to a text file. After running the macro, a save dialog prompts you to choose a file name and location for the text file. The selected data is then looped through and written to the text file. Finally, a message box confirms the successful export. This method provides a convenient way to export Excel data to text files for further use or analysis.

5K+ Views
