
Article Categories
- All Categories
-
 Data Structure
-
 Networking
-
 RDBMS
RDBMS
-
 Operating System
-
 Java
Java
-
 MS Excel
-
 iOS
iOS
-
 HTML
HTML
-
 CSS
CSS
-
 Android
-
 Python
-
 C Programming
-
 C++
C++
-
 C#
C#
-
 MongoDB
-
 MySQL
MySQL
-
 Javascript
-
 PHP
PHP
-
 Economics & Finance
How to Create Phone numbers and Contacts List in ReactJS?
We can assume that you have used mobile devices to call someone and seen the contact list. Generally, when you open the phone book on most mobile devices, it will show you three sections. The first is a keypad to dial a custom number, the second is recent calls, and the third is saved contacts in the device.
The recent contact section shows recent calls with names, numbers, and call duration. The normal contact list section shows your contact name with your contact number. Here, we will design a contact list in ReactJS using the basic functionalities of ReactJS.
Syntax
Users can follow the syntax below to create a contact list using ReactJS.
<span class="tag"><div</span><span class="pln"> </span><span class="atn">className</span><span class="pln"> </span><span class="pun">=</span><span class="pln"> </span><span class="atv">"contact"</span><span class="tag">></span><span class="pln">
   </span><span class="tag"><div</span><span class="pln"> </span><span class="atn">className</span><span class="pln"> </span><span class="pun">=</span><span class="pln"> </span><span class="atv">"name"</span><span class="tag">></span><span class="pln"> Name </span><span class="tag"></div></span><span class="pln">
   </span><span class="tag"><div</span><span class="pln"> </span><span class="atn">className</span><span class="pln"> </span><span class="pun">=</span><span class="pln"> </span><span class="atv">"number"</span><span class="tag">></span><span class="pln"> Number </span><span class="tag"></div></span><span class="pln">
   </span><span class="tag"><div</span><span class="pln"> </span><span class="atn">className</span><span class="pln"> </span><span class="pun">=</span><span class="pln"> </span><span class="atv">"time"</span><span class="tag">></span><span class="pln"> Duration </span><span class="tag"></div></span><span class="pln">
</span><span class="tag"></div></span>
We used normal HTML to create a contact card in the above syntax. Also, we can apply some CSS to design the card.
Example
FileName - App.js
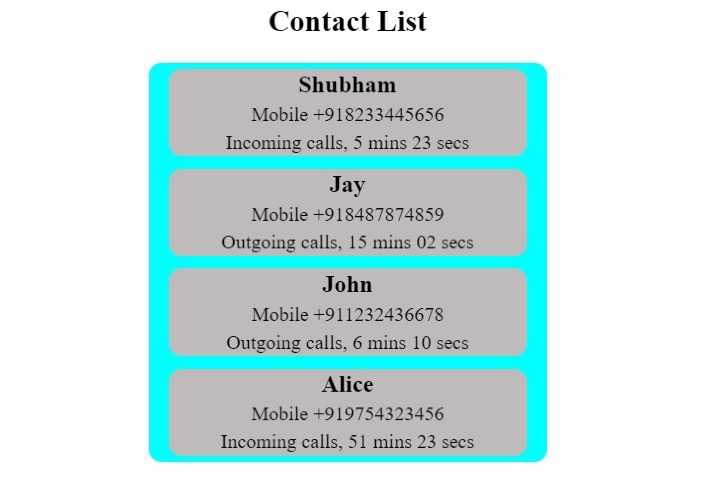
In the example below, we have created the div with the class name ?list?. We have added multiple divs with the ?contact? class name in the div. In the div with the ?contact? class name, we have added three more divs to add name, number, and duration.
import React from "react";
import { useState } from "react";
import "./App.css";
export default function App() {
   return (
      <div>
         <center>
            <h2> Contact List</h2>
            <div className="list">
               <div className="contact">
                  <div className="name"> Shubham </div>
                  <div className="number"> Mobile +918233445656 </div>
                  <div className="time"> Incoming calls, 5 mins 23 secs </div>
               </div>
               <div className="contact">
                  <div className="name"> Jay </div>
                  <div className="number"> Mobile +918487874859 </div>
                  <div className="time"> Outgoing calls, 15 mins 02 secs </div>
               </div>
               <div className="contact">
                  <div className="name"> John </div>
                  <div className="number"> Mobile +911232436678 </div>
                  <div className="time"> Outgoing calls, 6 mins 10 secs </div>
               </div>
               <div className="contact">
                  <div className="name"> Alice </div>
                  <div className="number"> Mobile +919754323456 </div>
                  <div className="time"> Incoming calls, 51 mins 23 secs </div>
               </div>
            </div>
         </center>
      </div>
   );
}
FileName - App.css
In the CSS file, we have applied style in such a way that we can see all contact cards in one column. Also, we have designed the contact card with various CSS.
.list {
   display: flex;
   flex-direction: column;
   background-color: aqua;
   width: 20rem;
   border-radius: 10px;
}
.contact {
   width: 90%;
   display: flex;
   flex-direction: column;
   background-color: rgb(190, 187, 187);
   border-radius: 10px;
   margin: 5px auto;
   padding: 0;
}
.name {
   font-size: 1.2rem;
   font-weight: 600;
   padding: 2px 10px;
}
.number {
   font-weight: 400;
   padding: 2px 10px;
}
.time {
   padding: 2px 10px;
}
Output
Example
Filename - App.js
In the example below, we have created the contactData array list containing the objects with name and number properties. In the component, we have used the map() method to show every contact in the card.
import React from "react";
import { useState } from "react";
import "./App.css";
export default function App() {
   const contactData = [
      {
         name: "Shubham",
         number: "+918143233476"
      },
      {
         name: "name 1",
         number: "+919732433232"
      },
      {
         name: "name 2",
         number: "+918987633476"
      },
      {
         name: "name 3",
         number: "+918908764231"
      },
      {
         name: "name 4",
         number: "+914323433476"
      },
      {
         name: "name 5",
         number: "+917856233476"
      },
      {
         name: "name 6",
         number: "+918143290668"
      },
   ];
   return (
      <div>
         <center>
            <h2> Contact List</h2>
            <div className="list">
               {contactData.map((contact) => {
                  return (
                     <div className="contact">
                        <div className="name"> {contact.name} </div>
                        <div className="number"> {contact.number} </div>
                     </div>
                  );
               })}
            </div>
         </center>
      </div>
   );
}
Filename - App.css
In the CSS file, we have applied CSS in such a way that we can show the contact list in the scrollable container. Also, we have designed the scrollbar of the container.
.list {
   display: flex;
   flex-direction: column;
   max-height: 20rem;
   overflow-y: auto;
   background-color: rgb(28, 29, 29);
   width: 20rem;
   border-radius: 10px;
}
.list::-webkit-scrollbar {
   width: 0.5em;
}
.list::-webkit-scrollbar-thumb {
   background-color: grey;
   border-radius: 4px;
   outline: none;
}
.contact {
   width: 90%;
   display: flex;
   flex-direction: column;
   background-color: rgb(241, 239, 239);
   border-radius: 10px;
   margin: 5px auto;
   padding: 0;
}
.name {
   font-size: 1.2rem;
   padding: 2px 10px;
}
.number {
   font-weight: 600;
   padding: 2px 10px;
}
Output
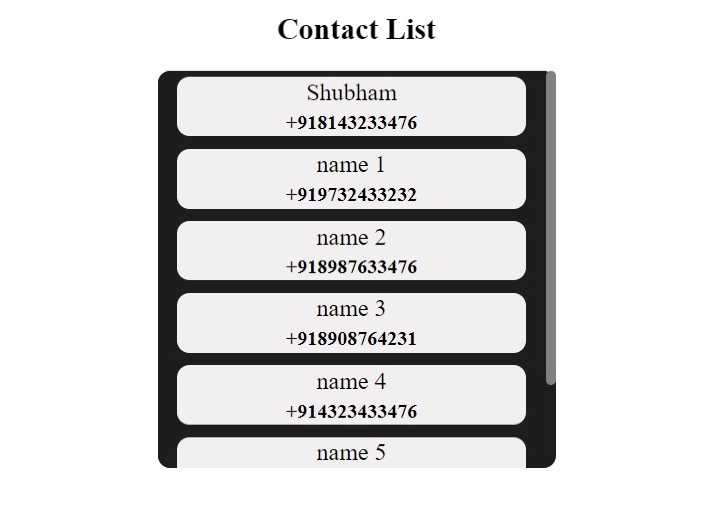
In the above output, users can see ten contacts. We have created a separate card for every contact. Also, users can scroll in the container to see all contacts.
We have seen two different examples of creating a contact list in ReactJS. In the first example, we used HTML and CSS with ReactJs to create a contact list. We optimized the first example and used the map() method to show all contacts in the second example. Following the second example to implement contact list in the real-time application is recommended.

995 Views
