 Data Structure
 Networking
 RDBMS
RDBMS Operating System
 Java
Java MS Excel
 iOS
iOS HTML
HTML CSS
CSS Android
 Python
 C Programming
 C++
C++ C#
C# MongoDB
 MySQL
MySQL Javascript
 PHP
PHP
- Selected Reading
- UPSC IAS Exams Notes
- Developer's Best Practices
- Questions and Answers
- Effective Resume Writing
- HR Interview Questions
- Computer Glossary
- Who is Who
How to apply Perspective Transformations on an image using OpenCV Python?
In Perspective Transformation, the straight lines remain straight even after the transformation. To apply a perspective transformation, we need a 3Ã3 perspective transformation matrix. We need four points on the input image and corresponding four points on the output image.
We apply the cv2.getPerspectiveTransform() method to find the transformation matrix. Its syntax is as follows ?
M = cv2.getPerspectiveTransform(pts1,pts2)
where,
pts1 ? An array of four points on the input image and
pts2 ? An array of corresponding four points on the output image.
The Perspective Transformation matrix M is a numpy array. We pass M to the cv2.warpAffine() function as an argument to compute perspective transformation. Its syntax is ?
cv2.warpAffine(img,M,(cols,rows))
Where,
img ? The image to be transformed.
M ? Perspective transformation matrix defined above.
(cols, rows) ? Width and height of the image after transformation.
To apply Perspective Transformation on an image, you can follow the steps given below ?
Steps
Import the required library. In all the following Python examples, the required Python library is OpenCV. Make sure you have already installed it.
import cv2
Read the input image using cv2.imread() function. Pass the full path of the input image.
img = cv2.imread('warning_wall.jpg')
Define pts1 and pts2. pts1 is an array of four points on the input image and pts2 is an array of corresponding four points on the output image.
pts1 = np.float32([[56,65],[368,52],[28,387],[389,390]])
pts2 = np.float32([[100,50],[300,0],[0,300],[300,300]])
Compute the perspective transform matrix M using cv2.getPerspectiveTransform(pts1, pts2) function.
M = cv2.getPerspectiveTransform(pts1,pts2)
Transform the image using cv2.warpAffine() method passing the perspective transform matrix as argument. cols and rows are the desired width and height of the image after transformation.
dst = cv2.warpAffine(img,M,(cols,rows))
Display the transformed image.
cv2.imshow("Transformed Image", dst)
cv2.waitKey(0)
cv2.destroyAllWindows()
Let's look at some examples for a better understanding of how it is done.
We will use this image as the input file for the following examples.

Example 1
In this example, we perform Perspective Transformation on the input image. We set the width and height of the output image the same as the input image.
# import required libraries
import cv2
import numpy as np

# read the input image
img = cv2.imread('warning_wall.jpg')

# find the height and width of image
# width = number of columns, height = number of rows in image array
rows,cols,ch = img.shape

# define four points on input image
pts1 = np.float32([[56,65],[368,52],[28,387],[389,390]])

# define the corresponding four points on output image
pts2 = np.float32([[100,50],[300,0],[0,300],[300,300]])

# get the perspective transform matrix
M = cv2.getPerspectiveTransform(pts1,pts2)

# transform the image using perspective transform matrix
dst = cv2.warpPerspective(img,M,(cols, rows))

# display the transformed image
cv2.imshow('Transformed Image', dst)
cv2.waitKey(0)
cv2.destroyAllWindows()
Output
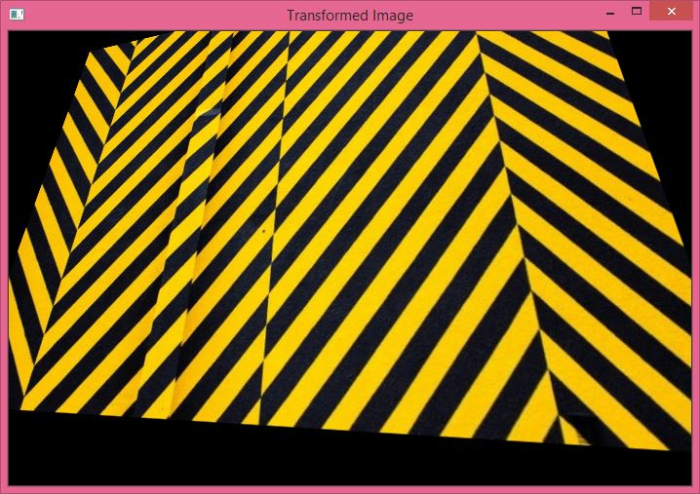
On execution, this Python program will produce the following output window ?
The above output image is obtained after the Perspective Transformation on the input image.

Example 2
In this example, we perform Perspective Transform on the input image. We set the width and height of the output image as (600, 350). It is different from the width and height of the input image.
import cv2
import numpy as np
import matplotlib.pyplot as plt

img = cv2.imread('warning_wall.jpg',0)
rows,cols = img.shape

pts1 = np.float32([[56,65],[368,52],[28,387],[389,390]])
pts2 = np.float32([[0,0],[300,0],[0,300],[300,300]])

M = cv2.getPerspectiveTransform(pts1,pts2)
dst = cv2.warpPerspective(img,M,(600,350))

plt.subplot(121),plt.imshow(img, cmap='gray'),plt.title('Input')
plt.subplot(122),plt.imshow(dst, cmap='gray'),plt.title('Output')
plt.show()
Output
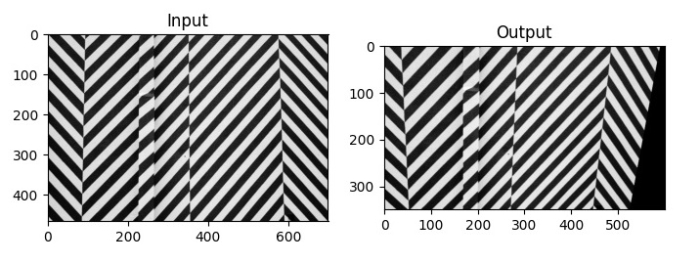
On execution, it will produce the following output window ?

The left image is the input image and the right image is the output image after Perspective Transformation.

