- OpenCV - Home
- OpenCV - Overview
- OpenCV - Environment
- OpenCV - Storing Images
- OpenCV - Reading Images
- OpenCV - Writing an Image
- OpenCV - GUI
- Image Conversion
- Colored Images to GrayScale
- OpenCV - Colored Image to Binary
- OpenCV - Grayscale to Binary
- Drawing Functions
- OpenCV - Drawing a Circle
- OpenCV - Drawing a Line
- OpenCV - Drawing a Rectangle
- OpenCV - Drawing an Ellipse
- OpenCV - Drawing Polylines
- OpenCV - Drawing Convex Polylines
- OpenCV - Drawing Arrowed Lines
- OpenCV - Adding Text
- Filtering
- OpenCV - Bilateral Filter
- OpenCV - Box Filter
- OpenCV - SQRBox Filter
- OpenCV - Filter2D
- OpenCV - Dilation
- OpenCV - Erosion
- OpenCV - Morphological Operations
- OpenCV - Image Pyramids
- Sobel Derivatives
- OpenCV - Sobel Operator
- OpenCV - Scharr Operator
- Transformation Operations
- OpenCV - Laplacian Transformation
- OpenCV - Distance Transformation
- Camera and Face Detection
- OpenCV - Using Camera
- OpenCV - Face Detection in a Picture
- Face Detection using Camera
- Geometric Transformations
- OpenCV - Affine Translation
- OpenCV - Rotation
- OpenCV - Scaling
- OpenCV - Color Maps
- Miscellaneous Chapters
- OpenCV - Canny Edge Detection
- OpenCV - Hough Line Transform
- OpenCV - Histogram Equalization
- OpenCV Useful Resources
- OpenCV - Quick Guide
- OpenCV - Cheatsheet
- OpenCV - Useful Resources
- OpenCV - Discussion
OpenCV - Bilateral Filter
Image filtering allows you to apply various effects to an image. In this chapter and the subsequent three chapters, we are going to discuss various filter operations such as Bilateral Filter, Box Filter, SQR Box Filter and Filter2D.
Bilateral Filter
The Bilateral Filter operation applies a bilateral image to a filter. You can perform this operation on an image using the medianBlur() method of the imgproc class. Following is the syntax of this method.
bilateralFilter(src, dst, d, sigmaColor, sigmaSpace, borderType)
This method accepts the following parameters −
src − A Mat object representing the source (input image) for this operation.
dst − A Mat object representing the destination (output image) for this operation.
d − A variable of the type integer representing the diameter of the pixel neighborhood.
sigmaColor − A variable of the type integer representing the filter sigma in the color space.
sigmaSpace − A variable of the type integer representing the filter sigma in the coordinate space.
borderType − An integer object representing the type of the border used.
Example
The following program demonstrates how to perform the Bilateral Filter operation on an image.
import org.opencv.core.Core;
import org.opencv.core.Mat;
import org.opencv.imgcodecs.Imgcodecs;
import org.opencv.imgproc.Imgproc;

public class BilateralFilter {
   public static void main(String args[]) {
      // Loading the OpenCV core library
      System.loadLibrary( Core.NATIVE_LIBRARY_NAME );

      // Reading the Image from the file and storing it in to a Matrix object
      String file ="E:/OpenCV/chap11/filter_input.jpg";
      Mat src = Imgcodecs.imread(file);

      // Creating an empty matrix to store the result
      Mat dst = new Mat();

      // Applying Bilateral filter on the Image
      Imgproc.bilateralFilter(src, dst, 15, 80, 80, Core.BORDER_DEFAULT);

      // Writing the image
      Imgcodecs.imwrite("E:/OpenCV/chap11/bilateralfilter.jpg", dst);

      System.out.println("Image Processed");
   }
}
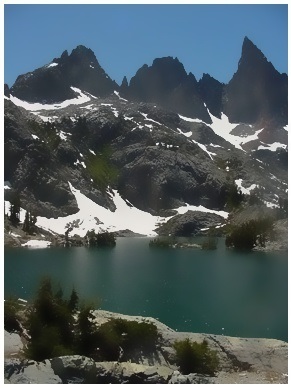
Assume that following is the input image filter_input.jpg specified in the above program.

Output
On executing the program, you will get the following output −
Image Processed
If you open the specified path, you can observe the output image as follows −