
 Data Structure
 Networking
 RDBMS
RDBMS Operating System
 Java
Java MS Excel
 iOS
iOS HTML
HTML CSS
CSS Android
 Python
 C Programming
 C++
C++ C#
C# MongoDB
 MySQL
MySQL Javascript
 PHP
PHP
- Selected Reading
- UPSC IAS Exams Notes
- Developer's Best Practices
- Questions and Answers
- Effective Resume Writing
- HR Interview Questions
- Computer Glossary
- Who is Who
How I Got Started with Angular and TypeScript?
I got started with Angular and TypeScript by realizing the importance of building scalable and maintainable web applications. Angular, as a web application framework, provided me with the tools I needed to build complex and dynamic applications with ease. TypeScript, as a statically typed superset of JavaScript, gave me the ability to write cleaner code, catch errors before runtime, and improve the overall scalability of my applications.
In this tutorial, I will share my experience and guide you through creating a simple Angular application using TypeScript. We will cover the basics of Angular and TypeScript and provide a step-by-step guide to creating an application that demonstrates some of the key features of the framework.
Syntax
To get started with Angular and TypeScript, the first step is to install the Angular CLI tool, which is used to create and manage Angular applications. Users can follow the syntax below to install the Angular CLI tool using npm ?
npm install -g @angular/cli
Once the installation is complete, users can create a new Angular application using the following syntax ?
ng new my-app
This will create a new Angular application in a folder called "my-app". The Angular CLI tool will generate a basic project structure, including a set of configuration files and a default application component.
Next, users can navigate to the project directory and start the application using the following commands ?
cd my-app
ng serve
With these steps, users can create and run a new Angular application using TypeScript and the Angular CLI tool.
Making Changes in the Angular App
First, I installed the necessary dependencies and generated a new project using Angular CLI.
Then, I opened the index.html file in my IDE and replaced the <title> element with <title>Homes</title> to update the title of the app.
Next, I opened the app.component.ts file and replaced the template property in the @Component decorator with <h1>Hello world!</h1> to change the text in the app component.
Then, in the AppComponent class definition in app.component.ts, I replaced the title property with title = 'home' to change the component title.
After making the changes, I saved the changes and ran the ng serve command in the Terminal window of my IDE.
To ensure that the changes were successfully applied, I opened my browser and visited http://localhost:4200/. The app displayed the message "Hello, World!" in the title and body, confirming that the changes had been applied successfully.
That's how I modified my Angular application and updated it to display a "Hello, World!" Message.
app.component.ts
import { Component } from '@angular/core';

@Component({
   selector: 'app-root',
   standalone: true,
   imports: [],
   template: `<h1>Hello world!</h1>`,
   styleUrls: ['./app.component.css'],
})
export class AppComponent {
   title = 'home';
}
Output
Hello Wolrd!
Example 1
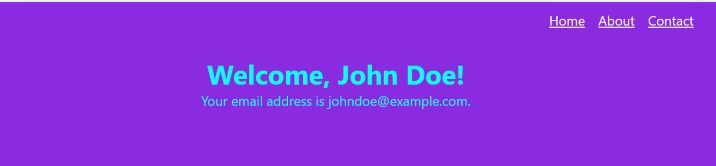
In this example, we have displayed some dynamic data on the screen from the components. Firstly, we have declared a user object in the app.component.ts file, which contains name and email properties.
Then, we used this user object to display the name and email on the screen in the app.component.html file. The name and email are displayed using string interpolation by wrapping the variables with double curly braces. The user object is accessed in the HTML template using the AppComponent class.
Finally, the router-outlet directive is used to render the content of the currently active route.
Users can observe the name and email values being displayed on the screen when they run the Angular application.
app.component.ts
import { Component } from '@angular/core';

@Component({
   selector: 'app-root',
   templateUrl: './app.component.html',
   styleUrls: ['./app.component.css']
})
export class AppComponent {
   user = { name: 'John Doe', email: 'johndoe@example.com' };
}
app.component.html
<style>
   header {
      width: 100%;
      height: 50vh;
      background-color: blueviolet;
      font-size: 1.5rem;
      text-align: center;
      color: rgb(5, 255, 255);
   }
   h2 {
      color: aquamarine;
   }

   nav ul {
      display: flex;
      flex-direction: row;
      align-items: center;
      justify-content: flex-end;
      padding: 1rem;
      margin-bottom: 2rem;
   }
   li {
      list-style: none;
      margin-right: 1.5rem;
   }
   li a {
      color: white;
   }
</style>

<header>
   <nav>
      <ul>
         <li><a target="_blank" href="/">Home</a></li>
         <li><a target="_blank" href="/about">About</a></li>
         <li><a target="_blank" href="/contact">Contact</a></li>
      </ul>
   </nav>
   <div>
      <h1>Welcome, {{ user.name }}!</h1>
      <p>Your email address is {{ user.email }}.</p>
   </div>
</header>
<router-outlet></router-outlet>
Output
Example 2
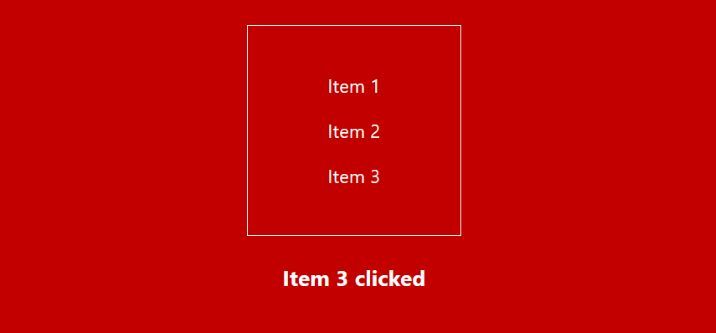
In this example, we have created an Angular component that displays a list of items and updates a message when an item is clicked.
First, Inside the AppComponent, we have defined an array of items with three objects that have an id and name property.
We have also defined a clickedItem variable to hold the message when an item is clicked.
We have created an onItemClick method that takes an item as a parameter and updates the clickedItem message to show which item was clicked.
In the template, we have used the *ngFor directive to loop through the items array and create a list item for each item. We have also added a (click) event listener to each list item that calls the onItemClick method.
Finally, we have added a heading that displays the clickedItem message when an item is clicked.
App.component.html
<style>
   header {
      display: flex;
      align-items: center;
      justify-content: center;
      color: white;
      font-size: 1.4rem;
      flex-direction: column;
   }
   ul {
      margin: 2rem 0;
      padding: 2rem 6rem;
      list-style: none;
      border: 1px solid white;
   }
   li {
      margin: 1.5rem 0;
      cursor: pointer;
   }
</style>
<header>
   <ul>
      <li *ngFor="let item of items" (click)="onItemClick(item)">
         {{ item.name }}
      </li>
   </ul>
   <h3>{{ clickedItem }}</h3>
</header>
<router-outlet></router-outlet>
App.component.ts
import { Component } from '@angular/core';
@Component({
   selector: 'app-root',
   templateUrl: './app.component.html',
   styleUrls: ['./app.component.css']
})
export class AppComponent {
   items = [
   { id: 1, name: 'Item 1' },
   { id: 2, name: 'Item 2' },
   { id: 3, name: 'Item 3' }
   ];
   clickedItem = "";
   onItemClick(item: any) {
      this.clickedItem = `Item ${item.id} clicked`;
   }
}
Output
In this tutorial, we went through various examples of how to create components and use them in an Angular application. We started with a basic example of displaying dynamic data on the screen from the component. Through these examples, users can learn the basics of using Angular applications with Typescript.

201 Views
