- DirectX - Home
- 3D MATHS
- 3D Maths - Vector Algebra
- 3D Maths - Matrix Algebra
- 3D Maths - Transformations
- 3D Maths - DirectX Math
- DIRECTX
- DirectX - Overview
- DirectX - Installation
- DirectX - Components
- DirectX - Tools
- DirectX - Creating App
- DirectX - Window Events
- DirectX - App Lifecycle
- DirectX - Direct3D Initialization
- DirectX - First HLSL
- DirectX - Graphics Pipeline
- DirectX - Buffers
- DirectX - 3D Transformation
- DirectX - Drawing
- DirectX - Rendering
- DirectX - Modeling
- DirectX - Lighting
- DirectX - Texturing
- DirectX - Multi Texturing
- DirectX - Blending
- DirectX - Picking
- DirectX - Stenciling
- DirectX - First Shader
- DirectX - Pixel Shader
- DirectX - Geometry Shaders
- DirectX - Compute Shaders
- DirectX - Shader Effects
- DirectX - Quaternion
- DirectX Resources
- DirectX - Quick Guide
- DirectX - Useful Resources
- DirectX - Discussion
DirectX - Shader Effects
This chapter will include an illustration of various shader effects which most 2D games use with respect to sprites. Most 2D effects are created with the help of fragment shaders. The main goal here is to create a simple effect with respect to the secondary texture to modify the original color. This type of shading effect is called as ToonShading.
If the original image has a color combination red/green/blue values of black (0, 0, 0), the user will look at 0% inside the color ramp and see (1.0, 1.0, 1.0) (switching black to white). We will be performing following steps to analyze the shader effect of printing Hello World which is mentioned below −
The user will be working with three color components (red, green and blue), expressed as a percentage between 0 and 1. If the user has used a range between 0-255, just divide what has been used by 255.
Notice how the type of image gets changed with color combination (RGB 0.0, 0.0, 0.0) to black (RGB 1.0, 1.0, 1.0). For each RGB value in the original image, we are going to look up the corresponding entry in this color mask, effectively reversing the color of the original image.
If the original image has a red/green/blue value of white (1.0, 1.0, 1.0), the user will look at it as 100% inside the color ramp and see (0, 0, 0).
If the original image has a red/green/blue value of the yellow in the Cocos2D logo, the user will look at the corresponding file sizes for each component inside the color ramp and see (0.01, 0.28, 0.58).
Also, since the color ramp is only 64 pixels wide, it will result in a smaller range of color values than the original image, resulting in a banding effect.
Consider a new file which is created in our project folder. Create a subclass of CCLayer and save the class as CSEColorRamp.
Create HelloWorldLayer.m and import CSEColorRamp.h at the top of the file as follows −
#import "CSEColorRamp.h"
Then replace the existing code for HelloWorldLayers init method with the following code −
// Initialize the hello world layer
-(id) init {
   if( (self=[super init])) {
      CCLabelTTF *label = Hello World" fontName:@"Marker Felt" fontSize:64;
      CGSize size = [[CCDirector sharedDirector] winSize];
      label.position = ccp( size.width /2 , size.height/2 );
      [self addChild: label];
      [CCMenuItemFont setFontSize:28];
      CCMenuItem *itemColorRamp = [CCMenuItemFont itemWithString:@"Color Ramp" block:^(id sender) {
         CCScene *scene = [CCScene node];
         [scene addChild: [CSEColorRamp node]];
         [[CCDirector sharedDirector] pushScene:scene];
      }];
      CCMenu *menu = [CCMenu menuWithItems:itemColorRamp, nil];
      [menu alignItemsHorizontallyWithPadding:20];
      [menu setPosition:ccp( size.width/2, size.height/2 - 50)];
      [self addChild:menu];
   }
   return self;
}
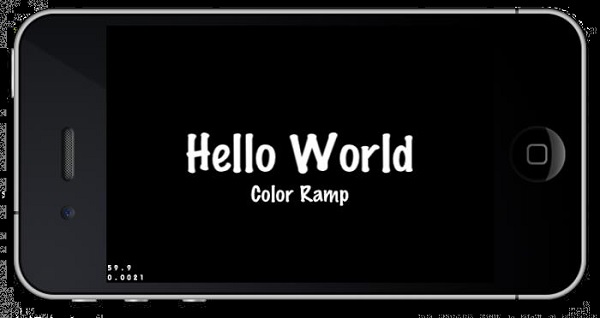
Compile and run the app, and you will see the following output −