- CUDA - Home
- CUDA - Introduction
- CUDA - Introduction to the GPU
- Fixed Functioning Graphics Pipelines
- CUDA - Key Concepts
- Keywords and Thread Organization
- CUDA - Installation
- CUDA - Matrix Multiplication
- CUDA - Threads
- CUDA - Performance Considerations
- CUDA - Memories
- CUDA - Memory Considerations
- Reducing Global Memory Traffic
- CUDA - Caches
CUDA - Installation
In this chapter, we will learn how to install CUDA.
For installing the CUDA toolkit on Windows, youll need −
- A CUDA enabled Nvidia GPU.
- A supported version of Microsoft Windows.
- A supported version of Visual Studio.
- The latest CUDA toolkit.
Note that natively, CUDA allows only 64b applications. That is, you cannot develop 32b CUDA applications natively (exception: they can be developed only on the GeForce series GPUs). 32b applications can be developed on x86_64 using the cross-development capabilities of the CUDA toolkit. For compiling CUDA programs to 32b, follow these steps −
Step 1 − Add <installpath>\bin to your path.
Step 2 − Add -m32 to your nvcc options.
Step 3 − Link with the 32-bit libs in <installpath>\lib (instead of <installpath>\lib64).
You can download the latest CUDA toolkit from here.
Compatibility
| Windows version | Native x86_64 support | X86_32 support on x86_32 (cross) |
|---|---|---|
| Windows 10 | YES | YES |
| Windows 8.1 | YES | YES |
| Windows 7 | YES | YES |
| Windows Server 2016 | YES | NO |
| Windows Server 2012 R2 | YES | NO |
| Visual Studio Version | Native x86_64 support | X86_32 support on x86_32 (cross) |
|---|---|---|
| 2017 | YES | NO |
| 2015 | YES | NO |
| 2015 Community edition | YES | NO |
| 2013 | YES | YES |
| 2012 | YES | YES |
| 2010 | YES | YES |
As can be seen from the above tables, support for x86_32 is limited. Presently, only the GeForce series is supported for 32b CUDA applications. If you have a supported version of Windows and Visual Studio, then proceed. Otherwise, first install the required software.
Verifying if your system has a CUDA capable GPU − Open a RUN window and run the command − control /name Microsoft.DeviceManager, and verify from the given information. If you do not have a CUDA capable GPU, or a GPU, then halt.
Installing the Latest CUDA Toolkit
In this section, we will see how to install the latest CUDA toolkit.
Step 1 − Visit − https://developer.nvidia.com and select the desired operating system.
Step 2 − Select the type of installation that you would like to perform. The network installer will initially be a very small executable, which will download the required files when run. The standalone installer will download each required file at once and wont require an Internet connection later to install.
Step 3 − Download the base installer.
The CUDA toolkit will also install the required GPU drivers, along with the required libraries and header files to develop CUDA applications. It will also install some sample code to help starters. If you run the executable by double-clicking on it, just follow the on-screen directions and the toolkit will be installed. This is the graphical way of installation, and the downside of this method is that you do not have control on what packages to install. This can be avoided if you install the toolkit using CLI. Here is a list of possible packages that you can control −
| nvcc_9.1 | cuobjdump_9.1 | nvprune_9.1 | cupti_9.1 |
| demo_suite_9.1 | documentation_9.1 | cublas_9.1 | gpu-library-advisor_9.1 |
| curand_dev_9.1 | nvgraph_9.1 | cublas_dev_9.1 | memcheck_9.1 |
| cusolver_9.1 | nvgraph_dev_9.1 | cudart_9.1 | nvdisasm_9.1 |
| cusolver_dev_9.1 | npp_9.1 | cufft_9.1 | nvprof_9.1 |
| cusparse_9.1 | npp_dev_9.1 | cufft_dev_9.1 | visual_profiler_9.1 |
For example, to install only the compiler and the occupancy calculator, use the following command −
<PackageName>.exe -s nvcc_9.1 occupancy_calculator_9.1
Verifying the Installation
Follow these steps to verify the installation −
Step 1 − Check the CUDA toolkit version by typing nvcc -V in the command prompt.
Step 2 − Run deviceQuery.cu located at: C:\ProgramData\NVIDIA Corporation\CUDA Samples\v9.1\bin\win64\Release to view your GPU card information. The output will look like −

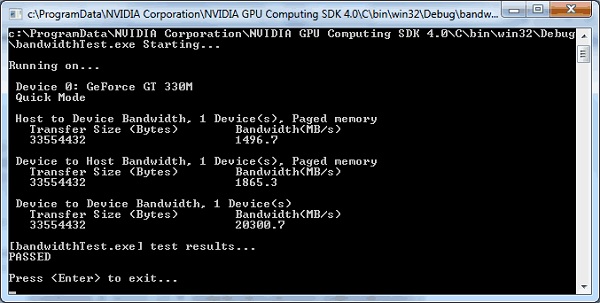
Step 3 − Run the bandWidth test located at C:\ProgramData\NVIDIA Corporation\CUDA Samples\v9.1\bin\win64\Release. This ensures that the host and the device are able to communicate properly with each other. The output will look like −
If any of the above tests fail, it means the toolkit has not been installed properly. Re-install by following the above instructions.
Uninstalling
CUDA can be uninstalled without any fuss from the Control Panel of Windows.
At this point, the CUDA toolkit is installed. You can get started by running the sample programs provided in the toolkit.
Setting-up Visual Studio for CUDA
For doing development work using CUDA on Visual Studio, it needs to be configured. To do this, go to − File → New | Project... NVIDIA → CUDA →. Now, select a template for your CUDA Toolkit version (We are using 9.1 in this tutorial). To specify a custom CUDA Toolkit location, under CUDA C/C++, select Common, and set the CUDA Toolkit Custom Directory.
