- ASP.NET WP - Home
- ASP.NET WP - Overview
- ASP.NET WP - Environment Setup
- ASP.NET WP - Getting Started
- ASP.NET WP - View Engines
- Project Folder Structure
- ASP.NET WP - Global Pages
- ASP.NET WP - Programming Concepts
- ASP.NET WP - Layouts
- ASP.NET WP - Working with Forms
- ASP.NET WP - Page Object Model
- ASP.NET WP - Database
- ASP.NET WP - Add Data to Database
- ASP.NET WP - Edit Database Data
- ASP.NET WP - Delete Database Data
- ASP.NET WP - WebGrid
- ASP.NET WP - Charts
- ASP.NET WP - Working with Files
- ASP.NET WP - Working with Images
- ASP.NET WP - Working with Videos
- ASP.NET WP - Add Email
- ASP.NET WP - Add Search
- Add Social Networking to the Website
- ASP.NET WP - Caching
- ASP.NET WP - Security
- ASP.NET WP - Publish
ASP.NET WP - Working with Forms
In this chapter, we will be covering how to create an input form and how to handle the user's input when you use the ASP.NET Web Pages using Razor syntax.
A form is a section of an HTML document where you put user-input controls, like text boxes, check boxes, radio buttons, and pull-down lists.
You use forms when you want to collect and process user input.
How to Create an Input Form?
Lets have a look into a simple example by creating a new cshtml file with MyForm.cshtml name and replace the code with the following program.
<!DOCTYPE html>
<html>

   <head>
      <title>Customer Form</title>
   </head>

   <body>
      <form method = "post" action = "">
         <fieldset>
            <legend>Add Student</legend>
            <div>
               <label for = "StudentName">Student Name: </label>
               <input type = "text" name = "StudentName" value = "" />
            </div>

            <div>
               <label for = "UniName">University Name:</label>
               <input type = "text" name = "UniName" value = "" />
            </div>

            <div>
               <label for = "Address">Res. Address:</label>
               <input type = "text" name = "Address" value = "" />
            </div>

            <div>
               <label> </label>
               <input type = "submit" value = "Submit" class = "submit" />
            </div>
         </fieldset>
      </form>

   </body>
</html>
Now lets run the application again and specify the following url − http://localhost:46023/myform, then you will see the following output.
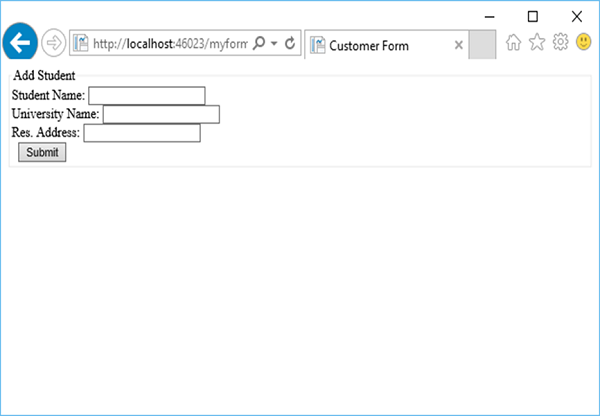
Lets enter some data in all the fields as shown in the following screenshot.
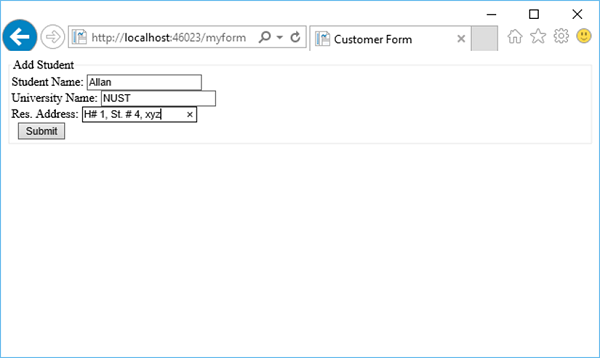
Now, when you click the Submit button then you will see that nothing happens. To make the form useful, we need to add some code that will run on the server.
Reading User Input from the Form
To read the user input from the form we will add some code that will read the values from all the fields and then process them as we want. This procedure shows you how to read the fields and display the user input on the page.
Lets have a look into the same example again in which we have added some code that will handle all the values from the fields.
<!DOCTYPE html>
<html>

   <head>
      <title>Customer Form</title>
   </head>

   <body>
      @{
         if (IsPost){
            string StudentName = Request["StudentName"];
            string UniName = Request["UniName"];
            string Address = Request["Address"];

            <p>
               You entered: <br />
               Student Name: @StudentName <br />
               University Name: @UniName <br />
               Res. Address: @Address <br />
            </p>
         } else{
            <form method = "post" action = "">
               <fieldset>
                  <legend>Add Student</legend>
                  <div>
                     <label for = y"StudentName">Student Name: </label>
                     <input type = "text" name = "StudentName" value = "" />
                  </div>

                  <div>
                     <label for = "UniName">University Name:</label>
                     <input type = "text" name = "UniName" value = "" />
                  </div>

                  <div>
                     <label for = "Address">Res. Address:</label>
                     <input type = "text" name="Address" value = "" />
                  </div>

                  <div>
                     <label> </label>
                     <input type = "submit" value = "Submit" class = "submit" />
                  </div>

               </fieldset>
            </form>
         }
      }
   </body>
</html>
Now lets run the application again and specify the following url − http://localhost:46023/myform then you will see the following output.
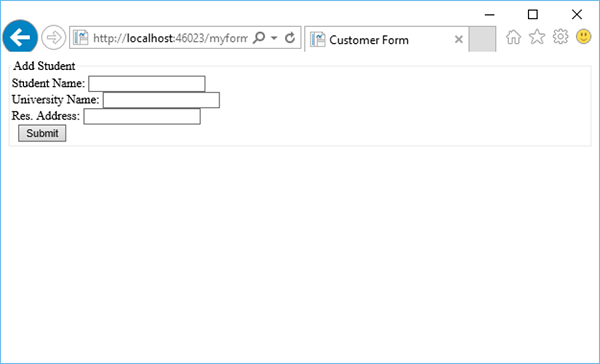
Lets enter some data in all the fields.

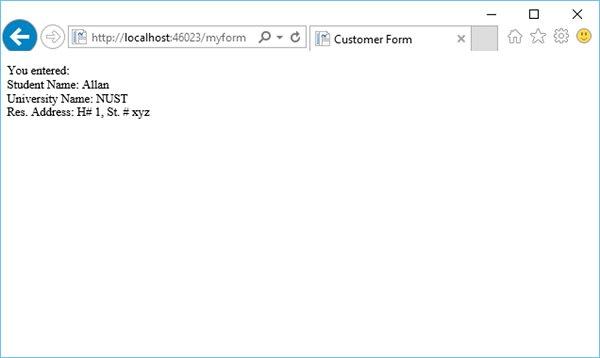
Now when you click the Submit button then you will see the following output.
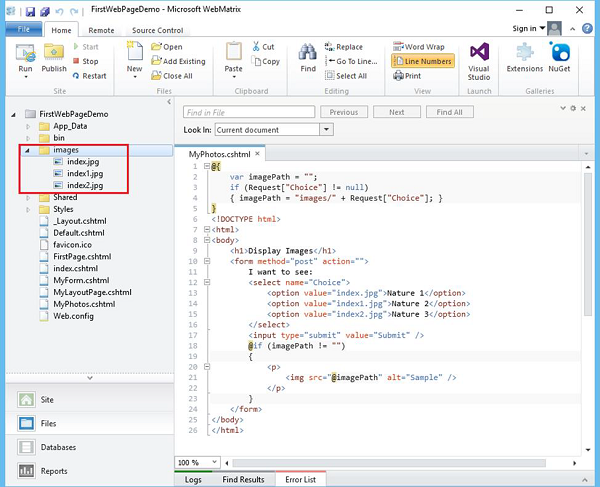
Lets have a look into another simple example by creating a new folder in your project and by naming it as images and then add some images in that folder.
Now add another cshtml file with MyPhotos.cshtml name and replace the following code.
@{
   var imagePath = "";

   if (Request["Choice"] != null)
   { imagePath = "images/" + Request["Choice"]; }
}

<!DOCTYPE html>
<html>

   <body>
      <h1>Display Images</h1>

      <form method = "post" action = "">
         I want to see:
         <select name = "Choice">
            <option value = "index.jpg">Nature 1</option>
            <option value = "index1.jpg">Nature 2</option>
            <option value = "index2.jpg">Nature 3</option>
         </select>
         <input type = "submit" value = "Submit" />

         @if (imagePath != ""){
            <p><img src = "@imagePath" alt = "Sample" /></p>
         }
      </form>

   </body>
</html>
As you can see that we have added references of some jpg files which are in the images folder as shown in the following screenshot.
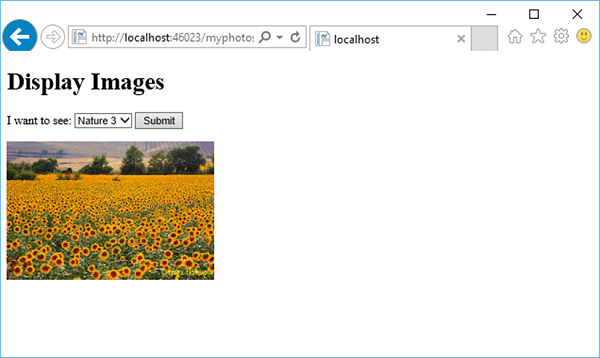
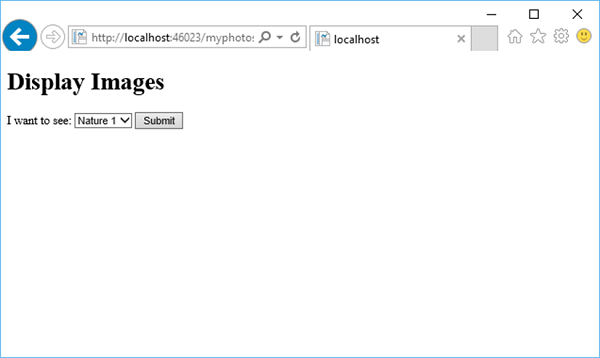
When you run the application and specify the following url − http://localhost:46023/myphotos then you will see the following output.
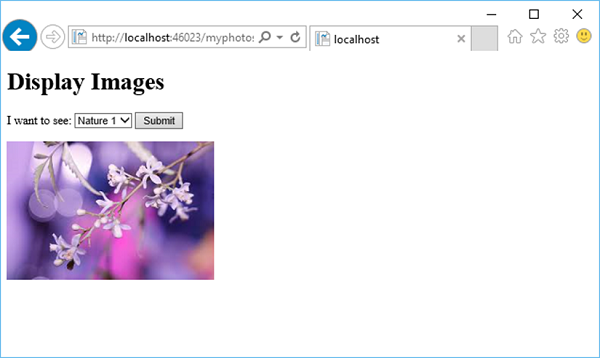
Lets click on Submit and you will see that the index.jpg file is loaded on the page.
When selecting another photo from the dropdown list, lets say Nature 3 and click Submit, then it will update the photo on the page as shown in the following image.