- ASP.NET WP - Home
- ASP.NET WP - Overview
- ASP.NET WP - Environment Setup
- ASP.NET WP - Getting Started
- ASP.NET WP - View Engines
- Project Folder Structure
- ASP.NET WP - Global Pages
- ASP.NET WP - Programming Concepts
- ASP.NET WP - Layouts
- ASP.NET WP - Working with Forms
- ASP.NET WP - Page Object Model
- ASP.NET WP - Database
- ASP.NET WP - Add Data to Database
- ASP.NET WP - Edit Database Data
- ASP.NET WP - Delete Database Data
- ASP.NET WP - WebGrid
- ASP.NET WP - Charts
- ASP.NET WP - Working with Files
- ASP.NET WP - Working with Images
- ASP.NET WP - Working with Videos
- ASP.NET WP - Add Email
- ASP.NET WP - Add Search
- Add Social Networking to the Website
- ASP.NET WP - Caching
- ASP.NET WP - Security
- ASP.NET WP - Publish
ASP.NET WP - Security
In this chapter, we will be covering how to secure the website so that some of the pages are available only to people who log in. To secure your website you can make your website so that users can log into it. Securing your website can be useful for many reasons.
Your site might have pages that should be available only to members.
Sometimes you will require users to log in so that they can send feedback or leave a comment on your website.
If the users are not logged in then they can still browse some of the pages, but not all of them.
Users who are not logged in are known as anonymous users.
How to Secure a Website with Authentication?
A user will first need to register on your website and can then log in to the site. To register on the website, a user will need a username and an email address along with a password to confirm that a user is who they claim to be. This process of logging in and confirming a user's identity is known as authentication.
WebMatrix provides a built-in template known as Starter Site to create a website, which contains the following properties.
A database that can store user names and passwords for users.
A registration page where users can register.
A login/logout page.
A password recovery and reset page.
Lets have a look into a simple example by creating a new Starter Site.
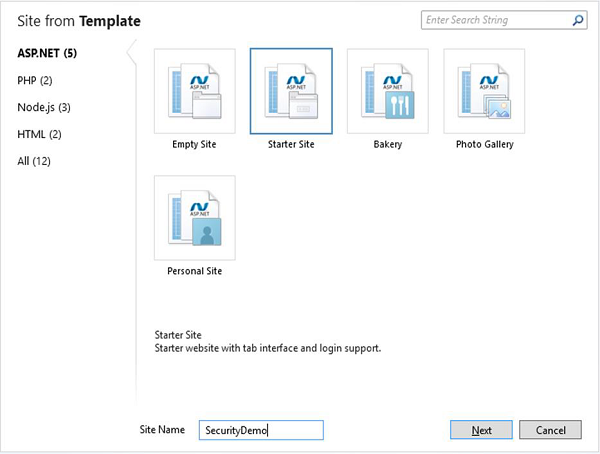
Enter SecurityDemo in the Site Name field and click Next. This will install and configure the required packages.
Once the installation is finished then lets run the application and you will see the following web page.
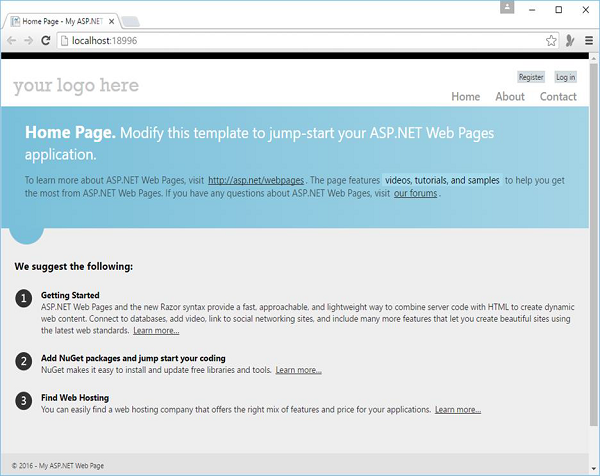
As you can see there are two buttons Register and Log in on the top right hand side of the page.
Lets click on the Register link and you will see the following webpage in which you can register by providing the following information.
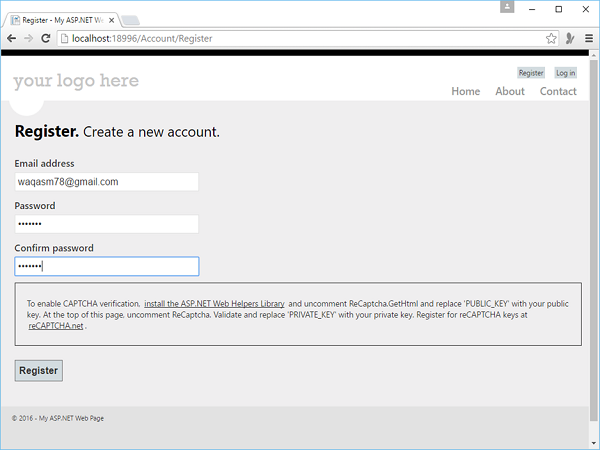
Here is the implementation Register.cshtml file which is under the Account folder on the site.
@* Remove this section if you are using bundling *@
@section Scripts {
   <script src = "~/Scripts/jquery.validate.min.js"></script>
   <script src = "~/Scripts/jquery.validate.unobtrusive.min.js"></script>
}
@{
   Layout = "~/_SiteLayout.cshtml";
   Page.Title = "Register";

   // Initialize general page variables
   var email = "";
   var password = "";
   var confirmPassword = "";

   // Setup validation
   Validation.RequireField("email", "You must specify an email address.");
   Validation.RequireField("password", "Password cannot be blank.");
   Validation.Add("confirmPassword",
   Validator.EqualsTo("password", "Password and confirmation password do not match."));
   Validation.Add("password",
      Validator.StringLength(
         maxLength: Int32.MaxValue,
         minLength: 6,
         errorMessage: "Password must be at least 6 characters"));

   // If this is a POST request, validate and process data
   if (IsPost) {
      AntiForgery.Validate();
      email = Request.Form["email"];
      password = Request.Form["password"];
      confirmPassword = Request.Form["confirmPassword"];

      // Validate the user's captcha answer
      // if (!ReCaptcha.Validate("PRIVATE_KEY")) {
         // ModelState.AddError("recaptcha", "Captcha response was not correct");
      // }

      // If all information is valid, create a new account
      if (Validation.IsValid()) {
         // Insert a new user into the database
         var db = Database.Open("StarterSite");

         // Check if user already exists
         var user = db.QuerySingle("SELECT Email FROM UserProfile WHERE LOWER(Email) =
            LOWER(@0)", email);

         if (user == null) {
            // Insert email into the profile table
            db.Execute("INSERT INTO UserProfile (Email) VALUES (@0)", email);
            // Create and associate a new entry in the membership database.
            // If successful, continue processing the request

            try {
               bool requireEmailConfirmation = !WebMail.SmtpServer.IsEmpty();
               var token = WebSecurity.CreateAccount(email, password,
                  requireEmailConfirmation);

               if (requireEmailConfirmation) {
                  var hostUrl = Request.Url.GetComponents(UriComponents.SchemeAndServer,
                     UriFormat.Unescaped);
                  var confirmationUrl = hostUrl + VirtualPathUtility.ToAbsolute
                     ("~/Account/Confirm?confirmationCode = "
                     + HttpUtility.UrlEncode(token));
                  WebMail.Send(
                     to: email,
                     subject: "Please confirm your account",
                     body: "Your confirmation code is: " + token + ".
                     Visit <a href = \"" + confirmationUrl + "\">" +
                     confirmationUrl + "</a> to activate your account."
                  );
               }

               if (requireEmailConfirmation) {
                  // Thank the user for registering and let them know an
                     email is on its way
                  Response.Redirect("~/Account/Thanks");
               } else {
                  // Navigate back to the homepage and exit
                  WebSecurity.Login(email, password);
                  Response.Redirect("~/");
               }
            }catch (System.Web.Security.MembershipCreateUserException e) {
               ModelState.AddFormError(e.Message);
            }
         } else {
            // User already exists
            ModelState.AddFormError("Email address is already in use.");
         }
      }
   }
}

<hgroup class = "title">
   <h1>@Page.Title.</h1>
   <h2>Create a new account.</h2>
</hgroup>

<form method = "post">
   @AntiForgery.GetHtml()
   @* If at least one validation error exists, notify the user *@
   @Html.ValidationSummary("Account creation was unsuccessful.
      Please correct the errors and try again.",
      excludeFieldErrors: true, htmlAttributes: null)

   <fieldset>
      <legend>Registration Form</legend>
      <ol>
         <li class = "email">
            <label for = "email" @if(!ModelState.IsValidField("email")){
               <text>class = "error-label"</text>}>Email address</label>
            <input type = "text" id = "email" name = "email" value = "@email"
               @Validation.For("email") />

            @* Write any email validation errors to the page *@
            @Html.ValidationMessage("email")
         </li>

         <li class = "password">
            <label for = "password" @if(!ModelState.IsValidField("password")) {<text>
               class = "error-label"</text>}>Password</label>
            <input type = "password" id = "password" name = "password"
               @Validation.For("password") />

            @* Write any password validation errors to the page *@
            @Html.ValidationMessage("password")
         </li>

         <li class = "confirm-password">
            <label for = "confirmPassword"
               @if(!ModelState.IsValidField("confirmPassword"))
               {<text>class = "error-label"</text>}>Confirm password</label>
            <input type = "password" id = "confirmPassword" name = "confirmPassword"
               @Validation.For("confirmPassword") />

            @* Write any password validation errors to the page *@
            @Html.ValidationMessage("confirmPassword")
         </li>

         <li class = "recaptcha">
            <div class = "message-info">
               <p>
                  To enable CAPTCHA verification, <a href =
                  "http://go.microsoft.com/fwlink/?LinkId=204140">install the
                  ASP.NET Web Helpers Library</a> and uncomment ReCaptcha.GetHtml
                  and replace 'PUBLIC_KEY' with your public key. At the top of this
                  page, uncomment ReCaptcha. Validate and replace 'PRIVATE_KEY' with
                  your private key.Register for reCAPTCHA keys at <a href =
                  "http://recaptcha.net"> reCAPTCHA.net</a>.
               </p>
            </div>
            @*
               @ReCaptcha.GetHtml("PUBLIC_KEY", theme: "white")
               @Html.ValidationMessage("recaptcha")
            *@
         </li>
      </ol>
      <input type = "submit" value = "Register" />

   </fieldset>
</form>
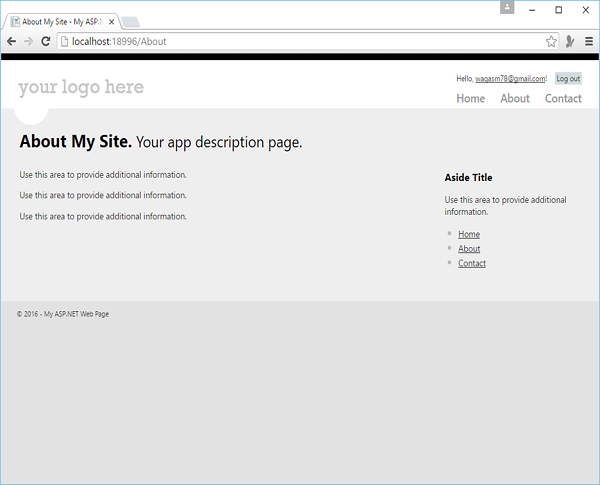
When you click on the Register button then you will see the Home page again, but you will see that now you are logged in by mentioning your email id.
Create Page for Members Only
In the website you will want some pages that can only be accessed by the members only. ASP.NET lets you configure pages so they can be accessed only by logged-in members. Typically, if anonymous users try to access a members-only page, you redirect them to the login page.
Lets have a look into a simple example in which we modify the About page. When a user is logged in, then the user can access this page otherwise the user will be redirected to the login page. So lets replace the following code in About.cshtml file.
@if (!WebSecurity.IsAuthenticated) {
   Response.Redirect("~/Account/Login");
}
@{
   Layout = "~/_SiteLayout.cshtml";
   Page.Title = "About My Site";
}

<hgroup class = "title">
   <h1>@Page.Title.</h1>
   <h2>Your app description page.</h2>
</hgroup>

<article>
   <p>Use this area to provide additional information.</p>
   <p>Use this area to provide additional information.</p>
   <p>Use this area to provide additional information.</p>
</article>

<aside>
   <h3>Aside Title</h3>
   <p>Use this area to provide additional information.</p>

   <ul>
      <li><a href = "~/">Home</a></li>
      <li><a href = "~/About">About</a></li>
      <li><a href = "~/Contact">Contact</a></li>
   </ul>

</aside>
Lets run the application and you will see the following Home page.
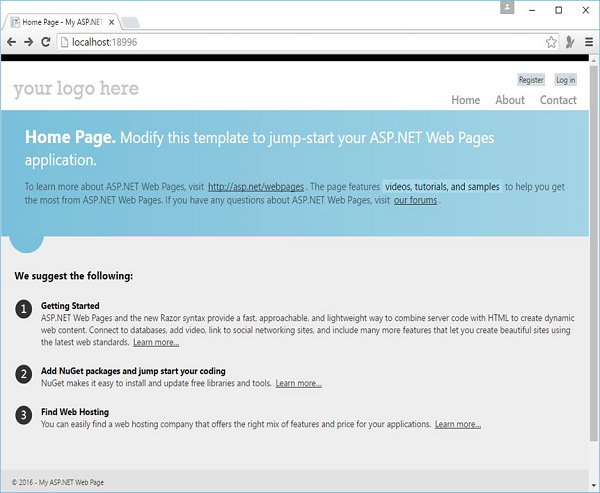
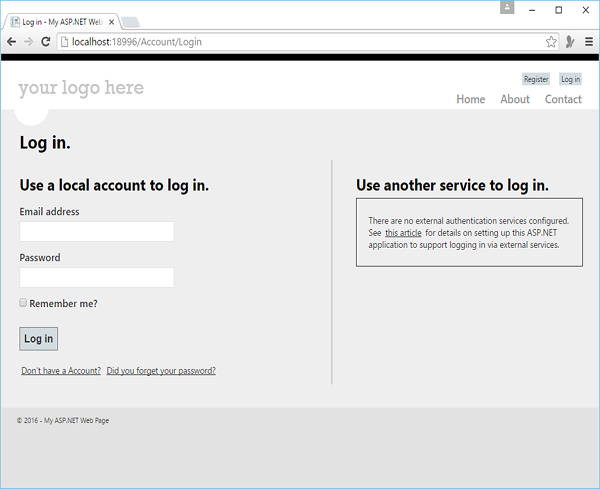
The user is not logged in as of now, so when you click on the About link then you will see that you will directed to the login page as shown in the following screenshot.
Lets enter the credentials.
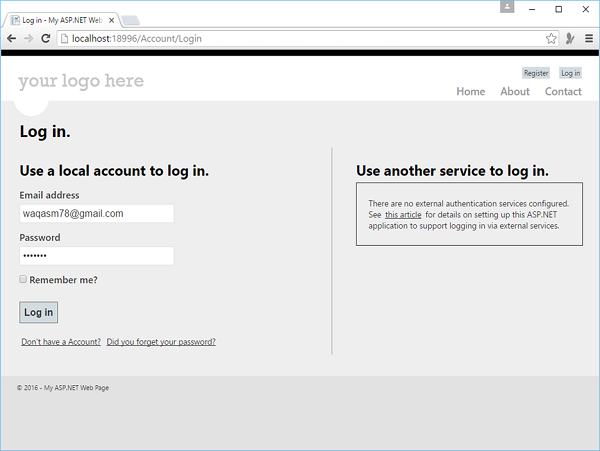
Now click on Log in and you will see the Home page.
When you now click on the About link, you will see that About page is now accessible to you as shown in the following screenshot.