- ASP.NET WP - Home
- ASP.NET WP - Overview
- ASP.NET WP - Environment Setup
- ASP.NET WP - Getting Started
- ASP.NET WP - View Engines
- Project Folder Structure
- ASP.NET WP - Global Pages
- ASP.NET WP - Programming Concepts
- ASP.NET WP - Layouts
- ASP.NET WP - Working with Forms
- ASP.NET WP - Page Object Model
- ASP.NET WP - Database
- ASP.NET WP - Add Data to Database
- ASP.NET WP - Edit Database Data
- ASP.NET WP - Delete Database Data
- ASP.NET WP - WebGrid
- ASP.NET WP - Charts
- ASP.NET WP - Working with Files
- ASP.NET WP - Working with Images
- ASP.NET WP - Working with Videos
- ASP.NET WP - Add Email
- ASP.NET WP - Add Search
- Add Social Networking to the Website
- ASP.NET WP - Caching
- ASP.NET WP - Security
- ASP.NET WP - Publish
ASP.NET WP - WebGrid
In the previous chapters of databases, we have displayed database data by using a razor code, and doing the HTML markup ourselves. But in ASP.NET Web Pages while using a Razor, we also have an easier way to display data by using the WebGrid helper.
This helper can render an HTML table for you that displays data.
This helper supports options for formatting, for creating a way to page through the data.
In the WebGrid helper you can sort the data just by clicking a column heading.
Lets have a look into a simple example in which we will display the same data, but this time we will be using the WebGrid helper. In this example, we will create a copy of ListCustomers.cshtml file and then use the WebGrid instead of manually creating the table using HTML markup like <tr> and <td> tags.
Display and Sort Data with WebGrid
We will need to create a CSHTML file to start with.
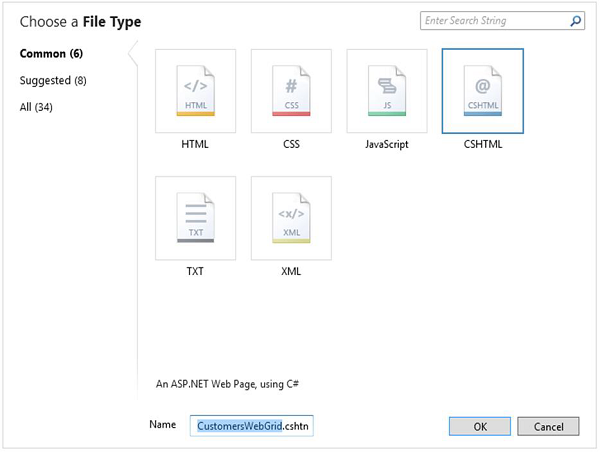
Enter CustomersWebGrid.cshtml in the name field and Click OK to continue.
Replace the following code in CustomersWebGrid.cshtml file.
@{
   var db = Database.Open("WebPagesCustomers");
   var selectQueryString = "SELECT * FROM Customers ORDER BY FirstName";
   var data = db.Query(selectQueryString);
   var grid = new WebGrid(data);
}

<!DOCTYPE html>
<html>

   <head>
      <title>Customers List</title>
      <style>
         table, th, td {
            border: solid 1px #bbbbbb;
            border-collapse: collapse;
            padding: 2px;
         }
      </style>

   </head>
   <body>
      <h1>Customers List</h1>

      <div id = "grid">
         @grid.GetHtml()
      </div>

   </body>
</html>
As you can see that the code first opens the WebPagesCustomers database file and then creates a simple SQL query.
var selectQueryString = "SELECT * FROM Customers ORDER BY FirstName";
A variable named data is populated with the returned data from the SQL Select statement.
var data = db.Query(selectQueryString);
Then the WebGrid helper is used to create a new grid from data.
var grid = new WebGrid(data);
This code creates a new WebGrid object and assigns it to the grid variable. In the body of the page, you render the data using the WebGrid helper as shown in the following program.
<div id = "grid">
   @grid.GetHtml()
</div>
Now lets run the application and specify the following url − http://localhost:36905/CustomersWebGrid and you will see the following web page.
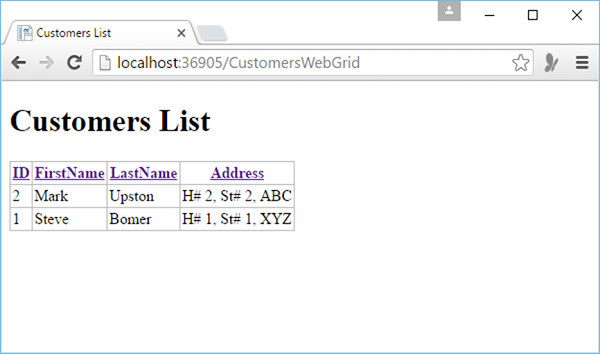
As you can see, by using the simplest possible code, the WebGrid helper does a lot of work when displaying and sorting the data.
In the above output, you can see that the data is sorted by FirstName, now you can easily sort the data by ID or LastName, etc. just by clicking on the column header.
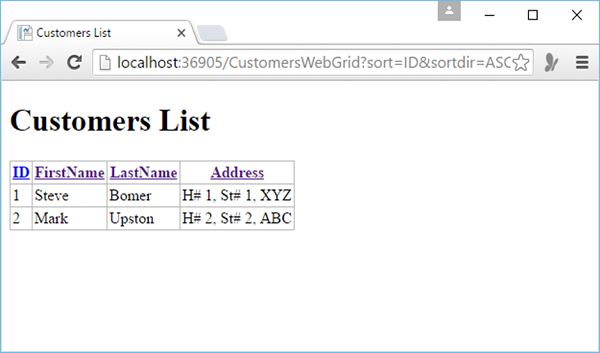
So lets click on the ID column header and you will see that data is now sorted by ID as shown in the following screenshot.
The WebGrid helper can do quite a lot more as well like formatting the columns and styling the whole grid.
Lets have a look into the same example, but this time, we will format the columns.
@{
   var db = Database.Open("WebPagesCustomers");
   var selectQueryString = "SELECT * FROM Customers ORDER BY FirstName";
   var data = db.Query(selectQueryString);
   var grid = new WebGrid(data);
}

<!DOCTYPE html>
<html>

   <head>
      <title>Customers List</title>
      <style>
         table, th, td {
            border: solid 1px #bbbbbb;
            border-collapse: collapse;
            padding: 2px;
         }
      </style>

   </head>
   <body>
      <h1>Customers List</h1>

      <div id = "grid">
         @grid.GetHtml(
            columns: grid.Columns(
               grid.Column("FirstName", format:@<i>@item.FirstName</i>),
               grid.Column("LastName", format:@<i>@item.LastName</i>),
               grid.Column("Address", format:@<text>$@item.Address</text>)
            )
         )
      </div>

   </body>
</html>
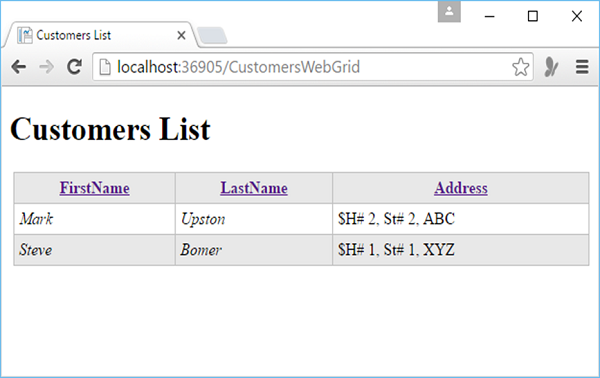
Now lets run the application and specify the following url − http://localhost:36905/CustomersWebGrid and you will see the following web page.
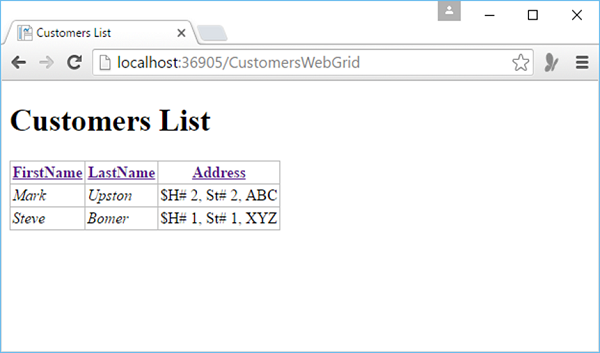
As you can see that the data in the FirstName and LastName columns are now displayed in the italic format.
Lets have a look into another simple example in which we will set the style of the whole grid by defining the CSS classes that specify how the rendered HTML table will look as shown in the following code.
@{
   var db = Database.Open("WebPagesCustomers");
   var selectQueryString = "SELECT * FROM Customers ORDER BY FirstName";
   var data = db.Query(selectQueryString);
   var grid = new WebGrid(data);
}

<!DOCTYPE html>
<html>

   <head>
      <title>Customers List</title>
      <style type = "text/css">
         .grid { margin: 4px; border-collapse: collapse; width: 600px; }
         .head { background-color: #E8E8E8; font-weight: bold; color: #FFF; }
         .grid th, .grid td { border: 1px solid #C0C0C0; padding: 5px; }
         .alt { background-color: #E8E8E8; color: #000; }
         .product { width: 200px; font-weight:bold;}
      </style>

   </head>
   <body>
      <h1>Customers List</h1>

      <div id = "grid">
         @grid.GetHtml(
            tableStyle: "grid",
            headerStyle: "head",
            alternatingRowStyle: "alt",
            columns: grid.Columns(
               grid.Column("FirstName", format:@<i>@item.FirstName</i>),
               grid.Column("LastName", format:@<i>@item.LastName</i>),
               grid.Column("Address", format:@<text>$@item.Address</text>)
            )
         )
      </div>

   </body>
</html>
Now lets run the application and specify the following url − http://localhost:36905/CustomersWebGrid and you will see the following web page.