- ASP.NET WP - Home
- ASP.NET WP - Overview
- ASP.NET WP - Environment Setup
- ASP.NET WP - Getting Started
- ASP.NET WP - View Engines
- Project Folder Structure
- ASP.NET WP - Global Pages
- ASP.NET WP - Programming Concepts
- ASP.NET WP - Layouts
- ASP.NET WP - Working with Forms
- ASP.NET WP - Page Object Model
- ASP.NET WP - Database
- ASP.NET WP - Add Data to Database
- ASP.NET WP - Edit Database Data
- ASP.NET WP - Delete Database Data
- ASP.NET WP - WebGrid
- ASP.NET WP - Charts
- ASP.NET WP - Working with Files
- ASP.NET WP - Working with Images
- ASP.NET WP - Working with Videos
- ASP.NET WP - Add Email
- ASP.NET WP - Add Search
- Add Social Networking to the Website
- ASP.NET WP - Caching
- ASP.NET WP - Security
- ASP.NET WP - Publish
ASP.NET WP - Add Email
In this chapter, we will be covering how to add email to the website and how you can send an email from your web page. There can be many reasons why you might need to send email from your website.
You can send confirmation messages to the users.
You can also send notifications to yourself. For example, when a new user has registered on the website.
It is very easy to send email by using the WebMail helper. To use this WebMail helper, you have to have access to an SMTP (SMTP stands for Simple Mail Transfer Protocol) server.
An SMTP server is an email server that only forwards messages to the recipients server.
If you use a hosting provider for your website, then they will setup your email and they can tell you what your SMTP server name is.
If you're working inside a corporate network, an administrator or your IT department can usually give you the information about an SMTP server that you can use.
If you are working at home, you might even be able to test using your ordinary email provider, who can tell you the name of their SMTP server.
To work with an SMTP server, you will need the following;
The name of the SMTP server.
The port number is mostly 25. However, your ISP may require you to use port 587.
Credentials such as user name, password.
Lets have a look into a simple example in which we will send an email. To begin with, we need to create a new CSHTML file.
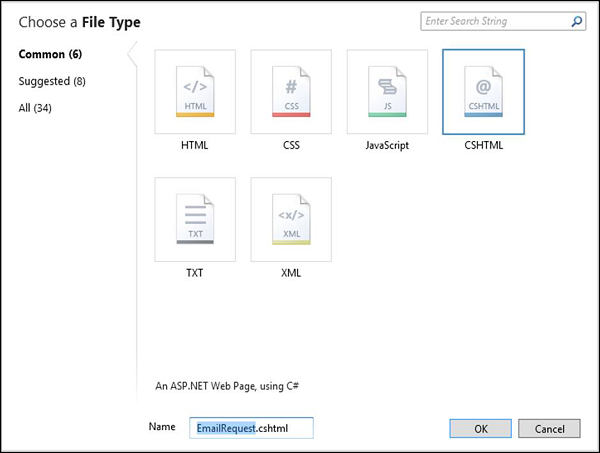
Enter EmailRequest.cshtml in the Name field and click OK.
Now replace the following code in EmailRequest.cshtml file.
<!DOCTYPE html>
<html>

   <head>
      <title>Request for Assistance</title>
   </head>

   <body>
      <h2>Submit Email Request for Assistance</h2>
      <form method = "post" action = "ProcessRequest.cshtml">
         <div>
            Your name:
            <input type = "text" name = "customerName" />
         </div>

         <div>
            Your email address:
            <input type = "text" name = "customerEmail" />
         </div>

         <div>
            Details about your problem: <br />
            <textarea name = "customerRequest" cols = "45" rows = "4"></textarea>
         </div>

         <div>
            <input type = "submit" value = "Submit" />
         </div>
      </form>

   </body>
</html>
As you can see in the above code that the action attribute of the form is set to ProcessRequest.cshtml, it means that the form will be submitted to that page. So lets create another CSHTML file ProcessRequest.cshtml and replace the following code.
@{
   var customerName = Request["customerName"];
   var customerEmail = Request["customerEmail"];
   var customerRequest = Request["customerRequest"];
   var errorMessage = "";
   var debuggingFlag = false;

   try {
      // Initialize WebMail helper
      WebMail.SmtpServer = "smtp.mail.yahoo.com";
      WebMail.SmtpPort = 465;
      WebMail.UserName = "waqasm78@yahoo.com";
      WebMail.Password = "**********";
      WebMail.From = "waqasm78@yahoo.com";

      // Send email
      WebMail.Send(to: customerEmail,
         subject: "Help request from - " + customerName,
         body: customerRequest
      );
   }catch (Exception ex ) {
      errorMessage = ex.Message;
   }
}

<!DOCTYPE html>
<html>

   <head>
      <title>Request for Assistance</title>
   </head>

   <body>
      <p>Sorry to hear that you are having trouble, <b>@customerName</b>.</p>

      @if(errorMessage == ""){
         <p>An email message has been sent to our customer service department regarding
            the following problem:</p>
         <p><b>@customerRequest</b></p>
      } else{
         <p><b>The email was <em>not</em> sent.</b></p>
         <p>Please check that the code in the ProcessRequest page has
            correct settings for the SMTP server name, a user name,
            a password, and a "from" address.</p>

         if(debuggingFlag){
            <p>The following error was reported:</p>
            <p><em>@errorMessage</em></p>
         }
      }

   </body>
</html>
If you are using Yahoo email provider, then you will have to replace the following code in the above program to make it run.
// Initialize WebMail helper
   WebMail.SmtpServer = "smtp.mail.yahoo.com";
   WebMail.SmtpPort = 465;
   WebMail.UserName = "waqasm78@yahoo.com";
   WebMail.Password = "**********";
   WebMail.From = "waqasm78@yahoo.com";
You need to type your own password in the WebMail.Password property.
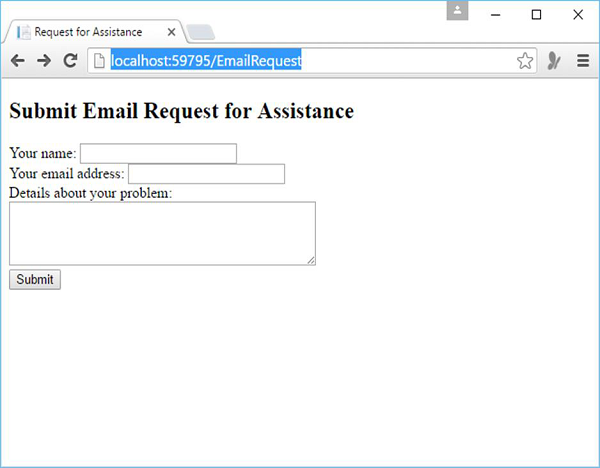
Now lets run the application and specify the following url − http://localhost:59795/EmailRequest and you will see the following web page.
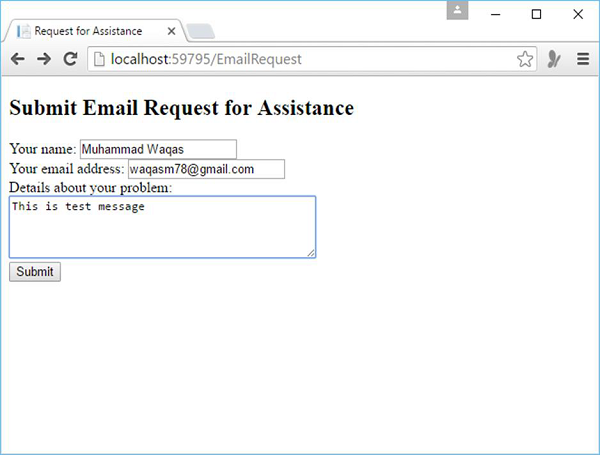
Now enter some information in all the mentioned fields as shown in the following screenshot.
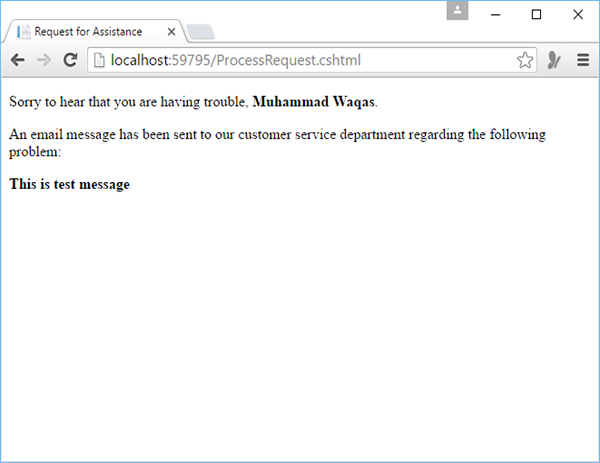
Click submit and then you will see the following message when the email is successfully sent.