- Angular Tutorial
- Angular - Home
- Angular - Overview
- Angular - Features
- Angular - Advantages & Disadvantages
- Angular Basics
- Angular - Environment setup
- Angular - First Application
- Angular - MVC Architecture
- Angular Components
- Angular - Components
- Angular - Component Lifecycle
- Angular - View Encapsulation
- Angular - Emulated Encapsulation
- Angular - ShadowDom Encapsulation
- Angular - Component Interaction
- Angular - Using @Input Decorator
- Angular - Using @Output Decorator
- Angular - Using Local Variable
- Angular - Using @ViewChild Decorator
- Angular - Using Services
- Angular - Component Styles
- Angular - Nested Components
- Angular - Content projection
- Angular - Single-slot Content Projection
- Angular - Multi-slot Content Projection
- Angular - Conditional Content Projection
- Angular - Dynamic components
- Angular - Using NgComponentOutlet
- Angular - Using ViewContainerRef
- Angular - Elements
- Angular Templates
- Angular - Templates
- Angular - Template statements
- Angular - Template Variables
- Angular - SVG as Templates
- Angular Binding
- Angular - Data Binding
- Angular - Interpolation
- Angular - Event Binding
- Angular - Property Binding
- Angular - Attribute Binding
- Angular - Class Binding
- Angular - Style Binding
- Angular - Two-way Binding
- Angular Directives
- Angular - Directives
- Angular - Attribute Directives
- Angular - Structural Directives
- Angular - Custom Directives
- Angular Pipes
- Angular - Pipes
- Angular - Built-in Pipes
- Angular - Custom Pipes
- Angular Forms
- Angular - Forms
- Angular - Template Driven Forms
- Angular - Reactive Forms
- Angular - Form Validation
- Angular - Dynamic Forms
- Angular Dependency Injection
- Angular - Dependency Injection
- Angular - Injectable Service
- Angular Routing
- Angular - Routing
- Angular - Dynamic Routes
- Angular - Wildcard Routes
- Angular - Nested Routes
- Angular - Navigation
- Angular - Routing in SPA
- Angular - Custom Route Matches
- Angular - Router Reference
- Angular HTTP Client programming
- Angular - Services
- Angular - HTTP Client
- Angular - Express based REST API
- Angular - Request
- Angular - Request Response Workflow
- Angular - Response
- Angular - Express based Upload API
- Angular - GET
- Angular - POST
- Angular - PUT
- Angular - DELETE
- Angular - JSONP
- Angular - CRUD Operations Using HTTP
- Angular Modules
- Angular - Introduction to Modules
- Angular - Root Module
- Angular - Feature Module
- Angular - Sharing Module
- Angular - Routing Module
- Angular - NgModules
- Angular Animation
- Angular - Animations
- Angular Service Workers & PWA
- Angular - Service Workers & PWA
- Angular Testing
- Angular - Testing Overview
- Angular Design Patterns
- Angular - Design Patterns
- Angular - Lazy Loading
- Angular - Singleton Pattern
- Angular - Observer Pattern
- Angular Libraries
- Angular - Libraries
- Angular - Angular Material
- Angular - PrimeNG
- Angular - RxJS
- Angular Advanced
- Angular - Signals
- Angular - Authentication & Authorization
- Angular - Internationalization
- Angular - Standalone Component
- Angular - Accessibility
- Angular - Web Workers
- Angular - Server Side Rendering
- Angular - Ivy Compiler
- Angular - Building with Bazel
- Angular - Backward Compatibility
- Angular - Reactive Programming
- Angular Tools
- Angular - CLI
- Angular Material UI Elements
- Angular - Paginator
- Angular - Datepicker
- Angular - Select Drop-down
- Angular Miscellaneous
- Angular - Third Party Controls
- Angular - Configuration
- Angular - Displaying Data
- Angular - Decorators & Metadata
- Angular - Basic Example
- Angular - Error Handling
- Angular - Testing & Building a Project
- Angular - Lifecycle Hooks
- Angular - User Input
- Angular - What's New?
- Angular Useful Resources
- Angular - Quick Guide
- Angular - Useful Resources
- Angular - Discussion
Angular - Using ViewContainerRef
The second way of creating and rendering components dynamically is by using ViewContainerRef. Other components or directives use it to get a reference to a view container corresponding to their location in the DOM. In this way, ViewContainerRef helps to dynamically create and insert components at that specific location.
Example - Use of ViewContainerRef
Let us create a real time application to display a collection of employees in two different formats, table and gallery. We will create two components, one to show employees in the table and another in gallery format. Then we will create a host component, which will dynamically load either table based component or gallery based component.
Step 1: Create an interface to hold common data across multiple dynamic component
$ ng generate interface DynData
CREATE src/app/dyn-data.ts (29 bytes)
Step 2: Create a dynamic component, DynList. The purpose of the component is to list the employee as gallery.
$ ng generate component DynList
CREATE src/app/dyn-list/dyn-list.css (0 bytes)
CREATE src/app/dyn-list/dyn-list.html (23 bytes)
CREATE src/app/dyn-list/dyn-list.spec.ts (567 bytes)
CREATE src/app/dyn-list/dyn-list.ts (209 bytes)
Step 3: Create a dynamic component, DynTable. The purpose of the component is to list the employees in tabular format.
$ ng generate component DynTable
CREATE src/app/dyn-table/dyn-table.css (0 bytes)
CREATE src/app/dyn-table/dyn-table.html (24 bytes)
CREATE src/app/dyn-table/dyn-table.spec.ts (574 bytes)
CREATE src/app/dyn-table/dyn-table.ts (213 bytes)
Step 4: Create a host component, DynHost. The purpose of the component is to host any one of the component, DynList and DynTable based on configuration.
$ ng generate component DynHost
CREATE src/app/dyn-host/dyn-host.css (0 bytes)
CREATE src/app/dyn-host/dyn-host.html (23 bytes)
CREATE src/app/dyn-host/dyn-host.spec.ts (567 bytes)
CREATE src/app/dyn-host/dyn-host.ts (209 bytes)
Step 5: Next, open the interface, DynData and add an array property, data
DynData.ts
export interface DynData {
   data : any[]
}
Step 6: Next, open the DynList component and implement DynData interface.
DynList.ts
import { Component } from '@angular/core';
import { DynData } from '../dyn-data';

@Component({
   selector: 'app-dyn-list',
   imports: [],
   templateUrl: './dyn-list.html',
   styleUrl: './dyn-list.css',
})
export class DynList implements DynData {
   data: any[] = []
}
Here,
Imported DynData interface and implements it in class definition
Included the data property as per DynData interface specification
Step 7: Next, open the components template and render the data as list of items
dyn-list.html
<div class="gallery">
    @for (item of data; track $index) {
   <div class="card">
      <div class="container">
         <h4><b>{{ item.name }}</b></h4>
         <p>{{ item.role }}</p>
      </div>
   </div>
   }
</div>
Here,
data holds the list of employees with two properties, name and role
Used @for to show the employees as list of cards
Step 8: Next, open the components styles and add necessary CSS as shown below −
dyn-list.css
.gallery {
   display: flex;
   flex-wrap: wrap;
   justify-content: left;
   gap: 10px;
}

.card {
   flex-basis: 200px;
   box-shadow: 0 4px 8px 0 rgba(0,0,0,0.2);
}

.card:hover {
   box-shadow: 0 8px 16px 0 rgba(0,0,0,0.2);
}

.container {
   padding: 2px 16px;
   max-width: 200px;
}
Here, we used flex feature of CSS to show the employees in gallery format
Step 9: Next, open the DynTable component and implement DynData interface.
DynTable.ts
import { Component } from '@angular/core';
import { DynData } from '../dyn-data';

@Component({
   selector: 'app-dyn-table',
   imports: [],
   templateUrl: './dyn-table.html',
   styleUrl: './dyn-table.css',
})
export class DynTable implements DynData {
   data: any[] = []
}
Here,
Imported DynData interface and implements it in class definition
Included the data property as per DynData interface specification
Step 10: Next, open the components template and render the data as list of items
Dyn-Table.html
<table class="employees">
   <thead>
      <tr>
         <th>Name</th>
         <th>Role</th>
      </tr>
   </thead>
   <tbody>
    @for (item of data; track $index) {
      <tr>
         <td>{{ item.name }}</td>
         <td>{{ item.role }}</td>
      </tr>
    }
   </tbody>
</table>
Here,
data hold the list of employees with two properties, name and role
Used ngFor to render the employees as rows in the html table
Step 11: Next, open the components styles and add necessary CSS as shown below −
.employees {
   border-collapse: collapse;
   width: 400px;
}

.employees td, .employees th {
   padding: 8px;
}

.employees tbody tr:nth-child(even){background-color: #f2f2f2;}

.employees tbody tr:hover {background-color: #ddd;}

.employees thead th {
   padding-top: 12px;
   padding-bottom: 12px;
   text-align: left;
   background-color: brown;
   color: white;
}
Step 12: Next, open DynHost components template and include the ng-container as shown below −
<ng-container #container></ng-container>
Here, we have shown the usage of ng-container.
Step 13: Next, open DynHostComponent and import necessary classes
import { AfterViewInit, Component, Input, ViewChild, ViewContainerRef } from '@angular/core';
Step 14: Next, import interface, list component, table component and directive
import { DynData } from '../dyn-data';
import { DynList } from '../dyn-list/dyn-list';
import { DynTable } from '../dyn-table/dyn-table';
Step 15: Implement AfterViewInit life cycle hook in the class declaration
export class DynHost implements AfterViewInit {
}
Step 16: Declare an input property to get format information (table / list) from user.
@Input() format: string = 'list'
Step 17: Declare a property, data and set the sample data
private data = [
   {
      'name': 'John',
      'role': "Manager"
   },
   {
      'name': 'Peter',
      'role': "Marketing Intern"
   },
   {
      'name': 'Mary',
      'role': "Technical Intern"
   },
   {
      'name': 'Jack',
      'role': "Sales Manager"
   },
   {
      'name': 'Jessica',
      'role': "Delivery Head"
   },
]
Step 18: Get the ng-container view component from the template by using @ViewChild
@ViewChild('container', { read: ViewContainerRef }) container!: ViewContainerRef;
Step 19: Do actual implementation of dynamically creating the component and loading it into the appropriate place in the ngOnInit life cycle hook
ngAfterViewInit() {

   if(this.format == 'table') {
      const compRef = this.container.createComponent<DynData>(DynTable);
      compRef.instance.data = this.data;
   } else {
      const compRef = this.container.createComponent<DynData>(DynList);
      compRef.instance.data = this.data;
   }
}
Step 20: The complete listing of the host component is as follows,
import { AfterViewInit, Component, Input, OnInit, ViewChild, ViewContainerRef } from '@angular/core';

import { DynData } from '../dyn-data';
import { DynList } from '../dyn-list/dyn-list';
import { DynTable } from '../dyn-table/dyn-table';

@Component({
   selector: 'app-dyn-host',
   templateUrl: './dyn-host.html',
   styleUrls: ['./dyn-host.css']
})
export class DynHost implements AfterViewInit {
   @Input() format: string = 'table'
   @ViewChild('container', { read: ViewContainerRef }) container!: ViewContainerRef;

   private data = [
   {
      'name': 'John',
      'role': "Manager"
   },
   {
      'name': 'Peter',
      'role': "Marketing Intern"
   },
   {
      'name': 'Mary',
      'role': "Technical Intern"
   },
   {
      'name': 'Jack',
      'role': "Sales Manager"
   },
   {
      'name': 'Jessica',
      'role': "Delivery Head"
   },
  ]

   ngAfterViewInit() {

      if(this.format == 'table') {
         const compRef = this.container.createComponent<DynData>(DynTable);
         compRef.instance.data = this.data;
      } else {
         const compRef = this.container.createComponent<DynData>(DynList);
         compRef.instance.data = this.data;
      }
   }
}
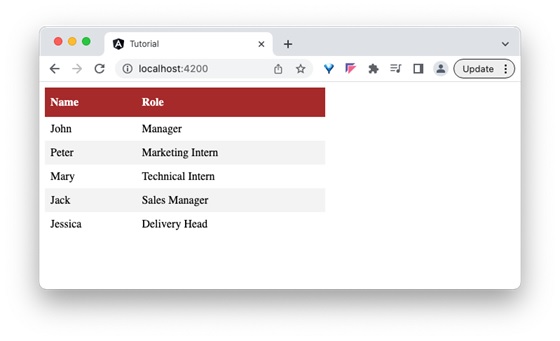
Step 21: Next, open the app components template and include the host component.
app.html
<app-dyn-host format="table" />
Here, we have directed the host component to render the employees data in the tabular format. The host component will dynamically create the DynTableComponent and inject into the host component template.
Step 22: Next, run the application and you can see that the employee data is shown in a tabular format as shown below −
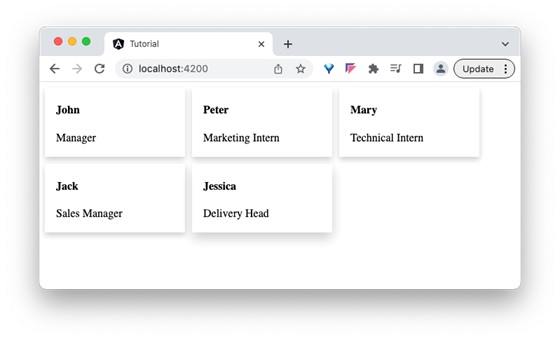
Step 23: Next, open the app components template and change the format to gallery.
<app-dyn-host format="gallery" />
Here, we have directed the host component to render the employees data in gallery format. The host component will dynamically create the DynListComponent and inject into the host component template.
Output
Step 24: Next, run the application and you can see that the employee data is shown in gallery format as shown below −