- Angular Tutorial
- Angular - Home
- Angular - Overview
- Angular - Features
- Angular - Advantages & Disadvantages
- Angular Basics
- Angular - Environment setup
- Angular - First Application
- Angular - MVC Architecture
- Angular Components
- Angular - Components
- Angular - Component Lifecycle
- Angular - View Encapsulation
- Angular - Emulated Encapsulation
- Angular - ShadowDom Encapsulation
- Angular - Component Interaction
- Angular - Using @Input Decorator
- Angular - Using @Output Decorator
- Angular - Using Local Variable
- Angular - Using @ViewChild Decorator
- Angular - Using Services
- Angular - Component Styles
- Angular - Nested Components
- Angular - Content projection
- Angular - Single-slot Content Projection
- Angular - Multi-slot Content Projection
- Angular - Conditional Content Projection
- Angular - Dynamic components
- Angular - Using NgComponentOutlet
- Angular - Using ViewContainerRef
- Angular - Elements
- Angular Templates
- Angular - Templates
- Angular - Template statements
- Angular - Template Variables
- Angular - SVG as Templates
- Angular Binding
- Angular - Data Binding
- Angular - Interpolation
- Angular - Event Binding
- Angular - Property Binding
- Angular - Attribute Binding
- Angular - Class Binding
- Angular - Style Binding
- Angular - Two-way Binding
- Angular Directives
- Angular - Directives
- Angular - Attribute Directives
- Angular - Structural Directives
- Angular - Custom Directives
- Angular Pipes
- Angular - Pipes
- Angular - Built-in Pipes
- Angular - Custom Pipes
- Angular Forms
- Angular - Forms
- Angular - Template Driven Forms
- Angular - Reactive Forms
- Angular - Form Validation
- Angular - Dynamic Forms
- Angular Dependency Injection
- Angular - Dependency Injection
- Angular - Injectable Service
- Angular Routing
- Angular - Routing
- Angular - Dynamic Routes
- Angular - Wildcard Routes
- Angular - Nested Routes
- Angular - Navigation
- Angular - Routing in SPA
- Angular - Custom Route Matches
- Angular - Router Reference
- Angular HTTP Client programming
- Angular - Services
- Angular - HTTP Client
- Angular - Express based REST API
- Angular - Request
- Angular - Request Response Workflow
- Angular - Response
- Angular - Express based Upload API
- Angular - GET
- Angular - POST
- Angular - PUT
- Angular - DELETE
- Angular - JSONP
- Angular - CRUD Operations Using HTTP
- Angular Modules
- Angular - Introduction to Modules
- Angular - Root Module
- Angular - Feature Module
- Angular - Sharing Module
- Angular - Routing Module
- Angular - NgModules
- Angular Animation
- Angular - Animations
- Angular Service Workers & PWA
- Angular - Service Workers & PWA
- Angular Testing
- Angular - Testing Overview
- Angular Design Patterns
- Angular - Design Patterns
- Angular - Lazy Loading
- Angular - Singleton Pattern
- Angular - Observer Pattern
- Angular Libraries
- Angular - Libraries
- Angular - Angular Material
- Angular - PrimeNG
- Angular - RxJS
- Angular Advanced
- Angular - Signals
- Angular - Authentication & Authorization
- Angular - Internationalization
- Angular - Standalone Component
- Angular - Accessibility
- Angular - Web Workers
- Angular - Server Side Rendering
- Angular - Ivy Compiler
- Angular - Building with Bazel
- Angular - Backward Compatibility
- Angular - Reactive Programming
- Angular Tools
- Angular - CLI
- Angular Material UI Elements
- Angular - Paginator
- Angular - Datepicker
- Angular - Select Drop-down
- Angular Miscellaneous
- Angular - Third Party Controls
- Angular - Configuration
- Angular - Displaying Data
- Angular - Decorators & Metadata
- Angular - Basic Example
- Angular - Error Handling
- Angular - Testing & Building a Project
- Angular - Lifecycle Hooks
- Angular - User Input
- Angular - What's New?
- Angular Useful Resources
- Angular - Quick Guide
- Angular - Useful Resources
- Angular - Discussion
Angular - Quick Guide
Angular is a TypeScript based full-stack web framework for building web and mobile applications. One of the major advantages is that Angular support for web applications that can fit in any screen resolution. Angular application is fully compatible with mobiles, tablets, laptops or desktops. Angular has an excellent user interface library for web developers which contains reusable UI components.
This functionality helps us to create Single Page Applications (SPA). SPA is a reactive and fast application. For example, if you have a button in single page and click on the button then the action performs dynamically in the current page without loading the new page from the server. Angular is a TypeScript-based framework that supports object-oriented programming and includes features for server-side rendering as well.
Comparison of angular versions
As we know already, Google releases the version of Angular for the improvement of mobile and web development capabilities. All the released versions are backwards compatible and can be updated easily to the newer version. Lets go through the comparison of released versions.
| Version & Release Date | Description |
|---|---|
AngularJS (October 2010) |
AngularJS is based on Model View Controller (MVC) architecture and automatically handles JavaScript code suitable for each browser. |
Angular 2.0 (September 2016) |
It is a re-engineered and rewritten version of AngularJS. AngularJs had a focus on controllers but, version 2 has changed the focus on components. Components are the main building block of application. It supports features for speed in rendering, updating pages and building cross-platform native mobile apps for Google Android and iOS. |
Angular 4.0 (March 2017) |
Features −
|
Angular 5.0 (November 2017) |
It supported some of the salient features such as HTTPClient API, Lambda support, Improved Compiler and build optimizer. |
Angular 6.0 (May 2018) |
Features added to this version are −
|
Angular 7.0 (October 2018) |
Some salient features of this version of Angular are −
|
Angular 8.0 (May 2019) |
Angular 8.0 comes up with the following new attractive features −
|
Angular 9.0 (February 2020) |
With this new update, drawbacks of the previous versions were modified and various new features were added which include −
|
Angular 10.0 (June 2020) |
It brings a range of new features and improvements which are listed below −
|
Angular 11.0 (November 2020) |
It gets an updated Hot Module Replacement support that allows the modules to be replaced without a full browser refresh. Another major update was the automatic inlining of fonts. It converts your Google Fonts and Icon to inline in index.html. |
Angular 12.0 (May 2021) |
The different improvements introduced with the release of this version of the Angular framework are described below −
|
Angular 13.0 (November 2021) |
Angular 13.0 introduces a new strict mode that gives improved error messages and helps to find common mistakes. Additionally, it updated dependencies for TypeScript 4.4, RxJS 7, and Zone.js 0.11. |
Angular 14.0 (June 2022) |
Like other versions, it also comes with several new features and bug fixes. Introducing a Standalone component that eliminated the need to use NgModules, typed forms and auto completion in Angular CLI are some notable changes. |
Angular 15.0 (November 2022) |
Angular v15 introduces several significant improvements −
|
Angular 16.0 (May 2023) |
This new release of Angular includes developer previews for new reactivity primitives (signal, computed, and effect), enhanced hydration for better page load performance, and faster builds with ESBuild integration. It also supports standalone component migration and scaffolding. Now, developers require Node.js v16 or v18 and TypeScript v4.9 or later. The Angular v16 removes the Angular Compatibility Compiler (ngcc) which means libraries built with View Engine are no longer supported. |
Angular 17.0 (November 2023) |
The Angular v17 was launched with certain new features including −
|
Angular 18.0 (May 2024) |
Features added to the new version of Angular is given below −
|
Angular 19.0 (Nov 2024) |
Features added to the new version of Angular is given below −
|
Angular 20.0 (May 2025) |
Features added to the new version of Angular is given below −
|
Angular 21 new Features
Angular 21 comes up with the following new attractive features −
Experimental Signal Forms: A more scalable, composable reactive form built on signals.
Angular Aria as Developer Preview: Headless components having accessibility as priority. Can be customized.
Angular MCP Server: A server to allows LLMs to use Angular new features.
Integration with Vitest: Vitest is the new test runner by default in Angular CLI.
Excludes zone.js: Angular Applications are not having zone.js by default from this version onwards.
Apps Built with Angular
Some of the popular websites built using Angular Framework are listed below −
Weather.com: It is one of the leading forecasting weather report websites.
Youtube: It is a video and sharing website hosted by Google.
Netflix: It is a technology and media services provider.
PayPal: It is an online payment system.
Difference between Angular and AngularJs
The table below describes the difference between Angular and AngularJS −
| Angular | AngularJS |
|---|---|
Angular is based on TypeScript language. |
AngularJS is based on JavaScript language. |
All the popular mobile browsers support Angular. |
Mobile browsers do not support AngularJS. |
It has the feature of dependency injection. |
It does not support dependency injection. |
Angular has CLI tool. |
CLI tool is not available in AngularJS. |
It has component based structure. |
It has MVC (Model View Controller) based architecture. |
Angular - Features
In this tutorial, we will explore the features of Angular and understand how this framework is different from other JavaScript frameworks. Features in simple term refers to the distinct functionalities and characteristics of any application, library or framework that helps to fulfill user requirements.

Features of Angular framework
The list of features Angular framework provides is as follows −
TypeScript based framework
Reactive framework
Component based architecture
Module based design
Efficient and performant template engine
Lot of Inbuilt directives to enhance the template engine
Easy to create custom directives to extend the features of template engine
Pipes to add helper functions into the template engine
Automatic data binding
Efficient and performance routing engine
Easy to use dependency injection framework
Support modern HTTP and CSS functionality
Support CSS preprocessor
Inbuilt support for HTTP client
Supports Single page application development
Supports progressive web app development (PWA app)
Supports accessibility
Supports internationalization
Supports Server Side Rendering (SSR) through Angular Universal
Inbuilt End-to-End testing support
Support code generation through Angular CLI tools
Efficient and performant code building through in-house build tools
Angular was launched in 2016 as a replacement for AngularJS and within a few months, it gained popularity among developers community, especially front-end developers due to its features and ease of use. Even today, it continues to be one of the popular frameworks because Google actively maintains, improves and adds new features to it.
Despite of the numerous features Angular provides, one should be aware of the advantages and disadvantages before start learning and using it. Let's discuss it in detail.
Advantages of Angular Framework
Following are the advantages of Angular framework −
TypeScript language − TypeScript provides type safety. Type safety reduces the bug by catching it early during the development phase and helps to create high quality application.
Full stack framework − Angular is a full stack framework supporting both client side and server-side rendering. It supports PWA application as well. It has builtin testing framework, dependency injection, reactive programming, template engine and data binding. It bundles the code efficiently to support fast rendering in the browser.
Easy to learn − Since angular has all the functionality to develop a modern application, developer dont need to search, analyze and learn different libraries. Also, Angular provides extensive documentation for all the feature along with code snippets for each and every version of the angular framework.
Easy to start − Angular provides CLI tool to quickly start a new application with basic setting. It supports routing and CSS preprocessor configuration as well.
Easy to develop − Angular provides CLI tools to create new components and directive. Angular component-based architecture, module-based design, reactive programming, data binding, routing and component-based framework enables the developer to program the application faster.
Easy to deploy − Angular provides builtin tools to compile and deploy the application. Angular team continuously enhances the build tools to improve the developer experience.
Easy to test − Angular provides end to end testing framework supporting all aspect of the angular features. Developer can write the spec for each component and test it.
Continuous development − Angular team continuously enhance the framework and provides the update in every 6 months. They improve the framework on every aspect and develop new feature in accordance with the improvements in web development.
Disadvantages of Angular framework
The list given below explains the disadvantages of the Angular framework −
Little support for JavaScript language − Even though TypeScript is better programming language, little support for JavaScript leads developer to learn TypeScript before starting the Angular application and delays the adaptability of the Angular framework.
Steep learning curve − Since angular framework has lot of builtin concepts, it took considerable time to learn all aspect of the framework.
Hard to specialize − Developer needs lot of time and efforts to master the angular framework to write high performance application.
Low options − Being a full stack framework reduces the option in choosing the best library for the given task. Developer has to content with the functionality provided by the Angular team and has to wait for their preferred functionality to be developed by Angular team.
Low developer tools − Compared to React, Angular has less number of developer tools for debugging, profiling and testing the application.
Angular - Environment Setup
This tutorial will guide you on how to set up an Angular development environment on your local machine. This environment setup will allow you to develop and run your Angular application locally without the need for Internet. Additionally, you will be able to store your progress without losing any essential data.
Steps to Setup Environment for Angular
There are only two steps required to set up an Angular development environment on your local machine −
Installation of Node.js and npm
Installation of Angular CLI
Node.js and npm Installation
Node.js is a JavaScript runtime environment that provides a platform to execute JavaScript code outside of a browser. It is also a central repository from where one can download JavaScript packages using npm. The npm stands for Node Package Manager. These tools come bundled together when you install Node.js on your machine.
To install Node.js and npm for Angular development, follow the steps given below −
Step 1:
Head over to the Node.js official website by following this link. From here, download the LTS (Long Term Support) version of NodeJS installer.

Step 2:
After downloading, navigate to the folder where NodeJS is located and double click the installer. When you double click, the following window will pop up −

Here, click on Next button.
Step 3:
Accept the end-user license agreement and click Next button to move further.

Step 4:
In this step, choose the location where you want to install NodeJS on your machine. Click the Change button to choose custom location or simply click on the Next button to leave default location. We suggest leaving the default location as it is.

Step 5:
Next, you will be asked to select the features for NodeJS you want to install. Keep the default features selected and click the Next button.

Step 6:
Now, click on the checkbox to install the tools necessary to compile native modules. Then, click Next.

Step 7:
Finally, clicking on the install button will start installation process.

Open the command prompt to verify if node is installed or not. We can check it using the below command −
node --version
Angular CLI Installation
Angular CLI, a command line interface used to maintain Angular applications directly from a command shell, uses Node and node package manager to install and run JavaScript tools outside the browser.
Use the following command to install Angular CLI −
npm install -g @angular/cli
If you want a specific version of Angular CLI, use the following command −
npm install -g @angular/cli@version_name
This command will install the latest version of Angular CLI −
npm install -g @angular/cli@latest
For MAC or Linux operating systems, the below command is used −
sudo npm install -g @angular/cli
To verify the successful installation of Angular CLI, use the command given below −
ng version
Angular - First Application
In this tutorial, we will learn how to create and run our first Angular application on a local machine. We also analyze its project structure. Before we proceed, please ensure that you have set up an Angular development environment on your system. You can refer to our Angular Environment Setup tutorial, where we explain the installation of all the necessary tools required for the Angular development process.
Steps to Create and Run First Angular Application
The following steps are necessary to create and run each Angular application successfully −
Install Angular CLI
Create Angular Application
Start Angular Application
Install Angular CLI
Angular CLI is a command line interface used to maintain Angular applications directly from a command shell. It uses Node and node package manager to install and run JavaScript tools outside the browser.
Use the following command to install Angular CLI −
npm install -g @angular/cli
Let us check whether the Angular is installed in our system and the version of the installed Angular using below command −
ng --version
21.0.0
Here,
ng is the prefix that stands for Angular. It is used to denote Angular-specific directives, components, and modules. It runs in NodeJS environment.
The result shows the details of the Angular version
So, Angular is installed in our system and the version is 21.0.0.
Create Angular Application
To create a new Angular application ng new command is used.
ng new application-name
Let us create an Angular application to check our day to day expenses. Give it a name expense-manager. But, first navigate to the folder where you want to create an Angular application using the cd command. Then, use below command to create the new application −
cd /path/to/workspace
ng new expense-manager
When you run the above command a new folder with the name expense-manager will be created in the current working directory. Inside this folder, the Angular CLI install all the necessary Angular npm packages and other dependencies.
You will be asked some basic question in order to create new application like type of style sheet, enable SSR and SSG. For style sheet, choose CSS and do not enable SSR and SSG for the time being.
Once the basic questions are answered, a new Angular application will be created under expense-manager folder. Let us move into the our newly created application folder −
cd expense-manager
The initial structure of the application will be −

The important directories of the application are −
src: This directory contains all the source code for your Angular application, including components, services, modules, templates, styles, and assets.
app: It is a sub-folder of src directory. It contains component files.
angular.json: This is the workspace configuration file which means it defines the configuration options for the entire Angular workspace.
node_modules: This directory contains all the npm packages installed as dependencies for the project.
package.json: This file contains metadata about the project and lists the npm dependencies required for the project.
tsconfig.json: It is the TypeScript configuration file that specifies the compiler options for TypeScript files.
public: This file is used to store asset files.
Start Angular Application
To start an Angular application, we use the ng serve CLI command.
ng serve
Here, the above sub command compile and run the Angular application using a local development web server. It will start a development web server and serves the application under port, 4200.
Let us fire up a browser and open http://localhost:4200. The browser will show the application as shown below −

We will change the application and learn how to code an Angular application in the upcoming chapters.
Angular - MVC Architecture
Building an application is one part of the job, and maintaining it is another. However, while building, it is necessary to consider the potential load on the application in future. We need to develop an application in a way that ensures it can run for a longer period of time. Architecture of a framework help developers to use the same structure each time they build code for an application, so that they do not have to rebuild each piece of code from scratch.
Angular framework has a well-defined architecture that provides a structured and organized approach to building and maintaining software or applications. Let's understand the architecture of the Angular framework in this tutorial.
Architecture Overview of Angular
Angular framework is based on several core concepts and they are as follows −
- Components
- Templates with Data binding and Directives
- Modules
- Services and dependency injection
- Metadata
Component
The core of the Angular framework architecture is Angular Component. Angular Component is the building block of every Angular application. Every angular application is made up of one more Angular Component. It is basically a plain JavaScript/Typescript class along with a HTML template and an associated name.
The HTML template can access the data from its corresponding JavaScript/Typescript class. Component's HTML template may include other component using its selectors value (name). The Angular Component may have an optional CSS Styles associated it and the HTML template may access the CSS Styles as well.
Let us analyse the App component in our ExpenseManager application. The App code is as follows −
app.ts
import { Component, signal } from '@angular/core';
import { RouterOutlet } from '@angular/router';

@Component({
  selector: 'app-root',
  imports: [RouterOutlet],
  templateUrl: './app.html',
  styleUrl: './app.css'
})
export class App {
  protected readonly title = signal('expense-manager');
}
In the above code block,
@Component: A decorator used to convert a normal Typescript class to Angular Component.
app-root: It is the selector/name of the component and it is specified using selector meta data of the component's decorator.
app.html: It is the HTML template document associated with the component. The component template is specified using templateUrl meta data of the @Component decorator.
App: Its property (title) is used in the HTML template to set the title of the application.
app.css: This is the CSS style document associated with the component. The component style is specified using styleUrls meta data of the @Component decorator.
To show the view of this component, the app-root selector is used by root document, i.e. src/index.html of the Angular application as shown below −
index.html
<!doctype html>
<html lang="en">
   <head>
      <meta charset="utf-8">
      <title>ExpenseManager</title>
      <base href="/">
      <meta name="viewport" content="width=device-width, initial-scale=1">
      <link rel="icon" type="image/x-icon" href="favicon.ico">
   </head>
   <body>
      <app-root></app-root>
   </body>
</html>
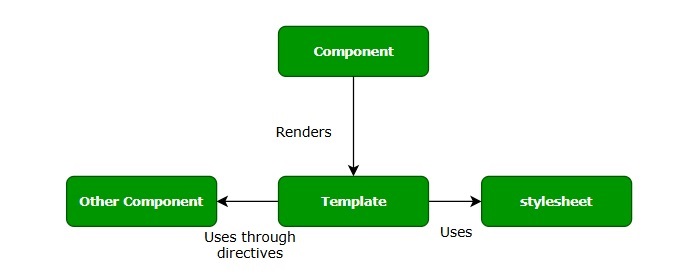
Template
Template is basically a super set of HTML. Template includes all the features of HTML and provides additional functionality to bind the component data into the HTML and to dynamically generate HTML DOM elements.
The core concept of the template can be categorised into two items and they are as follows −
Data binding
Used to bind the data from the component to the template.
{{ title }}
Here, title is a property in AppComponent and it is bind to template using Interpolation.
Directives
Used to include logic as well as enable creation of complex HTML DOM elements.
<p *ngIf="canShow">
   This sectiom will be shown only when the *canShow* property's value in the corresponding component is *true* </p>
<p [showToolTip]='tips' />
Here, ngIf and showToolTip (just an example) are directives. ngIf create the paragraph DOM element only when canShow is true. Similarly, showToolTip is Attribute Directives, which adds the tooltip functionality to the paragraph element.
When a user hover mouse over the paragraph, a tooltip will be shown. The content of the tooltip comes from tips property of its corresponding component.
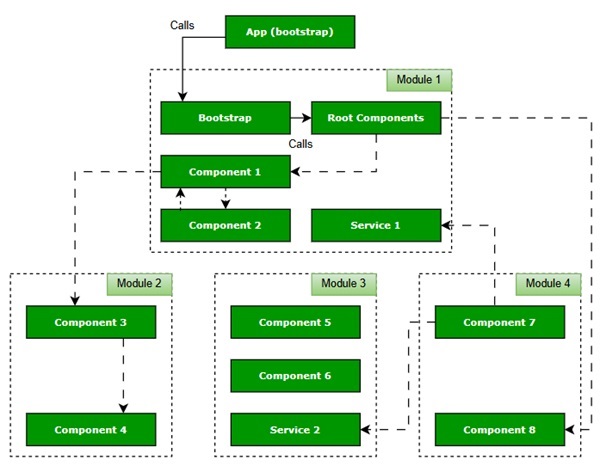
Modules
Angular Module is basically a collection of related features/functionality. It groups multiple components and services under a single context.
For example, animations related functionality can be grouped into single module and Angular already provides a module for the animation related functionality, BrowserAnimationModule module.
An Angular application can have any number of modules but only one module can be set as root module, which will bootstrap the application and then call other modules as and when necessary. A module can be configured to access functionality from other module as well. In short, components from any modules can access component and services from any other modules.
Following diagram depicts the interaction between modules and its components.
Services
Services are plain Typescript/JavaScript class providing a very specific functionality. They will do a single task and do it best. The main purpose of the service is to make a certain feature reusable. Instead of writing a functionality inside a component, separating it into a service will make it usable in other component as well.
Also, Services enables the developer to organize the business logic of the application. Basically, component uses services to do its own job. Dependency Injection is used to properly initialize the service in the component so that the component can access the services as and when necessary without any setup.
Metadata
In Angular, metadata is used to provide additional information about a class, component, or service. This information helps Angular understand how to process and use these elements within the application. Metadata is defined using decorators, which are special functions that associate metadata to a class.
Workflow of Angular Application
We have learned the core concepts of Angular application. Let us see the complete flow of a typical Angular application.
When we run an Angular application, index.html is the first file that is loaded on the browser. Then, browser looks for the main TypeScript file, i.e. src/main.ts which is the entry point of Angular application.
Now, this file bootstraps the AppComponent (src/app.component.ts), the root component of every Angular application.
The AppComponent renders its template (src/app.component.html) and uses the corresponding styles (src/app.component.css). AppComponent name, i.e., app-root is used inside the src/index.html so that view of the angular application can be rendered.
<!doctype html>
<html lang="en">
   <head>
      <meta charset="utf-8">
      <title>ExpenseManager</title>
      <base href="/">
      <meta name="viewport" content="width=device-width, initial-scale=1">
      <link rel="icon" type="image/x-icon" href="favicon.ico">
   </head>
   <body>
      <app-root></app-root>
   </body>
</html>
A component can use another component through directive in its template using target component's selector name.
<component-selector-name></component-selector-name>
Also, all registered services are accessible to all Angular components through Dependency Injection (DI) framework.
NOTE: For the complete workflow of a non-standalone angular application, please refer to this link: angular application workflow
Multiple Choice Questions (MCQ) on Angular Architecture
Now that you have learned the Angular architecture, let's test your knowledge. Please answer the following questions based on your understanding −
Q. 1 - What is the core building block of an Angular application?
Answer : C
Explanation
Component is the building block of every Angular application. It is a Typescript class which controls the View, which is defined in its HTML template.
Answer : A
Explanation
The ngIf is a structural directive.
Q. 3 - In Angular, what is a Service primarily used for?
A - To define the HTML structure.
Answer : B
Explanation
Service is TypeScript class that can be used to share data or a common feature across different parts of your angular application.
Angular - Components
Components are the building blocks of an Angular application. The primary use of Angular Component is to generate a section of web page called View. By combining different views, a single application is created. Every component will have an associated template and it will be called in order to generate views.
Let us learn the basic concept of components in this tutorial.
Structure of Angular Component
Each component of an Angular application has a few important parts which are as follows −
@component Decorator: All the application related configurations are written inside this decorator.
HTML Template: View of the Angular application.
Styles: It controls the styles of a view.
TypeScript Class: Code related to behavior of the Angular application goes into this class.
By default, all these parts are created by Angular CLI, you can update, add or even delete them if any of them is not required.
How to Create Components in Angular?
In Angular, a new Component is created using the ng generate component command as specified below −
ng generate component name-of-component
Example
Let's see an example where we create a new component in our ExpenseManager application. This component will contain our first expense entry. First, open the command prompt and navigate to ExpenseManager application.
cd expense-manager
Now, use the command given below to create a expense-entry component −
ng generate component expense-entry
Following files and folders will be created by Angular CLI on the above command −
CREATE src/app/expanse-entry/expanse-entry.spec.ts (597 bytes)
CREATE src/app/expanse-entry/expanse-entry.ts (224 bytes)
CREATE src/app/expanse-entry/expanse-entry.css (0 bytes)
CREATE src/app/expanse-entry/expanse-entry.html (29 bytes)
Here,
- ExpanseEntry is created under src/app/expense-entry folder.
- Component class, Template and stylesheet are created.
Next, we add a title property to ExpenseEntry, i.e., (src/app/expense-entry/expense-entry.ts) component.
expense-entry.ts
import { Component, OnInit } from '@angular/core';

@Component({
   selector: 'app-expense-entry',
   imports: [],
   templateUrl: './expense-entry.html',
   styleUrl: './expense-entry.css',
})
export class ExpenseEntry implements OnInit {
   title: any;
   constructor() {}
   ngOnInit(): void {
      this.title = "Expense Entry"
   }
}
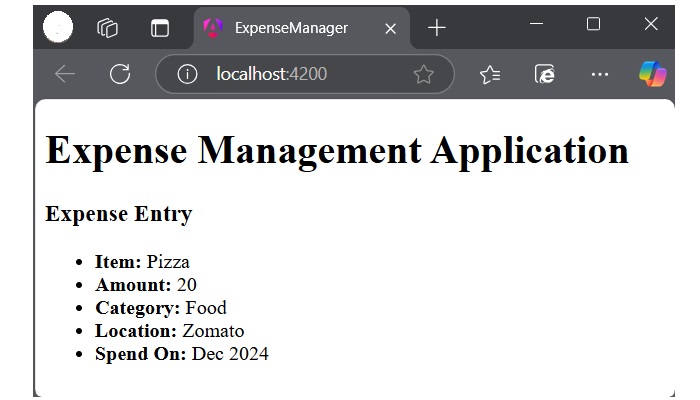
Update template, src/app/expense-entry/expense-entry.html with below content.
expense-entry.html
<h3>{{title}}</h3>
<ul>
   <li><b>Item:</b> Pizza</li>
   <li><b>Amount:</b> 20</li>
   <li><b>Category:</b> Food</li>
   <li><b>Location:</b> Zomato</li>
   <li><b>Spend On:</b> Dec 2024</li>
</ul>
Open src/app/app.html and include the newly created component.
app.html
<h1>Expense Management Application</h1>
<app-expense-entry></app-expense-entry>
<router-outlet />
Here,
app-expense-entry is the selector value and it can be used as a regular HTML Tag.
At the end, import ExpenseEntry to the app.ts file as shown below −
app.ts
import { Component, signal } from '@angular/core';
import { RouterOutlet } from '@angular/router';
import { ExpenseEntry } from './expense-entry/expense-entry';

@Component({
   selector: 'app-root',
   imports: [RouterOutlet, ExpenseEntry],
   templateUrl: './app.html',
   styleUrl: './app.css'
})
export class App {
   protected readonly title = signal('expense-manager');
}
Finally, the output of the application is −
Component Lifecycle Hook
Angular component goes through a series of stages/events during its existence. The different stages of the Angular Components Lifecycle are creation, change detection, rendering and destruction.
Each phase of the angular component is associated with a lifecycle hook interface which can be implemented to perform arbitrary action in that particular phase. The lifecycle hooks refer to the methods of lifecycle hook interfaces.
Component Interaction
Component interaction is one of the important and necessary features in the context of component based architecture. Angular provides multiple options to pass and receive data between components.
You can share data from parent component to child component as well as, child to parent component. Also, it is possible to share data between any other component within the Angular application.
In Angular, parent and child components interacts through the following ways −
- @Input decorator
- @Output decorator
- local variable
- @Viewchild decorator
- Services
Component Styling
Component styling is the process of designing and formatting the visual presentation of views or components. You can use the following ways for styling:
- Using "styles"
- Using "styleUrls"
- Styling through template
- Using global styles
- Using CSS preprocessor
- Customized styles
- Using custom selectors
Nested Components
Nested components are normal Angular Components with parent-child relations. The parent can access and share data with the child, either partially or fully. The component nested inside another component is called child component. The component containing the child component is called the parent component.
Dynamic Components
Angular allows the component to be dynamically created and loaded at run time at a specific location in the host (another) component.
You can create dynamic components in Angular using the following ways −
- Using NgComponentOutlet
- Using ViewContainerRef
Multiple Choice Questions (MCQ) on Angular Components
You have reached the end of this chapter. Now, it's time to check your understanding of the angular component concept. Please try to give correct answers to the questions given below −
Q. 1 - What is the primary purpose of an Angular Component?
A - To define the routing configuration
B - To generate and manage views
Answer : B
Explanation
An Angular Component is responsible for generating views and managing the behavior associated with them.
Q. 2 - Which Angular decorator is used to define a component?
Answer : A
Explanation
The @Component decorator is used to define an Angular component, which contains metadata such as the selector, template, and style URLs.
Q. 3 - Command to generate a new component in Angular:
Answer : B
Explanation
The ng generate component component-name command is used to create a new component in an Angular application using Angular CLI.
Angular - Component Lifecycle
Angular component goes through a series of stages/events during its existence. Before moving further in the journey of learning Angular, it is necessary to understand how a component interacts with the framework and the DOM throughout its existence.
When an angular component is constructed, it first goes through the change detection phase, where it checks whether there are any changes in the input and then acts accordingly. Then, the initialization phase kicks on and continues to other phases and finally gets destroyed in the destruction phase.
Component Lifecycle Phases in Angular
The different stages of the Angular Components Lifecycle are as follows −
Creation: It is the first phase where a component is instantiated.
Change Detection: Then, Angular try to detect changes in the View and Content of the application.
Rendering: After change detection, the new template is updated.
Destruction: The Component is destroyed at the end.
Component Lifecycle Hook in Angular
Each phase of the angular component is associated with a lifecycle hook interface which can be implemented to perform arbitrary action in that particular phase. Generally, the lifecycle hooks refer to the methods of lifecycle hook interfaces. Let's see the phases, their sequence and the corresponding hooks.
| Phases | Lifecycle Hooks | Description |
|---|---|---|
Creation |
Constructor |
Constructor runs when Angular instantiates the component for the first time. |
Change Detection |
ngOnChanges() |
Change detection is the first phase, where the angular component will check the inputs for changes and act accordingly. It has a corresponding lifecycle hook, ngOnChanges(). This hook runs before the ngOnInit() during the first initialization process. |
ngOnInit() |
The ngOnInit() lifecycle hook runs exactly once after ngOnChanges(). It is raised to do the necessary initialization process based on the initial input. |
|
ngDoCheck() |
Next, Angular tries to detect the changes in the component and act accordingly. The lifecycle hook used for checking is ngDoCheck(). This hook is invoked even if there is not change in the input bound properties. Avoid defining this hook as it might affect the page's performance. |
|
ngAfterContentInit() |
This lifecycle hook is called only once after the initialization of all children nested inside the content of component. |
|
ngAfterContentchecked() |
It is invoked during every change detection phase after the children nested inside the component's content have been checked for changes. |
|
ngAfterViewInit() |
Next is the view initialization phase, where angular sets the various child views of the component template. The lifecycle hook used for view initialization phase is ngAfterViewInit(). |
|
ngAfterViewchecked() |
Now, Angular tries to detect the changes in the view of the component/directive. The lifecycle hook for view checking phase is ngAfterViewchecked(). |
|
Rendering |
afterNextRender() |
It runs only once when all components have been rendered to the DOM. |
afterRender() |
Runs every time after all components have been rendered to the DOM. |
|
Destruction |
ngOnDestroy() |
In the final phase, ngOnDestroy() hook is called to destroy the component/directive. |
Execution Order of Component Lifecyle Hooks
Let us see the lifecycle sequence of an arbitrary component/directive through its hooks.
- ngOnChanges
- ngOnInit
- ngDoCheck
- ngAfterContentInit
- ngAfterContentChecked
- ngAfterViewInit
- ngAfterViewChecked
- ngOnChanges
- ngDocheck
- ngAfterContentChecked
- ngAfterViewchecked
- Repeation of Step 8 - 11 until destruction
- ngOnDestroy
Example
Let us create a new component, MyLifecycleComponent, wire up all hooks and check the sequence of the lifecylce using console output.
Step 1: Create a new component using angular CLI as shown below −
ng generate component my-lifecycle-sample
This will create a new component and its related template and styles as shown below.
ng generate component my-lifecycle-sample
CREATE src/app/my-lifecycle-sample/my-lifecycle-sample.spec.ts (633 bytes)
CREATE src/app/my-lifecycle-sample/my-lifecycle-sample.ts (247 bytes)
CREATE src/app/my-lifecycle-sample/my-lifecycle-sample.css (0 bytes)
CREATE src/app/my-lifecycle-sample/my-lifecycle-sample.html (35 bytes)
Step 2: Add all lifecycle hooks into the component and log messages:
MyLifecycleSample.ts
import { Component } from '@angular/core';
@Component({
selector: 'app-my-lifecycle-sample',
imports: [],
templateUrl: './my-lifecycle-sample.html',
styleUrl: './my-lifecycle-sample.css',
})
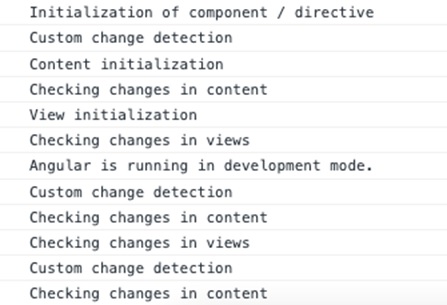
export class MyLifecycleSample {
ngOnChanges() {
console.log("Change detection")
}
ngOnInit() {
console.log("Initialization of component / directive")
}
ngDoCheck() {
console.log("Custom change detection")
}
ngAfterContentInit() {
console.log("Content initialization")
}
ngAfterContentChecked() {
console.log("Checking changes in content")
}
ngAfterViewInit() {
console.log("View initialization")
}
ngAfterViewChecked() {
console.log("Checking changes in views")
}
ngOnDestroy() {
console.log("Destruction of component / directive")
}
}
Step 3: Add the component in the app components template app.component.html.
<h1>Expense Management Application</h1>
<app-expense-entry></app-expense-entry>
<app-my-lifecycle-sample></app-my-lifecycle-sample>
<router-outlet />
Run the application using ng serve and test the console through developer tool in the browser. It will show all the lifecycle events executing in the above discussed order.
Multiple Choice Questions on Angular Component Lifecycle
In this section, test your understanding of the angular component lifecycle by giving correct answers to the questions given below −
Q. 1 - What is the first lifecycle hook called when an Angular component is instantiated?
Answer : D
Explanation
The constructor runs when Angular instantiates the component for the first time. It is the very first phase before change detection and initialization.
Q. 2 - Which lifecycle hook is called after the component's content is initialized?
Answer : B
Explanation
The ngAfterContentInit() lifecycle hook is called only once after the initialization of all the children nested inside the content of the component.
Q. 3 - Which of the following is true about ngDoCheck()?
A - It is only invoked when there is a change in the input properties.
B - It runs after ngOnInit() and is used for custom change detection.
Answer : B
Explanation
ngDoCheck() is used for custom change detection and runs after ngOnInit(). It is called even if there are no changes to the input-bound properties.
Angular - View Encapsulation
View encapsulation is a technique to encapsulate the style of the given view from other sections of the application. By default, the CSS style applied in an HTML document will affect the entire document. The same applies to the Angular framework as well. This default behaviour is going to be an advantage in some scenarios like global styles but at the same time, it may affect specific parts of the application unintentionally (like a special button/link with specific styles).
To make sure that the style of the specific part of the application does not get affected, the view encapsulation concept provided by Angular can be used.
View Encapsulation Modes in Angular
Angular provides a property named view encapsulation in the Component decoration to direct the scope of component style. There are three modes of encapsulation, which are as follows −
- None (ViewEncapsulation.None)
- Emulated (ViewEncapsulation.Emulated)
- ShadowDom (ViewEncapsulation.ShadowDom)
ViewEncapsulation.None
The mode None will not do anything to safeguard the style of an element inside the component. Component view will be exposed to all the global styles and get affected by it.
Example
Let us create a simple component to check how ViewEncapsulation.None mode works.
Step 1: Navigate to the project folder using cd command. Create a new component and name it view-encapsulation-sample.
ng generate component view-encapsulation-sample
CREATE src/app/view-encapsulation-sample/view-encapsulation-sample.spec.ts (675 bytes)
CREATE src/app/view-encapsulation-sample/view-encapsulation-sample.ts (271 bytes)
CREATE src/app/view-encapsulation-sample/view-encapsulation-sample.css (0 bytes)
CREATE src/app/view-encapsulation-sample/view-encapsulation-sample.html (41 bytes)
Step 2: Now, go to view-encapsulation-sample.ts file. Add ViewEncapsulation.None mode for the component as shown below −
view-encapsulation-sample.ts
import { Component, ViewEncapsulation } from '@angular/core';

@Component({
   selector: 'app-view-encapsulation-sample',
   imports: [],
   templateUrl: './view-encapsulation-sample.html',
   styleUrl: './view-encapsulation-sample.css',
   encapsulation: ViewEncapsulation.None
})
export class ViewEncapsulationSample {

}
Step 3: Change the template, view-encapsulation-sample.html and add two containers as shown below −
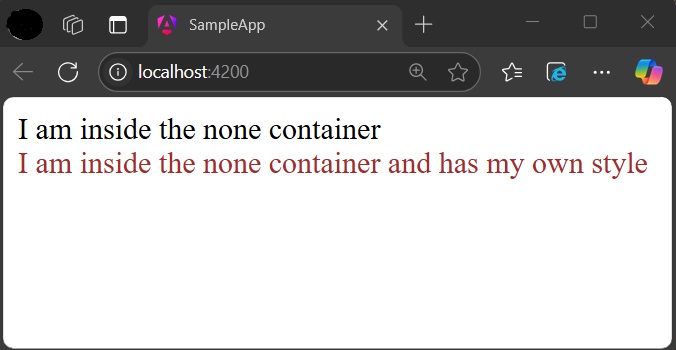
view-encapsulation-sample.ts
<div>I am inside the none container</div>
<div class="mystyle">I am inside the none container and has my own style</div>
Here, the first container does not have any styles or class and it is more prone to get affected by the global styles. The second container has class attributes and yet has a chance to get affected by global styles.
Step 4: Apply the style in the component css file, view-encapsulation-sample.css as shown below −
view-encapsulation-sample.css
div.mystyle { color: brown }
Step 5: Add the component in the app component and app.html as shown below −
app.ts
import { Component, signal } from '@angular/core';
import { RouterOutlet } from '@angular/router';
import { ViewEncapsulationSample } from './view-encapsulation-sample/view-encapsulation-sample';

@Component({
   selector: 'app-root',
   imports: [RouterOutlet, ViewEncapsulationSample],
   templateUrl: './app.html',
   styleUrl: './app.css'
})
export class App {
   protected readonly title = signal('expense-manager');
}
<app-view-encapsulation-sample />
<router-outlet />
Step 6: On running the application, you can clearly see that the generated style and element are plain and no safeguard is applied and the application will look as shown below −
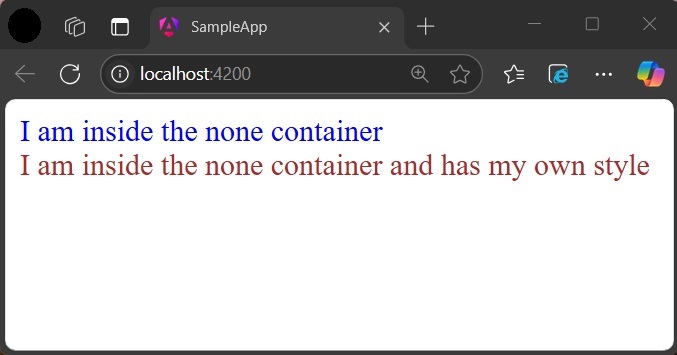
Step 7: Add a style in the global css assets, styles.css targeting div tag and re-run the application.
styles.css
div { color: blue }
Now, the color of the first container changed to blue as shown below −
ViewEncapsulation.Emulated
Emulated mode will change the styles in such a way that it only applies to the element inside the component only. However, global styles may still affect elements inside a component.
Example
Let us change our application and apply the Emulated option as shown below −
import { Component, ViewEncapsulation } from '@angular/core';

@Component({
   selector: 'app-view-encapsulation-sample',
   imports: [],
   templateUrl: './view-encapsulation-sample.html',
   styleUrl: './view-encapsulation-sample.css',
   encapsulation: ViewEncapsulation.Emulated
})
export class ViewEncapsulationSample {

}
Now, re-run the application and check the result −
ViewEncapsulation.ShadowDom
ShadowDom mode will apply the HTML native shadow dom concept to scope the style of the component. The element of the component will not be affected by the global styles in any situation as it completely hide using shadowDOM concept.
Example
Change our application and apply the ShadowDOM mode as shown below −
import { Component, ViewEncapsulation } from '@angular/core';

@Component({
   selector: 'app-view-encapsulation-sample',
   imports: [],
   templateUrl: './view-encapsulation-sample.html',
   styleUrl: './view-encapsulation-sample.css',
   encapsulation: ViewEncapsulation.ShadowDom
})
export class ViewEncapsulationSample {

}
Now, re-run the application and check the output.

Now, both containers are safeguarded by native shadowDOM concept and are not affected by the global styles.
Applying different encapsulation in an application
View encapsulation of a component can be different from other components used in the application as view encapsulation is applied per component basis. Even the nested component can have different view encapsulation options as per component requirements. Angular will apply the encapsulation as directed even in very complex nested component trees as well.
Multiple Choice Questions on Angular View Encapsulation
In this section, you can check your knowledge of the angular view encapsulation by giving correct answers to the questions given below −
Q. 1 - Why we use the view encapsulation in Angular?
A - To separate Angular templates from global styles.
B - To encapsulate the style of the given view from other sections of the application.
Answer : B
Explanation
To make sure that the style of the specific part of the application does not get affected, the view encapsulation is used in Angular.
Q. 2 - Which of the following option is not a valid view encapsulation mode?
B - ViewEncapsulation.Emulated
Answer : D
Explanation
The valid view encapsulation modes are None, Emulated, and ShadowDom. ViewEncapsulation.Global is not a valid option.
Q. 3 - Name the default view encapsulation mode in Angular:
Answer : D
Explanation
By default, Angular uses ViewEncapsulation.Emulated mode.
Angular - Emulated Encapsulation
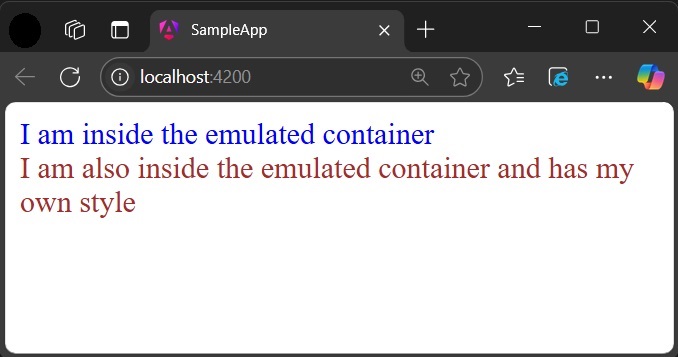
ViewEncapsulation.Emulated
Emulated mode will change the styles in such a way that it only applies to the element inside the component only. However, global styles may still affect elements inside a component.
Example - Usage of Emulated Encapsulation
Let us create a simple component to check how ViewEncapsulation.Emulated mode works.
Step 1: Navigate to the project folder using cd command. Create a new component and name it view-encapsulation-sample.
ng generate component view-encapsulation-sample
CREATE src/app/view-encapsulation-sample/view-encapsulation-sample.spec.ts (675 bytes)
CREATE src/app/view-encapsulation-sample/view-encapsulation-sample.ts (271 bytes)
CREATE src/app/view-encapsulation-sample/view-encapsulation-sample.css (0 bytes)
CREATE src/app/view-encapsulation-sample/view-encapsulation-sample.html (41 bytes)
Step 2: Now, go to view-encapsulation-sample.ts file. Add ViewEncapsulation.None mode for the component as shown below −
view-encapsulation-sample.ts
import { Component, ViewEncapsulation } from '@angular/core';

@Component({
   selector: 'app-view-encapsulation-sample',
   imports: [],
   templateUrl: './view-encapsulation-sample.html',
   styleUrl: './view-encapsulation-sample.css',
   encapsulation: ViewEncapsulation.Emulated
})
export class ViewEncapsulationSample {

}
Step 3: Change the template, view-encapsulation-sample.html and add two containers as shown below −
view-encapsulation-sample.ts
<div>I am inside the none container</div>
<div class="mystyle">I am inside the none container and has my own style</div>
Here, the first container does not have any styles or class and it is more prone to get affected by the global styles. The second container has class attributes and yet has a chance to get affected by global styles.
Step 4: Apply the style in the component css file, view-encapsulation-sample.css as shown below −
view-encapsulation-sample.css
div.mystyle { color: brown }
Step 5: Add the component in the app component and app.html as shown below −
app.ts
import { Component, signal } from '@angular/core';
import { RouterOutlet } from '@angular/router';
import { ViewEncapsulationSample } from './view-encapsulation-sample/view-encapsulation-sample';

@Component({
   selector: 'app-root',
   imports: [RouterOutlet, ViewEncapsulationSample],
   templateUrl: './app.html',
   styleUrl: './app.css'
})
export class App {
   protected readonly title = signal('expense-manager');
}
app.html
<app-view-encapsulation-sample />
<router-outlet />
Step 6: Add a style in the global css assets, styles.css targeting div tag and run the application.
styles.css
div { color: blue }
Output
On running the application, you can the result as shown as below −
Angular - ShadowDom Encapsulation
ViewEncapsulation.ShadowDom
ShadowDom mode will apply the HTML native shadow dom concept to scope the style of the component. The element of the component will not be affected by the global styles in any situation as it completely hide using shadowDOM concept.
Example - Usage of ShadowDom Encapsulation
Let us create a simple component to check how ViewEncapsulation.None mode works.
Step 1: Navigate to the project folder using cd command. Create a new component and name it view-encapsulation-sample.
ng generate component view-encapsulation-sample
CREATE src/app/view-encapsulation-sample/view-encapsulation-sample.spec.ts (675 bytes)
CREATE src/app/view-encapsulation-sample/view-encapsulation-sample.ts (271 bytes)
CREATE src/app/view-encapsulation-sample/view-encapsulation-sample.css (0 bytes)
CREATE src/app/view-encapsulation-sample/view-encapsulation-sample.html (41 bytes)
Step 2: Now, go to view-encapsulation-sample.ts file. Add ViewEncapsulation.None mode for the component as shown below −
view-encapsulation-sample.ts
import { Component, ViewEncapsulation } from '@angular/core';

@Component({
   selector: 'app-view-encapsulation-sample',
   imports: [],
   templateUrl: './view-encapsulation-sample.html',
   styleUrl: './view-encapsulation-sample.css',
   encapsulation: ViewEncapsulation.None
})
export class ViewEncapsulationSample {

}
Step 3: Change the template, view-encapsulation-sample.html and add two containers as shown below −
view-encapsulation-sample.ts
<div>I am inside the none container</div>
<div class="mystyle">I am inside the none container and has my own style</div>
Here, the first container does not have any styles or class and it is more prone to get affected by the global styles. The second container has class attributes and yet has a chance to get affected by global styles.
Step 4: Apply the style in the component css file, view-encapsulation-sample.css as shown below −
view-encapsulation-sample.css
div.mystyle { color: brown }
Step 5: Add the component in the app component and app.html as shown below −
app.ts
import { Component, signal } from '@angular/core';
import { RouterOutlet } from '@angular/router';
import { ViewEncapsulationSample } from './view-encapsulation-sample/view-encapsulation-sample';

@Component({
   selector: 'app-root',
   imports: [RouterOutlet, ViewEncapsulationSample],
   templateUrl: './app.html',
   styleUrl: './app.css'
})
export class App {
   protected readonly title = signal('expense-manager');
}
app.html
<app-view-encapsulation-sample />
<router-outlet />
Step 6: Add a style in the global css assets, styles.css targeting div tag and run the application.
styles.css
div { color: blue }
Output
Now, Run the application and check the output.
Now, both containers are safeguarded by native shadowDOM concept and are not affected by the global styles.
Applying different encapsulation in an application
View encapsulation of a component can be different from other components used in the application as view encapsulation is applied per component basis. Even the nested component can have different view encapsulation options as per component requirements. Angular will apply the encapsulation as directed even in very complex nested component trees as well.
Angular - Component Interaction
Sharing Data between Angular Components
Angular provides options to share data from parent component to child component as well as, child to parent component. Also, it is possible to share data between any other component within the Angular application. Component is a TypeScript class decorated with the @Component decorator. It is used to create the user interface.
Data sharing is the practice of making important information accessible to different parts of an application. It is done by transferring data from one component to another, allowing access to data during operations, or synchronizing data between different parts of an application.
Interaction between components is one of the important and necessary features in the context of component based architecture. Angular provides multiple options to pass and receive data between components. Let us see how to share data between components in this tutorial.
How Components Interact in Angular?
In Angular, parent and child components shares data or interacts to each other through the following ways −
- Using @Input decorator
- Using @Output decorator
- Using local variable
- Using @Viewchild decorator
- Using Services
Multiple Choice Questions on Angular Component Interaction
Now that you have learned the how Angular Components interacts, let's test your knowledge. Please answer the following questions based on your understanding −
Q. 1 - Which Angular decorator is used to pass data from a parent component to a child component?
Answer : C
Explanation
The @Input decorator bind data of the parent component to a property in the child component.
Q. 2 - Which lifecycle hook detect changes in input properties in Angular?
Answer : A
Explanation
The ngOnChanges lifecycle hook is called whenever Angular detects changes in the input properties of a component.
Q. 3 - Use of @Output decorator:
A - It allows the parent component to pass data to the child component.
B - It creates an event emitter for the child to send data to the parent.
Answer : B
Explanation
The @Output decorator is used to emit events from the child component to the parent component.
Angular - Using @Input decorator
The parent component can pass the data to the child component through the @Input()decorator. The child component receives data during its entire life cycle from initialization to destruction. Angular is designed in such a way that the child component automatically intercepts the data changes from the parent component and does the necessary update. Angular also provides hooks to intercept the data changes and write custom processing.
Overall, we have three ways for the child component to intercept data from parent component −
- Auto interception
- Setter interception
- ngOnChanges hook
Auto Interception
Auto interception simplifies receiving the data from parent component. Angular provides a decorator @Input to receive data from parent component. It receives the data whenever the parent component updates the data Configuring Input decorator is very simple. Just append the input decorator to a property in the child component and then pass the data from parent component through child component attributes in the template.
Example - Usage of Auto Interception
Let us create a child component and then try to pass the data from parent to child and render it in the child component.
Step 1: Create a new child component, InOutChildSample using angular CLI as shown below −
ng generate component InOutChildSample
CREATE src/app/in-out-child-sample/in-out-child-sample.spec.ts (627 bytes)
CREATE src/app/in-out-child-sample/in-out-child-sample.ts (246 bytes)
CREATE src/app/in-out-child-sample/in-out-child-sample.css (0 bytes)
CREATE src/app/in-out-child-sample/in-out-child-sample.html (35 bytes)
Step 2: Add a counter property in the child component and decorate it with @Input() decorator as shown below −
in-out-child-sample.ts
import { Component, Input } from '@angular/core';

@Component({
   selector: 'app-in-out-child-sample',
   imports: [],
   templateUrl: './in-out-child-sample.html',
   styleUrl: './in-out-child-sample.css',
})
export class InOutChildSample {
   @Input() counter : number = 0;
}
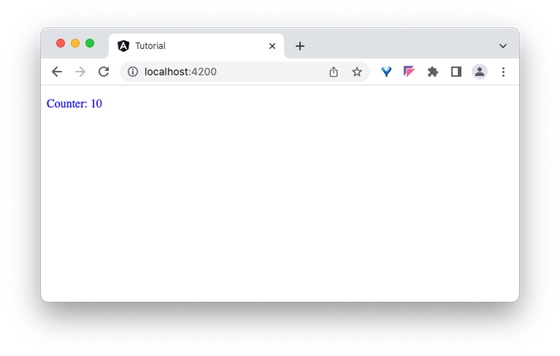
Step 3: Open the child component template, in-out-child-sample.html and use the counter property as shown below −
in-out-child-sample.html
<div>
   <p>Counter: {{counter}}</p>
</div>
Step 4: Open the parent component template, app.html and render the child component along with counter attribute as shown below −
app.html
<app-in-out-child-sample [counter]="counter"></app-in-out-child-sample>
<router-outlet />
Step 5: Open the app.ts file and add the code given below −
app.ts
import { Component, signal } from '@angular/core';
import { RouterOutlet } from '@angular/router';
import { InOutChildSample } from './in-out-child-sample/in-out-child-sample';

@Component({
   selector: 'app-root',
   imports: [RouterOutlet, InOutChildSample],
   templateUrl: './app.html',
   styleUrl: './app.css'
})
export class App {
   protected readonly title = signal('expense-manager');
   counter = 10;
}
Output
Step 6: Finally, run the application and check that the counter shows whether the value passed from the parent component or not −
Setter Interception
The setter based interception is just an extension of the previous technique. It basically uses a getter and setter for the property used in @Input decorator.
Example - Usage of Setter Interception
Let us change our counter example, in-out-child-sample.ts to intercept the counter using setter and reset the counter to 1, if the counter value exceeds 25.
in-out-child-sample.ts
import { Component, Input } from '@angular/core';

@Component({
   selector: 'app-in-out-child-sample',
   imports: [],
   templateUrl: './in-out-child-sample.html',
   styleUrl: './in-out-child-sample.css',
})
export class InOutChildSample {
   @Input()
   get counter(): number { return this._counter; }
   set counter(val: number) {
      this._counter = val || 0;
      if(val > 25) this._counter = val % 25;
   }
   private _counter: number = 1;
}
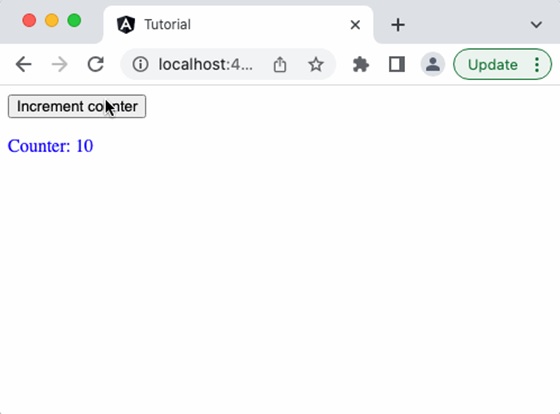
Add a function to increment the counter value in the parent component as shown below −
inc() {
   this.counter++
}
Add a button in the parent components template and bind the function as shown below −
<button (click)="inc()">Increment counter</button>
<app-in-out-child-sample [counter]="counter" />
Output
Run the application, and you can see that the counter will reset to 1 once it reaches 25.
The ngOnChanges Hook Interception
As we learned in the life cycle of a component and its hook methods, ngOnChanges is a hook method, which will run whenever angular detects changes in its input.
ngOnChanges hook accepts an object of type SimpleChanges. SimpleChanges is a dictionary having all properties with changes. We can go through all the properties and find the latest value of the property. The pseudo-code to go through all changed properties is as follows −
ngOnChanges(changes: SimpleChanges) {
   for (const key in changes) {
      const prop = changes[key];

      const prevVal = prop.previousValue
      const currentVal = prop.currentValue
      cont isFirstChange = pop.isFirstChange()

      if (prop.isFirstChange()) {
         console.log("The current value is ${prop.currentValue}")
      } else {
         console.log(`${key} changed from ${prop.previousValue} to
         ${prop.currentValue}`);
      }
   }
}
Angular - Using @Output Decorator
Child component can send the data to parent component through the @Output decorator. Use of this decorator is quite simple and similar to @Input decorator except that the output is actually an event emitter passing the data (output) along with event. The parent component can be subscribed for the event in the child component and get the emitted value from the child component whenever the data is changed in the child component.
Example - Usage of @Output Decorator
Let us write an @output decorator in our child component, InOutChildSample component and try to get the output from the parent component.
Step 1: Create an output event emitter in the child component, in-out-child-sample.ts along with a method to pass the value of the counter by emitting the event along with counter data in the child component, in-out-child-sample.ts.
in-out-child-sample.ts
import { Component, EventEmitter, Input, Output } from '@angular/core';

@Component({
   selector: 'app-in-out-child-sample',
   imports: [],
   templateUrl: './in-out-child-sample.html',
   styleUrl: './in-out-child-sample.css',
})
export class InOutChildSample {
   @Input() counter : number = 0;
   @Output() counterEvent = new EventEmitter();
   passCounterToParent() {
      this.counterEvent.emit(this.counter)
   }
}
Step 2: Open the child component template, in-out-child-sample.html and add a button to invoke the counter event when the user clicks the button.
in-out-child-sample.html
<div>
  <p>Counter: {{counter}}</p>
  <button (click)="passCounterToParent()">Pass Counter to Parent</button>
</div>
Here,
click is the button click event and it is configured to run passCounterToParent() function when it is clicked.
Step 3: Add a variable in the parent component to hold the output data passed through event from child component. Also, add a function in the parent component to get the output data passed through event from child component.
App.js
import { Component } from '@angular/core';
import { RouterOutlet } from '@angular/router';
import { InOutChildSample } from './in-out-child-sample/in-out-child-sample';
@Component({
  selector: 'app-root',
  imports: [RouterOutlet, InOutChildSample],
  templateUrl: './app.html',
  styleUrl: './app.css'
})
export class App {
   title = 'sample-app';
   counter = 10;
   childCounter: number = 0;
   inc() {
      this.counter++
   }
   get(val: number) {
      this.childCounter = val;
   }
}
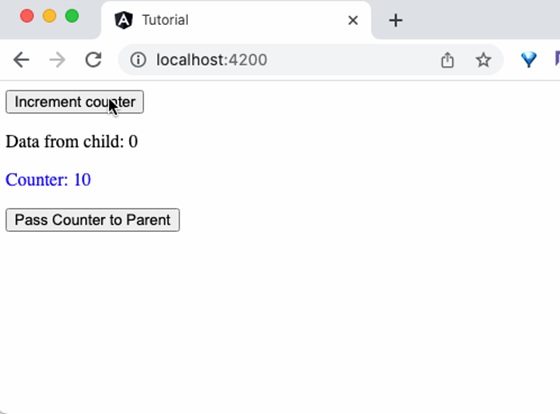
Step 4: Open the parent component template, app.html and add the code as shown below −
app.html
<button (click)="inc()">Increment counter</button>
<p>Data from child: {{childCounter}}</p>
<app-in-out-child-sample [counter]="counter" (counterEvent)="get($event)" />
Here,
counterEvent is the event from the child component
get($event) is the callback function. $event will hold the current counter value.
childContent is the data from the child component.
Output
Step 5: Finally, run the application and you can see that the child component will send the updated counter value to the parent component when the button in the child component is clicked.
Angular - Using Local Variable
Parent components can get complete access to the child component throughlocal variable. However, parent component gets access to the child component in its template only.
Example - Usage of Local Variable to pass data
Let us create two component, ParentCounterComponent and ChildCounterComponent to understand the concept. The purpose of the ParentCounterComponent is to provide counter functionality through two button, increment and decrement button. The increment button will increment the counter and the decrement button will decrement the counter. Parent component will get the increment and decrement functionality from child component instead of implementing itself.
Step 1: Create child component, ChildCounter Component using angular CLI as shown below −
ng generate component ChildCounter
CREATE src/app/child-counter/child-counter.spec.ts (597 bytes)
CREATE src/app/child-counter/child-counter.ts (224 bytes)
CREATE src/app/child-counter/child-counter.css (0 bytes)
CREATE src/app/child-counter/child-counter.html (29 bytes)
Step 2: Declare a variable counter and two methods inc() and dec() to increment and decrement the counter respectively inside the child component −
child-counter.ts
import { Component } from '@angular/core';

@Component({
   selector: 'app-child-counter',
   imports: [],
   templateUrl: './child-counter.html',
   styleUrl: './child-counter.css',
})
export class ChildCounter {
   counter: number = 0
   // increment and decrement counter
   inc() { this.counter++ }
   dec() { this.counter-- }
}
Step 3: Next, open parent component's template file, app.html and add child component along with an id, #child to access the child component.
<app-child-counter #child></app-child-counter>
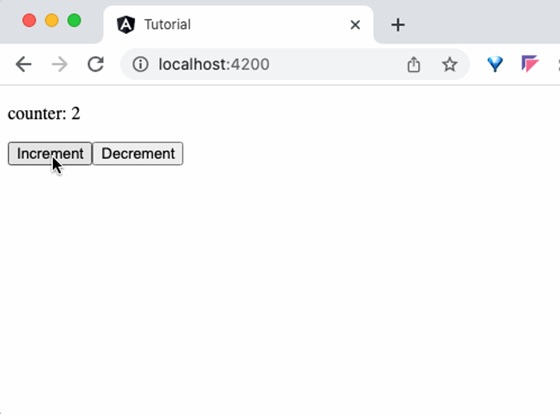
Step 4: Next, add two buttons and bind click events with child component's inc() and dec() methods accessed through child identifier. Also, show the current value of counter using child identifier.
app.html
<p>counter: {{child.counter}}</p>

<button (click)="child.inc()">Increment</button>
<button (click)="child.dec()">Decrement</button>

<app-child-counter #child></app-child-counter>
<router-outlet />
Step 5: Next, include the given code inside app.ts file.
app.ts
import { Component, signal } from '@angular/core';
import { RouterOutlet } from '@angular/router';
import { ChildCounter } from './child-counter/child-counter';

@Component({
   selector: 'app-root',
   imports: [RouterOutlet, ChildCounter],
   templateUrl: './app.html',
   styleUrl: './app.css'
})
export class App {
   protected readonly title = signal('expense-manager');
}
Output
Step 6: Finally, run the application and check whether the counter is working fine.

Angular - Using @Viewchild Decorator
Like the local variable, the @ViewChild decorator is also used to get complete access to the child component. However, along with template, the parent component will get access to the child component in its class environment as well. This makes a huge difference as the parent component can use the child component functionality in its methods as well.
Example - Usage of @ViewChild Decorator
To understand the @Viewchild decorator, let's change the parent component, i.e. AppComponent. Now, we will use @ViewChild concept instead of local variable. We don't need to make any changes in the child component.
Step 1: Import necessary classes from @angular/core module:
import { Component, ViewChild, AfterViewInit } from '@angular/core';
Step 2: Implement AfterViewInit life cycle hook as shown below:
export class VcParentCounterComponent implements AfterViewInit {
   ngAfterViewInit() {
      // ...
   }
}
Step 3: Access the child component using @ViewChild as shown below −
@ViewChild(ChildCounterComponent)
private child! : ChildCounterComponent;
Here, @ViewChild decorator accepts the type of the child component, which is in the component's template.
Step 4: Implement increment and decrement functionality by accessing the child component.
inc() { this.child.inc() }
dec() { this.child.dec() }
Here, we have used this.child variable to access the functionality from child component.
Step 5: Implement a counter functionality to retrieve the current counter value as shown below −
counter() { return 0; }

ngAfterViewInit() {
   setTimeout(() => this.counter = () => this.child.counter, 0)
}
Here, we have created a counter method in ngAterViewInit life cycle hook. The child component will be available only after this life cycle. So, we have created a dummy counter method (which needs to access child component's counter value ) during component initialization and the update the counter method in the hook method.
Step 6: The complete code of the App.ts is as follows −
App.ts
import { AfterViewInit, Component, signal, ViewChild } from '@angular/core';
import { RouterOutlet } from '@angular/router';
import { ChildCounter } from './child-counter/child-counter';

@Component({
   selector: 'app-root',
   imports: [RouterOutlet, ChildCounter],
   templateUrl: './app.html',
   styleUrl: './app.css'
})
export class App implements AfterViewInit {
   protected readonly title = signal('expense-manager');
   @ViewChild(ChildCounter)
   private child! : ChildCounter;
   inc() { this.child.inc() }
   dec() { this.child.dec() }
   counter() { return 0; }
   ngAfterViewInit() {
      setTimeout(() => this.counter = () => this.child.counter, 0)
   }
}
Step 7: Next, open the component's template file, app.html and add the child component along with button and method binding as shown below −
app.html
<p>counter: {{ counter() }}</p>

<button (click)="inc()">Increment</button>
<button (click)="dec()">Decrement</button>

<app-child-counter></app-child-counter>
Here, we have not included the identifier and used only the parent components functionality instead of child component (which we have done in previous example, local variable concept). The parent component will get the required functionality from child variable, which it got through @ViewChild decorator.
Output
Step 8: Finally, run the application and check that the counter shows that the value passed from parent component as shown below −
Angular - Using Services
Service is an integral part of the angular framework. We can create a service to implement specific functionality and then use it in any component. The best use cases of services are as follows:
- API calls
- Utility functions
- Sharing data between components
Example - Usage of a Service to share data
Let us learn how to use services to share data between components in this section. We will learn the step by step process to share data through a service in this example.
Step 1: Create a service, MyCounterService using angular CLI as shown below −
ng g service services/MyCounter
CREATE src/app/services/my-counter.spec.ts (389 bytes)
CREATE src/app/services/my-counter.ts (147 bytes)
It is better to put all the services inside a single folder. Therefore, we are creating MyCounter inside service folder using the above command.
Step 2: Create a component, MyCounterService using angular CLI as shown below −
ng generate component MyCounterService
CREATE src/app/my-counter-service/my-counter-service.spec.ts (626 bytes)
CREATE src/app/my-counter-service/my-counter-service.ts (243 bytes)
CREATE src/app/my-counter-service/my-counter-service.css (0 bytes)
CREATE src/app/my-counter-service/my-counter-service.html (34 bytes)
Step 3: Create an observable object to track the value of counter variable in the service as shown below −
private counterSource = new Subject<number>();
public counter$ = this.counterSource.asObservable()
Here,
counterSource is a variable of type Subject. Subject is an observable object provided by rxjs library. Subject can emit and receive values.
Invoked asObservable method on the counterSource to hide the identity of the source sequence.
Step 4: Implement increment and decrement methods as shown below −
inc(val: number) { this.counterSource.next(val + 1) }
dec(val: number) { this.counterSource.next(val - 1) }
Here,
next() method from counterSource is used to update the value of the counter.
Step 5: The complete code of the service, MyCounter is as follows:
my-counter.ts
import { Injectable } from '@angular/core';
import { Subject } from 'rxjs';

@Injectable({
   providedIn: 'root'
})
export class MyCounter {
   constructor() { }

   private counterSource = new Subject<number>();
   public counter$ = this.counterSource.asObservable();

   inc(val: number) { this.counterSource.next(val + 1) }
   dec(val: number) { this.counterSource.next(val - 1) }
}
Step 6: Now, open the my-counter-service.ts file and inject the service through constructor in the component.
export class MyCounterService {
   constructor(private counterService: MyCounter) {
   }
}
Step 7: Subscribe to the observables available in the service through component constructor as shown below −
this.counterService.counter$.subscribe( counter => {
   this.counter = counter;
})
Here, the subscription will update the counter value whenever there is a change in the observable.
Step 8: Implement increment (inc()) and decrement (dec()) methods by calling counter service methods as shown below −
inc() { this.counterService.inc(this.counter) }
dec() { this.counterService.dec(this.counter) }
Step 9: The complete code of the component, MyCounterService is as follows,
my-counter-service.ts
import { Component } from '@angular/core';
import { MyCounter } from '../services/my-counter';

@Component({
  selector: 'app-my-counter-service',
  imports: [],
  templateUrl: './my-counter-service.html',
  styleUrl: './my-counter-service.css',
})
export class MyCounterService {
   counter: number = 0;

   constructor(private counterService: MyCounter) {
      this.counterService.counter$.subscribe( counter => {
         this.counter = counter;
      })
   }

   inc() { this.counterService.inc(this.counter) }
   dec() { this.counterService.dec(this.counter) }
}
Step 10: Next, open the component's template, my-counter-service.html and write template markup to show the current counter value and then add two more buttons to increment and decrement the counter value. Bind inc() and dec() methods to increment and decrement button's click event respectively.
<p>counter: {{counter}}</p>

<button (click)="inc()">Increment</button>
<button (click)="dec()">Decrement</button>
Step 11: Next, open the app component's template and include our component as shown below −
<app-my-counter-service />
<router-outlet />
Output
Step 12: Run the application and check the output.
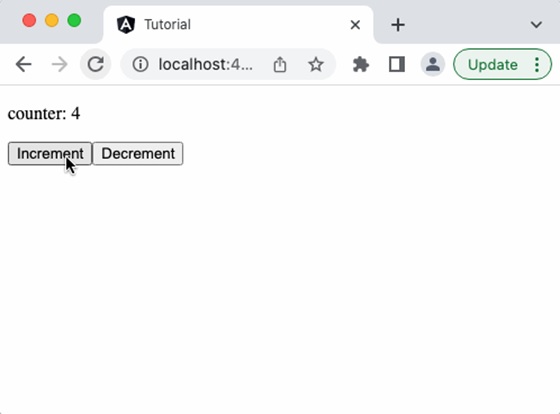
Step 13: Next, add another component in the app component's template as shown below −
<app-my-counter-service />
<app-my-counter-service />
<router-outlet></router-outlet>
Output
Step14: Run the application and see that incrementing one component will reflect in the other component as well. It happens as it is based on the same service.

Angular - Component Styling
Styling is the process of designing and formatting the visual presentation of web pages. Since Angular applications are composed of multiple components, styles are applied to them individually. Angular components can be styled using CSS as well as popular pre-processors such as Sass and Less.
Let's see different techniques of applying styles to the Angular components and different ways to allow safe and efficient customization of styles by the component users in this chapter.
How to Add Styles to Angular Components?
You can use the following ways for styling Angular components −
- Using "styles"
- Using "styleUrls"
- Styling through template
- Using global styles
- Using CSS preprocessor
- Customized styles
- Using custom selectors
Using "styles"
The simplest and fastest way to style a component is by usingstyles. It is a property of the@Componentdecorator. It accepts an array of CSS styles and applies it to the component view. The pseudo-code of using styles in a component is as follows:
@Component({
   // selector and template code

   styles: ['p { font-style: italic; }', 'em { font-style: italic;
   font-weight: bold }']

   // other properties / meta data
})
export class MyComponent {
   // ...
}
The style applied using styles will affect the component view generated through component template only and is not inherited by the view of the nested components in the component template as well as any content projected in the component view.
Using "styleUrls"
The styleUrls is also a property of the @Component decorator and is similar to styles property. It accepts an array of CSS style file paths instead of the style itself and applies it to the component view. The pseudo-code of using styleUrls in a component is as follows:
@Component({
   // selector and template code

   styleUrls: ['my-component.component.css', 'my-component-another.component.css']

   // other properties / meta data
})
export class MyComponent {
   // ...
}
The style applied using styleUrls will affect the component view generated through the component template only and is not inherited by the view of the nested components in the component template as well as any content projected in the component view.
Styling Through Template
Styling through template is old school method of using CSS styles in the HTML itself through template property of @Component decorator. We can style a component using template in two ways, which are:
- Applying styles using HTML style tag
- Linking CSS files through link tag
Styling through template does not restrict the styles to the component view only and applies to the entire HTML generated from the component including nested components and projections.
Applying Style Using "style" Tag
In HTML, style tag is used to define internal CSS styles for a web page. This tag allows you to embed CSS rules directly within the HTML document. The use of this tag in the Angular template is similar to how we use it in HTML. The pseudo-code to apply styles using style tag is as follows:
@Component({
   // selector

   template: `
      <style>
         h1 {
               color: red;
         }
      </style>
      <h1>Hello</h1>
   `,

   // other properties / meta data
})
export class MyComponent {
   // ...
}
Applying Style Using "link" Tag
The most common use of link tags in HTML documents is to attach external stylesheets. The pseudo code to apply styles to an Angular component using link tag is as follows:
@Component({
   // selector

   template: `
      <link rel="stylesheet" href="../assets/my-component.component.css">
      <h1>Hello</h1>
   `,

   // other properties / meta data
})
export class MyComponent {
   // ...
}
The CSS file path should be relative to the component file. Otherwise, the CSS path in the generated HTML may be pointing to an incorrect or non-existing file.
@import can be used in CSS files to load more CSS files and the import file should be relative to the host CSS file.
@import './another-css.css'
Using Global Styles
Global styles will be configured during the application creation itself. Angular CLI will set src/styles.css file as a global stylesheet. We can use it to set styles targeting anything in the application. We can use the global setting to set one or more style sheets as required. The below snippet shows the initial angular configuration created during application creation through angular CLI.
{
   "$schema": "./node_modules/@angular/cli/lib/config/schema.json",
   "version": 1,
   "newProjectRoot": "projects",
   "projects": {
      "tutorial": {
         // ...
         "architect": {
            "build": {
               "builder": "@angular-devkit/build-angular:browser",
               "options": {
                  "outputPath": "dist/tutorial",
                  "index": "src/index.html",
                  "main": "src/main.ts",
                  "polyfills": [
                     "zone.js"
                  ],
                  "tsConfig": "tsconfig.app.json",
                  "assets": [
                     "src/favicon.ico",
                     "src/assets"
                  ],
                  "styles": [
                     "src/styles.css"
                  ],
                  "scripts": []
               },
               "configurations": {
                  "production": {
                     // ...
                  },
                  "development": {
                     // ...
                  }
               },
               "defaultConfiguration": "production"
            },
         }
      }
   }
}
Using CSS Preprocessor
Angular allow not only the plain CSS to style the component. It allows the popular CSS preprocessors such as Sass and Less. Using Sass and Less is as simple as including the Sass and Less files instead of CSS files.
Component styleUrls can be used to include Sass and Less as specified below.
@Component({
   // selector and template code

   styleUrls: ['my-component.component.scss']

   // other properties / meta data
})
export class MyComponent {
   // ...
}
CSS preprocessor can be configured at project level or component level through angular settings. Angular CLI command "ng new" will ask the preprocessor to set during initial project creation.
$ ng new myapp
? Would you like to add Angular routing? No
? Which stylesheet format would you like to use? (Use arrow keys)
 CSS
  SCSS   [ https://sass-lang.com/documentation/syntax#scss                ]
  Sass   [ https://sass-lang.com/documentation/syntax#the-indented-syntax ]
  Less   [ http://lesscss.org
Angular CLI will configure the project with proper CSS preprocessor.
Customize Styles of Angular Component
Generally, every angular component will have a default style associated with it. As components can be used in various scenarios, there is a necessity to customize the style of the component to match a given scenario. A good component should have a clear approach to changing the style to suit the environment where the component is used. Angular provides four ways to customize the style of a component.
- CSS custom properties
- Global CSS along with @mixins
- Using pseudo selectors of shadow DOM
- Using component properties / API
CSS Custom Properties
CSS provides CSS variables to hold styles. Once the CSS variables are defined, they can be used in any CSS properties and allow certain styles to be changed across the application by changing the value of the CSS variable.
Let us see how to define and use CSS variables. CSS variables can be created using :root pseudo selector as shown below −
:root {
   --myColor: red;
}
Here, myColor variable is defined and its initial value is red. myColor variable can be used in other CSS properties as shown below −
p {
   color: var(--myColor, grey);
}
Here, color will be set with the value of myColor (red in this case). If myColor does not have any value or undefined, then grey will be set as color.
The same concept can be applied in a component by using component property and CSS Variable as shown below.
Declare a property for the CSS variable, myColorVar in the component as shown below −
@Component({
   // setting
})
export class MyComponent {
   myColorVar: string = null;
}
Use CSS variable, myColor and Component property, myColorVar in the style (template) as shown below −
<p [style.--myColor]="myColorVar">Hello</p>
Now, the component can be customized by changing the CSS variable in the :root pseudo selector as shown below −
:root {
   --myColor: green;
}
Global CSS with @mixins
CSS preprocessor provides a great option to mix different style as and when needed in the CSS using mixin concept. Mixin is simply grouping of one or more CSS styles with a name and using it afterwards wherever necessary using the defined name. Let us define two mixin, one for color and another for font style:
@mixin color($c) {
   color: $c;
}

@mixin fontstyle($fs) {
   font-style: $fs;
}
Next, we can use the mixin to define a global style using the @include option as shown below −
.mystyle {
   @include color('red');
   @include fontstyle('italic');
}
Finally, the user can customize the color and font style in the global style without interfering with the component.
Pseudo Selector of Shadow DOM
Components using shadow DOM can be set with part attributes to allow the users to customize the style using ::part pseudo selector in the CSS styles as shown below −
<template id="my-web-component">
   <h1 part="hello">Hello</h1>
</tempalte>
Here, my-web-component web component sets the part attribute for the h1 tag.
my-web-component::part(hello) {
   // custom css styles
}
Here, h1 tag is targeted through ::part selector and can be customized.
Component Properties
The final and least preferred way to customize the style of the component is through custom component property as shown below −
@Component({
   // ...
})
export class MyComponent() {
   color: string;
}
Here, component will use the properties to get the color information from the user and set it in the template.
Using Custom Selectors
Angular provides two custom selectors similar to the shadow DOM concept.
- :host
- :host-context
:host selector is used to style the host element of the component. It comes in two forms. First one is a simple form as shown below −
Here, :host selector applies to the host element and all its descendant elements.
The second one is the function form, which will target the host element only if the host element has the included selector (as arguments) as shown below −
:host(.active) {
   font-weight: bold;
}
Here, :host(.active) targets the host element only if it has an active class.
Finally, :host-context selector is similar to host function form :host() except it checks whether any of the ancestor of the host element has the specified selector (in the argument).
:host(.active) {
   font-weight: bold;
}
Here, the style applies to the host only when any of the ancestors of the host element has .active class assigned to it.
Multiple Choice Questions on Angular Component Styles
Based on the Angular Component styles concept, there are three MCQs given below. Answer them to test your knowledge about the topics −
Q. 1 - Which of the following is used to apply an array of CSS styles directly in the component?
Answer : A
Explanation
The styles property is used in the @Component decorator to directly define an array of CSS styles that apply to the component's view.
Q. 2 - Correct way to apply multiple external CSS files to an Angular component:
A - styles property with inline CSS
B - Template property with link tags
Answer : D
Explanation
The styleUrls property is used to link multiple external CSS files by specifying the file paths in the array.
Q. 3 - Correct way to define Styling Process:
C - Designing and formatting the visual presentation of web pages
Answer : C
Explanation
Styling is the process of designing and formatting the visual presentation of web pages.
Angular - Nested Component
What is Nested Component?
When you work with a large Angular application, placing all features in a single Component is not a good idea. As the application grows, maintaining it can become quite challenging. Therefore, we need to split it into multiple components. It may require creating components inside others to form a hierarchical structure.
In Angular, it is possible to nest components inside each other. The outside container is known as the parent container, and the inner one is known as the child container.
How to Create Nested Components in Angular?
Nested components are normal Angular Components with parent-child relations. The parent can access and share data with the child, either partially or fully. Creating nested components follows the same process as creating regular components.
Example
Let's look at an example of how to create nested components in an Angular application. Following are the steps −
Step 1: Create an application named nestedApplication.
ng new nestedApplication
Step 2: Use the cd command to navigate inside the project folder. Then, create a component called parent using the following command −
ng g c parent
Step 3: To create child component, use the command given below −
ng g c parent/child
Here, child will be created inside the parent component. And, your project structure will look like this −
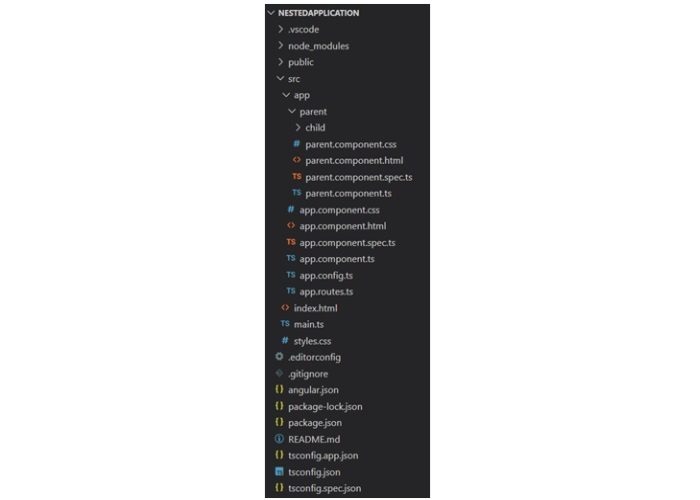
Step 4: Next, make changes in the child.html file:
child.html
<p>This is child component. It is inside parent component.</p>
Step 5: Add the below code snippet to the parent.html file:
parent.html
<p>This is parent component.
<app-child></app-child>
</p>
Step 6: Now, call the ParentComponent inside the app.html file:
app.html
<h2>Nested Component Example</h2>
<app-parent></app-parent>
<router-outlet />
Step 7: After working on the HTML files, it's time to update all the TypeScript files. Start with the child.ts file:
child.ts
import { Component } from '@angular/core';

@Component({
   selector: 'app-child',
   imports: [],
   templateUrl: './child.html',
   styleUrl: './child.css',
})
export class Child {

}
Step 8: Next, import the ChildComponent in parent.ts file:
parent.ts
import { Component } from '@angular/core';
import { Child } from './child/child';

@Component({
   selector: 'app-parent',
   imports: [Child],
   templateUrl: './parent.html',
   styleUrl: './parent.css',
})
export class Parent {

}
Step 9: Finally, call the ParentComponent by importing it inside app.ts file:
app.ts
import { Component, signal } from '@angular/core';
import { RouterOutlet } from '@angular/router';
import { Parent } from './parent/parent';

@Component({
   selector: 'app-root',
   imports: [RouterOutlet, Parent],
   templateUrl: './app.html',
   styleUrl: './app.css'
})
export class App {
   protected readonly title = signal('nestedApplication');
}
Step 10: To put style to p tag, updates the styles.css
styles.css
/* You can add global styles to this file, and also import other style files */
p {
   border: 1px solid blue;
   border-radius: 25px;
   padding: 16px 32px;
}
Once you save all the code changes and run the application using ng s command, you will get the following output −

Multiple Choice Questions on Angular Component Styles
You have reached the end of this chapter. Now, it's time to check your understanding of the angular nested component. Please try to give correct answers to the questions given below −
Q. 1 - A component inside another component called as:
Answer : B
Explanation
In Angular, components nested inside another component are called child components. The component containing them is called the parent component.
Q. 2 - What must be done in the parent component to display the child component in Angular?
A - Import the child component in the parent component
B - Add a <router-outlet> inside the parent component
Answer : D
Explanation
To display the child component, use the child component's selector inside the parent component's template. And, import the child component in the parent component.
Q. 3 - In parent-child relations, the parent can access and share data with the child, either partially or fully:
Answer : A
Explanation
Nested components are normal Angular Components with parent-child relations. The parent can access and share data with the child, either partially or fully.
Angular - Content Projection
What is Content Projection in Angular?
Content projection is a technique available in the Angular component to include external content (from consumer of the component) along with layout and styles in the specific area of the component template.
Different Implementation of Content Projection
The different ways in which we can implement content projection are:
Special Case: ngProjectAs Attribute
ngProjectAs is a special attribute used to project content in complex scenarios. One example is using ng-container to layout the template. As we know, ng-container does not render itself and out-render its child content, we need to use ngProjectAs attribute to project its content.
Let us change the above example to use ng-container and ngProjectAs attribute. Update the app component template, app.component.html as shown below −
<app-content-projection-sample>
   <p>This is external content</p>
   <ng-container ngProjectAs="second">
      <p>This is yet another external content</p>
   </ng-container>
</app-content-projection-sample>

<router-outlet></router-outlet>
Here, the value of selector attribute (second) set in the component template is used in the ng-container.
The output of the application is as shown below −

Angular - Single Slot Content Projection
A component involving only one content projection is called single-slot content projection.
Example - Single Slot Content Projection
Let us understand the content projection by creating the above explained component.
Step 1: Create a projectionSample application using the below command −
ng new projectionSample
Step 2: Navigate to project folder and create a new component with the name content-projection-sample:
cd projectSample

ng generate component content-projection-sample
CREATE src/app/content-projection-sample/content-projection-sample.spec.ts (675 bytes)
CREATE src/app/content-projection-sample/content-projection-sample.ts (271 bytes)
CREATE src/app/content-projection-sample/content-projection-sample.css (0 bytes)
CREATE src/app/content-projection-sample/content-projection-sample.html (41 bytes)
Step 3: Add <ng-content> tag in the template, i.e. content-projection-sample.html file as shown below −
content-projection-sample.html
<p>This is content from the component template</p>
   <ng-content></ng-content>
<p>This is another content from component template</p>
Step 4: Use the content-projection-sample component in the app.html file as shown below −
app.html
<app-content-projection-sample>
   <p>This is external content</p>
</app-content-projection-sample>
<router-outlet></router-outlet>
Step 5: Now import the ContentProjectionSampleComponent inside the App Component.
App.ts
import { Component, signal } from '@angular/core';
import { RouterOutlet } from '@angular/router';
import { ContentProjectionSample } from './content-projection-sample/content-projection-sample';

@Component({
  selector: 'app-root',
  imports: [RouterOutlet, ContentProjectionSample],
  templateUrl: './app.html',
  styleUrl: './app.css'
})
export class App {
  protected readonly title = signal('nestedApplication');
}
Output
The output of the application is as shown below −
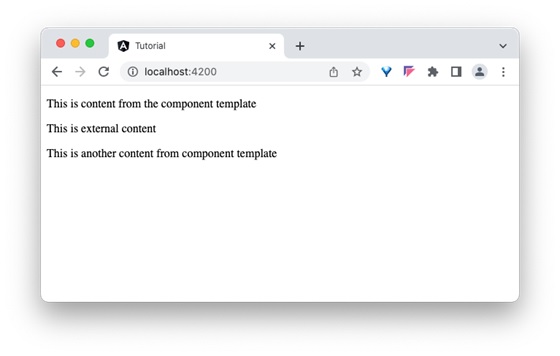
Angular - Multi-Slot Content Projection
Angular allows multiple content to be projected in the component as well and it is called multi-slot content projection.
Example - Multi-slot Content Projection
Let us understand the content projection by creating the above explained component.
Step 1: Create a projectionSample application using the below command −
ng new projectionSample
Step 2: Navigate to project folder and create a new component with the name content-projection-sample:
cd projectSample

ng generate component content-projection-sample
CREATE src/app/content-projection-sample/content-projection-sample.spec.ts (675 bytes)
CREATE src/app/content-projection-sample/content-projection-sample.ts (271 bytes)
CREATE src/app/content-projection-sample/content-projection-sample.css (0 bytes)
CREATE src/app/content-projection-sample/content-projection-sample.html (41 bytes)
Step 3: Add <ng-content> along with selector attribute in the component template, content-projection-sample.html as shown below −
content-projection-sample.html
<p>This is content from the component template</p>
<ng-content></ng-content>
<p>This is another content from component template</p>
<ng-content select="[second]"></ng-content>
Step 4: Update the app component template, app.html as shown below −
app.html
<app-content-projection-sample>
   <p>This is external content</p>
   <p second>This is yet another external content</p>
</app-content-projection-sample>

<router-outlet></router-outlet>
Here, the value of selector attribute (second) set in the component template is used in the content to be projected.
Output
Step 3: Now, run the application and check the output.
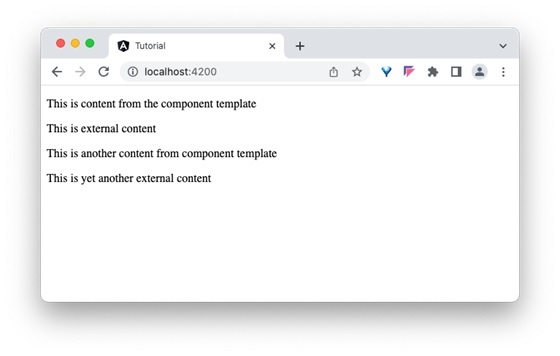
Angular - Conditional Content Projection
Conditional content projection is projecting a content when certain condition is met. We can use ng-content to conditionally project the content. But it is not recommended since <ng-content> will be initialized even if the content is not going to be rendered. Instead, we can use <ng-template> to project the content safely since it will initialize the content only when it is going to be rendered.
Example - Conditional Content Projection
Let us understand the content projection by creating the above explained component.
Step 1: Create a projectionSample application using the below command −
ng new projectionSample
Step 2: Navigate to project folder and create a new component with the name content-projection-sample:
cd projectSample

ng generate component content-projection-sample
CREATE src/app/content-projection-sample/content-projection-sample.spec.ts (675 bytes)
CREATE src/app/content-projection-sample/content-projection-sample.ts (271 bytes)
CREATE src/app/content-projection-sample/content-projection-sample.css (0 bytes)
CREATE src/app/content-projection-sample/content-projection-sample.html (41 bytes)
Step 3: In the component's template, use @if for checking the condition, ng-container and ng-template to display the template (greet.template) in the components template as shown below −
ContentProjectionSample.html
<p>This is content from the component template</p>
<ng-content></ng-content>
<p>This is another content from component template</p>
<ng-content select="[second]"></ng-content>

@if (show) {
 <ng-container *ngTemplateOutlet="greet"></ng-container>
}
<ng-template #greet>Hi, I am coming from conditional template</ng-template>
Output
Step 4: Run the application and check the output to find whether content is rendered through conditional projection concept or not:
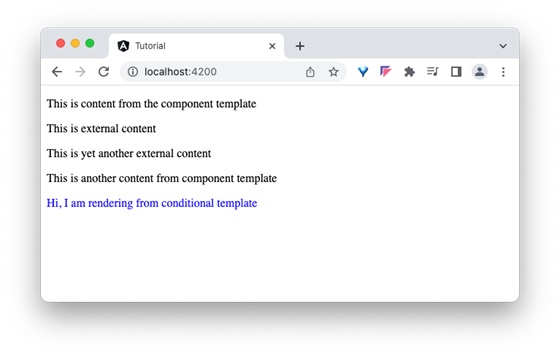
Step 5: Update the condition, show in the component to false and check the output to find that the ng-template content is not rendered.
export class ContentProjectionSampleComponent {
   show = false;
   @ContentChild(GreetContentDirective) greet!: GreetContentDirective;
}

Angular - Dynamic components
Angular allows the component to be dynamically created and loaded at run time at a specific location in the host (another) component. Loading a component at run time opens a lot of opportunities to do advanced functionality. For example, a banner rotation component can accept heavily customized banner item instead of accepting banners confirming to a specific template, which is always pre-defined and static in nature.
Let us learn how to create an Angular component at run time and attach it to the host component in this chapter.
How to Render Angular Components Dynamically?
There are two ways to create dynamic components in Angular:
Angular - Using NgComponentOutlet
The NgComponentOutlet is a directive that helps in dynamic component creation. It instantiates a Component and embeds its view (host view) inside the current view. Please note it only accepts Components and to use it, you need to import CommonModule.
Example - Usage of NgComponentOutlet
In this example, we see the practical implementation of NgComponentOutlet directive. Here, we create an Angular application that will have two main child components and they will be associated with buttons named Admin and User. On clicking the Admin button, AdminBio Component will be displayed and when you click the User button, StandardBio Component will be displayed.
Step 1: Create AdminBio Component using the given command −
ng g c admin-bio
Step 2: Create a second component, StandardBio Component using the command given below −
ng g c standard-bio
Step 3: We need another component that will contain the logic of dynamic component creation.
ng g c check-bio
Step 4: Now, open admin-bio.html file and copy the below code −
admin-bio.html
<h3>Admin Bio</h3>
<p>Content of the Admin Bio Component.</p>
Step 5: Then, open standard-bio.html file and copy the below code −
standard-bio.html
<h3>Standard Bio</h3>
<p>Content of the Standard Bio Component.</p>
Step 6: Next, open check-bio.html file and copy the below code −
check-bio.html
<ng-container *ngComponentOutlet="getBioComponent()"></ng-container>
Step 7: In the check-bio.ts file, create a method named getBioComponent(). This method will check which button is clicked among the two and display the view accordingly. The complete code is given below −
check-bio.ts
import { NgComponentOutlet } from '@angular/common';
import { Component, Input } from '@angular/core';
import { StandardBio } from '../standard-bio/standard-bio';
import { AdminBio } from '../admin-bio/admin-bio';

@Component({
   selector: 'app-check-bio',
   imports: [NgComponentOutlet],
   templateUrl: './check-bio.html',
   styleUrl: './check-bio.css',
})
export class CheckBio {
   @Input() user!: {name: string, isAdmin: boolean};
   getBioComponent() {
      console.log(this.user.isAdmin)
      return this.user.isAdmin ? AdminBio : StandardBio;
   }
}
Step 8: Next, open app.html file and copy the below code −
app.html
<!-- buttons to trigger admin() and userLog() methods -->
<button (click) = "admin()">Admin</button>
<button (click) = "userLog()">User</button>
<!-- conditional rendering -->
@if(isValid){
   <!--input binding -->
   <app-check-bio [user]="user"></app-check-bio>
   <router-outlet />
}
Here, the given buttons will trigger the admin() and userLog() methods. The @If directive conditionally includes the <div> element in the DOM if the isValid property is true. If it is false, the <div> and its contents are not rendered.
Step 9: Finally, inside the app.ts file, copy the below code −
app.ts
import { Component } from '@angular/core';
import { RouterOutlet } from '@angular/router';
import { CheckBio } from './check-bio/check-bio';
import { CommonModule } from '@angular/common';

@Component({
  selector: 'app-root',
  imports: [RouterOutlet, CheckBio, CommonModule],
  templateUrl: './app.html',
  styleUrls: ['./app.css']
})
export class AppComponent {
  title = 'dynamicComponent';

  user = {"name": "Admin", "isAdmin": false}
  isValid = false;
  admin(){
    this.user.isAdmin = true;
    this.isValid = true;
  }
  userLog(){
    this.user.isAdmin = false;
    this.isValid = true;
  }
}
Output
Run the application and check the output −
Angular - Using ViewContainerRef
The second way of creating and rendering components dynamically is by using ViewContainerRef. Other components or directives use it to get a reference to a view container corresponding to their location in the DOM. In this way, ViewContainerRef helps to dynamically create and insert components at that specific location.
Example - Use of ViewContainerRef
Let us create a real time application to display a collection of employees in two different formats, table and gallery. We will create two components, one to show employees in the table and another in gallery format. Then we will create a host component, which will dynamically load either table based component or gallery based component.
Step 1: Create an interface to hold common data across multiple dynamic component
$ ng generate interface DynData
CREATE src/app/dyn-data.ts (29 bytes)
Step 2: Create a dynamic component, DynList. The purpose of the component is to list the employee as gallery.
$ ng generate component DynList
CREATE src/app/dyn-list/dyn-list.css (0 bytes)
CREATE src/app/dyn-list/dyn-list.html (23 bytes)
CREATE src/app/dyn-list/dyn-list.spec.ts (567 bytes)
CREATE src/app/dyn-list/dyn-list.ts (209 bytes)
Step 3: Create a dynamic component, DynTable. The purpose of the component is to list the employees in tabular format.
$ ng generate component DynTable
CREATE src/app/dyn-table/dyn-table.css (0 bytes)
CREATE src/app/dyn-table/dyn-table.html (24 bytes)
CREATE src/app/dyn-table/dyn-table.spec.ts (574 bytes)
CREATE src/app/dyn-table/dyn-table.ts (213 bytes)
Step 4: Create a host component, DynHost. The purpose of the component is to host any one of the component, DynList and DynTable based on configuration.
$ ng generate component DynHost
CREATE src/app/dyn-host/dyn-host.css (0 bytes)
CREATE src/app/dyn-host/dyn-host.html (23 bytes)
CREATE src/app/dyn-host/dyn-host.spec.ts (567 bytes)
CREATE src/app/dyn-host/dyn-host.ts (209 bytes)
Step 5: Next, open the interface, DynData and add an array property, data
DynData.ts
export interface DynData {
   data : any[]
}
Step 6: Next, open the DynList component and implement DynData interface.
DynList.ts
import { Component } from '@angular/core';
import { DynData } from '../dyn-data';

@Component({
   selector: 'app-dyn-list',
   imports: [],
   templateUrl: './dyn-list.html',
   styleUrl: './dyn-list.css',
})
export class DynList implements DynData {
   data: any[] = []
}
Here,
Imported DynData interface and implements it in class definition
Included the data property as per DynData interface specification
Step 7: Next, open the components template and render the data as list of items
dyn-list.html
<div class="gallery">
    @for (item of data; track $index) {
   <div class="card">
      <div class="container">
         <h4><b>{{ item.name }}</b></h4>
         <p>{{ item.role }}</p>
      </div>
   </div>
   }
</div>
Here,
data holds the list of employees with two properties, name and role
Used @for to show the employees as list of cards
Step 8: Next, open the components styles and add necessary CSS as shown below −
dyn-list.css
.gallery {
   display: flex;
   flex-wrap: wrap;
   justify-content: left;
   gap: 10px;
}

.card {
   flex-basis: 200px;
   box-shadow: 0 4px 8px 0 rgba(0,0,0,0.2);
}

.card:hover {
   box-shadow: 0 8px 16px 0 rgba(0,0,0,0.2);
}

.container {
   padding: 2px 16px;
   max-width: 200px;
}
Here, we used flex feature of CSS to show the employees in gallery format
Step 9: Next, open the DynTable component and implement DynData interface.
DynTable.ts
import { Component } from '@angular/core';
import { DynData } from '../dyn-data';

@Component({
   selector: 'app-dyn-table',
   imports: [],
   templateUrl: './dyn-table.html',
   styleUrl: './dyn-table.css',
})
export class DynTable implements DynData {
   data: any[] = []
}
Here,
Imported DynData interface and implements it in class definition
Included the data property as per DynData interface specification
Step 10: Next, open the components template and render the data as list of items
Dyn-Table.html
<table class="employees">
   <thead>
      <tr>
         <th>Name</th>
         <th>Role</th>
      </tr>
   </thead>
   <tbody>
    @for (item of data; track $index) {
      <tr>
         <td>{{ item.name }}</td>
         <td>{{ item.role }}</td>
      </tr>
    }
   </tbody>
</table>
Here,
data hold the list of employees with two properties, name and role
Used ngFor to render the employees as rows in the html table
Step 11: Next, open the components styles and add necessary CSS as shown below −
.employees {
   border-collapse: collapse;
   width: 400px;
}

.employees td, .employees th {
   padding: 8px;
}

.employees tbody tr:nth-child(even){background-color: #f2f2f2;}

.employees tbody tr:hover {background-color: #ddd;}

.employees thead th {
   padding-top: 12px;
   padding-bottom: 12px;
   text-align: left;
   background-color: brown;
   color: white;
}
Step 12: Next, open DynHost components template and include the ng-container as shown below −
<ng-container #container></ng-container>
Here, we have shown the usage of ng-container.
Step 13: Next, open DynHostComponent and import necessary classes
import { AfterViewInit, Component, Input, ViewChild, ViewContainerRef } from '@angular/core';
Step 14: Next, import interface, list component, table component and directive
import { DynData } from '../dyn-data';
import { DynList } from '../dyn-list/dyn-list';
import { DynTable } from '../dyn-table/dyn-table';
Step 15: Implement AfterViewInit life cycle hook in the class declaration
export class DynHost implements AfterViewInit {
}
Step 16: Declare an input property to get format information (table / list) from user.
@Input() format: string = 'list'
Step 17: Declare a property, data and set the sample data
private data = [
   {
      'name': 'John',
      'role': "Manager"
   },
   {
      'name': 'Peter',
      'role': "Marketing Intern"
   },
   {
      'name': 'Mary',
      'role': "Technical Intern"
   },
   {
      'name': 'Jack',
      'role': "Sales Manager"
   },
   {
      'name': 'Jessica',
      'role': "Delivery Head"
   },
]
Step 18: Get the ng-container view component from the template by using @ViewChild
@ViewChild('container', { read: ViewContainerRef }) container!: ViewContainerRef;
Step 19: Do actual implementation of dynamically creating the component and loading it into the appropriate place in the ngOnInit life cycle hook
ngAfterViewInit() {

   if(this.format == 'table') {
      const compRef = this.container.createComponent<DynData>(DynTable);
      compRef.instance.data = this.data;
   } else {
      const compRef = this.container.createComponent<DynData>(DynList);
      compRef.instance.data = this.data;
   }
}
Step 20: The complete listing of the host component is as follows,
import { AfterViewInit, Component, Input, OnInit, ViewChild, ViewContainerRef } from '@angular/core';

import { DynData } from '../dyn-data';
import { DynList } from '../dyn-list/dyn-list';
import { DynTable } from '../dyn-table/dyn-table';

@Component({
   selector: 'app-dyn-host',
   templateUrl: './dyn-host.html',
   styleUrls: ['./dyn-host.css']
})
export class DynHost implements AfterViewInit {
   @Input() format: string = 'table'
   @ViewChild('container', { read: ViewContainerRef }) container!: ViewContainerRef;

   private data = [
   {
      'name': 'John',
      'role': "Manager"
   },
   {
      'name': 'Peter',
      'role': "Marketing Intern"
   },
   {
      'name': 'Mary',
      'role': "Technical Intern"
   },
   {
      'name': 'Jack',
      'role': "Sales Manager"
   },
   {
      'name': 'Jessica',
      'role': "Delivery Head"
   },
  ]

   ngAfterViewInit() {

      if(this.format == 'table') {
         const compRef = this.container.createComponent<DynData>(DynTable);
         compRef.instance.data = this.data;
      } else {
         const compRef = this.container.createComponent<DynData>(DynList);
         compRef.instance.data = this.data;
      }
   }
}
Step 21: Next, open the app components template and include the host component.
app.html
<app-dyn-host format="table" />
Here, we have directed the host component to render the employees data in the tabular format. The host component will dynamically create the DynTableComponent and inject into the host component template.
Step 22: Next, run the application and you can see that the employee data is shown in a tabular format as shown below −
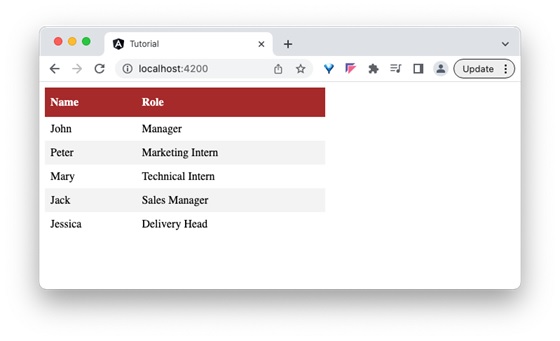
Step 23: Next, open the app components template and change the format to gallery.
<app-dyn-host format="gallery" />
Here, we have directed the host component to render the employees data in gallery format. The host component will dynamically create the DynListComponent and inject into the host component template.
Output
Step 24: Next, run the application and you can see that the employee data is shown in gallery format as shown below −
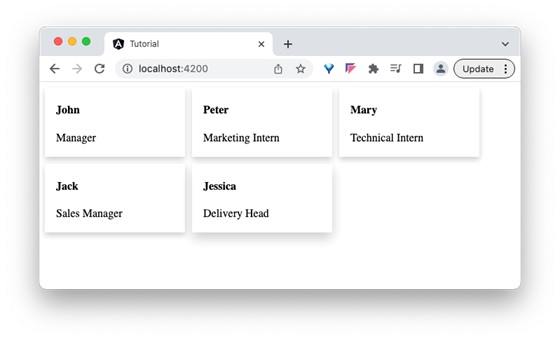
Angular - Elements
What is an Angular Element?
Angular elements are reusable components that have been transformed into custom elements (also called Web Components). Angular provides a simple and effective method to create Web components.
Web components are custom HTML elements available in native HTML specifications to extend the features/tags of the HTML document. It can be created through JavaScript and can be made available in the HTML document. JavaScript has special methods to create custom HTML elements.
Creating custom HTML elements using JavaScript is a lengthy process and developers need to understand the internal workings of custom HTML elements and the Shadow DOM concept. Angular simplifies the process by enabling the conversion of Angular components to web components with minimal change in the component class.
Creating Angular elements means transforming a component into a custom element. For this purpose, the @angular/elements package is used. This package exports a createCustomElement() function that converts a component into a class that can be registered with the browser as a custom element.
Example - Creating Angular Elements
Let us learn how to create a custom HTML element in Angular.
In this example, we will create a component to display employee information (say EmpCard) and convert it into custom HTML element.
Step 1: Create an angular application, emp-card-web-component using Angular CLI.
ng new emp-card-web-component
Step 2: Create the emp-card component using Angular CLI.
ng generate component emp-card
CREATE src/app/emp-card/emp-card.spec.ts (562 bytes)
CREATE src/app/emp-card/emp-card.ts (204 bytes)
CREATE src/app/emp-card/emp-card.css (0 bytes)
CREATE src/app/emp-card/emp-card.html (24 bytes)
Step 3: Add encapsulation option in the @Component decorator with ViewEncapsulation.ShadowDom option. ShadowDom option enables the HTML native ShadowDom concept to preserve the styles of the component without leaking into the other part of the HTML document.
@Component({
   // ...
   encapsulation: ViewEncapsulation.ShadowDom
})
export class EmpCard {
   // ...
}
Step 4: Next, add two input properties, name and role of the employee in the HTML element.
export class EmpCard {
   @Input() name: string = '';
   @Input() role: string = '';
}
Step 5: The complete listing of the component is as follows −
emp-card.ts
import { Component, Input, ViewEncapsulation } from '@angular/core';

@Component({
  selector: 'app-emp-card',
  imports: [],
  templateUrl: './emp-card.html',
  styleUrl: './emp-card.css',
  encapsulation: ViewEncapsulation.ShadowDom
})
export class EmpCard {
   @Input() name: string = '';
   @Input() role: string = '';
}
Step 6: Next, open the components template and add markup to display employee name and role as shown below −
emp-card.html
<div class="card">
   <div class="container">
      <h4><b>{{ name }}</b></h4>
      <p>{{ role }}</p>
   </div>
</div>
Step 7: Next, open the components style and add css to show shadow in the employee card.
emp-card.css
.card {
   box-shadow: 0 4px 8px 0 rgba(0,0,0,0.2);
}

.card:hover {
   box-shadow: 0 8px 16px 0 rgba(0,0,0,0.2);
}

.container {
   padding: 2px 16px;
   max-width: 200px;
}
Step 8: Next, install @angular/elements module provided by angular team. @angular/elements module has options to create custom HTML element from angular component.
ng add @angular/elements
√ Determining Package Manager
  › Using package manager: npm
√ Searching for compatible package version
  › Found compatible package version: 21.0.0.
√ Loading package information from registry
√ Confirming installation
√ Installing package
Package installed successfully. The package does not provide any `ng add` actions, so no further actions were taken.
For more information about this package, visit its homepage at https://github.com/angular/angular#readme
Step 9: Next, open the main.ts file and remove all boilerplate code.
Step 10: Next, import createApplication from @angular/platform-browser. createApplication will bootstrap the angular application.
import { createApplication } from '@angular/platform-browser';
Step 11: Next, import createCustomElement from @angular/element module. createCustomElement will be used to create custom HTML element from the angular component.
import { createCustomElement } from '@angular/elements';
Step 12: Next, import EmpCardComponnet component as shown below −
import { EmpCard } from './app/emp-card/emp-card'
Step 13: Next, create application using createAppliation() method by inputting providers and a callback method. The callback method will be used to create the custom HTML element from angular component.
createApplication({ providers: [] }).then((appRef) => {
   // ...
});
Step 14: Implement the callback method and create custom element using createCustomElement() method. createCustomElement accepts the component to be converted and the apps injector.
We can get injector from application reference returned from createApplication() method.
createApplication({ providers: [] }).then((appRef) => {
   const empCard = createCustomElement(
      EmpCardComponent,
      { injector: appRef.injector }
   );
});
Step 15: Next, register the created custom component using JavaScript native method, customElements.define() method.
createApplication({ providers: [] }).then((appRef) => {
   const empCard = createCustomElement(
      EmpCardComponent,
      { injector: appRef.injector }
   );

   customElements.define('emp-card', empCard);
});
Step 16: The complete listing of the main file, main.ts is as follows,
main.ts
import { createApplication } from '@angular/platform-browser';
import { createCustomElement } from '@angular/elements';
import { EmpCard } from './app/emp-card/emp-card'

createApplication({ providers: [] }).then((appRef) => {
   const empCard = createCustomElement(
      EmpCard,
      { injector: appRef.injector }
   );

   customElements.define('emp-card', empCard);
});
Step 17: Next, buid the application using angular CLIs build command
ng build
Initial chunk files | Names         |  Raw size | Estimated transfer size
main-WKKDU3MJ.js    | main          | 101.87 kB |                30.60 kB
styles-5INURTSO.css | styles        |   0 bytes |                 0 bytes

                    | Initial total | 101.87 kB |                30.60 kB

Application bundle generation complete. [5.142 seconds] - 2025-11-21T14:43:54.251Z

Output location: D:\Angular\emp-card-web-component\dist\emp-card-web-component
Step 18: Once, the build is done, the output files are available in dist/emp-card-web-component folder. It has below files (similar files) along with a index.html file.
- main-5LWF45YA.js
- polyfills-FFHMD2TL.js
- styles-5INURTSO.css
Step 19: Update the index.html file of the src folder with the newly created component and check the output for correctness.
index.html
<!doctype html>
<html lang="en">
<head>
   <meta charset="utf-8">
   <title>EmpCardWebComponent</title>
   <base href="/">
   <meta name="viewport" content="width=device-width, initial-scale=1">
   <link rel="icon" type="image/x-icon" href="favicon.ico">
</head>
<body>
   <emp-card name="John" role="Angular developer"></emp-card>
   <emp-card name="Maria" role="Frontend developer"></emp-card>
</body>
</html>
Here, we have added to emp-card tag with two different employee details.
Step 20: Finally, run the application and check the output in the browser.

Summary
As we learned, creating a web component is super easy in Angular. We just need to develop the component as normal angular component. Once the functionality of the component is developed, we need to add some bootstrapping code in the main.ts file and build the application to get the necessary custom HTML element as a bunch of native JavaScript. We can use it on any website without angular.
Angular - Templates
What is an Angular Template?
Template is a small part of an Angular application's user interface(UI). It is written in HTML and its use is to generate the view of a component to be rendered in the browser. Since the purpose of an angular template is to produce only a chunk of HTML and not a complete HTML document, it does not support a few HTML elements, which are <html>, <body> and <base>. The <script> tag is not supported intentionally to prevent script injection in the final angular application.
Relation between Template and Component
Angular Component controls how a view should be displayed on the browser screen. It consists of a TypeScript class and CSS style along with an HTML template. Templates can be found inside the metadata of a Component defined using the template property or linked using the templateURL property. We can conclude that the Component generates the view with the help of Template.

Ways to Define Templates in Angular
There are two ways in which we can define Angular Templates −
Inline: We can create a template using the template property of the @Component decorator directly in the component class file.
External: It is the default way of creating a template. It uses the templateUrl property to link a template to a Component.
The Angular Views
Angular provides a rich set of features to create a user interface of the application. A portion of the user interface in an angular application is called View. Angular Views are basically a chunk of HTML/DOM structure represented immediately in the memory during the execution of an angular application and are rendered into the final HTML markup.
Each component in an Angular application has an associated view, known as a component view, which is created from the template associate with the component. This template and component instance have dynamic interaction between them. The template receives data from the component and sends data back to the component as well.
Features of Angular Template
In addition to HTML, The Angular template supports additional features to create dynamic content and to provide rich interaction with components. These additional features are −
- Text interpolation
- Text transformation through angular pipes
- Template Statements
- Data Binding
- Directives
- Template Variables
Text Interpolation
Text interpolation is the usage of a component's data in its template using the template expression. Let us consider that a component has a name as one of its properties.
export class HomeComponent {
   name: string = 'John'
}
Then, name can be used in its template as shown below −
Hello {{ name }}
Please note that the double curly brace is used to specify the template expression.
Text Transformation through Pipes
Text transformation can be done in the template using pipe symbol (|). Angular template provides a unique feature called Angular pipes, basically a javascript function, which accepts input along with modifiers through arguments and transforms the input data from one format to another and renders it. Angular has many built-in pipes for date, currency, etc., and also provides an option to create new, customized pipes.
Let us consider a simple component, CurrentTimeComponent to show the current time along with the date.
export class CurrentTimeComponent {
   currentDate : date = new Date()
}
<div>
   The current date and time is {{ currentDate | date:'short' }}
</div>
Here, the date is the pipe function (datePipe) and short is its argument. This will show the current date with time in a simple format as shown below
<div _ngcontent-ng-c323970836="">
   The current date and time is 7/29/23, 3:35 PM
</div>
Template Statement
Template statements are used to interact with users through events in the HTML document. They are similar to JavaScript expressions with few exceptions and few additions.
Let us consider a simple scenario of show/hide a section through user's action. The component will have a hide() method to hide and another method show() to show the section. The component's template will have two buttons to fire the show and hide action. The click event of the buttons will be set with show/hide method through template statement.
export class MySectionComponent {
   hideStatus: boolean = false;

   show() {
      this.hideStatus = false;
   }

   hide() {
      this.hideStatus = true;
   }
}
Here, hideStatus is a boolean property of the component used to set/remove the CSS class, hide in the section element. show() and hide() are two method to execute the action of setting / remove the css class from the section element.
.hide {
   display: none;
}
<div [class.hide]="hideStatus">
   <p>Hi, I am simple section created for the testing purpose<p>
</div>
<button (click)="hide()">Hide the section</button>
<button (click)="show()">Show the section</button>
Here, hide() and show() are template statements used to set the action for click event of the buttons. [class.hide]="hideStatus" is class binding concept available in angular template, which we will learn in upcoming chapters.
Data Binding
Binding is the process of connecting a target in the template and an expression or statement based on model of the component to which the template belongs. Text interpolation is the simplest form for binding and angular provides many types of binding. They are as follows,
Text interpolation: Text interpolation is the process of connecting model of a components instance to the text portion of components template
Attribute binding: Attribute binding is the process of connecting model of a components instance to the attribute of a (target) HTML element in the components template
Class and style binding: Class and style binding is the process of connecting model of a components instance to the class and style attributes of a (target) HTML element in the components template
Property binding: Property binding is the process of connecting model of a components instance to the property of a (target) HTML element / other component in the components template. Angular exposes the attributes of HTML element as properties with attribute names converted to CamelCase. This will help to connect all attributes of the HTML element through property binding.
Event binding: Event binding is the process of connecting the model of a components instance method to the event of a (target) HTML element / (another) component.
Two way data binding: Two way data binding is a combination of property and event binding to sync data between parent and child component.
Directives
Angular provides an excellent feature, Directive to add additional behavior to any existing HTML elements or components in a generic way. In addition to creating new directives, angular provides a default set of directives to provide additional functionality like condition (ngIf) and loops (ngFor) (which are not available in the angular tempaltes) to the HTML elements and component. We will learn the complete set of built-in directive in the later chapter.
A simple example of using ngIf directive to show or hide a target element is as follows,
import { Component } from '@angular/core';

@Component({
   selector: 'app-my-section',
   templateUrl: './my-section.component.html',
   styleUrls: ['./my-section.component.css']
})
export class MySectionComponent {
   showSection: boolean = true;
}
Here, showSection is a variable in the component having truthy value.
@if(showSection) {
<div>
   I will be shown based on the 'showSection' property in the component's
   instance.
</div>
}
Here, showSection is the condition (template expression) used by ngIf to decide whether to render the div element. If the condition succeeds, it will render the div element; otherwise, it will skip the rendering of the element.
If the showSection value is changed to false, then the section will not be shown.
Template Variables
The Template Variable is basically used to reference any one of the below items in the template.
- HTML element
- Directive
- Component
- Template inside template (ng-template)
- Web component
Let us create a reference to a input element and span element and show the value entered in the input element to the span element.
<input #source /> <span #target></span>

<div style="padding-top: 5px;">
   <button (click)="target.innerText = source.value;">Show</button>
</div>
Here,
source is the template variable referring to the input element.
target is the template variable referring to the target span element.
When the user clicks the button, the click event will fire and run the statement specified inside the event and set the data entered by user into the span element.
Summary
Templates in angular provide a lot of options to generate UI fragments quite effectively. It supports great interaction with component instances to sync the data. It prevents the script injection and improves the predictability of the template output by avoiding the side effects in the template.
Multiple Choice Questions on Angular Template
In this section, test your understanding of the angular template by giving correct answers to the questions given below −
Q. 1 - Use of angular template:
A - To define the entire structure of an Angular application
B - To manage the data flow between components
Answer : C
Explanation
In Angular, we use template to generate the view of a component, which will be rendered in the browser.
Q. 2 - Which HTML elements are not supported in Angular templates?
Answer : D
Explanation
Since the purpose of an angular template is to produce only a chunk of HTML and not a complete HTML document, it does not support <html>, <body>, <base> and <script> tags.
Q. 3 - Role of *ngIf directive in Angular templates:
A - It conditionally includes or excludes an HTML element from the DOM
B - It loops through a list of items
Answer : A
Explanation
The *ngIf directive is used to conditionally include or exclude an HTML element based on an expression. If the expression evaluates to true, the element is added to the DOM; otherwise, it is removed.
Angular - Template Statement
What are Template Statements?
Template statements are used to interact with users through events in the HTML document. They allow the developer to call the components method in response to the users action. Also, it allows the developer to write simple logic in the template itself with multiple statements separated by colon (;). Let's learn more about the template statement in this chapter.
Syntax
Template statement is similar to JavaScript expression with the below exceptions.
Compound assignment operators: The template statement does not support compound assignment operators (+= and -=). Compared to the template expression, the statement supports the normal assignment operator (=).
The new keyword: Template does not allow the creation of new objects. All objects should be created in the component class. An object created in the component will be available in the template.
Increment and decrement operators: Template does not allow side effects. Since the increment and decrement operators do the side effects, they are excluded.
Bitwise operator: Bitwise operators (| and &) are not supported.
Pipe operator: Template statement does not support pipe (|) operator.
How to use Template Statements in the Template
Template statements can be written inside the double quotes and set as the value of components or elements event property as shown below −
<button (click)="<statements>">Click here</button>
Here,
(click) represent the click event of the button. It uses event binding concept, which is explained in the Event binding chapter.
<statement> can be any template statement as specified in the previous section.
Template Statement Context
Similar to template expression, template statement has three contexts, which are:
1. Components property/method: Component's property/method is the property/method set in the components instance. For example, a user object (user) in the component can be used in the template as follows,
<button (click)="showUser(user)">Show user</button)
Here, the context of user property and showUser() method is components instance.
2. Template input variable: Template input variables are input to the template assigned through directives. For example, ngFor directive sends the index and current item of the loop to the template as shown below −
<ul>
@for(user of users; track $index) {
   <li (click)="showUser(user)">{{user.name}}</li>
}
</ul>
Here, the context of user property is template input variable.
3. Template reference variable: Template reference variable is basically a representation of HTML elements, components and directives in the given template as shown below −
<input #user /> <span>{{ user.value }}</span>
<button (click)="showUser(user.value)">Show User</button>
Here, the context of user & user.value is template reference variable.
The precedence of context in case of name collision is as follow,
Template variable
Variable in the directives context
Components member variable and method
The angular team recommends using complex logic in the components method and calling it through a template statement instead of trying to write the logic in the template itself using a template statement.
Example - Usage of Template Statements
Let us consider a simple scenario of show/hide a section through user's action.
Step 1: Create a new application using angular CLI as shown below −
$ ng new my-app
Step 2: Create a component, BlockWithShowHide using angular CLI as shown below −
$ ng generate component BlockWithShowHide
CREATE src/app/block-with-show-hide/block-with-show-hide.spec.ts (634 bytes)
CREATE src/app/block-with-show-hide/block-with-show-hide.ts (250 bytes)
CREATE src/app/block-with-show-hide/block-with-show-hide.css (0 bytes)
CREATE src/app/block-with-show-hide/block-with-show-hide.html (36 bytes)
Step 3: Next, open the component file, src/app/block-with-show-hide/block-with-show-hide.ts and add a variable, hideStatus to represent the show / hide status
hideStatus: boolean = false;
Step 4: Next, add two method, show() and hide() to change the value of hideStatus variable with respect to the users action.
show() {
   this.hideStatus = false;
}

hide() {
   this.hideStatus = true;
}
Step 5: Next, open the components template file, src/app/block-with-show-hide/block-with-show-hide.html and a block with two buttons,
<div>
   <div>
      <p>Hi, I am simple section created for the testing purpose<p>
   </div>
   <button>Hide the section</button>
   <button>Show the section</button>
</div>
Step 6: Next, add click event to the button and the corresponding method as shown below −
<div>
   <div [class.hide]="hideStatus">
      <p>Hi, I am simple section created for the testing purpose<p>
   </div>
   <button (click)="hide()">Hide the section</button>
   <button (click)="show()">Show the section</button>
</div>
Step 7: Next, add a class property binding, class.hide with value hideStatus in the block to be shown / hidden.
block-with-show-hide.html
<div>
   <div [class.hide]="hideStatus">
      <p>Hi, I am simple section created for the testing purpose<p>
   </div>
   <button (click)="hide()">Hide the section</button>
   <button (click)="show()">Show the section</button>
</div>
Here,
class.hide represents the hide CSS class and it will be set if its value hideStatus is true.
Step 8: The complete listing of the component is as follows,
block-with-show-hide.ts
import { Component } from '@angular/core';

@Component({
  selector: 'app-block-with-show-hide',
  imports: [],
  templateUrl: './block-with-show-hide.html',
  styleUrl: './block-with-show-hide.css',
})
export class BlockWithShowHide {
   hideStatus: boolean = false;

   show() {
      this.hideStatus = false;
   }

   hide() {
      this.hideStatus = true;
   }
}
Step 9: Next, add hide CSS class in the css file, src/app/block-with-show-hide/block-with-show-hide.css
block-with-show-hide.css
.hide {
   display: none;
}
Step 10: Next, open the app components template file, src/app/app.html and add our component as shown below −
app.html
<app-block-with-show-hide />
Step 11: Next, open the app components file, src/app/app.ts and add our component under import section as shown below −
app.ts
import { Component, signal } from '@angular/core';
import { RouterOutlet } from '@angular/router';
import { BlockWithShowHide } from './block-with-show-hide/block-with-show-hide';

@Component({
   selector: 'app-root',
   imports: [RouterOutlet, BlockWithShowHide],
   templateUrl: './app.html',
   styleUrl: './app.css'
})
export class App {
   protected readonly title = signal('myApp');

}
Output
Step 12: Finally, run the application and check whether the block is shown/hidden based on the users action.

Summary
Template statement enables the application to interact with users in a safe and effective method without sacrificing the flexibility in coding and rich user experience of the application.
Angular - Template Variables
What are Template Variables?
Template variables are variables available in the context of template. Angular does not allow the developer to create a new variable in the template. Instead, it allows new variables to be passed into the template through a component or directive instance. Also, it allows to declare a variable in the template and refers to any of the existing elements available in the template.
Let us learn more about template variables in this chapter.
Types of Template Variables
There are two types of template variables −
Template input variable: Template input variables are passed into the template either through component or directive instance.
Template reference variable: Template reference variables are declared in the template itself and refer to the existing element in the template.
Template Input Variable
Template input variables are variables passed into the template and available in the context of template. They are passed into the template through multiple channels. They are as follows:
Component: Component exposes all its public variables/properties to it's template
Directive: Directive exposes selective variables into the template during its execution. For example, ngFor exposes index and current looping variable to the template as shown below,
<ul>
   <ng-template ngFor let-user let-i="index" [ngForOf]="users">
      <li>User {{i}}: {{user.name}}
   </ng-template>
</ul>
Here,
users is template input variable exposed by component.
user and i are template input variables exposed by ngFor directive.
Template Reference Variable
The syntax to declare a template reference variables is #var (# along with variable name). Angular allows the variable to be declared as attributes of an element available in the template. The type and value of the template reference variable depend on where it is declared.
1. If a variable is declared inside an element, then it refers to the HTML element.
<button #btn>Click Here</button>
Here, btn refers to the button object of type HtmlButtonElement
2. If a variable is declared inside a component, then it refers to the component instance.
<app-comp #mycomp></app-comp>
Here, mycomp refers to the component instance and can access the internal of the referenced component.
3. If a variable is declared inside a template (ng-template, a tag used to create template within a template), then it refers to the instance of the template.
<ng-template #mytemplate>
   <div>Hi, I am template within the template</div>
</ng-template>
Here, mytemplate refers to the instance of the template.
4. If a variable is declared inside a custom web component, then it refers to the custom HTML element.
<my-card #mycard>Click Here</my-card>
Here, mycard refers to the custom web component, my-card
Let us see how to create a template reference variable, firstname to refer to an input element as shown below −
<input #firstname id="firstname" type="text" name="firstname" value="John" />
Here,
firstname is the template reference variable
firstname represents the instance of HtmlInputElement element. HtmlInputElement is a type in DOM to represent the input element.
firstname can access all properties and methods of HtmlInputElement element
The template reference variable can be used in template statement and text interpolation.
Example
Let us create an application to show the value entered by user in an input box to a span element using pure template reference variable concept. The application will provide a button for the user to fire the process of accessing the input box value and show it in the span element.
Step 1: Create a new application using angular CLI as shown below −
$ ng new my-app
Step 2: Create a component, MyTemplateRefVarSample using angular CLI as shown below −
$ ng generate component MyTemplateRefVarSample
CREATE src/app/my-template-ref-var-sample/my-template-ref-var-sample.spec.ts (670 bytes)
CREATE src/app/my-template-ref-var-sample/my-template-ref-var-sample.ts (273 bytes)
CREATE src/app/my-template-ref-var-sample/my-template-ref-var-sample.css (0 bytes)
CREATE src/app/my-template-ref-var-sample/my-template-ref-var-sample.html (42 bytes)
Step 3: Next, open the component template file, my-template-ref-var-sample.html and add an input element
<input type="text" id="firstname" name="firstname" #source />
Here, source is the template variable refering the input element
Step 4: Next, add a span element in the template
<input type="text" id="firstname" name="firstname" #source />
<span #target></span>
Here, target is the template variable referring the target span element.
Step 5: Next, add a button in the template
<input type="text" id="firstname" name="firstname" #source />
<span #target></span>

<div style="padding-top: 5px;">
   <button>Show</button>
</div>
Here, the button is used to fire the event and get the value entered by user in the firstname input element to set it into span element
Step 6: Next, add click event using property binding and write logic to set the value of input element to span element.
my-template-ref-var-sample.html
<input type="text" id="firstname" name="firstname" #source />
<span #target></span>

<div style="padding-top: 5px;">
   <button (click)="target.innerText = source.value;">Show</button>
</div>
Here, the click event has a single template statement, which will access the value entered by user in input element through value property of source object and set it into the target element, span using innerText property of target object.
Step 7: Next, open the app components template file, src/app/app.html and add our component as shown below −
app.html
<app-my-template-ref-var-sample />
Step 8: Next, open the app components file, src/app/app.ts and add our component as shown below −
app.ts
import { Component, signal } from '@angular/core';
import { RouterOutlet } from '@angular/router';
import { MyTemplateRefVarSample } from './my-template-ref-var-sample/my-template-ref-var-sample';

@Component({
   selector: 'app-root',
   imports: [RouterOutlet, MyTemplateRefVarSample],
   templateUrl: './app.html',
   styleUrl: './app.css'
})
export class App {
   protected readonly title = signal('myApp');
}
Step 9: Finally, run the application and check whether the button is working fine.
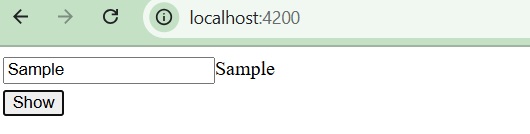
Template reference variable with a value
In general, a template reference variable will only declare a variable inside the element to be referred.
<form #formVar>
   <!-- form information -->
</form>
Here, the formVar represents the object of type HtmlFormElement. But, in some cases, it can include value as well. If it includes value, then the value is interrupted as directive or component with exportAs property matching the set value.
To better understand the concept, let us change the above form to include ngForm as value.
<form #formVar="ngForm">
   <!-- form information -->
</form>
ngForm is a directive provided by angular team to support form programming. Here, the formVar refers to an instance of ngForm directive instead of HtmlFormElement. formVar can access properties and methods (like formVar.form.valid) of ngForm and do better form programming.
Summary
Template variables are simple to use in the angular framework. It is minimal and easy to understand and covers all aspects of client-side programming.
Angular - SVG As Template
Scalable Vector Graphics, in short SVG, is used to create vector-based graphics in XML format. XML is a markup language like HTML that stores and transfers data on the web.
SVG provides a framework for creating rich graphics with declarative programming. Angular template can be applied to the SVG to create dynamic graphics with minimal effort.
In this chapter, we will understand how to create SVG as an Angular Template.
Creating SVG as a Template
Let us create a simple bar chart in SVG format and use it in our template and then update the bar chart dynamically through template input variables.
Step 1: Create a new application using angular CLI as shown below −
$ ng new my-app
Step 2: Create a component, chart using angular CLI as shown below −
$ ng generate component chart
CREATE src/app/chart/chart.spec.ts (547 bytes)
CREATE src/app/chart/chart.ts (193 bytes)
CREATE src/app/chart/chart.css (0 bytes)
CREATE src/app/chart/chart.html (21 bytes)
Step 3: Next, open the component template file, chart.html and add a static bar chart in SVG.
chart.html
<svg class="chart" width="420" height="150">
   <title id="title">Bar chart</title>
   <desc id="desc">Fruits count</desc>
   <g class="bar">
      <rect width="50" height="19"></rect>
      <text x="55" y="9.5" dy=".35em">5 Apples</text>
   </g>
   <g class="bar">
      <rect width="100" height="19" y="20"></rect>
      <text x="105" y="28" dy=".35em">10 Orange</text>
   </g>
   <g class="bar">
      <rect width="40" height="19" y="40"></rect>
      <text x="45" y="48" dy=".35em">2 Lemons</text>
  </g>
</svg>
Step 4: Next, open the component's style file, chart.css and add below css to style the SVG bar chart.
chart.css
.bar {
   fill: red;
   height: 21px;
   transition: fill .3s ease;
   cursor: pointer;
   font-family: Helvetica, sans-serif;
}
.bar text {
   color: black;
}
.bar:hover,
.bar:focus {
   fill: black;
}
.bar:hover text,
.bar:focus text {
   fill: red;
}
Step 5: Next, open the app component template, app.html and add our chart component.
<app-chart />
Step 6: Next, open the app component, app.ts and add our chart component.
import { Component, signal } from '@angular/core';
import { Chart } from './chart/chart';

@Component({
   selector: 'app-root',
   imports: [Chart],
   templateUrl: './app.html',
   styleUrl: './app.css'
})
export class App {
   protected readonly title = signal('myApp');
}
Step 7: Run the application and check whether the chart is rendered properly.
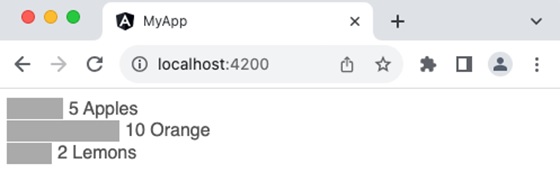
Step 8: Next, create an interface, Fruit to hold the chart data.
$ ng generate interface Fruit
CREATE src/app/fruit.ts (27 bytes)
Step 9: Update the interface with name and count value.
export interface Fruit {
   name: string;
   count: number;
}
Step 9: Import fruit interface in the chart component.
import { Fruit } from '../fruit'
Step 10: Add sample fruit data in the chart component.
fruits : Fruit[] = [
   {
      name: 'Apple',
      count: 10
   },
   {
      name: 'Orange',
      count: 20
   },
   {
      name: 'Lemon',
      count: 5
   }
]
Step 11: The complete listing of the component is as follows:
chart.ts
import { Component } from '@angular/core';
import { Fruit } from '../fruit';

@Component({
   selector: 'app-chart',
   imports: [],
   templateUrl: './chart.html',
   styleUrl: './chart.css',
})
export class Chart {
   fruits : Fruit[] = [
   {
      name: 'Apple',
      count: 10
   },
   {
      name: 'Orange',
      count: 20
   },
   {
      name: 'Lemon',
      count: 5
   }
   ]
}
Step 12: Next, open the component's template file and update the bar chart to use the fruit template variable from the component as shown below −
<svg class="chart" width="420" height="150">
    @for (fruit of fruits; track $index) {
   <g class="bar">
      <rect [attr.width]="fruit.count * 10" height="19" [attr.y]="0 + ($index * 20)"></rect>
      <text [attr.x]="fruit.count * 10 + 5" [attr.y]="10 + ($index * 20)" dy=".35em">
         {{ fruit.count }} {{ fruit.name }}
      </text>
   </g>
   }
</svg>
Here,
ngFor (structural directive) is used to loop over the fruits.
Attribute binding ([attr.width], [attr.x] & [attr-y]) is used along with template statement to dynamically add each bar in the chart based on the fruits template variable
fruit.count * 10 is a template statement, which sets the width of the bar based on the fruit count
0 + (i * 20) is another template statement, which sets the y position of the bar in the chart.
fruit.count * 10 + 5 is another template statement, which sets x position of the text at the end of the bar in the chart.
10 + (i * 20) is another template statement, which sets the y position of the text at the end of the bar in the chart.
Step 13: Run the application and check whether the chart is rendered properly.

Summary
SVG graphics can be done easily through angular templates. We can combine it with form programming to dynamically set the style of the bar chart and extend the bar chart to support another type of chart as well. SVG chart is just an example of how SVG can be created/manipulated in angular template. It can be used to create advanced SVG graphics like maps, SVG-based animation, etc.
Angular - Data Binding
Data Binding is the process of connecting a target (such as a DOM element, property, or event) in a template to a model (data or behavior) in the component. This process lets the template to dynamically reflect changes in the component's state or execute actions based on user interactions, using template expressions or template statements.
In Angular, data binding is used to establish communication between component class to view template and view template to the component class.
Types of Data Binding
There are two types of Data Binding in Angular −
The diagram below shows the categorization of data binding −
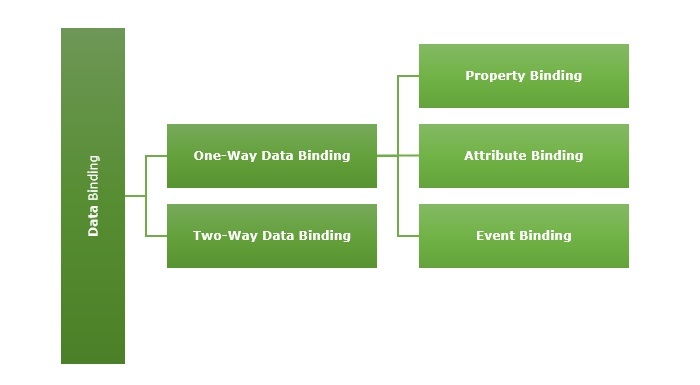
One-Way Data Binding
One-way data binding is a one-directional interaction between a component and its template. The data flows either from component to its corresponding template or template to the component. If you perform any changes in your component, then it will reflect in the HTML elements.
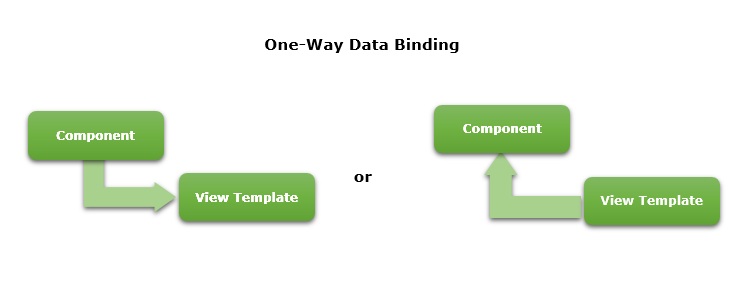
One-way data binding can be achieved through the following ways −
Text Interpolation
In general,Text Interpolationis the process of formatting or manipulating strings. In Angular,itis used to display data from a component to a view. In this way of data binding, we use the curly braces {{ }}.
Let us consider a variable, name available in the component.
name: string = "John"
Then, the name can be used in the template using interpolation as shown below −
Name: {{ name }}
The final output of the template is shown below −
Name: John
Event Binding
Event binding is the process of setting an action to the event of an HTML element or another component. It is used to achieve one-way data binding where data flows from the view template to the component class. Here, we use the parentheses ( ).
Events are actions like a mouse click, double click, hover or any other keyboard and mouse actions. If a user interacts with an application and performs some actions, then an event will be raised.
Suppose there is a method called myAction() inside the component.
myAction() {
   // do some process
}
For this, event binding can be written as shown below −
<button type="submit" (submit)="myAction">Click here</button>
Once the submit event is fired, myAction() method will be called and executed.
Property Binding
Property binding lets us bind a property of a DOM. It is used to show or hide a DOM element, or simply manipulate the DOM. Here, we use square brackets [ ]
Let us consider a property, name available in the component.
name: string = "John"
Property binding can be written as shown below −
<input type="text" name="username" [value]="name" />
The output of the template is shown below −
<input type="text" name="username" value="John" />
Attribute binding
Attribute binding is used to bind the data from component to HTML attributes. The syntax is as follows −
<HTMLTag [attr.ATTR]="Component data">
For example, let's consider a property, name available in the component.
name: string = "John"
Attribute binding can be written as shown below −
<input type="text" name="username" [attr.value]="name" />
The output of the template is shown below −
<input type="text" name="username" value="John" />
Two-way Data Binding
Two-way data binding is a two-way interaction where data flows in both ways, from component to views and views to component at the same time. If you do any changes in your property (or model) then, it reflects in your view and vice-versa. It is the combination of property and event binding.
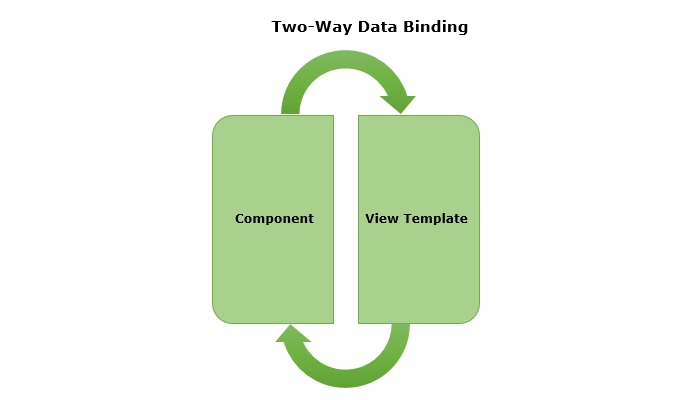
The NgModel, a standalone Angular directive, is used for two-way data binding. This directive binds the form control to property and the property to form control.
The syntax of ngModel is as follows −
<HTML [(ngModel)]="model.name" />
A sample two-way data binding format is as follows,
// 'parent-comp' template
<child-comp [(data)]="dataChange()" />
Here, data will be passed initially from parent to child component and then, whenever the data gets updated in the child component, the child component will fire an event with updated data and the parent will capture the data through event callback method, dataChange().
We will learn two-way data binding concept in more detail in the upcoming chapter.
Conclusion
Binding provides multiple options to connect a component to it's template. This enables the developer to create rich front-end application easily. Binding reduces the complexity of front-end logic and enable developer to concentrate on developing more feature in a short period of time.
Multiple Choice Questions on Angular Data Binding
Based on the Angular data binding concept, there are three MCQs given below. Answer them correctly to test your knowledge about the topic −
Q. 1 - Use of data binding:
A - For communication between the component class and the view template
B - To manage the data flow between components
Answer : A
Explanation
In Angular, data binding is used to establish communication between component class to view template and view template to the component class.
Answer : D
Explanation
One-way data binding to bind data from the component to the view is done using square brackets [ ].
Q. 3 - Which of the following is used for two-way data binding?
Answer : B
Explanation
The [(ngModel)] syntax is used for two-way data binding in Angular.
Angular - Text Interpolation
Text interpolation is the process of using data of Angular component in its corresponding template using the template expression. It is used just to display a piece of information in HTML, such as displaying a title or name.
The component is a building block of an Angular application. It consists of a TypeScript class, an HTML template, and CSS styles. The template expression is a piece of code written within double curly braces {{ }} in the Template.
How to use Text Interpolation?
As discussed earlier, we write the template expression inside double curly braces to use Text Interpolation. It is shown below for the reference −
{{ <template expression> }}
Let us consider that a component has name as one of its property.
export class HomeComponent {
   name: string = 'John'
}
Now, name can be used in it's template as shown below −
Hello {{ name }}
Understanding Template Expression
Template expressions are same as that of JavaScript expression excluding two set of expression:
Expression with no usage in the template (assignement, object creation, etc.,)
Expressions with side effects
For example, the increment operator (++) basically increment the given variable and then returns the incremented value. This is called side effect. Since the increment operator produces the side effect, it is not allowed in the template expression.
Some of the JavaScript expressions not allowed in the template expression. They are given below:
Assignment operators: Template does not have the concept of creating a new variable and setting value for it in the context of template.
new keyword: Template does not allow the creation of new object. Any object should be created in the component class. Object created in the component will be available in the template.
typeof and instanceOf keyword: Template does not allow interpretation of the object in the template. Logic should be done in the component through public method and should exposed to the template.
Chaining expressions: Template expression allows only a single expression and so, all chaining operators are excluded.
increment and decrement operators: Template does not allow side effects. Since the increment and decrement operator does side effects, they are excluded.
Bitwise operator: Pipe symbol (|) is used to represent the angular pipe concept. Angular pipes are used for text transformation.
As template will render many times during the lifetime of the application, angular team recommends the expression to be short, quick and have no side effects.
Template Expression Context
Template expression has three context −
1. Component's property: Components property are the property set in the components instance. For example, a user object (user) in the component can be used in the template as follows,
{{ user.name }}
Here, user context is component's instance.
2. Template input variable: Template input variable are input to the template assigned through directives. For example, ngFor directive send the index and current item of the loop to the template as shown below,
<ul>
   @for(user of users; track $index){
   <li>{{user.name}}</li>
   }
</ul>
Here, user context is template input variable.
3. Template reference variable: Template reference variable is basically representation of HTML elements, components and directive in the give template as shown below −
<input #user /> <span>{{ user.value }}</span>
Here, user context is template reference variable.
The precedence of context in case of name collision is as follow,
- Template variable
- Variable in the directive's context
- Component's member variable
Working Example
Now, let's see a practical example of Text Interpolation in Angular.
Step 1: Create a new application using angular CLI as shown below −
$ ng new my-app
Step 2: Create a component, Hello using angular CLI as shown below −
$ ng generate component Hello
CREATE src/app/hello/hello.spec.ts (547 bytes)
CREATE src/app/hello/hello.ts (193 bytes)
CREATE src/app/hello/hello.css (0 bytes)
CREATE src/app/hello/hello.html (21 bytes)
Step 3: Next, open the component file, hello.ts and add a variable named user with value John.
hello.ts
import { Component } from '@angular/core';

@Component({
  selector: 'app-hello',
  imports: [],
  templateUrl: './hello.html',
  styleUrl: './hello.css',
})
export class Hello {
   user: string = "John"
}
Step 4: Next, open the component template file, hello.html and add an input element:
hello.html
<h1> Hello, {{ user }} </h1>
Here, user is the template input variable exposed by component.
Step 5: Next, open the app component's template file, src/app/app.html and add our component as shown below −
app.html
<app-hello />
Step 6: Next, open the app component's file, src/app/app.ts and add our component as shown below −
app.ts
import { Component, signal } from '@angular/core';
import { Hello } from './hello/hello';

@Component({
   selector: 'app-root',
   imports: [Hello],
   templateUrl: './app.html',
   styleUrl: './app.css'
})
export class App {
   protected readonly title = signal('myApp');
}
Step 7: Finally, run the application and check whether the output is correct.
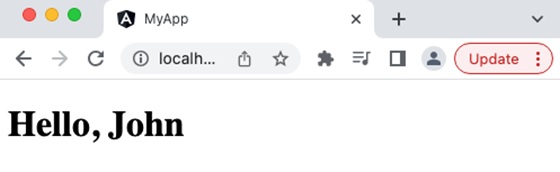
Summary
Text interpolation is easy to learn as it uses the JavaScript expression. Since, the text interpolation does not allow script tag and allows only expression with no side effect, the text interpolation will help to create safe and secure web application
Angular - Event Binding
Angular provides option to listen and fire action for each user initiated event in a typical web application. Event binding is the process of targeting an event in a HTML element/component and set a responder for the target event. The responder will execute once the event is fired.
In this tutorial, we will understand Event Binding.
How to use Event Binding?
An event can be set for an HTML element/component by including the event name inside the bracket (( )) and assigning a template statement. The template statement will execute once the event is fired by the user. The generic syntax to set an action for an event is as follows:
(<event_name>)="template statement"
The syntax to listen a click event of a button is as follows:
<button (click)="template statement">Click here</button>
Example - Event Binding
Let us create a button and set an action to the button's click event.
Step 1: Create a submit button.
<button type="submit>Submit</button>
Step 2: Create an action method in the component.
myAction() {
   alert('I am the action function for click event');
}
Step 3: Bind our myAction() method to click event of the button as shown below −
<button type="submit" (click)="myAction()">Submit</button>
Now, myAction() will execute whenever the submit button is clicked by the user.
Event Object ($event)
Event object has the data about target and the event send by the firing event to the responding action. Angular expose the event object of any event in the an object represented by $event in the context of template.
To get the event object of the button click event, use $event object available in the template as shown below −
<button type="submit" (click)="myAction($event)">Submit</button>
Now, modify the action, myAction() in the component to use the $event object as shown below −
myAction(e) {
   e.preventDefault()
}
Here, preventDefault() is the method available in the HtmlButtonElement's event object to suppress the button events built-in action like submitting the form.
Types of Events
Angular supports all events in a web application and the events are categorized by its source and usage. The type of events are as follows:
Let's learn them one by one in brief.
Mouse Based Events
Mouse based events are events fired by mouse actions like click, scroll, movement, drag, etc.,. Some of the most important events in this category and its angular event binding target name are given below −
- Single click - (click)
- Double click - (dblclick)
- Mouse down - (mousedown)
- Mouse up - (mouseup)
- Mouse entering an element - (mouseenter)
- Mouse leaving an element - (mouseleave)
- Scrolling a block - (scroll)
- Holding and dragging an element - (drag)
- Holding and dropping an element - (drop)
- Dragging an event over the target drop event - (dragover)
Keyboard Based Events
Keyboard based events are events fired when the user works on the keyboard. Some of the most important events in this category are mentioned below −
- Pressing a key - (keydown)
- Releasing a key - (keyup)
- Pressing a character key - (keypress)
- Focusing an element - (focus)
- Opposite of focusing an element - (blur)
- Pressing a specific key or key combination like Shift + T (keydown.shift.t)
Events targeting a specific key press can be done using below format:
keydown.<modifier_key>.<key_code>
keydown.<key_code>
keydown.code.<event code separated by dot(.)>
Here,
Modifier_key represents shift, alt and control
Key_code represent the target keyboard code like alphabets, digit, etc., as specified in HTML spec. Example, keydown.shift.t
Event code represent the event code as specified in HTML spec like keyT, Tab, etc.,
For example, pressing shift key and t at the same time can be targeted as shown below −
<div (keydown.shift.t)="alert('Shift + T')">
   <!-- content -->
</div>
Touch Based Events
Touch based events are events fired when the user interacts through a touch device. Some of the most important events in this category are as follows −
Pointing an element and start moving in a touch device - (touchstart)
Pointing an element and Moving in a touch device - (touchmove)
Pointing an element and stop moving in a touch device - (touchend)
Web Document Based Events
Web document based events are specific events fired in the web document to perform actions like cut, copy and paste a text, submitting a form, etc., Some of the most important events in this category are mentioned below −
Submitting a form by clicking the submit button - (submit)
Copying a text to clipboard - (copy)
Pasting a text from clipboard - (paste)
Deleting and copying a piece of text to clipboard - (cut)
Implementing Event Binding
Let us create a simple registration form to understand attribute binding. Our registration form will have three input field as shown below and a button to submit the registration form.
- Username
- Password
- Confirm password
Step 1: Create a new application, my-app using angular CLI as shown below −
ng new my-app
Step 2: Create a new registration form component, RegisterForm using angular CLI as shown below −
ng generate component RegisterForm
CREATE src/app/register-form/register-form.spec.ts (597 bytes)
CREATE src/app/register-form/register-form.ts (224 bytes)
CREATE src/app/register-form/register-form.css (0 bytes)
CREATE src/app/register-form/register-form.html (29 bytes)
Step 3: Next, open the registration form component's template and add a form with username, password and confirm password.
register-form.html
<div>
   <form method="post">
      <div class="container">
         <label for="username"><b>Username</b></label>
         <input type="text" name="username" required>

         <label for="password"><b>Password</b></label>
         <input type="password" name="password" required>

         <label for="confirm_password"><b>Confirm Password</b></label>
         <input type="password" name="confirm_password" required>

         <button type="submit">Register</button>
      </div>
   </form>
</div>
Step 4: Open the registration form components css style and style the form using CSS as shown below −
register-form.css
.container {
   padding: 15px;
}

input[type=text], input[type=password] {
   width: 100%;
   padding: 10px 20px;
   margin: 10px 0;
   display: inline-block;
   border: 1px solid #ccc;
   box-sizing: border-box;
}

button {
   background-color: blue;
   color: white;
   padding: 15px 20px;
   margin: 10px 0;
   border: none;
   cursor: pointer;
   width: 100%;
}
Step 5: Include our registration form component in the app template file, app.html.
<app-register-form />
Step 6: Include our registration form component in the app file, app.ts.
import { Component, signal } from '@angular/core';
import { RegisterForm } from './register-form/register-form';

@Component({
   selector: 'app-root',
   imports: [RegisterForm],
   templateUrl: './app.html',
   styleUrl: './app.css'
})
export class App {
   protected readonly title = signal('myApp');
}
Step 7: Let us add a method in the component to capture the submit event and suppress the form submission.
registerAccount(e: Event) {
   e.preventDefault();
   alert('The form submission is prevented');
}
Step 8: Open the template and set the method for click event using event binding.
<button type="submit" (click)="registerAccount($event)">Register</button>
Step 9: The complete listing of the component is as follows:
register-form.ts
import { Component } from '@angular/core';

@Component({
  selector: 'app-register-form',
  imports: [],
  templateUrl: './register-form.html',
  styleUrl: './register-form.css',
})
export class RegisterForm {
   registerAccount(e: Event) {
      e.preventDefault();
      alert('The form submission is prevented');
   }
}
Step 10: The complete listing of the component's template is as follows:
register-form.html
<div>
   <form method="post">
      <div class="container">
         <label for="username"><b>Username</b></label>
         <input type="text" name="username" required>

         <label for="password"><b>Password</b></label>
         <input type="password" name="password" required>

         <label for="confirm_password"><b>Confirm Password</b></label>
         <input type="password" name="confirm_password" required>

         <button type="submit" (click)="registerAccount($event)">Register</button>
      </div>
   </form>
</div>
Step 11: Run the application and check the output. Clicking the button does not submit the form as it is intercepted and prevented using event binding.
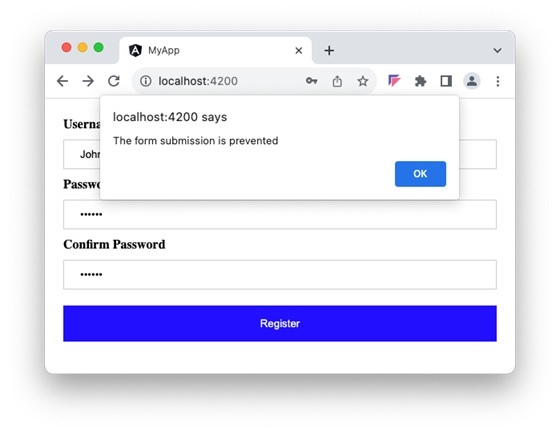
Conclusion
Event binding simplifies event based programming in a typical web application. It allows keyboard, mouse and touch events. It provides detailed information of the target element and its event.
Angular - Property Binding
Property binding is a type of Data Binding in which we bind a property of a DOM. Its purpose is to show or hide a DOM element, or simply manipulate the DOM. It helps to set the value for the property of the HTML element or angular component.
Data binding is a mechanism that allows flow of data between component class to template and template to component class.
How to use Property Binding?
To use property binding, we enclose the property of an HTML element or a component withing square brackets [...] as shown below −
<element-or-component [<property name>]="<template variable>">
   <!-- content -->
</element-orcomponent>
The value of the property is basically a template variable. While generating the view from the template, angular will set the value of the property by processing the template variable.
Example
Let's see how to set value for the property, src in img HTML element.
Step 1: Declare a variable, image in the component and set a value.
image: string = 'images/my-image.jpg'
Step 2: Set the image variable to the src property (enclose it using square bracket) of the img HTML element in the template as shown below −
<img [src]="image" />
Attributes of HTML element
Angular exposes attributes of the common HTML element with a matching property.
<input type="text" [value]="val" />
Here, value is the property of the HtmlInputElement exposed by angular.
For attributes with multiple words, the corresponding property name will be converted into camelCase format. for example, the colspan attribute's corresponding angular property is colSpan.
The Boolean Property
Boolean property of a HTML element/component does have value. Few examples of boolean property available in the HTML element are disabled, required and readonly. For boolean property, we can set a boolean variable for the property. The boolean value determines the presence / absence of property in the HTML element/component.
Example
Let us see how to set required property in input HTML element.
Step 1: Declare a variable, isRequired in the component and set either TRUE or FALSE.
isRequired: boolean = true
Step 2: Set the isRequired variable to the required property (enclose it using square bracket) of the input HTML element in the template as shown below −
<input type="text" name="Username" [required]="isRequired" />
Step 3: The output of the template will include required attribute because the value of the isRequired variable is true
<input type="text" name="Username" required />
Implementing Property Binding
Let us create a simple registration form to understand property binding. Our registration form will have three input field as shown below and a button to submit the registraion form.
- Username
- Password
- Confirm password
Step 1: Create a new application, my-app using angular CLI as shown below −
ng new my-app
Step 2: Create a new registration form component, RegisterForm using angular CLI as shown below −
ng generate component RegisterForm
Step 3: Open the registration form components template and a user with username, password and confirm password.
<div>
   <form method="post">
      <div class="container">
         <label for="username"><b>Username</b></label>
         <input type="text" name="username" required>

         <label for="password"><b>Password</b></label>
         <input type="password" name="password" required>

         <label for="confirm_password"><b>Confirm Password</b></label>
         <input type="password" name="confirm_password" required>

         <button type="submit">Register</button>
      </div>
   </form>
</div>
Step 4: Open the registration form components style and style the form using CSS as shown below −
.container {
   padding: 15px;
}

input[type=text], input[type=password] {
   width: 100%;
   padding: 10px 20px;
   margin: 10px 0;
   display: inline-block;
   border: 1px solid #ccc;
   box-sizing: border-box;
}

button {
   background-color: blue;
   color: white;
   padding: 15px 20px;
   margin: 10px 0;
   border: none;
   cursor: pointer;
   width: 100%;
}
Step 5: Include our registration form component in the app template file, app.html.
<app-register-form />
Step 5: Include our registration form component in the app file, app.ts.
import { Component, signal } from '@angular/core';
import { RegisterForm } from './register-form/register-form';

@Component({
   selector: 'app-root',
   imports: [RegisterForm],
   templateUrl: './app.html',
   styleUrl: './app.css'
})
export class App {
   protected readonly title = signal('myApp');
}
Step 7: Next, we will try to set the placeholder text for all input field using attributes binding. Add three member variable in the component to represent the placeholder text for username, password and confirm password input field.
placeholder1: string = "Enter username"
placeholder2: string = "Enter password"
placeholder3: string = "Repeat password"
Step 8: Assign the above declared components member variable to the placeholder attributes of username, password and confirm password input accordingly in the template using [placeholder] property as shown below −
<input type="text" [placeholder]="placeholder1" name="username" required>

<input type="password" [placeholder]="placeholder2" name="password" required>

<input type="password" [placeholder]="placeholder3" name="confirm_password" required>
Here,
attr.placeholder represents the placeholder attribute.
Step 9: The complete listing of the component is as follows:
register-form.ts
import { Component } from '@angular/core';

@Component({
  selector: 'app-register-form',
  imports: [],
  templateUrl: './register-form.html',
  styleUrl: './register-form.css',
})
export class RegisterForm {
   placeholder1: string = "Enter username"
   placeholder2: string = "Enter password"
   placeholder3: string = "Repeat password"
}
Step 10: The complete listing of the components template is as follows:
register-form.html
<div>
   <form method="post">
      <div class="container">
         <label for="username"><b>Username</b></label>
         <input type="text" [placeholder]="placeholder1" name="username" required>

         <label for="password"><b>Password</b></label>
         <input type="password" [placeholder]="placeholder2" name="password" required>

         <label for="confirm_password"><b>Confirm Password</b></label>
         <input type="password" [placeholder]="placeholder3"
         name="confirm_password" required>

         <button type="submit">Register</button>
      </div>
   </form>
</div>
Step 11: Next, run the application and check the output.

Conclusion
Property binding provides option to set dynamic value for HTML elements and components. It supports boolean property as well. It is quite easy and intutive.
Angular - Attribute Binding
What is Attribute Binding?
Attribute binding helps to set the value for the attribute of the HTML element. Angular exposes attributes of the HTML element with a matching property with the attribute name converted into camelCase.
For example, the colspan attribute's corresponding angular property is colSpan. Even though, angular tries to provide all HTML elements attributes as property, it still misses some of the attributes of SVG elements, aria (web accessibility) elements, etc.,
We can use attribute binding where the attributes of a HTML element is not available as property. Also, we can use attribute binding for attributes of all HTML element.
How to use Attribute Binding?
To use attribute binding in your Angular application, use the square brackets around the attribute name. It basically represents the attribute of a HTML element in the template.
Syntax
The syntax to use attribute binding is as follows −
<HTMLTag [attr.<attribute_name>]="<template variable>" />
We can combine attr. string with the actual attribute name of the HTML element to create the angular attribute representation. The value of the attribute is a template variable. While generating the view from the template, angular will set the value of the attribute by processing the template variable.
Example - Implementing Attribute Binding
Let us create a simple registration form to understand attribute binding. Our registration form will have three input field as shown below and a button to submit the registration form.
- Username
- Password
- Confirm password
Step 1: Create a new application, my-app using angular CLI as shown below −
ng new my-app
Step 2: Create a new registration form component, RegisterForm using angular CLI as shown below −
ng generate component RegisterForm
Step 3: Open the registration form component's template and add user registration form with username, password and confirm password.
<div>
   <form method="post">
      <div class="container">
         <label for="username"><b>Username</b></label>
         <input type="text" name="username" required>

         <label for="password"><b>Password</b></label>
         <input type="password" name="password" required>

         <label for="confirm_password"><b>Confirm Password</b></label>
         <input type="password" name="confirm_password" required>

         <button type="submit">Register</button>
      </div>
   </form>
</div>
Step 4: Open the registration form component's style and style the registration form using CSS as shown below −
.container {
   padding: 15px;
}

input[type=text], input[type=password] {
   width: 100%;
   padding: 10px 20px;
   margin: 10px 0;
   display: inline-block;
   border: 1px solid #ccc;
   box-sizing: border-box;
}

button {
   background-color: blue;
   color: white;
   padding: 15px 20px;
   margin: 10px 0;
   border: none;
   cursor: pointer;
   width: 100%;
}
Step 5: Include our registration form component in the app template file, app.component.html:
<app-register-form />
Step 6: Run the application and test the registration form.
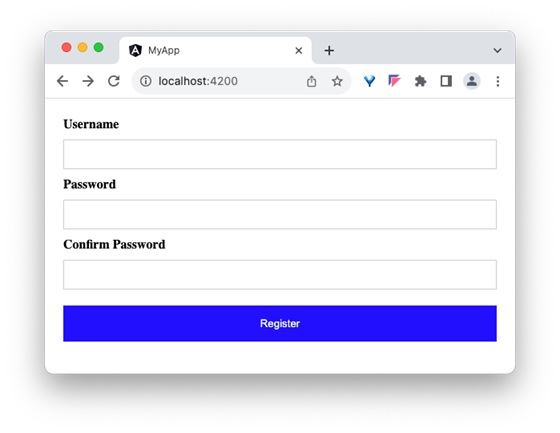
Step 7: Next, we will try to set the placeholder text for all input field using attributes binding. Add three member variable in the component to represent the placeholder text for username, password and confirm password input field.
placeholder1: string = "Enter username"
placeholder2: string = "Enter password"
placeholder3: string = "Repeat password"
Step 8: Assign the above declared component's member variable to the placeholder attributes of username, password and confirm password input accordingly in the template using [attr.placeholder] attribute as shown below −
<div>
<form method="post">
<div class="container">
<label for="username"><b>Username</b></label>
<input type="text" [attr.placeholder]="placeholder1" name="username" required>
<label for="password"><b>Password</b></label>
<input type="password" [attr.placeholder]="placeholder2" name="password" required>
<label for="confirm_password"><b>Confirm Password</b></label>
<input type="password" [attr.placeholder]="placeholder3"
name="confirm_password" required>
<button type="submit">Register</button>
</div>
</form>
</div>
Here,
attr.placeholder represents the placeholder attribute of input elements.
Step 9: Let us add ARIA attribute, aria-label to the input field. aria-label is used for accessibility purposes.
<div>
<form method="post">
<div class="container">
<label for="username"><b>Username</b></label>
<input type="text" [attr.aria-label]="placeholder1"
[attr.placeholder]="placeholder1" name="username" required>
<label for="password"><b>Password</b></label>
<input type="password" [attr.aria-label]="placeholder2"
[attr.placeholder]="placeholder2" name="password" required>
<label for="confirm_password"><b>Confirm Password</b></label>
<input type="password" [attr.aria-label]="placeholder3"
[attr.placeholder]="placeholder3" name="confirm_password" required>
<button type="submit">Register</button>
</div>
</form>
</div>
Step 10: Next, run the application and check the output.

Step 11: Since, we can set any attribute of the HTML element using attribute binding, let us apply the class, container using attribute binding.
Step 12: Create a new member variable, myContainerClass in the component as shown below −
myContainerClass: string = "container"
Step 13: Apply the member variable in the template as shown below −
<div [attr.class]="myContainerClass"> <!-- form --> </div>
Step 14: The complete listing of the component is as follows:
import { Component } from '@angular/core';
@Component({
selector: 'app-register-form',
imports: [],
templateUrl: './register-form.html',
styleUrl: './register-form.css',
})
export class RegisterForm {
myContainerClass: string = "container"
placeholder1: string = "Enter username"
placeholder2: string = "Enter password"
placeholder3: string = "Repeat password"
}
Step 15: The complete listing of the component's template is as follows:
<div>
<form method="post">
<div class="container">
<label for="username"><b>Username</b></label>
<input type="text" [attr.aria-label]="placeholder1"
[attr.placeholder]="placeholder1" name="username" required>
<label for="password"><b>Password</b></label>
<input type="password" [attr.aria-label]="placeholder2"
[attr.placeholder]="placeholder2" name="password" required>
<label for="confirm_password"><b>Confirm Password</b></label>
<input type="password" [attr.aria-label]="placeholder3"
[attr.placeholder]="placeholder3" name="confirm_password" required>
<button type="submit">Register</button>
</div>
</form>
</div>
Step 16: Next, run the application and check the output.
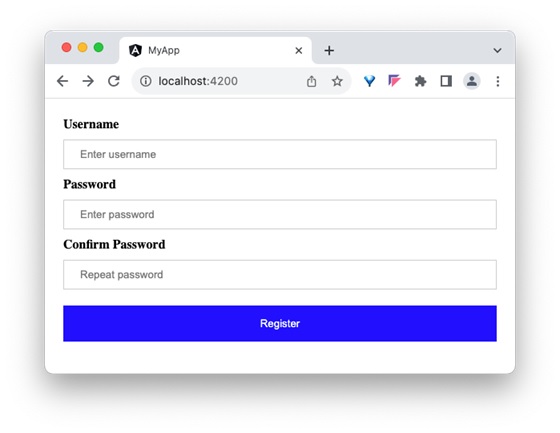
Differences between Property Binding and Attribute Binding
The table below shows how property binding is different from attribute binding −
| Property Binding | Attribute Binding |
|---|---|
Property Binding binds to the properties of DOM elements or directives. |
Attribute binding binds to the attributes of an element |
It is used to bind properties that can change dynamically, like DOM properties. |
It is used when you need to bind to attributes that do not have corresponding properties on the element. |
It directly updates the DOM property. |
It updates the attribute value, but does not directly affect the DOM property. |
Conclusion
Attribute binding enables the developer to set dynamic value for attribute of the any HTML element, even for element, which may be defined in the future.
Angular - Class & Style Binding
What is Class Binding?
A dynamic web application usually have dynamic styles and are set during the runtime of the application. Class binding is a special binding to bind a dynamic value to the class attribute of a HTML element.
Let us see more details about class binding in this chapter.
Ways to use Class Binding
Angular provides four different ways to implement class binding. Each of them supports a special feature. The four ways are as follows:
- Single class binding
- Single class binding with on/off feature
- Multiple style binding
- Multiple style binding through an object with on/off feature
Let us learn one by one in the upcoming sections.
Single Class Binding
In single class binding, class string should be surrounded by square bracket and a template variable should be set as it's value.
<div [class]="<template variable>"> <!-- content --> </div>
Here, the template variable holds the class name for the specific HTML element.
Single Class Binding with on/off Feature
In single class binding with on/off feature, class style should be appended by the actual class name of the given HTML element and a template variable with boolean value should be set as it's value. The boolean value determines the availability of the specific class to the HTML element.
<div [class.<class name>]="template variable"> <!-- content --> </div>
Here, the template variable outputs either true or false.
Let us consider a class with name red, used to set the text of the HTML element to red color.
.red {
color: red;
}
Consider a member variable, isRedEnabled available in the component.
isRedEnabled: boolean = true
Then, the class binding can be set in a HTML element as shown below −
<div [class.red]="isRedEnabled"> <!-- content --> </div>
Multiple Class Binding
In multiple class binding, class string should be surrounded by square bracket and the value should be set with one of more existing class name separated by space. For example, two class (myClass and myAnotherClass) for a HTML element can be set using [class] as shown below −
<div [class]="<template variable>"> <!-- content --> </div>
Here, the template variable will emit myClass myAnotherClass string.
Multiple Class Binding through an Object with on/off Feature
In multiple class binding through an object with on/off feature, class string should be surrounded by square bracket and the value should be set with an object of type Record<string, boolean> having keys and values with class name and boolean value respectively. The boolean value of a key determine whether the corresponding key will be set a class of the given HTML element.
<div [class]="<objects as template variable>"> <!-- content --> </div>
Let as consider an object with multiple keys representing class name and have boolean values as shown below −
// in component
myClass: Record<string, boolean> = {
c1: true,
c2: false
c3: true
}
Apply the class binding in the template as shown below −
// in template <div [class]="myClass"> <!-- content --> </div>
Then the output will have c1 and c3 class because both of these classes have true value in the object.
// output <div class="c1 c3"> <!-- content --> </div>
Implementing Class Binding
Let us create a simple registration form to understand class binding. Our registration form will have three input field as shown below and a button to submit the registration form.
1. Username 2. Password 3. Confirm password
Step 1: Create a new application, my-app using angular CLI as shown below −
ng new my-app
Step 2: Create a new registration form component, RegisterForm using angular CLI as shown below −
ng generate component RegisterForm
register-form.html
Step 3: Next, open the registration form component's template and add a form with username, password and confirm password.
<div>
<form method="post">
<div class="container">
<label for="username"><b>Username</b></label>
<input type="text" name="username" required>
<label for="password"><b>Password</b></label>
<input type="password" name="password" required>
<label for="confirm_password"><b>Confirm Password</b></label>
<input type="password" name="confirm_password" required>
<button type="submit">Register</button>
</div>
</form>
</div>
register-form.css
Step 4: Open the registration form component's CSS style and style the form using CSS as shown below −
.container {
padding: 15px;
}
input[type=text], input[type=password] {
width: 100%;
padding: 10px 20px;
margin: 10px 0;
display: inline-block;
border: 1px solid #ccc;
box-sizing: border-box;
}
button {
background-color: blue;
color: white;
padding: 15px 20px;
margin: 10px 0;
border: none;
cursor: pointer;
width: 100%;
}
Step 5: Include our registration form component in the app template file, app.component.html
<app-register-form />
Output
Step 6: Run the application and test the registration form.

Step 7: Next, let us create few classes in the style file and apply our new class for the button using class binding.
Step 8: Next, add two class, purple and smallcaps in the component's style file.
.purple {
background-color: purple;
}
.smallcaps {
font-variant: small-caps;
}
Step 9: Add a member variable, isPurple in the component as shown below −
isPurple: boolean = true
Step 10: Next, add an object in the component with purple and smallcaps class as keys as shown below −
btnClass: Record<string, boolean> = {
'purple': true,
'smallcaps': true
}
Step 11: Next, assign the variable, isPurple to the button through class binding.
<button type="submit" [class.purple]="isPurple">Register</button>
Step 12: Run the application and check the output. Output will show the button with purple color.
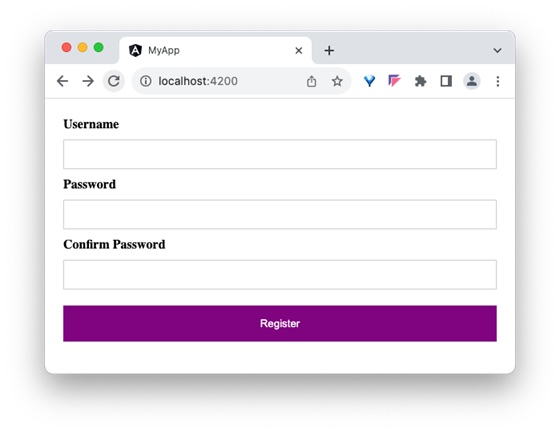
Step 13: Next, reassign the object, btnClass to the buttons class through class binding.
<button type="submit" [class]="btnClass">Register</button>
Here, both purple and small caps will be applied.
Output
Step 14: Run the application and check the output. Output will show the button with purple color and Register text is small caps format.

Step 15: The complete listing of the component is as follows,
register-form.ts
import { Component } from '@angular/core';
@Component({
selector: 'app-register-form',
imports: [],
templateUrl: './register-form.html',
styleUrl: './register-form.css',
})
export class RegisterFormComponent {
isPurple: boolean = true
btnClass: Record<string, boolean> = {
'purple': true,
'smallcaps': true
}
}
Step 16: The complete listing of the component's template is as follows,
register-form.html
<div>
<form method="post">
<div class="container">
<label for="username"><b>Username</b></label>
<input type="text" name="username" required>
<label for="password"><b>Password</b></label>
<input type="password" name="password" required>
<label for="confirm_password"><b>Confirm Password</b></label>
<input type="password" name="confirm_password" required>
<!-- <button type="submit" [class.purple]="isPurple">Register</button> -->
<button type="submit" [class]="btnClass">Register</button>
</div>
</form>
</div>
Style binding
Style binding in Angular allows you to dynamically set inline CSS styles on an HTML element based on the component's properties or template variables.
Syntax of Style Binding
Angular provides four different syntax in style binding. Each type of style binding supports a special feature. The four syntax as are follows:
- Single style binding
- Single style binding with unit
- Multiple style binding
- Multiple style binding through a custom style object
We will learn style binding in the next chapter in more detail.
Conclusion
Class binding enables the developer to set complex values for class attribute of the any HTML element easily through either string or custom object.
Angular - Style Binding
What is Style Binding?
A dynamic web application usually have dynamic styles and are set during the runtime of the application. Style binding is a special binding to bind a value to the style attribute of a HTML element dynamically.
Let us see more details about style binding in this chapter.
Ways to use Style Binding
Angular provides four different ways to implement style binding. Each type of style binding supports a special feature. The four ways are as follows:
- Single style binding
- Single style binding with unit
- Multiple style binding
- Multiple style binding through a custom style object
Let us learn one by one in the upcoming sections.
Single Style Binding
In single style binding, the property name of a CSS style should be appended to style. string and should be surrounded by square bracket. For example, the width of a HTML element can be set using [style.width] as shown below −
<div [style.width]="<template variable>"> <!-- content --> </div>
Single Style Binding with Unit
In single style binding with unit, the property name of a CSS style should be appended to style. string, the unit (.px) should be appended to the property name of a CSS style and should be surrounded by square bracket. For example, the width of a HTML element in px using can be set using [style.width.px] as shown below −
<div [style.width.px]="<template variable>"> <!-- content --> </div>
Multiple Style Binding
In multiple style binding, style string should be surrounded by square bracket and the value should have proper CSS styles. For example, the width and height of a HTML element can be set using [style] as shown below −
<div [style]="<template variable>"> <!-- content --> </div>
Here, an example output of the template variable is width: 100px; height: 200px
Multiple Style Binding with Object
In multiple style binding with object, style string should be surrounded by square bracket and the value should be set with an object of type Record<string, string having keys and values with proper CSS property name (or converted to camelCase) and value respectively. For example, the width and height of a HTML element can be set using [style] as shown below −
<div [style]="<objects as template variable>"> <!-- content --> </div>
Here, an example object is as follows,
{
width: '100px',
height: '100px'
}
Implementing Style Binding
Let us create a simple registration form to understand attribute binding. Our registration form will have three input field as shown below and a button to submit the registration form.1. Username 2. Password 3. Confirm password
Step 1: Create a new application, my-app using angular CLI as shown below −
ng new my-app
Step 2: Create a new registration form component, RegisterForm using angular CLI as shown below −
ng generate component RegisterForm
Step 3: Next, open the registration form component's template and add a form with username, password and confirm password.
register-form.html
<div>
<form method="post">
<div class="container">
<label for="username"><b>Username</b></label>
<input type="text" name="username" required>
<label for="password"><b>Password</b></label>
<input type="password" name="password" required>
<label for="confirm_password"><b>Confirm Password</b></label>
<input type="password" name="confirm_password" required>
<button type="submit">Register</button>
</div>
</form>
</div>
Step 4: Open the registration form component's CSS style file and style the form using CSS as shown below −
register-form.css
.container {
padding: 15px;
}
input[type=text], input[type=password] {
width: 100%;
padding: 10px 20px;
margin: 10px 0;
display: inline-block;
border: 1px solid #ccc;
box-sizing: border-box;
}
button {
background-color: blue;
color: white;
padding: 15px 20px;
margin: 10px 0;
border: none;
cursor: pointer;
width: 100%;
}
Step 5: Include our registration form component in the app template file, app.html:
app.html
<app-register-form />
Output
Step 6: Run the application and test the registration form.

Step 7: Next, let us try to apply the style for the button using style binding.
Step 8: Add an object in the component with necessary values as shown below −
btnStyle: Record<string, string> = {
'backgroundColor': 'purple',
'color': 'white',
'padding': '15px 20px',
'margin': '10px 0',
'border': 'none',
'cursor': 'pointer',
'width': '100%'
}
Here, we have changed the background color of the button from blue to purple. Also, note that the name of the background color style property, background-color is in camelCase, backgroundColor.
Step 9: Next, remove the button style in the components style file.
Step 10: Next, assign the style object to the button through style binding.
<button type="submit" [style]="btnStyle">Register</button>
Step 11: The complete listing of the component is as follows:
register-form.ts
import { Component } from '@angular/core';
@Component({
selector: 'app-register-form',
imports: [],
templateUrl: './register-form.html',
styleUrl: './register-form.css',
})
export class RegisterFormComponent {
btnStyle: Record<string, string> = {
'backgroundColor': 'purple',
'color': 'white',
'padding': '15px 20px',
'margin': '10px 0',
'border': 'none',
'cursor': 'pointer',
'width': '100%'
}
}
Step 12: The complete listing of the component's template is as follows:
register-form.html
<div>
<form method="post">
<div class="container">
<label for="username"><b>Username</b></label>
<input type="text" name="username" required>
<label for="password"><b>Password</b></label>
<input type="password" name="password" required>
<label for="confirm_password"><b>Confirm Password</b></label>
<input type="password" name="confirm_password" required>
<button type="submit" [style]="btnStyle" >Register</button>
</div>
</form>
</div>
Output
Step 13: Run the application and check the output.

Conclusion
Style binding enables the developer to set complex values for style attribute of the any HTML element easily through either plain style or custom style object.
Angular - Two Way Binding
Two-Way Data Binding in Angular
Two-way data binding is a two-directional interaction in Angular. In this type of data binding, data flows in both ways, from the component to views and from the views back to the component. When you bind a value into an element then, two-way binding gives that element the ability to apply changes back to the source. It is the combination of property and event binding.
The term Data binding refers to a mechanism that allows flow of data between component class to template and template to component class.
Implementing Two-Way Binding
We can use the following ways to implement two-way binding in Angular −
Two-Way Binding using ngModel
The ngModel is a directive in Angular that is used for two-way data binding between the component class and the HTML template. It helps to sync the data between the model in the component and the view in template. This directive is commonly used on form controls, such as <input>, <textarea>, and <select> to bind them to a component property.
When the user interacts with the input field of a form, the value of the input is automatically updated in the component property. Similarly, if the component property is changed by any means, the input field is automatically updated to reflect the new value.
Syntax
For two-way binding using ngModel, we use 'banana-in-a-box syntax' which is shown below −
<HTML [(ngModel)]="model.name" />
Where,
- [(ngModel)]: The parentheses () represent the event binding and the square brackets [] represent property binding.
- model.name: This is the component property that will be linked to the form control.
Example - Two way binding
In this example, we are demonstrating two-way data binding in Angular. We bind a form control to a component property using the ngModel directive. This will allow the input field to update the component's user property and reflect any changes made to this property in the view immediately.
Step 1: Create an Angular application named formApp using the command given below −
ng new formApp
Step 2: Import FormsModule first and then define a variable user inside src/app/app.ts. FormModule will do the necessary setup to enable two-way data binding.
app.ts
import { Component, signal } from '@angular/core';
import { FormsModule } from '@angular/forms';
import { RouterOutlet } from '@angular/router';
@Component({
selector: 'app-root',
imports: [RouterOutlet, FormsModule],
templateUrl: './app.html',
styleUrl: './app.css'
})
export class App {
protected readonly title = signal('nestedApplication');
user: string = '';
}
Step 3: Update the view template, app.html as mentioned below −
app.html
<h3>{{ title }}</h3>
<input type="text" [(ngModel)]="user" />
<p>Welcome {{ user }}!</p>
<router-outlet />
Here,
The user property is bind to form control using ngModel directive. If you enter any text in the input box, it will update the user property.
Output
Finally, start your application using the below command −
ng serve
After running your application, you could see a response as given below −
Try to change the input value to any string of your choice. You will get the output as per the given input.
NOTE: We will learn more about form controls in the upcoming chapters.
Two-Way Binding using custom Event and Property Binding
As mentioned earlier, if we combine event and property binding, we can achieve two-way binding. It is mainly used when we need to establish two-directional interaction between a parent and its child component. Compare to ngModel, using custom event and property binding requires more configuration.
To enable two-way binding between components, the @Input() property and corresponding @Output property along with an event emitter method that updates the value of the @Input() needs to defined inside child component.
Inside the parent component, wrap the @Input() property name in the 'banana-in-a-box syntax' and specify the corresponding property to which the updated value is assigned.
Example - Combining Event and Property Binding
In this example, we are illustrating two-way data binding by combining event and property binding together.
Step 1: Create an Angular application named customApp using the command given below −
ng new customApp
Step 2: Next, generate a child component named child-component.
ng generate component child-component CREATE src/app/child-component/child-component.html (31 bytes) CREATE src/app/child-component/child-component.spec.ts (672 bytes) CREATE src/app/child-component/child-component.ts (281 bytes) CREATE src/app/child-component/child-component.css (0 bytes)
Step 3: Open child-component.ts file and add the following code −
import { Component, EventEmitter, Input, Output } from '@angular/core';
import { FormsModule } from '@angular/forms';
@Component({
selector: 'app-child-component',
imports: [FormsModule],
template: '<input [value]="val" (input)="onValChange($event)" />',
styleUrls: ['./child-component.component.css']
})
export class ChildComponent {
@Input() val: string = '';
@Output() valChange: EventEmitter<string> = new EventEmitter<string>();
onValChange(event: Event) {
// Cast the event target to HTMLInputElement and access the value
const input = event.target as HTMLInputElement;
if (input) {
this.valChange.emit(input.value);
}
}
}
Step 4: Add the following code inside app.ts file −
import { Component } from '@angular/core';
import { FormsModule } from '@angular/forms';
import { RouterOutlet } from '@angular/router';
import { ChildComponent } from './child-component/child-component';
@Component({
selector: 'app-root',
imports: [RouterOutlet, FormsModule, ChildComponent],
template: `<h3>{{ title }}</h3>
<app-child-component [(val)]="user"></app-child-component>
<p>Hello {{ user }}!</p>`,
styleUrl: './app.css'
})
export class App {
title = 'Two Way Binding Example';
user: string = "";
}
Output
Now, start your application using the below command −
ng serve
After running your application, you could see the following output −
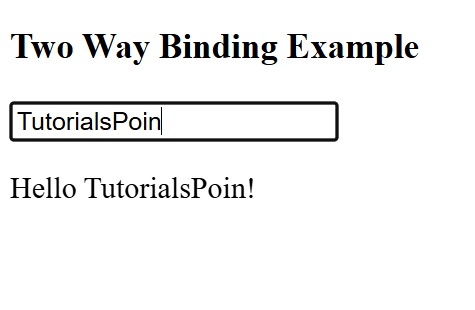
Angular - Directives
Angular directives are classes that enhance the feature of a HTML element or component and add additional behavior to the web application. They can transform a static HTML page into dynamic by manipulating DOM. They begin with ng, which stands for Angular.
The @directive decorator is used to mark a TypeScript class as an Angular Directive. This decorator contains some configuration metadata that determines how the directive should be processed, instantiated and used at runtime.
HTML DOM model is constructed as a tree of objects. It is a standard object model to access HTML elements.
Features and Uses of Angular Directives
Following are the features and uses of Angular Directives −
- Using directives, you can create your custom HTML elements, attributes and classes.
- They allow developers to create the required features once and reuse them across different parts of the Angular application.
- It became easy to update and maintain the code as we didn't need to write code for the same feature again and again.
- Directives can control the DOM elements.
Types of Directives
Directives are categorized based on the type of feature it provides to the HTML element/component. The type of directive and its purpose are as follows:
Components: Component is basically a type of directive. As we know, they can generate a a piece of HTML document in memory (DOM structure), called View. The view will have both design and event based dynamic functionality.
Attribute directives: Attribute directives provides additional feature to a HTML element/component (host) with respect to appearance and behavior. For example, a menu component attached to a attribute directive can show next level of menu upon hovering the component.
Structural directives: Structural directives can change the entire layout of the host HTML element/component by adding or removing the component's DOM elements.

Structural Directives
Structural directives change the structure of DOM by adding or removing elements. It is denoted by an asterisk (*) symbol with three pre-defined directives ngIf, ngFor and ngSwitch. Let's understand one by one in brief.
The list of commonly used structural directives are:
ngIf − This directive is used to display or hide data in your application. When the given condition becomes TRUE, it will display the data, otherwise not. We can add this to any tag in our template.
ngFor − ngFor is used to repeat a portion of elements from the given list of items.
ngSwitch − It checks multiple conditions.
Attribute Directives
Attribute directives change the appearance or behavior of DOM elements or components. It is used just like a normal HTML attribute. However, the directive should be enclosed within square brackets [ ] to bind it to the element.
The most commonly used attribute directives are as follows:
ngStyle − It is used to add dynamic styles.
ngClass − It adds or removes CSS classes in HTML elements.
ngModel − This directive is used for two-way binding.
Component Directives
Each component of an Angular application is a directive itself. It is a special directive with Views. Also, it has @Input and @Output decorator to send and receive information between parent and child components.
Syntax
To create a component for your Angular application, use the command given below −
ng generate component component-name
Difference between Component and Directive
The table below shows how Components are different from Directives −
| Components | Directives |
|---|---|
Components in Angular are used to create UI elements and manage their state. |
Directives in Angular are classes that can modify the behavior or appearance of existing DOM elements. |
They create reusable UI elements. |
They create reusable features and behaviors for certain elements. |
The @Component decorator is used to declare a Component. |
The @Directive decorator is used to declare a Directive. |
There is only one component for each DOM element. |
There can be one or more directives for each DOM element. |
Custom Directives
A custom directive is a user-defined directive that allows developers to extend the functionality of HTML elements. The attribute and structural built-in directives (covered in previous two chapters) offers very basic and pre-defined functionalities. However, with custom directives, you can add specific behaviors to HTML elements based on project requirements, user interactions, or changes in data.
To create a custom directive, run the following command in Angular CLI −
ng generate directive <directive-name>
Multiple Choice Questions on Angular Directives
You have reached the end of this chapter. Now, it's time to check your understanding of the angular directives. Please try to give correct answers to the questions given below −
Q. 1 - Angular Directives are used for:
A - To create reusable UI elements
B - To manage the data flow between components
Answer : C
Explanation
Angular directives are classes that enhance the feature of HTML element or component and add additional behavior to the web application.
Q. 2 - Which decorator is used to define Angular Directive?
Answer : C
Explanation
The @Directive decorator is used to mark a TypeScript class as an Angular Directive.
Angular - Attribute Directives
What are Attribute Directives?
Attribute directives change the appearance or behavior of DOM elements or components. It is used just like a normal HTML attribute. However, the directive should be enclosed within square brackets [ ] to bind it to the element.
Built-in Attribute Directives
The most commonly used attribute directives are as follows −
ngStyle: It is used to add dynamic styles.
ngClass: It adds or removes CSS classes in HTML elements.
ngModel: This directive is used for two-way binding.

NOTE: To use ngStyle and ngClass directive, importing CommonModule is necessary as they are part of this module. For ngModel, we are required to import FormsModule.
Example - Usage of ngStyle Directive
The ngStyle directive is used to add dynamic styles. You can set one or more style properties using key-value pairs separated by a colon. Here, key is the name of style and the value is an expression that gets calculated. If the result is null, no style will be applied to the element.
The example below shows how to apply blue color to the paragraph using ngStyle directive.
Step 1: Create a directive-app application using the below command:
ng new directive-app
Step 2: Add the below content in app.html file.
app.html
<p [ngStyle]="{'color': 'blue', 'font-size': '14px'}">
paragraph style is applied using ngStyle
</p>
<router-outlet />
Step 3: Import CommonModule inside app.ts file:
import { CommonModule } from '@angular/common';
import { Component, signal } from '@angular/core';
import { RouterOutlet } from '@angular/router';
@Component({
selector: 'app-root',
imports: [RouterOutlet, CommonModule],
templateUrl: './app.html',
styleUrl: './app.css'
})
export class App {
protected readonly title = signal('directive-app');
}
Output
Step 4: Start your application (if not done already) using the below command −
ng serve
Now, run your application and you can see the below response −
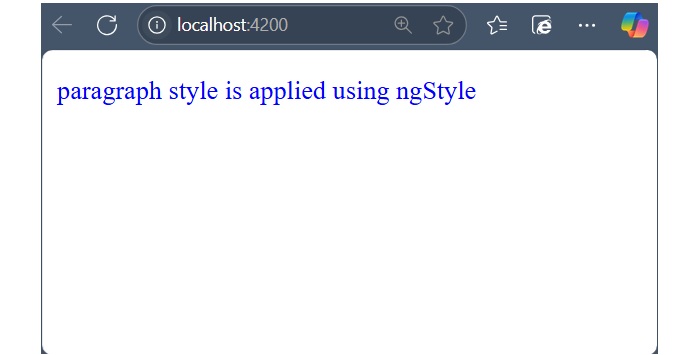
Example - Usage of ngClass Directive
The ngClass directive is used to add or remove CSS classes in HTML elements. The CSS classes are updated based on given conditions or type of expression.
If the expression is a string, the CSS classes specified in the string are added. If it's an array, the CSS classes listed as array elements are added. And, if the expression is an object, the keys represent CSS classes that will be added when their corresponding values are evaluated to a truthy value and removed when their values are falsy.
Let's try ngClass directive in our directive-app application.
Step 1: Change the above code of the app.html file with the following code:
app.html
<div [ngClass] = "dark"> Tutorialspoint </div> <button (click) = "changeBackground()">Toggle</button> <router-outlet />
app.ts
Step 2: Open app.ts file and add the below changes −
import { CommonModule } from '@angular/common';
import { Component, signal } from '@angular/core';
import { RouterOutlet } from '@angular/router';
@Component({
selector: 'app-root',
imports: [RouterOutlet, CommonModule],
templateUrl: './app.html',
styleUrl: './app.css'
})
export class App {
protected readonly title = signal('nestedApplication');
dark = "";
changeBackground() {
if(this.dark == "") {
this.dark = "darkCol";
} else {
this.dark = "";
}
}
}
Step 3: Now, open app.css file and add the below code:
app.css
div {
width: 200px;
height: 200px;
border-radius: 5px;
box-shadow: 0px 5px 15px rgb(6, 51, 51);
text-align: center;
align-items: center;
justify-content: center;
display: flex;
}
button {
border-radius: 3px;
margin: 10px auto;
padding: 10px 10px;
color: white;
font-weight: bold;
background-color: rgb(66, 59, 59);
cursor: pointer;
}
.darkCol {
background-color: black;
color: white;
transition: background-color 0.5s;
}
Output
Step 4: Finally, start your application (if not done already) using the below command −
ng serve
Now, run your application and you can see the below response −
Example - Usage of ngModel Directive
The ngModel is a built-in attribute directive. It is mostly used to enable two-way data binding for HTML form elements with the help of banana-in-a-box syntax "[()]". However, you if you use ngModel in square bracket [] syntax, it will enable the one-way binding.
The ngModel directive is provided by a separate module called FormsModule, which is necessary for template-driven forms.
A simple example of two way binding is given below. Here, a user object with name property is defined. Whenever user change the input field, the updated user name will be reflected to the user.name variable in the component. Similarly, if the components variable, user.name gets changed, the input fields value will be updated as well.
Let us create a simple registration form to understand ngModel directive. Our registration form will have three input fields as shown below and a button to submit the registration form:
- Username
- Password
- Confirm password
Step 1: Create a new application, my-app using angular CLI as shown below −
ng new my-app
Step 2: Create a new registration form component, RegisterForm using angular CLI as shown below −
ng generate component RegisterForm
Step 3: Open the registration form component's template and a user with username, password and confirm password.
register-form.html
<div>
<form method="post">
<div class="container">
<label for="username"><b>Username</b></label>
<input type="text" name="username" [(ngModel)]="user.username" required>
<label for="password"><b>Password</b></label>
<input type="password" name="password" [(ngModel)]="user.password" required>
<label for="confirm_password"><b>Confirm Password</b></label>
<input type="password" name="confirm_password" [(ngModel)]="user.confirmPassword" required>
<button type="submit" (click)="showInfo($event)">Register</button>
</div>
</form>
</div>
Here, ngModel sets the value from "user" object to HTML input element. It sets the user-entered value to the user object in the reverse direction as well.
Step 4: Open the registration form component's style and add some CSS to the form as shown below −
register-form.css
.container {
padding: 15px;
}
input[type=text], input[type=password] {
width: 100%;
padding: 10px 20px;
margin: 10px 0;
display: inline-block;
border: 1px solid #ccc;
box-sizing: border-box;
}
button {
background-color: blue;
color: white;
padding: 15px 20px;
margin: 10px 0;
border: none;
cursor: pointer;
width: 100%;
}
Step 5: Include our registration form component in the app template file, app.html:
app.html
<app-register-form></app-register-form> <router-outlet />
Step 6: Next, add an object named "user" with username, password and confirmPassword properties. The "user" object will have an empty string initially. Once the user enters the data, it will get populated through NgModel directive.
user: any = {
username: '',
password: '',
confirmPassword: ''
}
Step 7: Create a new member method, showInfo() in the component class. The purpose of the method is to collect the current user information and show it through alert() method.
showInfo(e: Event) {
e.preventDefault();
let info: string = '';
info += 'Username = ' + this.user.username;
info += '\nPassword = ' + this.user.password;
info += '\nConfirm password = ' + this.user.confirmPassword;
alert(info)
}
Here,
preventDefault() method of the event object will prevent the default action of submit button.
alert() method will show the message to the user.
Step 8: The complete listing of the component i.e. register-form.ts is as follows:
register-form.ts
import { Component } from '@angular/core';
import { FormsModule } from '@angular/forms';
@Component({
selector: 'app-register-form',
imports: [FormsModule],
templateUrl: './register-form.html',
styleUrl: './register-form.css',
})
export class RegisterForm {
user: any = {
username: '',
password: '',
confirmPassword: ''
}
showInfo(e: Event) {
e.preventDefault();
let info: string = '';
info += 'Username = ' + this.user.username;
info += '\nPassword = ' + this.user.password;
info += '\nConfirm password = ' + this.user.confirmPassword;
alert(info)
}
}
Step 9: Before running the application, add the RegisterForm to the app.ts file.
app.ts
import { Component, signal } from '@angular/core';
import { RouterOutlet } from '@angular/router';
import { RegisterForm } from './register-form/register-form';
@Component({
selector: 'app-root',
imports: [RouterOutlet, RegisterForm],
templateUrl: './app.html',
styleUrl: './app.css'
})
export class AppComponent {
title = 'my-app';
}
Output
Step 10: Now, run the application, fill out the form and click the register button. It will collect the information through ngModel binding and show it through the alert() function.
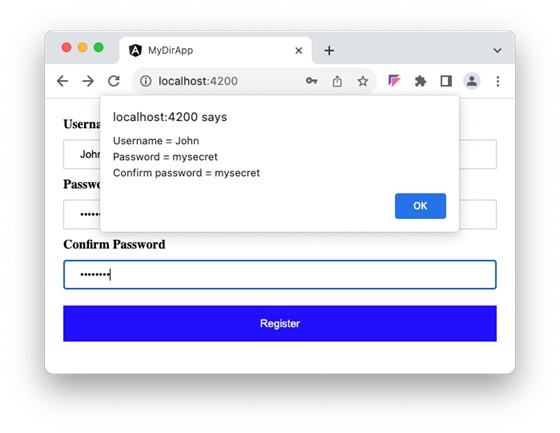
Multiple Choice Questions on Angular Attribute Directives
In this section, test your knowledge of the angular attribute directives by giving correct answers to the MCQs given below −
Q. 1 - An angular attribute directive is used to:
B - change the appearance or behavior of DOM elements or components
Answer : B
Explanation
An attribute directive change the appearance or behavior of DOM elements or components. It is used just like a normal HTML attribute.
Q. 2 - Which of the following directives is used to add dynamic styles to an element in Angular?
Answer : A
Explanation
The ngStyle directive is used to add dynamic styles.
Q. 3 - Which module needs to be imported to use ngStyle and ngClass in an Angular application?
Answer : D
Explanation
To use ngStyle and ngClass directive, importing CommonModule is necessary as they are part of this module.
Angular - Structural Directives
Structural directives change the structure of DOM by adding or removing elements at runtime. This type of Angular Directive is used to show or hide elements based on user authentication, render dynamic lists from APIs, or create interfaces like tabs and accordions that change based on user actions.
The structural directives are applied to elements by prefixing the directive name with an asterisk (*) symbol. To use these directives in your angular application, importing CommonModule is necessary as they are part of this module.
Built-in Structural Directives
The list of commonly used structural directives are −
ngIf: This directive is used to display or hide data in your application. When the given condition becomes TRUE, it will display the data, otherwise, it will not.
ngFor: ngFor is used to repeat a portion of elements from the given list of items.
ngSwitch: It checks multiple conditions.

Example - Usage of ngIf Directive
The Angular Template does not provide the facility of conditional logic. Therefore, the ngIf directive is used to apply conditional logic. For this reason, it is also known as a conditional directive. For example, you can use the ngIf directive to display or hide data in your application based on the specified condition.
Let us try the ngIf directive in our directive-app application to show and hide information.
Step 1: Add the below code in app.html.
<div *ngIf="showData"> Tutorialspoint </div> <button (click) = "show()">Show Data</button> <router-outlet />
Step 2: Import the CommonModule and add a show() method in the app.ts file as follows −
import { Component } from '@angular/core';
import { RouterOutlet } from '@angular/router';
import { CommonModule } from '@angular/common';
@Component({
selector: 'app-root',
imports: [RouterOutlet, CommonModule],
templateUrl: './app.html',
styleUrl: './app.css'
})
export class App {
title = 'directive-app';
showData = false;
show() {
this.showData = !this.showData;
}
}
Step 3: Open app.css file and add below CSS:
div {
background-color: black;
color: white;
width: 200px;
height: 200px;
border-radius: 5px;
box-shadow: 0px 5px 15px rgb(6, 51, 51);
text-align: center;
align-items: center;
justify-content: center;
display: flex;
}
button {
border-radius: 3px;
margin: 10px auto;
padding: 10px 10px;
color: white;
font-weight: bold;
background-color: rgb(66, 59, 59);
cursor: pointer;
}
Output
Now, run your application using the ng serve command and you can see the below response −

Clicking on the button will show the hidden contents.
Example - Usage of ngIfElse Directive
The ngIfElse directive functions similarly to ngIf, but it also allows you to render content when the condition is evaluated as false. It is identical to the if-else condition that you may have learned in programming languages like C, C++ and Java.
Let's understand how the ngIfElse works by creating a sample application.
Step 1: Add the following code in app.html file as follows −
<div *ngIf="showData; else noData"> Tutorialspoint </div> <ng-template #noData>Nothing to display here!!</ng-template> <button (click) = "show()">Show Data</button>
If the condition is false, a text will be displayed and in the case of TRUE, a box will be displayed.
Output
Step 2: Finally, start your application (if not done already) using the below command −
ng serve
Now, run your application and you can see the below response −
Example - Usage of ngFor Directive
Angular template does not have the feature of looping logic as well. So, to loop through given data, Angular provides NgFor directive. For example, you can use this directive to loop over an array of items and show it as a list, gallery, table, etc.
Example
Let's understand how ngFor with the help of a sample application.
Step 1: Add the list in app.ts file as shown below −
import { Component } from '@angular/core';
import { RouterOutlet } from '@angular/router';
import { CommonModule } from '@angular/common';
@Component({
selector: 'app-root',
standalone: true,
imports: [RouterOutlet, CommonModule],
templateUrl: './app.html',
styleUrl: './app.css'
})
export class App {
title = 'directive-app';
list = [1,2,3,4,5];
}
Step 2: Add ngFor directive in app.html as shown below −
<h2>ngFor directive Example</h2>
<ul>
<li *ngFor="let l of list">
{{l}}
</li>
</ul>
Here, the let keyword creates a local variable and it can be referenced anywhere in your template. The l creates a template local variable to get the list elements.
Output
Step 3: Finally, start your application using the below command −
ng serve
The following response will be displayed −
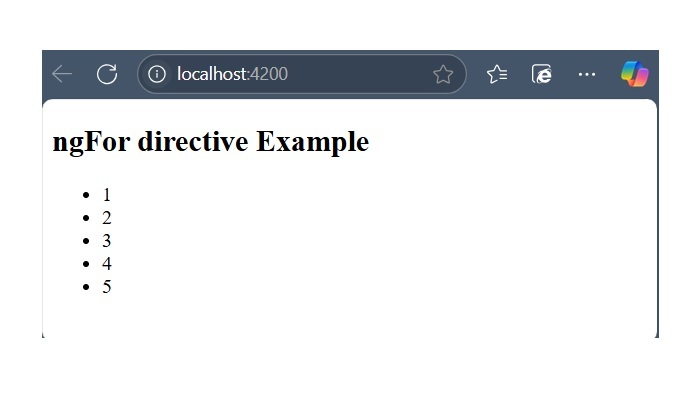
Example - Special Case: trackBy Function
Sometimes, the ngFor directive performance is low with large lists. For example, when adding a new item or removing any item in the list may trigger several DOM manipulations. To iterate over a large object collection, we usethe trackBy function.
It tracks when elements are added or removed. It has two arguments index and element. The index is used to identify each element uniquely.
Let's understand how trackBy is used with ngFor in this example.
Step 1: Add the below code in app.ts file.
import { Component } from '@angular/core';
import { RouterOutlet } from '@angular/router';
import { CommonModule } from '@angular/common';
@Component({
selector: 'app-root',
imports: [RouterOutlet, CommonModule],
templateUrl: './app.html',
styleUrl: './app.css'
})
export class App {
title = 'directive-app';
studentArr: any[] = [ {
"id": 1,
"name": "student1"
},
{
"id": 2,
"name": "student2"
},
{
"id": 3, "name": "student3"
},
{
"id": 4,
"name": "student4"
}
];
trackByData(index:number, studentArr:any): number {
return studentArr.id;
}
}
Here,
We have created,
trackByData()
method to access each student element in a unique way based on the id.Step 2: Add the below code in app.html file to define trackBy method inside ngFor.
<ul>
<li *ngFor="let std of studentArr; trackBy: trackByData">
{{std.name}}
</li>
</ul>
Output
Step 3: Now, run your application using ng serve command and you will get the below response −
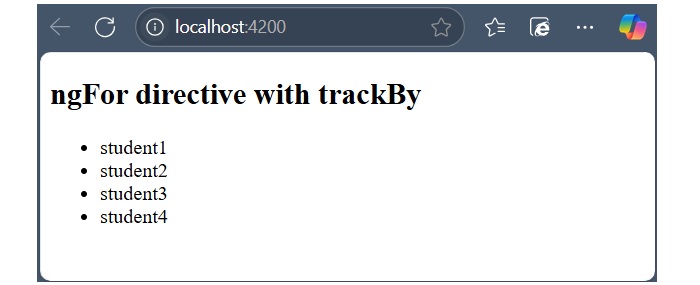
Here, the application will print the student names. Now, the application is tracking student objects using the student id instead of object references. So, DOM elements are not affected.
Example - The ngSwitch Directive
Angular template does not have switch statement as well. At the place of switch statement, Angular provides the ngSwitch and its related directive to check multiple conditions and select any one of the item in a collection (of items).
Let us try ngSwitch directive in our directive-app application.
Step 1: Add the following code in app.ts file.
import { Component, OnInit } from '@angular/core';
import { RouterOutlet } from '@angular/router';
import { CommonModule } from '@angular/common';
@Component({
selector: 'app-root',
imports: [RouterOutlet, CommonModule],
templateUrl: './app.html',
styleUrl: './app.css'
})
export class App implements OnInit {
ngOnInit(): void {
// code
}
title = 'directive-app';
logInName = 'admin';
}
Step 2: Add the following code in app.html file as follows −
<h2>ngSwitch directive</h2>
<ul [ngSwitch]="logInName">
<li *ngSwitchCase="'user'">
<p>User is logged in..</p>
</li>
<li *ngSwitchCase="'admin'">
<p>admin is logged in</p>
</li>
<li *ngSwitchDefault>
<p>Please choose login name</p>
</li>
</ul>
Output
Step 3: Finally, start your application (if not done already) using the below command −
ng serve
Now, run your application and you can see the below response −
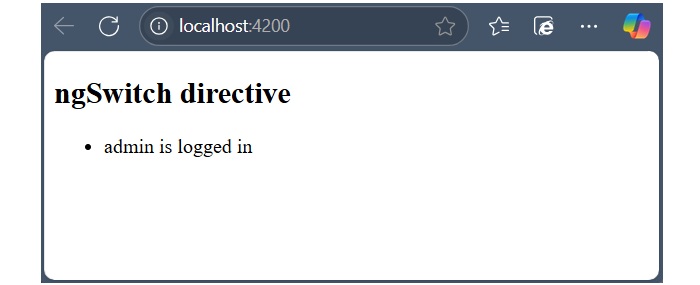
Here, we have defined logInName as admin. So, it matches the second SwitchCase and prints above admin related message.
Multiple Choice Questions on Angular Structural Directives
In this section, test your knowledge of the angular attribute directives by giving correct answers to the MCQs given below −
Q. 1 - Find the correct structural directive used for conditional rendering:
Answer : D
Explanation
The *ngIf, *ngSwitch and *ngIfElse directives are used for conditional rendering in Angular.
Angular - Custom Directives
Custom Directives in Angular
A custom directive is a user-defined directive that allows developers to extend the functionality of HTML elements. The attribute and structural built-in directives (covered in previous two chapters) offers very basic and pre-defined functionalities. However, with custom directives, you can add specific behaviors to HTML elements based on project requirements, user interactions, or changes in data.
Features and Uses of Angular Custom Directives
The Angular Custom Directives provides the following features −
- The first and most basic feature of a custom directive is to modify the structure or appearance of DOM elements based on your specific logic.
- It allows you to embed event listeners to the HTML elements so that their behavior can be changed in response to user interaction.
- You can create a reusable and modular piece of code using custom directives.
- The custom directives can also help us add various features to the user interface, such as tooltip, drag and drop, form validation, dynamic styles and much more.
Creating a Custom Directive in Angular
To create a custom directive, run the following command in Angular CLI −
ng generate directive <directive-name>
The above command will create a new directive with the specified name and add the necessary files for it. Among these files, the most important one is TypeScript file. This file has.tsextension.
Example
In this example, we will learn how to create a custom directive in Angular.
Step 1: Use the below command to create customStyle directive −
ng generate directive customStyle
After running this command, Angular CLI will create below files −
CREATE src/app/customstyle.spec.ts (252 bytes) CREATE src/app/customstyle.ts (182 bytes)
Step 2: Open customstyle.ts file and add the below code −
customstyle.ts
import { Directive, ElementRef } from '@angular/core';
@Directive({
selector: '[appCustomStyle]',
})
export class CustomStyle {
constructor(el: ElementRef) {
el.nativeElement.style.fontSize = '24px';
}
}
Here, constructor method gets the element using CustomStyle as el. Then, it accesses style of el and sets its font size as 24px using the CSS property.
Step 3: Add the below text and use the selector of custom directive as shown below −
app.html
<p appCustomStyle>This text is styled using custom style directive</p> <router-outlet />
Step 4: Import this custom directive inside app.ts file as shown below −
app.ts
import { Component} from '@angular/core';
import { RouterOutlet } from '@angular/router';
import { CustomStyle } from './customstyle';
@Component({
selector: 'app-root',
standalone: true,
imports: [RouterOutlet, CustomStyle],
templateUrl: './app.html',
styleUrl: './app.css'
})
export class AppComponent {
}
Output
Step 5: Finally, run your application using the below command −
ng serve
Output of the above code is shown below −

Angular - Pipes
What are Angular Pipes?
In Angular, pipes are functions that format specified data before displaying it in the View. They help to transform and manage data within interpolation, denoted by {{ | }}. Therefore, pipes are sometimes referred to as filters. It accepts arrays, integers and strings as inputs which are separated by a vertical bar "|" symbol.

Features and Uses of Angular Pipes
Some of the features and uses of Angular pipes are listed below −
- Pipes can apply transformations directly within the HTML element.
- Once a custom pipe is created, it can be reused throughout the Angular application.
- Multiple pipes can be chained together. The output of one pipe can be passed as input to another pipe.
- You can use pipes to format and transform numbers, objects, strings, and dates in a way that is suitable for display in the UI.
- Pipes are used to filter data which means it can show only certain items from a list based on passed conditions.
How to Use Angular Pipes?
To use Angular pipes in your application, embed the pipe directly inside template expression. This is done using Angular's pipe operator which is denoted by a vertical bar character "|".
The pipe operator is a binary operator. On the left of this operator, the input value is passed to the transformation function, and the right side operand is the pipe name.
All the built-in pipes in Angular are available in the @angular/common package. Hence, make sure to import the required pipe from this package by specifying the pipe name in the following command −
import { Pipe-Name } from '@angular/common';
Syntax
The syntax to use Angular pipe is as follows −
<html-tag-name>{{ input-value | pipe-name }}</html-tag-name>
Where,
html-tag-name can be replaced by any HTML tag, input-value is the input that will be passed into the pipe on the right side of pipe operator.
Chaining Angular Pipes
Chaining multiple pipes together is also possible. The output of one pipe can be passed as input to another pipe. And, the chained pipes run from left to right.
The syntax to chain Angular pipes is as follows −
<html-tag-name>{{ input-value | pipe1 | pipe2 }}</html-tag-name>
Passing Parameters to Angular Pipes
Some Angular pipes allow to configure the transformation by passing parameters. To specify a parameter, append the pipe name with a colon (:) followed by the parameter value.
The syntax to add parameters to Angular pipes is shown below −
<html-tag-name>{{ input-value | pipe : parameter }}</html-tag-name>
Working Example
The following example illustrates how to use the DatePipe in your Angular application to format dates.
Step 1: Create a pipe-app application using the below command:
ng new pipe-app
Step 2: Add the below content in app.html file.
app.html
<div>
Today's date :- {{presentDate}}
</div>
Step 3: Import @angular/common package and create an Date object inside app.ts file −
app.ts
import { Component } from '@angular/core';
import { RouterOutlet } from '@angular/router';
import { DatePipe} from '@angular/common';
@Component({
selector: 'app-root',
imports: [RouterOutlet, DatePipe],
templateUrl: './app.html',
styleUrl: './app.css'
})
export class App {
title = 'pipe-app';
presentDate = new Date();
}
Output
Step 4: Start your application using the below command −
ng serve
It will display the following output on your browser −
Today's date :- Tue Jan 07 2025 11:52:26 GMT+0530 (India Standard Time)
Step 5: Let's add date pipe in the HTML file.
<div>
Today's date :- {{presentDate | date }}
</div>
Now, you will see the below output on your screen −
Today's date :- Jan 7, 2025
Step 6: Pass fullDate parameter to the date pipe as shown below −
<div>
Today's date :- {{presentDate | date: 'fullDate' }}
</div>
Step 7: Now, run your application and you can see the below response −
Today's date :- Tuesday, January 7, 2025
Angular Built-in Pipes
Angular supports a number of built-in pipes, which are as follows −
| SNo. | Pipes & Description |
|---|---|
1. |
DatePipe
It is used to format a given date value. |
2. |
UpperCasePipe
It converts individual letters of the specified texts into uppercase. |
3. |
LowerCasePipe
It transforms individual letters of the specified texts into lowercase. |
4. |
CurrencyPipe
This pipe is used to transform a given number into a currency string. |
5. |
DecimalPipe
This pipe formats a number into a string of decimal point number. |
6. |
PercentPipe
It formats specified numbers into a percentage string. |
7. |
TitleCasePipe
It is used to convert the specified text to a title case. |
8. |
JsonPipe
This built-in pipe is used to transform an object to its corresponding JSON string representation. |
9. |
KeyValuePipe
Use this pipe to create an array of key-value pairs from a given object or map. |
10. |
SlicePipe
It returns a new sub-string from the specified string. |
Angular Custom Pipes
A custom pipe is a user-defined pipe that allows developers to perform specific transformations that Angular's built-in pipes can't achieve. The built-in pipes provide limited functionalities like formatting dates, numbers and strings. However, you can achieve more than that using custom pipes. For example, sorting and filtering.
To create a custom pipe, run the following command in Angular CLI −
ng generate pipe <pipe-name>
Multiple Choice Questions on Angular Pipes
Now that you have learned the Angular Pipes, let's test your knowledge. Please answer the following questions based on your understanding −
Q. 1 - Which of the following Angular pipe formats dates?
Answer : D
Explanation
DatePipe is a built-in Angular pipe used to format a given date value.
Q. 2 - What does the UpperCasePipe do in Angular?
A - It converts individual letters of a text into uppercase
B - It transforms the entire text to lowercase
Answer : A
Explanation
The UpperCasePipe in Angular converts all characters in a string to uppercase letters.
Q. 3 - How can you chain multiple pipes in Angular?
Answer : C
Explanation
You can chain multiple pipes in Angular by using the | symbol. The output of one pipe is passed as input to the next pipe.
Angular - Built-In Pipes
Angular is a TypeScript (a superset of JavaScript) based framework used for building web applications. It offers various built-in features which include routing, data binding, server-side rendering and data transformation and formatting that help to fulfill project requirements.
Suppose your project requires some data formatting tasks, such as formatting dates, numbers, and text. For this kind of task, pipes are used in Angular to format specified data before displaying it in View. In this tutorial, we are going to cover how Angular built-in pipes work.
Built-in Pipes in Angular
Some of the important Angular built-in pipes are given below −
Let's see how they work with examples.
Example - The LowerCasePipe
The LowerCasePipe is used to convert all letters of the input string to lowercase. If the input value is null or undefined, this pipe returns null.
Syntax
Syntax of the LowerCasePipe is given below −
{{ inputvalue | lowercase }}
In this example, we will see the practical implementation of the LowerCase Pipe.
Step 1: Import the @angular/common package and define a string and an array of strings inside the app.ts file.
import { Component } from '@angular/core';
import { RouterOutlet } from '@angular/router';
import { LowerCasePipe} from '@angular/common';
@Component({
selector: 'app-root',
imports: [RouterOutlet, LowerCasePipe],
templateUrl: './app.html',
styleUrl: './app.css'
})
export class App {
TutorialName: string = 'Angular';
chapterList: string[] = ["Binding", "Pipe", "Services"];
}
Step 2: Open app.html file and apply lowercase pipe to each string as shown below −
app.html
<p>The name of this Tutorial is {{TutorialName}}</p>
<p>The first Topic is {{chapterList[0] | lowercase}}</p>
<p>The second Topic is {{chapterList[1] | lowercase}}</p>
<p>The third Topic is {{chapterList[2]| lowercase}}</p>
<router-outlet />
Once you save all the code changes, run the application to get the following output −
The name of this Tutorial is Angular The first Topic is binding The second Topic is pipe The third Topic is services
Example - The UpperCasePipe
The UpperCasePipe is used to convert all letters of the input string to uppercase. If the input value is null or undefined, this pipe returns null.
Syntax
The UpperCasePipe has the following syntax −
{{ inputvalue | uppercase }}
The following example shows how to use the UpperCasePipe.
Step 1: Add the following code in the app.ts file.
app.ts
import { Component } from '@angular/core';
import { RouterOutlet } from '@angular/router';
import { UpperCasePipe} from '@angular/common';
@Component({
selector: 'app-root',
imports: [RouterOutlet, UpperCasePipe],
templateUrl: './app.html',
styleUrl: './app.css'
})
export class App {
TutorialName: string = 'Angular';
chapterList: string[] = ["Binding", "Pipe", "Services"];
}
Step 2: Add the below code in the app.html file.
app.html
<div>
The name of this Tutorial is {{TutorialName}}<br>
The first Topic is {{chapterList[0] | uppercase }}<br>
The second Topic is {{chapterList[1] | uppercase }}<br>
The third Topic is {{chapterList[2]| uppercase }}<br>
</div>
Once you save all the code changes and refresh the browser, you will get the following output −
The name of this Tutorial is Angular The first Topic is BINDING The second Topic is PIPE The third Topic is SERVICES
Example - The SlicePipe
The SlicePipe is used to slice a piece of data from the input string. It creates a new array or string containing sub-string from the specified string based on the start and end positions.
Syntax
The below code block contains the syntax of SlicePipe −
{{ inputvalue | slice:start:end }}
Where,
start − This is the starting position from where the slicing begins.
end − This is the position where the slicing should end.
The following example illustrates the use of SlicePipe.
Step 1: First ensure the following code is present in the app.ts file
app.ts
import { Component } from '@angular/core';
import { RouterOutlet } from '@angular/router';
import { SlicePipe} from '@angular/common';
@Component({
selector: 'app-root',
imports: [RouterOutlet, SlicePipe],
templateUrl: './app.html',
styleUrl: './app.css'
})
export class App {
TutorialName: string = 'Angular';
chapterList: string[] = ["Binding", "Pipe", "Services"];
}
Step 2: Change the code of app.html file with the code given below −
app.html
<div>
The name of this Tutorial is {{TutorialName}}<br>
The first Topic is {{chapterList[0] | slice:1:2}}<br>
The second Topic is {{chapterList[1] | slice:1:3}}<br>
The third Topic is {{chapterList[2]| slice:2:3}}<br>
</div>
Now, refresh the browser, you will get the below result on screen −
The name of this Tutorial is Angular The first Topic is i The second Topic is ip The third Topic is r
Example - The DatePipe
This is used to convert the input string to date format. If the input value is null, the DatePipe returns null as an output.
Syntax
Syntax of the DatePipe is as follows −
{{ inputvalue | date:"dateformat" }}
Where,
dateformat is the date format the input string should be converted to.
Let's understand the working of DatePipe using a sample example.
Step 1: Change the code of the app.ts file with the following code −
app.ts
import { Component } from '@angular/core';
import { RouterOutlet } from '@angular/router';
import { DatePipe} from '@angular/common';
@Component({
selector: 'app-root',
imports: [RouterOutlet, DatePipe],
templateUrl: './app.html',
styleUrl: './app.css'
})
export class App {
presentDate = new Date();
}
Step 2: Navigate to the app.html file and embed the DatePipe inside HTML element as shown in the given code block −
<div>
Today's date :- {{presentDate | date:"MM/dd/yy"}}
</div>
Once you save all the code changes, you will get the following output −
Today's date :- 01/07/25
Example - The CurrencyPipe
The CurrencyPipe converts the input string to currency format. The given input value will be formatted according to the locale rules and optional parameters, such as code, symbol, symbol-narrow and digitsInfo.
Syntax
Syntax of the CurrencyPipe is given below −
{{ inputvalue | currency : 'code' : 'symbol' : 'symbol-narrow' }}
Where,
code − The ISO 4217 currency code, such as 'USD' for US dollars or 'EUR' for euros.
symbol − Displays the currency symbol.
symbol-narrow − Displays a narrow version of the currency symbol.
digitsInfo − It specifies the number of decimal places and the minimum and maximum number of integer digits.
NOTE: All the parameters are optional.
In this example, we will see the use of CurrencyPipe.
Step 1: Declare and initialize a number inside the app.ts file.
app.ts
import { Component } from '@angular/core';
import { RouterOutlet } from '@angular/router';
import { CurrencyPipe} from '@angular/common';
@Component({
selector: 'app-root',
imports: [RouterOutlet, CurrencyPipe],
templateUrl: './app.html',
styleUrl: './app.css'
})
export class App {
newValue: number = 54213;
}
Step 2: Next, open the app.html file and apply the currency pipe to the defined number.
app.html
<div>
The number in currency: {{newValue | currency}}
</div>
All the above changes will generate the following result on browser −
The number in currency: $54,213.00
Example - The PercentPipe
The PercentPipe is used to convert the input string to percentage format. Like other built-in pipes mentioned above, it also returns null when an undefined or null value is passed.
Syntax
The PercentPipe has the following syntax −
{{ inputvalue | percent : "digitsInfo" }}
Where,
digitsInfo controls the formatting of the percentage value. It determines the number of decimal places and the minimum and maximum number of integer digits.
Let's understand how PercentPipe works with the help of an example.
Step 1: Define a decimal number inside the app.ts file. Also, make sure to import the PercentPipe.
App.ts
import { Component } from '@angular/core';
import { RouterOutlet } from '@angular/router';
import { PercentPipe} from '@angular/common';
@Component({
selector: 'app-root',
imports: [RouterOutlet, PercentPipe],
templateUrl: './app.html',
styleUrl: './app.css'
})
export class App {
newValue: number = 0.59;
}
Step 2: Make the following changes in app.html file.
app.html
<div>
The given number in percentage: {{newValue | percent}}
</div>
Once you save all the code changes, you will see the following output on your browser −
The given number in percentage: 59%
Example - The DecimalPipe
The DecimalPipe formats a number into a string of decimal point numbers. The given input number will be formatted according to the specified digitsInfo parameter.
Syntax
The following code block contains the syntax of DecimalPipe.
{{ inputvalue | decimal : "digitsInfo" }}
Where,
digitsInfo − It determines the number of decimal places and the minimum and maximum number of integer digits.
The example given below demonstrates the working of DecimalPipe.
Step 1: First ensure the following code is present in the app.ts file.
app.ts
import { Component } from '@angular/core';
import { RouterOutlet } from '@angular/router';
import { DecimalPipe} from '@angular/common';
@Component({
selector: 'app-root',
imports: [RouterOutlet, DecimalPipe],
templateUrl: './app.html',
styleUrl: './app.css'
})
export class App {
newValue: number = 5902;
}
Step 2: Next, ensure the following code is present in the app.html file.
app.html
<div>
The given number in decimal: {{newValue | number:'1.2-2'}}
</div>
Save all the mentioned changes to get the output.
The given number in decimal: 5,902.00
Angular - Custom Pipe
Custom Pipes in Angular
A custom pipe is a user-defined pipe that allows developers to perform specific transformations that Angular's built-in pipes can't achieve. The built-in pipes provide limited functionalities like formatting dates, numbers and strings. However, you can achieve more than that using custom pipes. For example, sorting and filtering.
In Angular, pipes are functions that format specified data before displaying it in the View.
Features and Uses of Angular Custom Pipes
The Angular Custom Pipes provides the following features −
- Once you define a custom pipe, you can reuse it wherever needed in the application.
- Like built-in pipes, custom pipes can also be used directly in the template expressions.
- The logic for custom pipes is written in a separate TypeScript class and applied within the template. This helps in maintaining the code and improving the performance.
- There are a number of features that you can add using custom pipes to your Angular application, such as digit count, filtering, sorting, password generation and many more.
Creating a Custom Pipe in Angular
Follow the steps given below to create a Custom pipe in Angular −
Step 1: Create a TypeScript class and export it. By convention, a pipe class should end with the string "Pipe".
Step 2: Decorate the created TypeScript class with @Pipe Decorator. Inside this decorator, specify a name for the pipe.
Step 3: In the end, inherit the PipeTransform interface and implement its transform() method.
Example
The following example explains about creating a custom Pipe and using it inside an Angular application.
Step 1: Open Angular CLI and generate a Pipe using the below command −
ng g pipe digitcount
After executing the above command, you can see these two files −
CREATE src/app/digitcount.pipe.spec.ts (211 bytes) CREATE src/app/digitcount.pipe.ts (258 bytes)
Step 2: Let's create a logic for counting digits in a number using Pipe. Open digitcount.pipe.ts file and add the below code −
import { Pipe, PipeTransform } from '@angular/core';
@Pipe({
name: 'digitcount',
})
export class DigitcountPipe implements PipeTransform {
transform(value: number, ...args: unknown[]): number {
return value.toString().length;
}
}
Step 3: Navigate to app.html file and use the newly created pipe inside the template as shown below −
<div>
<h3> Using Custom DigitCount Pipe </h3>
<p>Count :- {{ digits | digitcount }}</p>
</div>
<router-outlet />
Step 4: Now, we have added logic to count number of digits in a given number. It's time to add the final code in app.component.ts file. Here, we import the DigitcountPipe and define a number.
import { Component, signal } from '@angular/core';
import { RouterOutlet } from '@angular/router';
import { DigitcountPipe } from './digitcount-pipe';
@Component({
selector: 'app-root',
imports: [RouterOutlet,DigitcountPipe],
templateUrl: './app.html',
styleUrl: './app.css'
})
export class App {
protected readonly title = signal('myApp');
digits : number = 100;
}
Step 5: Now, run the application using ng serve command. The code will display the following result on the browser −
Using Custom DigitCount Pipe Count :- 3
Angular - Forms
Forms are used to collect input data from users and enable users to interact with the application. A general form consists of various input fields such as text boxes, radio buttons, checkboxes, and dropdowns, along with a submit button that triggers the action of sending data to a server or performing some other operation within the application.
In this tutorial, we will learn what are Angular forms, how they work and their use cases.
Forms in Angular
Angular forms are a way to accept user input in an Angular application. They receive input events from users through the template view, validate the input given by the user, create a form model and data model to update, and also, provide a way to track changes. It is important to note that the Angular forms are structured using the HTML form tag.
An Angular application that contains a form, keeps the view in sync with the component model and the component model in sync with the view. When users type or update values through the view, the new values are reflected in the data model. Similarly, if the program logic updates values in the data model, those values are also reflected in the view.
Features and Uses of Angular Forms
Following are the features and uses of Angular Forms −
- Angular forms support two-way data binding. It is a type of data binding that allows two-way interaction between component and view.
- You can find various built-in validators in Angular forms that help to check whether the user has entered valid data or not before submitting the form.
- Angular forms also allow developers to add, remove, and modify form controls dynamically as per the needs of the user interface.
- Developers can organize form controls into logical groups using FormGroup. It helps to manage and track the state of different sections of the form.
Angular Form Classes
The Angular forms are built on the following four foundation classes −
FormControl: Represents a single form input field. It tracks the value, validation status, and user interactions for the individual input control.
FormGroup: This foundation class represents a collection of FormControl instances or nested FormGroup instances. You can group related form controls together using this class. It's used to manage the state of a form section (e.g., user details, address information).
FormArray: It is used to handle an array of form controls, such as a list of checkboxes or input fields.
ControlValueAccessor: It connects Angular FormControl instances to built-in DOM elements.
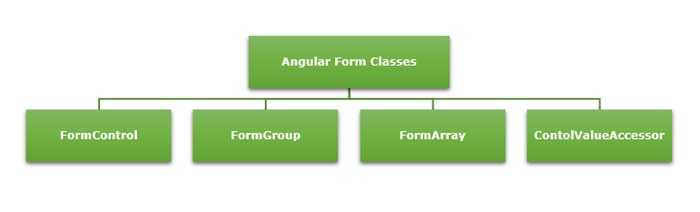
Types of Form in Angular
Angular supports two types of forms. They are as follows −
-
Template-Driven Forms: As the name suggests, the template-driven forms are closely associated with Angular Templates. User input validation and behaviors are defined using directives within the template. For data flow, these forms use two-way data binding. You can build any kind of simple form within your Angular application, such as login forms and contact forms. Remember, if you have very basic form requirements and prefer to manage it solely using the template, then template-driven forms may be a suitable choice.
-
Reactive Forms: The reactive forms follow a model-driven approach. Compared to template-driven forms, they are more robust, scalable and suitable for complex forms. Instead of a template, these forms are controlled from the Angular Component class. Use this type of form, if forms are a key part of your Angular application.
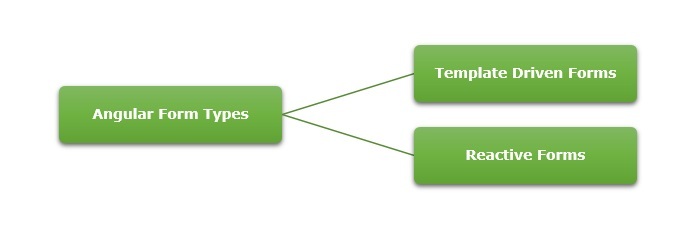
Difference between Reactive Forms and Template-Driven Forms
The table below shows how Reactive Forms are different from Template-Driven Forms −
| Reactive Forms | Template-Driven Forms |
|---|---|
They follow a model-driven approach. |
They follow a view-driven approach |
Forms are created and controlled from the component class. |
Forms are created and validations are handled directly in the template. |
The flow of data is Synchronous. |
Asynchronous data flow. |
It is flexible and scalable for complex forms with dynamic behavior. |
More suitable for simple and static forms. |
In reactive forms, the form control instances are accessed using FormControl and FormGroup. |
Form controls are accessed using template reference variables. |
Form validations are applied using the built-in validator functions. |
Form validations are applied using the built-in directives. |
Form Validation
Form validation is a process used to check whether the user input is in the correct format or not before submission. The validation process can be used to verify the format of email addresses and phone numbers as they have specific formats. Also, you can verify if the given input meets specific constraints like a minimum or maximum length. The form validation can prevent errors by catching invalid input before it is processed or sent to the server.
The Validator class in Angular provides a set of built-in validator functions that validate the form controls. A few example of validators are min, max, required, email, pattern and so on.
Dynamic Form?
A form generated or modified at the run time based on the application state or user interaction is called a dynamic form. It makes the forms adaptable to changes in data model. For example, if a user selects a country, the form could dynamically adjust to show additional fields like postal code, state, or country code.
You can learn how to create and use dynamic forms in angular by visiting this link: dynamic form.
Multiple Choice Questions on Angular Forms
You have reached the end of this chapter. Now, it's time to check your understanding of the angular forms. Please try to give correct answers to the questions given below −
Q. 1 - Which Angular form class represents a single form input field?
Answer : C
Explanation
FormControl represents a single form input field. It tracks the value, validation status, and user interactions for an individual form control.
Q. 2 - Which type of Angular form is more suitable for complex forms?
Answer : B
Explanation
Reactive Forms are more suitable for complex forms.
Angular - Template Driven Form
Template-Driven Forms in Angular
The template-driven form is a type of Angular form that relies on the template for managing form state and validation. It is created directly in the HTML template using Angular directives.
These forms are simpler to set up and hence, mainly used for creating a simple and less complex form application. Let's understand how to create and use template driven forms in an Angular application.
Directives used in Template-Driven Form
The following directives of the FormsModule class are used in Template-Driven Form −
NgModel: This directive is used to create two-way data binding between the form control in the template and the corresponding property in the component class. It binds the input field to a model in the component, and the model is updated whenever the input field value changes.
NgForm: It is used to track the form state. It automatically creates a FormGroup for the entire form when applied to the form tag.
NgModelGroup: The ngModelGroup directive is used to group related form controls into a nested form group.
Creating Angular Template-Driven Form
To create an Angular template-driven form, follow the steps given below −
-
Step 1: First, import FormsModule class of the @angular/forms package.
-
Step 2: Next, define the properties that will be bound to form controls in the template. These properties will hold the data entered by the user.
-
Step 3: Now, open the component's HTML template (e.g., app.html) and create the form. Inside the newly created form, use the ngForm directive to bind the entire form and track its state.
-
Step 4: Finally, use the ngModel directive on each form control to bind it to the corresponding property in the component class. The name attribute is used to identify the control within the form, and the ngModel for two-way data binding.
Example - Template Driven Form
Let us create a sample application (template-form-app) in Angular to learn the template-driven form. Here, we create a simple template-driven form to display user-entered text.
Step 1: Open the Angular CLI and create a new Angular application using the below command −
ng new template-form-app
Step 2: Add the below code in app.html file −
app.html
<div>
<form #userForm="ngForm" (ngSubmit)="onClickSubmit(userForm.value)">
<input class="input-box" type="text" name="username" placeholder="Username" ngModel required>
<input class="btn" type="submit" value="Submit" [disabled]="!userForm.valid">
</form>
</div>
@if (submitted) {
<p<You have entered: {{ username }}</p<
}
<router-outlet />
Here,
Created a template reference variable named userForm using the ngForm directive.
The ngSubmit event is bound to the onClickSubmit() function, which will be called when the form is submitted.
The ngModel directive binds the input field to the form model to enable two-way data binding.
The ngIf directive will display the paragraph conditionally i.e. when submitted becomes true.
Step 3: Now import the FormsModule inside app.ts file as shown below −
app.ts
import { CommonModule } from '@angular/common';
import { Component, signal } from '@angular/core';
import { FormsModule } from '@angular/forms';
import { RouterOutlet } from '@angular/router';
@Component({
selector: 'app-root',
imports: [RouterOutlet,FormsModule, CommonModule],
templateUrl: './app.html',
styleUrl: './app.css'
})
export class App {
protected readonly title = signal('nestedApplication');
username: string = "";
submitted: boolean = false;
onClickSubmit(result: { username: string; }) {
this.username = result.username;
this.submitted = true;
}
}
Step 4: Open app.css and add the code shown below −
app.css
div {
height: 100px;
margin-top: 25px;
display: flex;
justify-content: center;
align-items: center;
background-color: rgb(165, 223, 204);
}
.input-box {
margin: 10px;
padding: 5px 15px;
border-color: rgb(103, 220, 181);
}
.btn {
padding: 5px 15px;
color: white;
font-weight: bold;
background-color: rgb(103, 220, 181);
}
p {
font-weight: bold;
margin-top: 10px;
}
Step 5: Now, start your application using the below command −
ng serve
When the application will start, you will see the below response −

Flow of Data in Template-Driven Forms
In template-driven forms, the data flows in two ways as shown below −
- View to Model
- Model to View
View-to-Model Flow Diagram
The diagram given below illustrates how data flows when an input field's value is changed from the view in template-driven forms −

Model-to-View Flow Diagram
The diagram given below shows the model-to-view data flow in template-driven forms. This means how data flows from model to view when logic is changed.

Angular - Reactive Forms
Reactive Forms in Angular
Reactive Form is a type of Angular form that manages the form state using an immutable approach. Here, immutable means each change to the form state returns a new version of the state.
Reactive forms are created inside the component class and are also referred to as model-driven forms. Every form control used within these forms has a separate object in the component class, which helps developers access and manage the data received from user input.
Let's understand how to use Reactive Forms in angular.
Classes of Angular Reactive Forms
Before moving to create Reactive forms, we need to understand the use of following classes −
FormControl: Define the basic functionality of individual form control.
FormGroup: Used to aggregate the values of form control collection.
FormArray: Used to aggregate the values of form control into an array.
ControlValueAccessor: Acts as an interface between Forms API and HTML DOM elements.
Creating Angular Reactive Forms
You can create an Angular reactive form in the four simple steps given below −
-
Step 1: First, import ReactiveFormsModule, FormGroup, FormControl from the @angular/forms package.
-
Step 2: Instantiate FormGroup and FormControl inside your component's TypeScript file (e.g., app.ts).
-
Step 3: Now, open component's HTML template (e.g., app.html) and bind the form using formGroup.
-
Step 4: At the end, use formControlName to bind each individual input field to the corresponding form control.
Example
Let us create a sample application (reactive-form-app) in Angular to learn the reactive form. Here, we create a simple reactive form to display user-entered text.
Step 1: Open the command prompt and create a new Angular application using the below command −
ng new reactive-form-app
Step 2: As mentioned earlier, import FormGroup, FormControl and ReactiveFormsModule in app.ts file.
app.ts
import { CommonModule } from '@angular/common';
import { Component, OnInit, signal } from '@angular/core';
import { FormControl, FormGroup, ReactiveFormsModule } from '@angular/forms';
import { RouterOutlet } from '@angular/router';
@Component({
selector: 'app-root',
imports: [RouterOutlet,ReactiveFormsModule, CommonModule],
templateUrl: './app.html',
styleUrl: './app.css'
})
export class App implements OnInit {
protected readonly title = signal('reactive-form-app');
userName: string = "";
formdata: FormGroup = new FormGroup({});
ngOnInit() {
this.formdata = new FormGroup({
userName: new FormControl("")
});
}
onClickSubmit(data: { userName: string }) {
this.userName = data.userName;
}
}
Here,
Created an instance of formGroup and set it to a local variable, formdata.
Created an instance of FormControl and set it to one of the entry in formdata.
Created a onClickSubmit() function, which sets the local variable, userName with its argument.
Step 3: Add the below code in app.html file.
app.html
<div>
<form [formGroup]="formdata" (ngSubmit)="onClickSubmit(formdata.value)" >
<input class="input-box" type= "text" name="userName" placeholder="Enter Text"
formControlName = "userName">
<input class="btn" type="submit" value="Click here">
</form>
</div>
<p>You have entered: {{userName}} </p>
Here,
New form is created and its formGroup property is set to formdata.
New input text field is created and formControlName is set to username.
ngSubmit event property is used in the form and onClickSubmit() function is set as its value.
onClickSubmit() function gets formdata values as its arguments.
Step 4: Open app.css and add the code as specified below −
app.css
div {
height: 100px;
margin-top: 25px;
display: flex;
justify-content: center;
align-items: center;
background-color: rgb(165, 223, 204);
}
.input-box {
margin: 10px;
padding: 5px 15px;
border-color: rgb(103, 220, 181);
}
.btn {
padding: 5px 15px;
color: white;
font-weight: bold;
background-color: rgb(103, 220, 181);
}
p {
font-weight: bold;
margin-top: 10px;
}
Output
Step 5: Finally, start your application using the below command −
ng serve
On running the application, the following output will be displayed −

Enter any text in the input field and press submit button. The onClickSubmit() function will be called and user-entered text will be sent as an argument and displayed on the screen.
Flow of Data in Reactive Forms
In the case of reactive forms, the form elements defined within the view are directly associated with the FormControl instance. However, any update from the view to the form model and from the model to the view does not depend on the user interface.
In reactive forms, the data flows in two ways as shown below −
- View to Model
- Model to View
View-to-Model Flow Diagram
The diagram given below shows the view-to-model data flow. This means how data flows when value of an input field is changed from the view.

Suppose a user types a value or makes a selection through the input element. This input element emits an input event with the latest value. Then, the ControlValueAccessor, which listens for events, immediately relays the new value to the FormControl instance. Next, the FormControl instance generates the new value through the valueChanges observable. In the end, the new value will be received by all subscribers of the valueChanges observable.
Model-to-View flow diagram
The diagram given below shows the model-to-view data flow. This means how data flows from model to view when logic is changed.

First, the user calls the setValue() method, which updates the FormControl value. Then, the instance of FormControl generates the new value through the valueChanges observable. Now, the new value is received by the subscribers of the valueChanges observable. Lastly, the ControlValueAccessor will update the element with the new value.
Angular - Form Validation
Form validation is a process used to check whether the user input is in the correct format or not before submission. The validation process can be used to verify the format of email addresses and phone numbers as they have specific formats. Also, you can verify if the given input meets specific constraints like a minimum or maximum length. The form validation can prevent errors by catching invalid input before it is processed or sent to the server.
As we know, Angular has two kinds of forms. The first one is template-driven forms, and the other is reactive forms. The validation is implemented in two different ways. In template-driven forms, directives are used within the template to validate the form. In reactive forms, a model-driven approach is used where validation logic is defined in the component class.
Built-in Angular Validators
The Validator class in Angular provides a set of built-in validator functions that validate the form controls. A list of validator functions is −
| SNo. | Validators & Descriptions |
|---|---|
1. |
min This validator is used to check whether the control's value is greater than or equal to the specified number. |
2. |
max Unlike min, the max validator checks if the control's value is less than or equal to a specified number. |
3. |
required When required validator is applied, it checks if the input field has a value and marks the form control as invalid if it is empty. This validator is used in mandatory fields of a form to ensure that users provide the necessary information before submitting the form. |
4. |
requiredTrue If applied, it checks whether the value is true. Commonly used for checkbox validation. |
5. |
email To make sure the control's value is a valid email address format, the email validator is used. |
6. |
minLength It validates that the control's value is at least a specified length. |
7. |
maxLength This validators ensures that the control's value does not exceed a specified length. |
8. |
pattern It validates that the control's value matches a specified regular expression. |
9. |
nullValidator It is a no operation validator that always returns null. Commonly used for validation control. |
10. |
compose Combines multiple synchronous validators into one validator function. It returns an error map if any of the individual validators fail. |
11. |
composeAsync Similar to compose, but it combines asynchronous validators and returns an observable that emits either null for valid or an error object for invalid. |
Example - Validation in Angular Template-Driven Forms
In Angular, Template-Driven Forms are forms where the validation is applied directly in the HTML template using Angular's built-in directives, like required, minlength, maxlength, and more. This type of form uses ngModel directive for two-way data binding and needs less code than Reactive Forms.
In the below example, we will see how to use the validation in Template-Driven Form.
app.html
Step 1: Add the below code inside Template file −
<form #userForm="ngForm" (ngSubmit)="onSubmit(userForm)">
<div>
<label for="email">Email</label>
<input class="input-box" type="email" id="email" name="email" [(ngModel)]="user.email" required email #email="ngModel">
@if (email.invalid && email.touched) {
<div class="error">
Email is required and must be a valid email address.
</div>
}
</div>
<div>
<label for="password">Password</label>
<input class="input-box" type="password" id="password" name="password" [(ngModel)]="user.password" required minlength="6" #password="ngModel">
@if(password.invalid && password.touched){
<div class="error">
Password is required and must be at least 6 characters long.
</div>
}
</div>
<button class="btn" type="submit" [disabled]="userForm.invalid">Submit</button>
</form>
<router-outlet />
app.ts
Step 2: Add the below code inside component class −
import { CommonModule } from '@angular/common';
import { Component, signal } from '@angular/core';
import { FormsModule } from '@angular/forms';
import { RouterOutlet } from '@angular/router';
@Component({
selector: 'app-root',
imports: [RouterOutlet, FormsModule, CommonModule],
templateUrl: './app.html',
styleUrl: './app.css'
})
export class App {
protected readonly title = signal('nestedApplication');
user = {
email: '',
password: ''
};
onSubmit(form: any) {
if (form.valid) {
console.log('Form Submitted!', this.user);
}
}
}
Step 3: Add some CSS −
app.css
.input-box {
margin: 10px;
padding: 5px 15px;
border-color: rgb(103, 220, 181);
}
.btn {
padding: 5px 15px;
color: white;
font-weight: bold;
background-color: rgb(103, 220, 181);
}
p {
font-weight: bold;
margin-top: 10px;
}
.error {
color: red;
font-size: 12px;
}
input.ng-touched.ng-invalid {
border-color: red;
}
input.ng-touched.ng-valid {
border-color: green;
}
button {
margin-top: 10px;
}
Output
On running the application, you will get the following output −
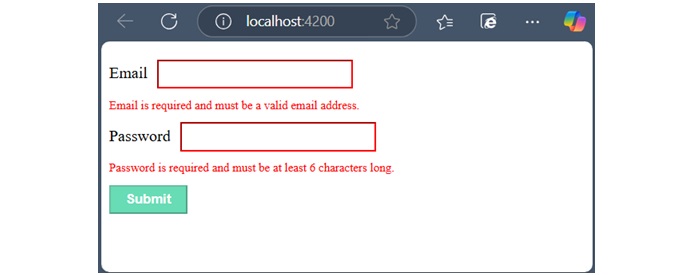
Example - Validation in Angular Reactive Forms
In Angular Reactive Forms, form validation is handled within component class using the FormControl, FormGroup, and FormArray classes, along with built-in or custom validators.
In the below example, we will see how to apply validation in Reactive Form.
Step 1: Add the below code inside Template file −
app.html
<form [formGroup]="loginForm" (ngSubmit)="onSubmit()">
<div>
<label for="email">Email</label>
<input class="input-box" type="email" id="email" formControlName="email">
@if(loginForm.controls['email'].invalid && loginForm.controls['email'].touched){
<div class="error">
Email is required and must be a valid email address.
</div>
}
</div>
<div>
<label for="password">Password</label>
<input class="input-box" type="password" id="password" formControlName="password">
@if(loginForm.controls['password'].invalid && loginForm.controls['password'].touched) {
<div class="error">
Password is required and must be at least 6 characters long.
</div>
}
</div>
<button class="btn" type="submit" [disabled]="loginForm.invalid">Submit</button>
</form>
<router-outlet />
Step 2: Add the below code inside component class −
app.ts
import { CommonModule } from '@angular/common';
import { Component, signal } from '@angular/core';
import { FormControl, FormGroup, ReactiveFormsModule, Validators } from '@angular/forms';
import { RouterOutlet } from '@angular/router';
@Component({
selector: 'app-root',
imports: [RouterOutlet, ReactiveFormsModule, CommonModule],
templateUrl: './app.html',
styleUrl: './app.css'
})
export class App {
protected readonly title = signal('nestedApplication');
loginForm: FormGroup;
constructor() {
this.loginForm = new FormGroup({
email: new FormControl('', [Validators.required, Validators.email]),
password: new FormControl('', [Validators.required, Validators.minLength(6)]),
});
}
onSubmit() {
if (this.loginForm.valid) {
console.log('Form Submitted!', this.loginForm.value);
} else {
console.log('Form is not valid');
}
}
}
Output
When you run the application, following response will be displayed −
Angular - Dynamic Forms
What is a Dynamic Form?
A form generated or modified at the run time based on the application state or user interaction is called a dynamic form. It makes the forms adaptable to changes in data model. For example, if a user selects a country, the form could dynamically adjust to show additional fields like postal code, state, or country code.
In Angular, Forms are a way of collecting input data from users and it helps them to interact with the application. In this tutorial, we will learn how to create a dynamic forms in Angular.
Need for Dynamic Forms
In Angular, dynamic forms are needed for several reasons which are as follows −
- They allow developers to tailor the form fields to the needs of individual users.
- Dynamic forms are also needed when input fields are required for data input without prior knowledge. Scenarios like questionnaires where the questions vary based on previous answers.
- You can hide, show, or validate certain form controls depending on previous answers or user input.
- Last but not least, the use case of dynamic form is that instead of having multiple forms for different cases, we can create a dynamic form to handle various scenarios by adjusting its layout and fields according to the changes in the data model.
Creating Dynamic Form in Angular
The dynamic form in Angular is based on Reactive Forms. To create a dynamic form in Angular, follow the steps given below −
Step 1: Install Angular CLI and create a new Angular project.
Step 2: Import the ReactiveFormsModule and define a data model for form controls inside the Component.
Step 3: Now, write logic for creating dynamic form controls within the same Component.
Step 4: In the end, render the dynamic form in the Template.
Working Example
In this example, we are going to create a Reactive Form. The form will generate a country code field dynamically when user select the country.
Step 1: Create a new Angular project. We have named it dynamic-form.
ng new dynamic-form
Step 2: Open the app.ts file. Import the necessary package, define a data model and code to generate form controls.
app.ts
import { CommonModule } from '@angular/common';
import { Component, signal } from '@angular/core';
import { FormBuilder, FormControl, FormGroup, ReactiveFormsModule, Validators } from '@angular/forms';
import { RouterOutlet } from '@angular/router';
interface Field {
type: string,
name: string,
label: string,
value: string,
required: boolean,
options?: string[]
}
@Component({
selector: 'app-root',
imports: [RouterOutlet, ReactiveFormsModule, CommonModule],
templateUrl: './app.html',
styleUrl: './app.css'
})
export class App {
protected readonly title = signal('dynamic-form');
dynamicForm: FormGroup = new FormGroup({});
fields: Field[] = [
{ type: 'text', name: 'firstName', label: 'First Name: ', value: '', required: true },
{ type: 'text', name: 'lastName', label: 'Last Name: ', value: '', required: true },
{ type: 'email', name: 'email', label: 'Email: ', value: '', required: true },
{ type: 'select', name: 'country', label: 'Country: ', value: '', required: true, options: ['USA', 'India', 'Israel'] }
];
constructor(private fb: FormBuilder) {}
ngOnInit() {
this.createForm();
this.onCountryChange();
}
createForm() {
const group: Record<string, any> = {};
this.fields.forEach(field => {
if (field.type === 'select') {
group[field.name] = [field.value, field.required ? Validators.required : []];
} else {
group[field.name] = [field.value, field.required ? Validators.required : []];
}
});
// Adding country-specific fields initially
group['countryCode'] = [''];
group['phoneNumber'] = [''];
this.dynamicForm = this.fb.group(group);
}
onCountryChange() {
this.dynamicForm.get('country')?.valueChanges.subscribe(country => {
// to modify the countryCode and phoneNumber fields
if (country === 'USA') {
this.dynamicForm.get('countryCode')?.setValue('+1');
} else if (country === 'India') {
this.dynamicForm.get('countryCode')?.setValue('+91');
} else if (country === 'Israel') {
this.dynamicForm.get('countryCode')?.setValue('+972');
} else {
this.dynamicForm.get('countryCode')?.setValue('');
}
});
}
onSubmit() {
console.log(this.dynamicForm.value);
}
}
Step 3: Open the app.html file and add the following code:
app.html
<div class="container">
<form [formGroup]="dynamicForm" (ngSubmit)="onSubmit()">
@for(field of fields; track $index){
<div class="form-group">
<label [for]="field.name">{{ field.label }}</label>
@switch (field.type) {
@case ('text') {
<input type="text" class="form-control" [formControlName]="field.name" [id]="field.name" />
}
@case('email'){
<input type="email" class="form-control" [formControlName]="field.name" [id]="field.name" />
}
@case('select'){
<select class="form-control" [formControlName]="field.name" [id]="field.name">
@for (option of field.options; track $index) {
<option [value]="option">{{ option }}</option>
}
</select>
}
}
@if(dynamicForm.get(field.name)?.invalid && (dynamicForm.get(field.name)?.touched || dynamicForm.get(field.name)?.dirty)){
<div>
<small class="text-danger">This field is required</small>
</div>
}
</div>
}
<!-- To show country code and phone number at runtime -->
@if (dynamicForm.get('country')?.value) {
<div class="form-group" *ngIf="">
<label for="countryCode">Country Code:</label>
<div class="dynamic-container">
<input type="text" class="c-code" [formControlName]="'countryCode'" id="countryCode" readonly />
<input type="text" class="phone-field" [formControlName]="'phoneNumber'" id="phoneNumber" placeholder="Phone Number" />
</div>
</div>
}
<button type="submit" class="btn btn-primary" [disabled]="dynamicForm.invalid">Submit</button>
</form>
</div>
<router-outlet />
Step 4: Add some CSS:
app.ts
.container {
margin-top: 20px;
width: 80%;
margin-left: 20px;
}
.form-group {
margin-bottom: 15px;
padding: 10px;
}
.form-group label {
font-weight: bold;
margin-right: 10px;
}
.form-row {
display: flex;
justify-content: space-between;
gap: 20px;
}
.form-group.col-md-6 {
flex: 1;
}
.dynamic-container {
display: flex;
justify-content: flex-start;
gap: 10px;
}
.c-code {
width: 30px;
}
button {
margin-top: 10px;
padding: 8px 16px;
}
Now, run the code using ng serve command. You will see the following result −

Angular - Dependency Injection
What is Dependency Injection?
Dependency Injection (in short, DI) is a design pattern in which a class receives its dependencies from an external source instead of creating them itself. This approach helps applications achieve loose coupling and reduce tight coupling between different parts of the application. By injecting dependencies, applications become more flexible and adaptable to changes.
In Angular, dependency injection is used to inject services and other dependencies into components and other classes. Before understanding dependency injection in Angular, let's discuss its features and uses.
Features and Uses of Dependency Injection
Dependency injection is used because of the following reasons −
- DI decrease the tight coupling between classes and their dependencies.
- You create dependency once and reuse it according to the need in different parts of the application.
- DI helps in unit testing as configuration details are saved within configuration files and system can be reconfigured without recompiling.
- Using DI, lazy loading is implemented. Lazy loading is also a design pattern. In this design pattern, dependencies are created when they are required.
- With DI, the code become more testable, maintainable and reusable because the client classes do not need to know about the implementation process of dependencies.
Dependency Injection in Angular
In Angular, dependency injection is the feature of injecting services and values (like, strings and functions) into classes having Angular decorators. Angular uses providers to define how dependencies should be created, and injectors to manage the lifecycle of these dependencies. Services, components, directives, and pipes can all use DI to receive their dependencies.
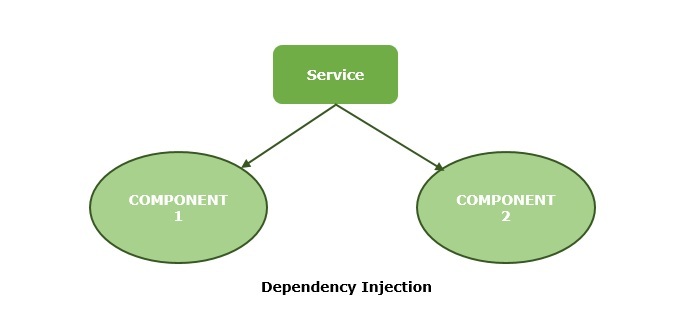
How Dependency Injection Works in Angular?
In Angular, when you declare a dependency in the Component's class constructor, Angular looks up the service in its dependency graph and injects it into the component automatically. Let's see how dependency injection works step by step −
Service Creation: First, define a service using the @Injectable decorator. Inside this decorator use providedIn and give it a value root which will provide the service at the root level (means whole application).
Injecting the Service: In the component's constructor, declare the service as a parameter. Angular will inject the required instance of the service automatically.
Usage: Once injected, you can use the service in your component or other classes.
Scope of the Service: By default, services provided in the root are singleton, which means only one instance is shared across the application. However, services can also be provided at different levels if you want different instances for different parts of the application.
Implementing Dependency Injection in Angular
In this section, we will see how to implement dependency injection in an Angular application with the help of an example.
Example - Usage of Dependency Injection
In the following example, we create an array of color names and then print it. The name of the colors will be printed using dependency injection.
Step 1: Create a service which is a class that holds the code to fetch data. This data will be shared across components within the application. Use the below command to create a service −
ng g s dataprovider CREATE src/app/dataprovider.spec.ts (367 bytes) CREATE src/app/dataprovider.ts (125 bytes)
You can give any name of your choice.
Step 2: Open the service file and add the code given below −
dataprovider.ts
import { Injectable } from '@angular/core';
@Injectable({
providedIn: 'root'
})
export class DataproviderService {
constructor() { }
getData() {
return ['Red', 'Orange', 'Violet', 'Yellow', 'Saffron'];
}
}
Step 3: Once you have created a service, inject it into any component that needs it by including it in the constructor as shown below. We are injecting it inside app component.
app.ts
import { Component, signal } from '@angular/core';
import { RouterOutlet } from '@angular/router';
import { Dataprovider } from './dataprovider';
@Component({
selector: 'app-root',
imports: [RouterOutlet],
templateUrl: './app.html',
styleUrl: './app.css'
})
export class App {
protected readonly title = signal('myApp');
color: string[];
constructor(private colorService: Dataprovider) {
this.color = this.colorService.getData();
}
}
Step 4: Now, add the following code inside template file.
app.html
<h2>Color Names</h2>
<p>Name of the colors: {{color}} </p>
<router-outlet />
Output
Step 5: Run the application using ng serve command to get the output.
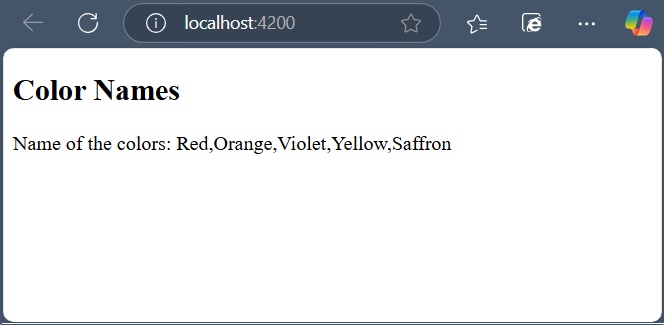
Angular - Injectable Service
Injectable Services in Angular
In Angular, an injectable service or simply service is a TypeScript class that can be used to share data or a common feature across different parts of your angular application. A service is defined using @injectable decorator. This decorator tells Angular that we can use instances of the service in dependency injection. In other words, it makes a service injectable.
Dependency injection is a design pattern that is used to inject services and other dependencies into angular components and other classes. In this design pattern, other parts of the application request service objects to perform some operation. The provideIn property of the @injectable decorator metadata specifies where in the angular application the service should be injected.
Creating an Injectable Service
There are two ways to create an injectable service. If you don't want a separate folder for services, use the following command in your IDE's terminal −
ng generate service service-name
The above command will create a service class directly in your Angular application without a separate folder, which can be a bit confusing.
When you want to create services inside a separate folder, use the command given below −
ng generate service Services/service-name
This command will create a Services folder and place the service class inside it. After executing the command, you will see a similar output as given below −
CREATE src/app/Services/service-name.spec.ts (389 bytes) CREATE src/app/Services/service-name.ts (147 bytes)
Injecting Service at Root Level
To inject a service at the root level, set the value of providedIn property to root. This property is used inside the @Injectable decorator. By default, the service is configured for injecting at the root level, which means a service is shared throughout the whole application.
Suppose we are creating a printName service, this will be the default configuration of the service −
import { Injectable } from '@angular/core';
@Injectable({
providedIn: 'root'
})
export class PrintName {
// some code...
constructor() { }
}
Injecting Service at Component Level
To inject a service in a particular component and its children only, omit the providedIn property in the service class and use the providers array of the specific component where you want to use it.
Service:
import { Injectable } from '@angular/core';
@Injectable({
})
export class PrintName {
// some code...
constructor() { }
}
Component:
@Component({
selector: 'app-my-component',
imports:[]
templateUrl: './my-component.html',
providers: [PrintName]
})
export class MyComponent {
// code
}
Injecting Service into Another Service
You can also inject a service into another service. This allows one service to depend on another service. In this type of dependency, Angular follow the same pattern as injecting into a component.
To do this, you simply add the service as a parameter in the constructor of the other service.
import { Injectable } from '@angular/core';
import { MyService } from './my-service'; // Make sure to import the service
@Injectable({
providedIn: 'root'
})
export class AnotherService {
constructor(private myService: MyService) {}
getAnotherData() {
return this.myService.getData();
}
}
Angular - Routing
What is Routing?
In web development, routing is a technique for navigating between different views or pages in a an application. It allows the application to determine which page to display based on the URL requested by the user.
Routing in Angular
In Angular, routing is used to develop a single-page applications (SPAs). Although, an SPA does not support multipage navigation, it allows navigation from one view (component) to another without reloading the entire page. You can define the routes for different components to navigate when the URL changes.
Below is the snippet of code of how routes are defined for different components:
routes = [
{path: 'home', component: HomeComponent},
{path: 'about', component: AboutComponent}
]
Here,
- routes: An array contains all the routes for different components.
- path: A path, which you can access on the URL to load the target component.
- component: A target component will be loaded when the path is active on the URL.
When you create a new application, an app.routes.ts file will automatically generated, where you can define these routes for navigation.
The diagram below will give you a clear understanding of how routing works in Angular when the user clicks on a link to navigate to a different component:

Types of routes in Angular
- Static routes: These are the simple routes that map a specific URL path to a component.
{path: 'path-name', component: component-name}
These routes are use parameters in the URL to dynamically load different entities of a components based on current paramter pased in URL:
{path: 'path-name/:parameter', component: component-name}
{path: '**', component: component-name}
{
path: 'parent-path', loadChildren:
[
{path: 'child-path1', component: component-name},
{path: 'child-path2', component: component-name}
]
}
Configure Routing in Angular
To configure a static (basic) routing in our Angular application, the Angular CLI (command line interface) provides comprehensive support for setting up routing both during the application creation process and while working on an existing application.
Let's create a new application with routing enabled using the command below:
ng new routing-app --routing
Even if you do not provide the --routing flag, the above command will generate a new file named app.routes.ts by default:
import { Routes } from '@angular/router';
export const routes: Routes = [];
Here,
Imports Routes from '@angular/router' package.
Routes provides functionality to configure and execute routing in the application.
Routes is the type used to setup the navigation rules.
Routes is the local variable (of type Routes) used to configure the actual navigation rules of the application.
Defining Routes
To define routes in your Angular application that redirect to different components when the URL changes, follow the steps below:
Step 1: Add your routes to your application
Open the app.routes.ts file and place the below code:
app.routes.ts
import { Routes } from '@angular/router';
import { HomeComponent } from './home/home.component';
import { AboutComponent } from './about/about.component';
export const routes: Routes = [
{path: 'home', component: HomeComponent},
{path: 'about', component: AboutComponent}
];
Here,
- home and about are paths that will be used in the URL to navigate to the "Home" and "About" components.
- HomeComponent and AboutComponent are the target component or destination.
- When the URL changes "/home" and "/about", the matched component will be called and rendered.
Adding routes in Configuration file
Make sure that the generated routes are added in the Configuration file (app.config.ts) otherwise, you might get an error:
app.config.ts
import { ApplicationConfig, provideBrowserGlobalErrorListeners } from '@angular/core';
import { provideRouter } from '@angular/router';
import { routes } from './app.routes';
export const appConfig: ApplicationConfig = {
providers: [
provideBrowserGlobalErrorListeners(),
provideRouter(routes)
]
};
Adding 'router-outlet' in root Component
To work with routing, you need to include the <router-outlet> directive in your root component (recommended to add in app.html.), where you want to display the loaded components.
Including the "router-outlet" directive in app.html:
<h1>Angular Routing</h1> <router-outlet></router-outlet>
Testing the Routing
To test the routing, run the application and try to navigate to "/home" and "/about" by changing the URL:

Using RouterLink for Navigation
Rather than changing the URL manually, you can use the RouterLink directive. The RouterLink directive is used to set a path for navigating between views or components in an Angular application.
Binding a specified path in app.routes.ts with an anchor element (<a>) to handle navigation when links are clicked:
<h1>Angular Routing</h1> <a routerLink="/home">Home</a><br> <a routerLink="/about">About</a> <router-outlet></router-outlet>
Include routerModule in app.ts
app.ts
import { Component, signal } from '@angular/core';
import { RouterModule, RouterOutlet } from '@angular/router';
@Component({
selector: 'app-root',
imports: [RouterOutlet, RouterModule],
templateUrl: './app.html',
styleUrl: './app.css'
})
export class App {
protected readonly title = signal('myApp');
}
The output will look like:
Here,
- routerLink set the route to be called using the path.
Note: Make sure that all the necessary modules and dependencies such as RouterOutlet, RouterLink, and CommonModule should be added to your root component.
Multiple Choice Questions (MCQ's):
Here we have mentioned a few MCQs to test your knowledge on the current concept:
Q 1 − What is the purpose of Angular Router?
A − To manage server-side routing.
B − To manage client-side navigation.
Answer : B
Explanation:
Angular Router is used to manage the client-side navigation. It enables developers to create Single Page Applications (SPA).
Q 2 − Which decorator is used to define routes in Angular?
Answer : D
Explanation:
In Angular, the @RouteConfig decorator is used to define route configurations in Angular.
Q 3 − How can you pass parameters in Angular routes?
Answer : C
Explanation:
You can pass parameters in Angular routes using both URL segments and query strings. For example, /user/:id for URL segments and /user?id=1 for query strings.
Q 4 − Which method is used to navigate between routes programmatically in Angular?
Answer : B
Explanation:
The Router.navigate() method is used to navigate between routes programmatically in Angular.
Q 5 − Which method is used to navigate between routes programmatically in Angular?
A − To display the default component.
B − To switch between different templates.
C − To act as a placeholder for dynamically loaded components based on the current route.
Answer : C
Explanation:
The RouterOutlet directive acts as a placeholder that marks where the router should display the component for the active route.
Angular - Dynamic Routes
This chapter will discuss, what is dynamic routes in Angular, including its syntax, usage and example of using in real-time Angular project.
Dynamic Routes in Angular
In Angular, dynamic routes are used to load a specific data or entity within a component based on the route parameters.
For example, in a streaming platform having multiple videos, the application could use dynamic routes to load each video within the VideosComponent by passing the video ID as a route parameter.
This way, each time a user navigates to a new video (e.g., /videos/:id), the corresponding video data is fetched and displayed dynamically.
Note: Dynamic routing refers to the overall technique or approach of implementing dynamic routes.
Syntax of Angular Dynamic Routes
Below is the syntax to create Dynamic Routes in Angular −
const routes: Routes = [
{ path: 'route-path/:parameterName', component: SomeComponent }
];
Here,
- route-path: This represents the name of the route path that will be used to access the current component.
- parameterName: The name of the parameter that you want to access, such as id.
- SomeComponent: The name of the component that should be loaded based on the current path and parameter.
The 'parameterName' can be accessed in the component using two techniques, which are:
- Using Observable.
- Using snapshot (non-observable option).
Using Observable
Angular provides a special interface named paramMap to access the parameters of the path (URL). parmaMap has the following methods −
has(name): Returns true if the specified name is available in the path (parameter list).
get(name): Returns the value of the specified name in the path (parameter list).
getAll(name): Returns the multiple value of the specified name in the path. The get() method returns only the first value when multiple values are available.
keys: Returns all parameters available in the path.
The Steps to access the parameter using paramMap are as follows −
Import paramMap available in @angular/router package.
Use paramMap in the ngOnInit() to access the parameter and set it to a local variable.
ngOnInit() {
this.route.paramMap.subscribe(params => {
this.parameterName = params.get('parameterName);
});
}
We can use it directly in the rest service using the pipe method.
this.item$ = this.route.paramMap.pipe(
switchMap(params => {
this.selectedId = Number(params.get('parameterName'));
return this.service.getItem(this.selectedId);
})
);
Using snapshot
The snapshot is similar to Observable, but it does not support observable and gets the parameter value immediately.
let id = this.route.snapshot.paramMap.get('parameterName');
Example - Usage of Angular Dynamic Routes
Below is a example of using the Dynamic Routes in a Angular project −
Step 1: Define Home Component
ng g c home CREATE src/app/home/home.spec.ts (540 bytes) CREATE src/app/home/home.ts (189 bytes) CREATE src/app/home/home.css (0 bytes) CREATE src/app/home/home.html (20 bytes)
Step 2: Define About Component
ng g c about CREATE src/app/about/about.spec.ts (547 bytes) CREATE src/app/about/about.ts (193 bytes) CREATE src/app/about/about.css (0 bytes) CREATE src/app/about/about.html (21 bytes)
Step 3: Define ViewItem Component
ng g c view-item CREATE src/app/view-item/view-item.spec.ts (569 bytes) CREATE src/app/view-item/view-item.ts (208 bytes) CREATE src/app/view-item/view-item.css (0 bytes) CREATE src/app/view-item/view-item.html (25 bytes)
Step 4: Define dynamic route
app.routes.ts
import { Routes } from '@angular/router';
import { Home } from './home/home';
import { About } from './about/about';
import { ViewItem } from './view-item/view-item';
export const routes: Routes = [
{path: 'home', component: Home},
{path: 'about', component: About},
{path: 'view/:id', component: ViewItem}
];
Step 5: Add your routes to your application
<h1>Angular Routing</h1> <a routerLink="/home">Home</a><br /> <a routerLink="/about">About</a><br /> <a routerLink="/view/1">View Item1</a><br /> <a routerLink="/view/2">View Item2</a><br /> <router-outlet></router-outlet>
Step 6: Include routerModule in app.ts
app.ts
import { Component, signal } from '@angular/core';
import { RouterModule, RouterOutlet } from '@angular/router';
@Component({
selector: 'app-root',
imports: [RouterOutlet, RouterModule],
templateUrl: './app.html',
styleUrl: './app.css'
})
export class App {
protected readonly title = signal('myApp');
}
Step 7: Access 'id' parameter in ViewItem Component
view-item.ts
import { Component, OnInit } from '@angular/core';
import { ActivatedRoute } from '@angular/router';
@Component({
selector: 'app-view-item',
imports: [],
templateUrl: './view-item.html',
styleUrl: './view-item.css',
})
export class ViewItem implements OnInit{
id: any;
constructor(private route: ActivatedRoute){}
ngOnInit(): void {
this.route.paramMap.subscribe(res=> {
this.id = res.get('id');
});
}
}
Step 8: Display the current Item based on it's id
view-item.html
<p>View item{{id}}</p>
Now run the application and see the output:

By observing the URL in the above GIF, you can clearly see that the items are loaded dynamically based on changes to their ID parameter in the routes.
Angular - Wildcard Routes
This chapter will discuss the Wildcard routes in Angular, including its syntax, usage and example of using in real-time angular project.
Wildcard Routes in Angular
In Angular, wildcard routes are used to match any path, whether it is valid or not. If the user navigates to an "invalid" or "undefined URL", you can use a wildcard route to catch that URL and navigate to a specified fallback component, such as Home, Login, or PageNotFound, depending on your application's needs.
Wildcard routes are defined using a double asterisk (**) symbols. This special route matches any URL that doesn't match any of the predefined routes in the route configuration.
Real-time Scenario
For example, if a user tries to access a path like /dashboard, which is not defined in the routes array, the wildcard route will match and can redirect them to a default or error component, such as a PageNotFound component.
Syntax of Angular Wildcard Routes
Below is the syntax to create a Angular Wildcard Routes −
const routes: Routes = [
{ path: '**', component: SomeComponent }
];
Here,
- **: The wildcard path that matches any URL, whether valid or invalid.
- SomeComponent: The component that will be rendered when the URL is invalid (e.g., Login, Home, or PageNotFound).
Example - Angular Wildcard Routes
Below is a example of using the Wildcard Routes in a Angular project −
Step 1: Create a pagenotfound component
ng g c page-not-found CREATE src/app/page-not-found/page-not-found.spec.ts (598 bytes) CREATE src/app/page-not-found/page-not-found.ts (227 bytes) CREATE src/app/page-not-found/page-not-found.css (0 bytes) CREATE src/app/page-not-found/page-not-found.html (30 bytes)
Step 2: Define wildcard route
import { Routes } from '@angular/router';
import { Home } from './home/home';
import { About } from './about/about';
import { ViewItem } from './view-item/view-item';
import { PageNotFound } from './page-not-found/page-not-found';
export const routes: Routes = [
{path: 'home', component: Home},
{path: 'about', component: About},
{path: 'view/:id', component: ViewItem},
{path: '**', component: PageNotFound}
];
Step 3: Add your routes to your application
<h1>Angular Routing</h1> <a routerLink="/home">Home</a><br /> <a routerLink="/about">About</a><br /> <a routerLink="/view/1">View Item1</a><br /> <a routerLink="/view/2">View Item2</a><br /> <router-outlet></router-outlet>
Now run the application and try to enter an invalid URL:

By observing the URL in the above GIF, you can see that whenever a user tries to access an invalid or undefined URL, it will automatically redirect to the "page not found" page.
Angular - Nested Routes
This chapter will discuss, what is Nested Routes and Nested Routing in Angular, including its syntax, usage and example of using in real-time angular project.
Nested Routes in Angular
In Angular, nested routes are used to define hierarchical routes for components. This technique allows you to load a specific child component only when its parent component is loaded.
For example, if you want to load all the items within the ItemsComponent, you can use a route like /items/item-lists/, where the "item-list" is nested within the "items routes".
When the <router-outlet> directive is used in a component other than the root component, it allows you to display child routes within that component, and those routes will be considered child routes of the parent component. This concept is known as nested routing, and it can be achieved by implementing nested routes.
Syntax of Angular Nested Routes
Below is the syntax to create Nested Routes in Angular −
const routes: Routes = [
{
path: 'parent',
component: ParentComponent,
children: [
{
path: 'child1',
component: Child1Component
},
{
path: 'child2',
component: Child2Component
}
]
}
];
Here,
- path: It specifies the URL segment for the route.
- component: It defines the component to be rendered for the route.
- children: An array of child routes nested under the parent route.
Note: The nested URL will be: "/parent/child1" and "/parent/child2".
Example - Angular Nested Routes
Below is a example of using the Nested Routes in a Angular project −
Step 1: Define Nested Routes for your application
app.routes.ts
import { Routes } from '@angular/router';
import { Home } from './home/home';
import { About } from './about/about';
import { ViewItem } from './view-item/view-item';
import { PageNotFound } from './page-not-found/page-not-found';
import { EditItem } from './edit-item/edit-item';
export const routes: Routes = [
{path: 'home', component: Home},
{path: 'about', component: About},
{path: 'item', children:[
{path: 'view/:id', component: ViewItem},
{path: 'edit/:id', component: EditItem},
]},
{path: '**', component: PageNotFound}
];
Step 2: Add your routes to your application
app.html
<h1>Angular Routing</h1> <a routerLink="/home">Home</a><br /> <a routerLink="/about">About</a><br /> Item1: <a routerLink="/item/view/1">View Item1</a> <a routerLink="item/edit/1">Edit Item1</a><br /> Item2: <a routerLink="item/view/2">View Item2</a> <a routerLink="item/edit/2">Edit Item2</a><br /> <router-outlet></router-outlet>
Step 3: Access 'id' parameter in ViewItem Component and EditItem Component
view-item.ts
import { Component, OnInit } from '@angular/core';
import { ActivatedRoute, RouterOutlet } from '@angular/router';
@Component({
selector: 'app-view-item',
imports: [],
templateUrl: './view-item.html',
styleUrl: './view-item.css',
})
export class ViewItem implements OnInit{
id: any;
constructor(private route: ActivatedRoute){}
ngOnInit(): void {
this.route.paramMap.subscribe(res=>{
this.id = res.get('id');
});
}
}
edit-item.ts
import { Component, OnInit } from '@angular/core';
import { ActivatedRoute, RouterOutlet } from '@angular/router';
@Component({
selector: 'app-edit-item',
imports: [],
templateUrl: './edit-item.html',
styleUrl: './edit-item.css',
})
export class EditItem implements OnInit{
id: any;
constructor(private route: ActivatedRoute){}
ngOnInit(): void {
this.route.paramMap.subscribe(res=>{
this.id = res.get('id');
});
}
}
Output
Now run the application and see the output:

By observing the URL in the above GIF, you can clearly see that the View and Edit components are only loaded when the Item route is activated. In the context of Angular, the child components (View and Edit) are rendered only within the parent Item route.
Angular - Navigation
What is Navigation?
Navigation in web applications refers to the process of moving (navigating) through different pages or views within an application. It allows users to interact with various components, access different sections, and use application features.
Let's consider a simple login page in an application. On this login page, users can see links for Sign Up and Forgot Password. These links allow users to navigate to the Sign-Up and Forgot Password sections or components.
Navigation in Angular
In Angular, navigation is a feature that allows users to move between different sections or components within an application. This can be done by defining routing for an individual click requests without using the routerLink directive from the RouterModule.
In this chapter, we will discuss how to manually set the navigation without using the routerLink directive. In Angular, the router service provides the navigate() method to programmatically navigate to different routes within the application.
Example - Setting Navigation Manually
To manually set navigation and navigate through different components in Angular, follow these steps:
Step 1: Open the node.js command or terminal in your IDE (such as VS code) and go to your favorite workspace as follows:
cd /go/to/your/favorite/workspace
Step 2: Install CLI and create a new application using the command below:
npm install @angular/cli ng new myApp
Step 3: Now, navigate to your newly created application as follows:
cd myApp
Step 4: Open theapp.htmlfile and remove everything leaving only the following:
<router-outlet></router-outlet>
Step 5: Run the application using the below command to ensure that the application is created successfully:
ng serve
Step 6: Create two components using the command below:
ng g c product CREATE src/app/product/product.spec.ts (561 bytes) CREATE src/app/product/product.ts (201 bytes) CREATE src/app/product/product.css (0 bytes) CREATE src/app/product/product.html (23 bytes) ng g c inventory CREATE src/app/inventory/inventory.spec.ts (575 bytes) CREATE src/app/inventory/inventory.ts (209 bytes) CREATE src/app/inventory/inventory.css (0 bytes) CREATE src/app/inventory/inventory.html (25 bytes)
Step 7: Open the app.html file and place the below code:
app.html
<h1>Welcome to Angular Application</h1>
<button (click)="open('product')">Go to Product</button>
<button (click)="open('inventory')">Go to Inventory</button>
<router-outlet></router-outlet>
Step 8: Open the app.ts file and place the below code:
app.ts
import { CommonModule } from '@angular/common';
import { Component, signal } from '@angular/core';
import { Router, RouterModule, RouterOutlet } from '@angular/router';
@Component({
selector: 'app-root',
imports: [RouterOutlet, CommonModule, RouterModule],
templateUrl: './app.html',
styleUrl: './app.css'
})
export class App {
protected readonly title = signal('myApp');
constructor(private router: Router){}
open(data: any){
if(data === "product"){
//here used navigate() to set navigation manually
this.router.navigate(["/product"]);
}
else if(data === "inventory"){
this.router.navigate(["/inventory"]);
}
}
}
Step 9: Now open the app.routes.ts file and place the code below:
app.routes.ts
import { Routes } from '@angular/router';
import { Product } from './product/product';
import { Inventory } from './inventory/inventory';
export const routes: Routes = [
{path: 'product', component: Product},
{path: 'inventory', component: Inventory}
];
Step 10: Finally, run the application using the following command:
ng serve
Output
Step 11: Navigate to http://localhost:4200/ in your browser to see the first view of the application as follows:
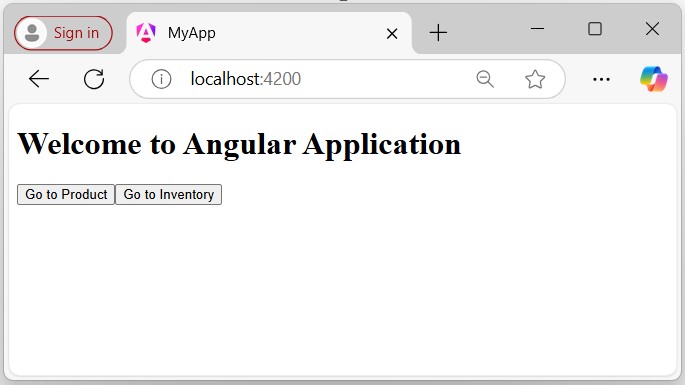
Click the Go to Inventory button to navigate the Inventory Page as follows:
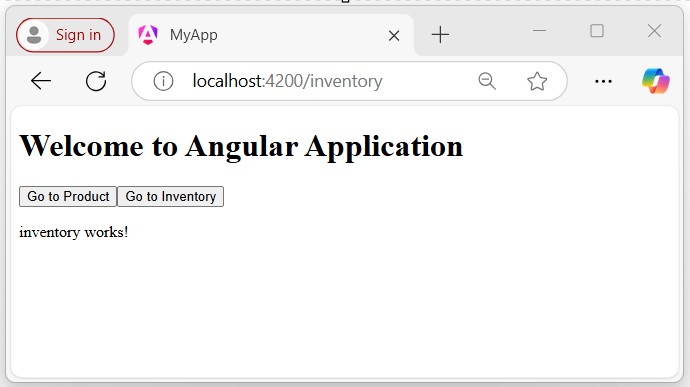
Click the Go to Product button, you will get the following output which takes you to the Products page.
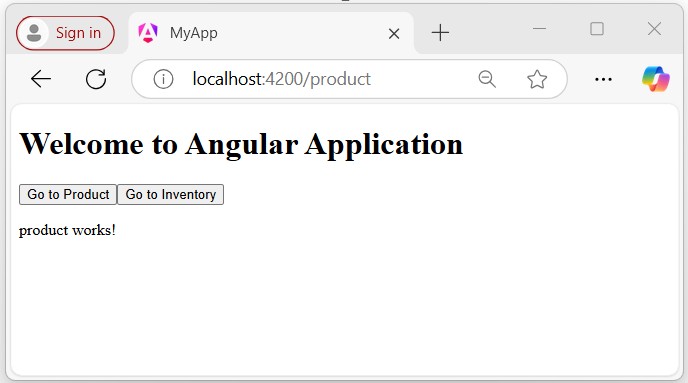
Multiple Choice Questions (MCQ's):
Here we have mentioned a few MCQs to test your knowledge on the current concept:
Q 1 − What is the default behavior of Angular Router when an unknown URL is accessed?
Answer : B
Explanation:
By default, Angular Router displays a 404 page when an unknown URL is accessed.
Q 2 − Which Angular module is used to configure the routing in an Angular application?
Answer : C
Explanation:
The RouterModule is used to configure the routing in an Angular application.
Q 3 − Which method is used to get the current route parameters in Angular?
A − this.route.snapshot.params
Answer : A
Explanation:
The this.route.snapshot.params method is used to get the current route parameters in Angular.
Angular - Routing in Single Page Application
This tutorial (chapter) describes, how to build a single-page application (SPA). A angular application that uses the multiple routes to make it SPA.
What is Single-Page Application?
A single-page Application (SPA) is a web application or website that interacts with the user by dynamically rewriting the current page rather than loading entire new pages from the server. The routing features in Angular allow developers to develop and design a single-page application.
Example - Create a Sample Application
Let's create a sample Angular application with two different components to demonstrate how to achieve a single-page application (SPA) by setting up routing.
We will use the Angular CLI to create a new sample angular application. Use the following steps to create a new application:
Step 1: Open the node.js command or IDE's terminal (such as VS code) and go to your favorite workspace as follows:
cd /go/to/your/favorite/workspace
Step 2: Install the Angular CLI using the following command (see more):
install @angular/cli or for latest version install @angular/cli@latest
Step 3: Create a new angular application as follows(see more):
ng new mySPA
Enable the stylesheet by choosing the following option:
? Which stylesheet format would you like to use? (Use arrow keys) ->CSS SCSS [ https://sass-lang.com/documentation/syntax#scss ] Sass [ https://sass-lang.com/documentation/syntax#the-indented-syntax ] Less [ http://lesscss.org ]
When prompted with Do you want to enable Server-Side Rendering, select No.
Now go to your newly created application using the cd mySPA command.
Step 4: Create a component with the name Home as follows:
ng generate component Home
In your IDE (code editor), locate the file,home.html, and replace the placeholder content with the following HTML code:
home.html
<h3>Welcome to Home</h3> <p>All content will be visible here...</p>
Step 5: Create a component with the name Contact as follows:
ng generate component Contact
In your IDE (code editor), locate the file,contact.html, and replace the placeholder content with the following HTML code:
contact.html
<h3>Welcome to Contact</h3> <p>You can contact us here..</p>
Step 6: Now, in your code editor open the app.html file and replace its code with as follows:
app.html
<h1>Angular Router Sample Application</h1> ... <app-home></app-home> <app-contact></app-contact>
Output
Step 7: Verify that your newly created application runs as expected by running the following command:
ng serve
Step 8: Open the browser and navigate to localhost:4200.
You should see a single web page, consisting of a title and the HTML of your two components.
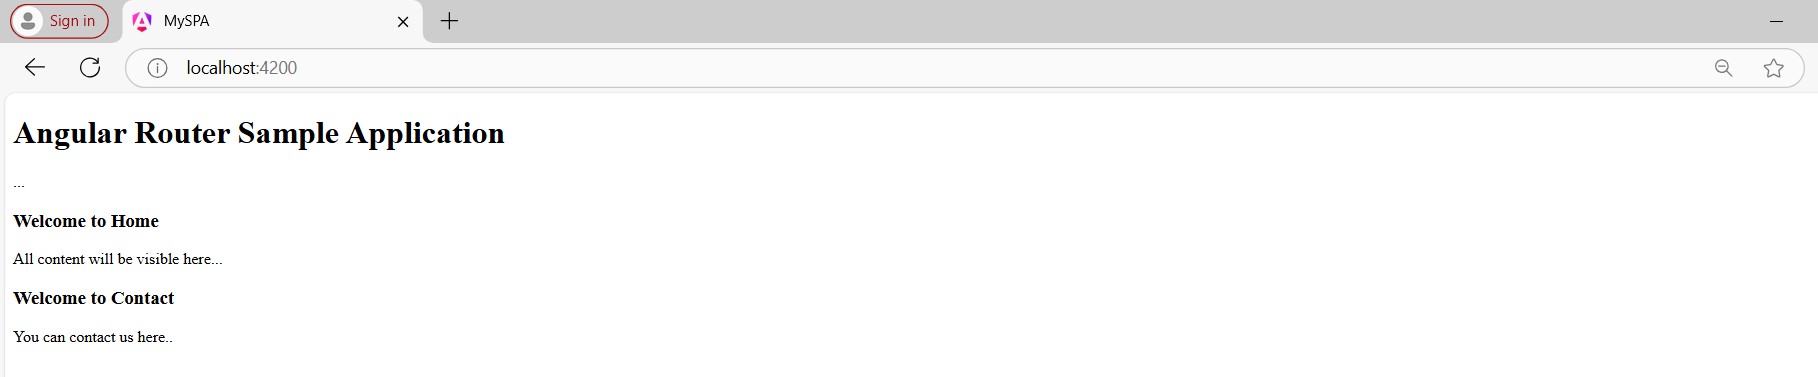
Example - Define Routes
In this section, we will define two routes as follows:
- The router /home will open the Home Component.
- The router /contact will open the Contact Component.
In Angular, a route defines the path for different sections (components). Each route has two properties. The first property,path, is a string that specifies the URL path for the route. The second property,component, is a string that specifies what component your application should display for that path.
Step 1: In your IDE, open the app.routes.ts file (create it manually, if does not exist) as follows:
import { Routes } from '@angular/router';
export const routes: Routes = [];
Step 2: Add routes for the two-component you have created:
app.routes.ts
import { Routes } from '@angular/router';
import { Home } from './home/home';
import { Contact } from './contact/contact';
export const routes: Routes = [
{path: 'home', component: HomeComponent},
{path: 'contact', component: ContactComponent}
];
This routes list is an array of objects (i.e., JavaScript objects), with each object defining the properties (path and component) of a route.
Import provideRouter
To add this functionality to your sample application, you need to update theapp.config.tsfile to use the router providers function,and import provideRouter as follows:
import { ApplicationConfig, provideBrowserGlobalErrorListeners } from '@angular/core';
import { provideRouter } from '@angular/router';
import { routes } from './app.routes';
export const appConfig: ApplicationConfig = {
providers: [
provideBrowserGlobalErrorListeners(),
provideRouter(routes)
]
};
Note: For@NgModule-based applications (i.e., older version), put theprovideRouterin the provider'slist of the AppModule (i.e., app.module.ts) or wherever the module is passed to bootstrapModule in the application.
Update the Component with router-outlet
To ensure that your defined routes work and dynamically load components based on the URL, you need to update your app.component.html file with the router-outlet directive. This directive acts as a placeholder for the routed components to be displayed.
Step 1: In your code editor, open the app.html file and delete the following
<h1>Angular Router Sample Application</h1> ... <app-home></app-crisis-list> <app-contact></app-heroes-list>
app.html
Step 2: Add the router-outlet directive to your app.html file:
<router-outlet></router-outlet>
Step 3: Import the RouterOutlet in your app.ts file as follows:
app.ts
import { Component } from '@angular/core';
import { CommonModule } from '@angular/common';
import { RouterOutlet } from '@angular/router';
import { Home } from './home/home';
import { Contact } from './contact/contact';
@Component({
selector: 'app-root',
imports: [CommonModule, RouterOutlet, Home, Contact],
templateUrl: './app.html',
styleUrl: './app.css'
})
export class AppComponent {
title = 'mySPA';
}
Output
Look at your updated application in your browser. To view the Home component, add /home to the end of the http://localhost:4200 URL:
http://localhost:4200/home
You can notice that thehomecomponent is displayed. Angular is using the route you defined to dynamically load the component. You can load theContact in the same way:
http://localhost:4200/contact
Example - Controlling Navigation with Template
Example - Controlling Navigation with Template
The application we have developed supports two routes. However, the only way for the user to navigate between different components is by manually changing the URL.
In this tutorial section, we will learn how to navigate through the different components without changing the URL manually.
We will create two links that users can click to navigate between the Home and Contact components. We will add some CSS to these links that will give more clarity about the currently loaded page.
Step 1: Open the app.html file and add the below code:
<nav>
<a routerLink="/home" class="my-link">Home</a>
<a routerLink="/contact" class="my-link">Contact</a>
</nav>
<div class="load">
<router-outlet></router-outlet>
</div>
Step 2: Open the app.css file and add the code below:
app.css
nav{
padding: 20px 0px;
border-bottom: 1px solid black;
}
nav .my-link{
margin: 10px 10px;
position: relative;
top: 5px;
text-decoration: none;
background-color: rgb(39, 110, 55);
color: white;
padding: 10px 30px;
border-radius: 10px;
border: 1px solid black;
box-shadow: 0px 5px 15px rgba(0, 0, 0, 0.35);
}
.load{
margin: 30px 0px;
}
Output
If you view your application in the browser, you should see these two links. When you click on a link, the corresponding component will load dynamically:

Example - Adding a Redirect
In this section of the tutorial, we will add a route that redirects you to the /home component directly when you navigate to http://localhost:4200.
Step 1: In your code editor open the app.route.ts file.
Step 2: Update the existing code with the following:
app.routes.ts
import { Routes } from '@angular/router';
import { Home } from './home/home';
import { Contact } from './contact/contact';
export const routes: Routes = [
{path: '', redirectTo: 'home', pathMatch: 'full'},
{path: 'home', component: Home},
{path: 'contact', component: Contact}
];
As you can see, we have added new routes with an empty path (''). In addition, it replaces the component property with two new properties as follows:
- redirectTo: This property instructs Angular to redirect from an empty ('') path to the 'home' path.
- pathMatch: This property instructs Angular on how much of the URL to match. If you keep it as a "full",it will match the entire path.
Output
Note: Now, when you open your application (navigate on browser localhost:4200), it displays the Home component by default as follows:

Example - Adding 404 page
A user can try to access a route that you have not defined. To acknowledge this behavior, the best practice is to display a 404 page. In this section, we'll create a 404 page (component) and update our route configuration to show that page for any unspecified routes.
Step 1: From your code editor terminal, create a new component with the name pageNotFound as follows:
ng generate component page-not-found
Step 2: In your code editor, open the page-not-found.html file and replace its contents with the following HTML code:
<h2>Page Not Found</h2> <p>The page you looking for, we could not found....!!!</p>
Step 3: Open the app.routes.ts file and add the following route to the routes list at the end (if not other routes will not work properly):
{path: '**', component: PageNotFoundComponent}
The new route uses a path as "**". This path is how Angular identifies a wildcard route. Any route that does not match an existing route in your configuration will use this route in the application.
Make sure that the wildcard route (**) is placed at the end of the array. The order of your routes is important, as Angular applies routes in order and uses the first match it finds; otherwise, the routes will not work properly.
Output
Now, try to navigate the non-existing route, for example, localhost:4200/about, it will redirect you to the page-not-found component, as the "/about" route does not match with any defined routes in your app.routes.ts file.
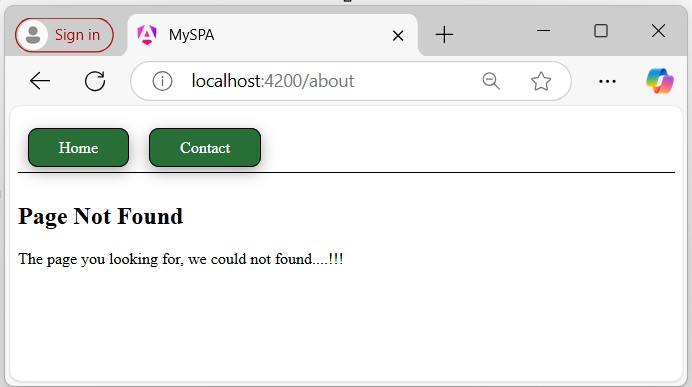
Multiple Choice Questions (MCQ's):
Here we have mentioned a few MCQs to test your knowledge on the current concept:
Q 1 − What is a Single-Page Application (SPA) in Angular?
B − A web application that loads multiple HTML pages for each route.
C − A web application that uses server-side rendering for each request.
Answer : A
Explanation:
A Single-Page Application (SPA) in Angular loads a single HTML page and dynamically updates the content as the user interacts with the application.
Q 2 − Which method is commonly used to define routes in an Angular SPA?
Answer : B
Explanation:
The RouterModule.forRoot() method is used to define routes in an Angular SPA.
Q 3 − What is the role of the RouterLink directive in Angular?
Answer : C
Explanation:
The RouterLink directive is used to define navigation paths within the application.
Angular - Custom Route Matches
What is Custom Route Matches?
In Angular, the custom route matches allow you to define a "specific condition" under which certain routes are matched. This is useful while controlling the application navigation when the URLs are more complicated.
Creating Custom Route Matches
The router in Angular supports a powerful matching strategy that you can use to help users navigate various sections in your application. This matching strategy supports static routes, variable routes with parameters (i.e., /:parameter), wildcard routes (i.e., **), and so on. Also, you can build your own custom pattern matching for situations in which the URLs are more complicated.
In this chapter, we will build a custom route matcher using AngularUrlMatcher. In Angular, UrlMatcher is a "function" used to define custom URL-matching logic for routes.
Let's create a sample Angular application to perform the creation of the custom router matcher.
Creating a Sample Application
We will use the Angular CLI to create a new sample application named angular-custom-route. In addition to the application creation, we will create a dashboard component.
Note: Make sure the Angular CLI is installed;if not,see this.
Step 1: Create a new Angular project, angular-custom-route as follows:
ng new angular-custom-route
Once you enter or write the above command in your IDE's terminal or node.js command prompt, it will ask a few questions as follows:
- ? Which stylesheet format would you like to use?, select CSS
- Do you want to enable Server-Side Rendering (SSR) and Static Site Generation (SSG/Prerendering)?, select N
After a few seconds, your new Angular project will be ready; you can see it in your code editor with the name angular-custom-route.
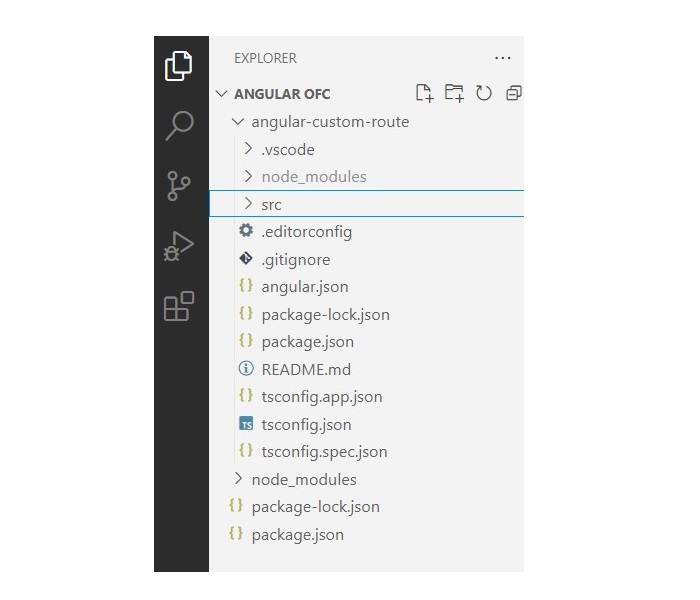
Step 2: From your IDE terminal navigate to your application directory as follows:
cd angular-custom-route
Step 3: Create a component with the name dashboard as follows:
ng generate component dashboard CREATE src/app/dashboard/dashboard.spec.ts (575 bytes) CREATE src/app/dashboard/dashboard.ts (209 bytes) CREATE src/app/dashboard/dashboard.css (0 bytes) CREATE src/app/dashboard/dashboard.html (25 bytes)
Step 4: In your code editor open the dashboard.html file and replace the below HTML code:
dashboard.html
<h3>Welcome to Dashboard</h3>
<p>Hello {{ dashboard }}!</p>
Step 5: In your code editor locate the app.html file, and replace the below code with:
app.html
<h3>Routing with Custom Matching</h3> Navigate to <a routerLink="/@Dashboard">my dashboard</a> <router-outlet></router-outlet>
Configure Routes for your Application
Next, you need to add routing capabilities to theapp.config.tsfile. As a part of this process, we will create a custom URL matcher that looks for a Twitter handle in the URL. This handle is identified by a preceding@symbol.
Step 1: In your IDE (code editor) open the app.config.ts file.
Step 2: Add the following import statements:
import { provideRouter, withComponentInputBinding } from '@angular/router';
import {routes} from './app.routes';
Step 3: In the given array, add the provideRouter(routes, withComponentInputBinding()) statement as follows:
app.routes.ts
import { ApplicationConfig, provideBrowserGlobalErrorListeners } from '@angular/core';
import { provideRouter, withComponentInputBinding } from '@angular/router';
import { routes } from './app.routes';
export const appConfig: ApplicationConfig = {
providers: [
provideBrowserGlobalErrorListeners(),
provideRouter(routes, withComponentInputBinding())
]
};
Step 4: Now, open the app.routes.ts file and define the "custom route matcher" as follows:
app.routes.ts
import { Routes, UrlSegment } from '@angular/router';
import { Dashboard } from './dashboard/dashboard';
export const routes: Routes = [
{
matcher: (url) =>{
if(url.length === 1 && url[0].path.match(/^@[\w]+$/gm)){
return {
consumed: url,
posParams: {
dashboard: new UrlSegment(url[0].path.slice(1), {})}};
}
else{
return null;
}
},
component: Dashboard
}
];
As we know the custom matcher is a function which is performed the following tasks as follws:
- Thematcherverifies that the array contains only "one" element.
- The matcher uses a regular expression to ensure that the format of the "dashboard" is a match.
- If there is a match found, the function returns the "entire URL", defining a dashboard route parameter as a substring of the path.
- If there is no match found, the function returns null, and the router continues to "look for other routes" that match the URL.
Reading the Route Parameters
As we created a link in our app.html file to redirect to the dashboard component, now we will bind the route parameter with the Dashboard component.
Step 1: Open the dashboard.ts file in your code editor and create an Input matching the dashboard parameter.
Note: As we imported withComponentInputBinding in our provideRouter. It will allow the Router to bind information directly to the route components.
import { Component, Input } from '@angular/core';
@Component({
selector: 'app-dashboard',
imports: [],
templateUrl: './dashboard.html',
styleUrl: './dashboard.css'
})
export class Dashboard {
@Input() dashboard!: string;
}
Step 2: Now run your application to check your custom URL matcher as follows:
ng serve
The output is as follows:
Angular - Router Reference
This angular chapter will "highlight" (cover) the core or important routing concepts starting from the basic as follows:
- Router Imports
- Configuration
- Router Outlet
- Router Links
- Active Router Links
- Router State
- Activated Route
- Router Events
- Router Terminology
- MCQ's
Router Imports
In Angular, the Router is an optional feature or a service that represents a particular component (section) view for the given URL. For example, the URL localhost:4200/dashboard will represent the DashboardComponent.
However it is not a part of the Angular core, but it has its own library package;@angualr/router. In case to use it as another angular package you need to import it as follows:
import { provideRouter } from '@angular/router';
Also, add it in the "providers array" as well located in the app.config.ts file:
providers: [provideRouter(routes)]
Configuration
An Angular application with routing has a single instance of the Router service. When the browser URL changes, the router searches for a matching Route to determine the component to display.
A router has no routes until we configure it, which means we must define the paths. The following example defines five different routes, and configures them via the provideRouter method, and adds the routes to the routes array in the app.routes.ts file:
app.routes.ts
import { Routes, UrlSegment } from '@angular/router';
import { View } from './view/view';
import { Dashboard } from './dashboard/dashboard';
import { Profile } from './profile/profile';
import { PageNotFound } from './page-not-found/page-not-found';
export const routes: Routes = [
{path: 'dashboard', component: Dashboard},
{path: 'view/:id', component: View},
{
path: 'profile', component: Profile,
data: {title: 'User Profile'}},
{path: '', redirectTo: '/dashboard', pathMatch: 'full'},
{path: "**", component: PageNotFound}
];
The above routes array contains multiple routes for the application to navigate through various components when the user interacts. Let's explain them one by one:
- In the above routes array, each Route maps a URL path to a component. There are no leading slashes in the path.
- The :id in the second route is a token for the route parameter. This is used whenever you want to view specific details (such as user or customer details). For example, in the URL localhost:4200/user/view/10, the value of the id parameter is 10.
- The data property in the third route is a place to store arbitrary data associated with this specific route. It is used to store items such as "titles", "static" "data", etc.
- The empty path (path: ' ') in the fourth route represents the default path for the application. It is the "place to go" when the path in the URL is empty at the start. It redirects to the /dashboard and later navigates to the Dashboard component.
- In the last route, path: "**" (known as a wildcard route), it redirects to PageNotFound when an incorrect URL is entered in the browser, such as localhost:4200/wrongurl. It should always be defined at the end of the routes.
Router Outlet
In Angular, the RouterOutlet is a directive that belongs to the router library, but it is used as a component. It is commonly placed in the root component (app.component.html) to make a "spot or a location" where the router should display the loaded component.
If the router-outlet is not used, the routing will not work until you use the selector (e.g., selector: 'app-dashboard') of a component in the root component.
This means that without the router-outlet, you need to directly place the "component's selector" in the root component to ensure it is displayed.
<router-outlet></router-outlet>
When the browser URL for an application requests /dashboard, this path will match the router path "/dashboard" and display the DashboardComponent as a "sibling" element of the RouterOutlet.
Router Links
To navigate users from one component to another, Angular uses the routerLinkdirective, which is used to set the path for a specific route. This directive binds a URL path to a clickable element, like a button or a link, allowing navigation within your Angular application.
<h3>Angular RouterLink</h3> <nav> <a routerLink="/home">Home</a> <a routerLink="/about">About</a> </nav> <router-outlet></router-outlet>
The routerLink directive in the anchor (<a>) element gives control over that element.
Active Router Links
The RouterLinkActive is a directive that toggles (adds or removes) CSS classes for the active RouterLink based on the current RouterState or when the link is active.
You may see the property binding on each anchor tag to the RouterLinkActive as follows:
<a routerLink = "" routerLinkActive="...">Link</a>
The expression to the right of the equal sign (=) contains a space-delimited string of CSS classes. The Router adds these classes when the link is "active" and removes them when the link is "inactive".
You set the RouterLinkActive directive to a string of classes such as routerLinkActive = "active myLink" (where myLink is a CSS class) or bind it to a component property that returns such a string, as shown below:
routerLinkActive="componentStringProperty"
Router State
The RouterState is a class that represents the current state of the router. It's part of the Angular Router module and provides information about the current route, including the activated routes.
After each successful navigation lifecycle, the router builds the tree ofActivatedRouteobjects that make the current state of the router. You can access the currentRouterStatefrom anywhere in the application using the"Routerservice" and its"properties".
In addition, each ActivatedRoute in the RouterState provides methods to traverse up and down the route tree to get information from "parent", "child", and "sibling" routes.
Activated Route
The route path and parameters are available through an injected router service called ActivatedRoute. Using this service, you can read the URL parameter data. For example, given the URL http://localhost:4200/user/view/userId?=se32sd, you can retrieve the user ID as follows:
view.ts
import { CommonModule } from '@angular/common';
import { Component, OnInit } from '@angular/core';
import { ActivatedRoute } from '@angular/router';
@Component({
selector: 'app-view',
imports: [CommonModule],
templateUrl: './view.html',
styleUrl: './view.css'
})
export class View implements OnInit{
constructor(private route: ActivatedRoute){}
userId: any;
ngOnInit(): void {
this.route.params.subscribe(response =>{
this.userId = response['id'];
console.log(this.userId);
});
}
}
Following is a list of important properties of the ActivatedRoute −
| Property | Descriptions |
|---|---|
| url | An Observable of the route paths is an array of strings, each representing a part of the route path. |
| data | AnObservablethat contains thedataobject provided for the route. |
| params | AnObservablethat contains the required and optional parameters specific to the route. |
| paramMap | AnObservablethat contains amapof the required and optional parameters specific to the route. |
| queryParamMap | AnObservablethat contains amapof the query parameters available to all routes. |
| queryParams | AnObservablethat contains the query parameters available to all routes. |
Router Events
While navigating, theRouteremits navigation events through theRouter.eventsproperty. Below is a list of important router events and their descriptions:
| Router Event | Descriptions |
|---|---|
| NavigationStart | This event is triggered when navigation starts. |
| RoutesRecognized | Triggered when the Router parses the URL and the routes are recognized. |
| GuardsCheckStart | It is triggered when the Router begins the guards phase of routing. |
| GuardsCheckEnd | It triggered, when the Router finishes the Guards phase of routing successfully. |
| ResolveStart | It is triggered when the Router begins the resolve phase of routing. |
| ResolveEnd | Triggered when the Router finishes the resolve phase of routing successfully. |
| NavigationEnd | This event is triggered when navigation ends successfully. |
| NavigationCancel | It is triggered when navigation is canceled. |
| NavigationError | Triggered when navigation fails due to an unexpected error. |
Router Terminology
Following is a list of a few router terms and their meanings:
| Router part (term) | Descriptions |
|---|---|
| Router | The router manages the navigation from one component to the other and displays the application component for active URL. |
| provideRouter | A function provides the necessary service providers for navigating through the application view. |
| RouterModule | A module provides necessary services and directives for managing application navigation and routing. |
| Routes | It defines an array of route configuration objects that define the navigation paths and their corresponding components. |
| Route | It defines how the router should navigate to a component based on a URL pattern. |
| RouterOutlet | A directive (<router-outlet>) that spots places where the router displays a view (or loaded components). |
| RouterLink | A directive used for binding a clickable HTML element (links, buttons, etc.) to a route. |
| RouterLinkActive | A directive used for toggling (adding or removing) classes from an HTML element when an associatedrouterLinkcontained on or inside the element becomes active or inactive. |
| ActivatedRoute | A service provided to each route component that contains route-specific information such as route parameters (e.g., path = "view/:id"), static data, resolve data, etc. |
| RouterState | An object that represents the current state of the router, containing information about the active routes and their hierarchy. |
Multiple Choice Questions (MCQ's):
Here we have mentioned a few MCQs to test your knowledge on the current concept:
Q 1 − What do you need to import to work with the Router in an Angular application?
A − import { Router } from '@angular/router';
B − import { RouterModule } from '@angular/router';
Answer : B
Explanation:
The RouterModule needs to be imported to configure the router in an Angular application
Q 2 − What directive is used to apply a CSS class to the current active route in Angular?
Answer : B
Explanation:
In Angular, the [routerLinkActive] directive is used to add a CSS class to an element when its associated router link is active.
Q 3 − In Angular, what value should you set to [routerLinkActiveOptions] to make sure the class is applied only when the exact URL is matched?
Answer : A
Explanation:
In Angular, by setting [routerLinkActiveOptions]="{ exact: true }", you ensure that the routerLinkActive class is applied only when the current link is active (matching full URL).
Q 4 − How can you retrieve a route parameter using ActivatedRoute in Angular?
A − this.route.paramMap.get('id')
Answer : A
Explanation:
To retrieve a route parameter in Angular, use this.route.paramMap.get('id') within the ActivatedRoute service.
Q 5 − Where should the router-outlet directive be placed in an Angular application?
A − In the root component only
B − Inside the index.html file
C − Inside any component's template that needs to display routed views
Answer : C
Explanation:
The router-outlet can be placed in any component template where you want to render the routed components.
Angular - Services
What are Services in Angular?
In Angular, Services are singleton (having a single instance) classes that provide specific functionality or handle common logic in an Angular application, which can be used throughout the entire application.
In a single Angular application, one or more services can be used. Similarly, an Angular component may depend on one or more services.
Angular services may depend on other services to work properly. Dependency resolution is one of the complex and time-consuming activities in developing any application. To reduce this complexity, Angular provides Dependency Injection (a design pattern) as one of its core concepts.

Key Elements of a Service Class
As we define the component in angular, services also include the following:
- A TypeScript decorator that declares the class as an Angular service via @Injectable (i.e., is a decorator) and allows you to define what part of the application can access the service via the providedIn property (which is by default 'root') to allow the service to access throughout the entire application.
- A TypeScript class (or say service) that defines the desired code that will be accessible when the service is injected into another components, directive, etc.
Here is a basic example of the printName service:
print-name.ts
import {Injectable} from '@angular/core';
@Injectable({providedIn: 'root'})
export class PrintName{
display(name: string) {
return name;
}
}
Creating Angular Service
An Angular service is a plain TypeScript class with one or more methods (functionality) along with the @Injectable decorator. This decorator allows the normal TypeScript class to be used as a service in an Angular application.
To create a service in an Angular application, run the following command in your IDE's terminal −
ng generate service service-name or ng generate service Services/service-name
Here, the first command will create a service class directly in your Angular application without a separate folder, which can be a bit confusing. However, the second command will create a 'Services' folder and place the service class inside it.
After executing the second command, the following will be displayed in your IDE's terminal −
ng g s Services/print-name CREATE src/app/Services/print-name.spec.ts (389 bytes) CREATE src/app/Services/print-name.ts (147 bytes)
The PrintName service is as follows −
print-name.ts
import { Injectable } from '@angular/core';
@Injectable({
providedIn: 'root'
})
export class PrintName {
//define it after the service is created..
display(name: string){
return name;
}
constructor() { }
}
Here, @Injectable decorator converts a plain Typescript class into Angular service.
How to use a Service?
When you want to use a service in a component, you need to −
- Import the service in the component where you want to use it.
- Declare a class field where the service needs to be injected.
- Assign the class field to the instance of the service created by Angular's dependency injection.
Here is what it might look like in the User component −
User.ts
import { Component, inject } from '@angular/core';
import { PrintName } from '../Services/print-name';
import { CommonModule } from '@angular/common';
@Component({
selector: 'app-user',
imports: [PrintName, CommonModule],
templateUrl: './user.html',
styleUrl: './user.css'
})
export class UserComponent {
private print_name = inject(PrintName);
my_name = this.print_name.display("John");
}
In this example, the PrintName service is being used by calling the Angular function inject and passing in the service to it.
How Service Works?
Here are the key concepts about how services work in Angular −
Service Registration- When you define a service with @Injectable({ providedIn: 'root' }), Angular registers it with the root injector.
- This means the service is available for injection throughout the entire application.
- When a component (or another service) requires the service, then the Angular DI (dependency injection) mechanism creates an instance of the service and injects it into the requesting component/service.
- Services provided at the root level (providedIn: 'root') are singletons by default. This means there is only one instance of the service throughout the entire application, which ensures a consistent state and shared data.
Register Angular service
To use Dependency Injection, every service needs to be registered into the system. Angular provides multiple option to register a service. They are as follows −
- ModuleInjector @ root level
- ModuleInjector @ platform level
- ElementInjector using providers meta data
- ElementInjector using viewProviders meta data
- NullInjector
ModuleInjector @ root
ModuleInjector enforces the service to used only inside a specific module. ProvidedInmeta data available in @Injectable has to be used to specify the module in which the service can be used.
The value should refer to the one of the registered Angular Module (decorated with @NgModule). root is a special option which refers the root module of the application. The sample code is as follows −
import { Injectable } from '@angular/core';
@Injectable({
providedIn: 'root',
})
export class Debug {
constructor() { }
}
ModuleInjector @ platform
Platform Injector is one level higher than ModuleInject and it is only in advanced and rare situation. Every Angular application starts by executing PreformBrowserDynamic().bootstrap method (see main.js), which is responsible for bootstrapping root module of Angular application.
PreformBrowserDynamic() method creates an injector configured by PlatformModule. We can configure platform level services using platformBrowser() method provided by PlatformModule.
NullInjector
NullInjector is one level higher than platform level ModuleInjector and is in the top level of the hierarchy. We could not able to register any service in the NullInjector. It resolves when the required service is not found anywhere in the hierarchy and simply throws an error.
ElementInjector using providers
ElementInjector enforces the service to be used only inside some particular components. providers and ViewProviders meta data available in @Component decorator is used to specify the list of services to be visible for the particular component. The sample code to use providers is as follows −
expense-entry-list.ts
// import statement
import { Debug } from '../debug';
// component decorator
@Component({
selector: 'app-expense-entry-list',
templateUrl: './expense-entry-list.html',
styleUrls: ['./expense-entry-list.css'],
providers: [Debug] })
Here, Debug Service will be available only inside the ExpenseEntryListComponent and its view. To make DebugService in other component, simply use providers decorator in necessary component.
ElementInjector using viewProviders
viewProviders is similar to provider except it does not allow the service to be used inside the component's content created using ng-content directive.
ExpenseEntryListComponent
// import statement
import { Debug } from '../debug';
// component decorator
@Component({
selector: 'app-expense-entry-list',
templateUrl: './expense-entry-list.html',
styleUrls: ['./expense-entry-list.css'],
viewProviders: [Debug]
})
Parent component can use a child component either through its view or content. Example of a parent component with child and content view is mentioned below −
Parent component view / template
<div> child template in view <child></child> </div> <ng-content></ng-content>
child component view / template
<div> child template in view </div>
Parent component usage in a template (another component)
<parent> <!-- child template in content --> <child></child> </parent>
Here,
- child component is used in two place. One inside the parent's view. Another inside parent content.
- Services will be available in child component, which is placed inside parent's view.
- Services will not be available in child component, which is placed inside parent's content.
Resolve Angular service
Let us see how a component can resolve a service using the below flow diagram.

Here,
- First, component tries to find the service registered using viewProviders meta data.
- If not found, component tries to find the service registered using providers meta data.
- If not found, Component tries to find the service registered using ModuleInjector
- If not found, component tries to find the service registered using PlatformInjector
- If not found, component tries to find the service registered using NullInjector, which always throws error.
The hierarchy of the Injector along with work flow of the resolving the service is as follows −

Multiple Choice Questions (MCQ's):
Here we have mentioned a few MCQs to test your knowledge on the current concept:
Q 1 − What is the primary purpose of a service in Angular?
A − To fetch templates for components
B − To handle business logic and data
Answer : B
Explanation:
Services in Angular are used to encapsulate business logic, data retrieval, and other functionality that can be shared across multiple components.
Q 2 − How do you create a service in Angular?
A − Using @Component decorator
Answer : C
Explanation:
The @Injectable decorator marks a class as a service that can be injected into other components or services using Angular DI.
Q 3 − How do you provide a service at the root level in Angular?
A − By adding it to the providers array in the NgModule
B − By using the providedIn: 'root' property in the @Injectable decorator
Answer : B
Explanation:
Use the providedIn: 'root' in the @Injectable decorator allows the service to be available throughout the entire application.
Q 4 − Which Angular feature allows you to share a single instance of a service across multiple components?
B − Template reference variables.
Answer : C
Explanation:
Dependency injection (DI) is a design pattern in Angular that allows you to inject services into components.
Angular - Http Client
HTTP is an application layer protocol on the Internet. It stands for Hypertext Transfer Protocol and is the foundation of any data exchange on the web. It transmits hypertext requests and information between a server and a browser (client).
What is HTTP Client?
HTTP Client is a client-side programming that provides the HTTP server access to various resources and services. It allows the client (a browser or application) to send HTTP requests and receive responses from the server.
HTTP client programming is an important feature in every modern web application. Nowadays, many applications expose their functionality through REST APIs, which work over the HTTP protocol.
To support this, the Angular team offers extensive tools to enable HTTP communication with servers. Angular provides a module called HttpClientModule and a service called HttpClient to handle HTTP programming.
The following diagram provides a clear understanding of the HTTP Client, and the request and response mechanism −

Let us learn how to use the HttpClient service in this chapter. Developers should have a basic understanding of HTTP programming to understand the concepts discussed in this chapter.
Create a Server for Expense REST APIConfigure Http client
Let's learn how to configure the HttpClientservice. You need to import the HttpClient in App Config:
provideHttpClient(withInterceptorsFromDi())
app.config.ts
import { ApplicationConfig, provideBrowserGlobalErrorListeners } from '@angular/core';
import { provideRouter } from '@angular/router';
import { routes } from './app.routes';
import { provideHttpClient, withInterceptorsFromDi } from '@angular/common/http';
export const appConfig: ApplicationConfig = {
providers: [
provideBrowserGlobalErrorListeners(),
provideRouter(routes),
provideHttpClient(withInterceptorsFromDi())
]
};
Create expense service
Let us create a new service named ExpenseEntryin your ExpenseManagerapplication to interact withExpense REST API. ExpenseEntryService will get the latest expense entries, insert new expense entries, modify existing expense entries, and delete the unwanted expense entries.
Open the command prompt and go to the project root folder:
cd /go/to/expense-manager
Start the application by running the below command:
ng serve
Run the below command to generate an Angular service with the name ExpenseEntry:
ng g s expense-entry
This will create two Typescript files (expense entry service & its testing file) as specified below:
CREATE src/app/expense-entry.spec.ts (364 bytes) CREATE src/app/expense-entry.ts (141 bytes)
Run the below command to generate an Angular Interface with the name Expense:
ng g i expense CREATE src/app/expense.ts (141 bytes)
Now, open the Expense Interface (src/app/expense.ts) file.
export interface Expense {
id: number,
item: string,
amount: number,
category: string,
location: string,
spendOn: string,
createdOn: string
}
Now, open the ExpenseEntry Service (src/app/expense-entry.service.ts) file. import ExpenseEntry, throwError, and catchErrorfrom the rxjs library, and importHttpClient, HttpHeaders, and HttpErrorResponse from @angular/common/http package:
import { Injectable } from '@angular/core';
import { Expense } from './expense';
import { throwError } from 'rxjs';
import { catchError } from 'rxjs/operators';
import { HttpClient, HttpHeaders, HttpErrorResponse } from '@angular/common/http';
Inject the HttpClient service into our service:
constructor(private httpClient : HttpClient) { }
Create a variable, expenseRestUrl to specify the Expense Rest API endpoints:
private expenseRestUrl = 'http://localhost:8000/api/expense';
Create a variable,httpOptionsto set the HTTP Header option. This will be used during the Http Rest API call by the AngularHttpClientservice:
private httpOptions = {
headers: new HttpHeaders( { 'Content-Type': 'application/json' })
};
The complete code is as follows:
expense-entry.ts
import { Injectable } from '@angular/core';
import { Expense } from './expense';
import { Observable, throwError } from 'rxjs';
import { catchError, retry } from 'rxjs/operators';
import { HttpClient, HttpHeaders, HttpErrorResponse } from '@angular/common/http';
@Injectable({
providedIn: 'root'
})
export class ExpenseEntry {
private expenseRestUrl = 'api/expense';
private httpOptions = {
headers: new HttpHeaders({'Content-Type': 'application/json'})
};
constructor(private httpClient : HttpClient) { }
}
HTTP GET
The HttpClient provides a get() method to fetch data from a web page. The main argument is the target web URL. Another optional argument is the option object with the below format −
{
headers?: HttpHeaders | {[header: string]: string | string[]},
observe?: 'body' | 'events' | 'response',
params?: HttpParams|{[param: string]: string | string[]},
reportProgress?: boolean,
responseType?: 'arraybuffer'|'blob'|'json'|'text',
withCredentials?: boolean,
}
Here,
headers: HTTP Headers of the request, either as string, an array of string, or an array of HttpHeaders.
- observe: Process the response and return the specific content of the response. Possible values are body, response, and events. The default option of the observer is the body.
- params: HTTP parameters of the request, either as string, array of string, or array of HttpParams.
- reportProgress: Whether to report the progress of the process or not (true or false).
- responseType: Refers to format of the response. Possible values are arraybuffer, blob, JSON, and text.
withCredentials: Whether the request has credentials or not (true or false).
Note: All options are optional, you can choose to use them or not.
The get() method returns the response of the request as Observable. The returned Observable emits the data when the response is received from the server.
The sample code to useget()method is as follows:
httpClient.get(url, options) .subscribe( (data) => console.log(data) );
Typed Response
Theget()method has an option to return observables, which emits a typed response as well. The sample code to get a typed response (ExpenseEntry) is as follows:
httpClient.get<T>(url, options) .subscribe( (data: T) => console.log(data) );
Handling errors
Error handling is one of the important aspects of HTTP programming. Encountering errors is one of the common scenarios in HTTP programming.
Errors in HTTP Programming can be categorized into two groups −
- Client-side issues can occur due to network failure, misconfiguration, etc. If a client-side error happens, then theget()method throwsan ErrorEventobject.
- Server-side issues can occur due to wrong URL, server unavailability, server programming errors, etc.
Let us write a simple error handling for our ExpenseEntry service.
private httpErrorHandler (error: HttpErrorResponse) {
if (error.error instanceof ErrorEvent) {
console.error("A client side error occurs. The error message is "
+ error.message);
} else {
console.error(
"An error happened in server. The HTTP status code is "
+ error.status + " and the error returned is " + error.message);
}
return throwError("Error occurred. Pleas try again");
}
The error function can be called in get() as specified below −
httpClient.get(url, options) .pipe(catchError(this.httpErrorHandler) .subscribe( (data) => console.log(data) )
Handle failed request
As we mentioned earlier, errors can happen, and one way is to handle them by implementing the error handling. Another option is to try for a certain number of times. If the request fails due to a network issue or the HTTP server is temporarily offline, the next request may succeed.
We can usethe rxjslibrary"retry"operator in this scenario as specified below :
httpClient.get(url, options)
.pipe(
retry(5),
catchError(this.httpErrorHandler))
.subscribe( (data) => console.log(data) )
Fetch expense entries
Let us do the actual coding to fetch the expenses from Expense Rest API in our ExpenseManager application.
Open the command prompt and go to the project root folder:
cd /go/to/expense-manager
Start the application by running the following command:
ng serve
Now, add the getExpenseEntries() and httpErrorHandler() methods in ExpenseEntryService (src/app/expense-entry.service.ts) service as follows:
getExpenseEntries() : Observable<Expense[]> {
return this.httpClient.get<Expense[]>(this.expenseRestUrl, this.httpOptions)
.pipe(retry(3),catchError(this.httpErrorHandler));
}
getExpenseEntry(id: number) : Observable<Expense> {
return this.httpClient.get<Expense>(this.expenseRestUrl + "/" + id, this.httpOptions)
.pipe(
retry(3),
catchError(this.httpErrorHandler)
);
}
private httpErrorHandler (error: HttpErrorResponse) {
if (error.error instanceof ErrorEvent) {
console.error("A client side error occurs. The error message is " + error.message);
} else {
console.error(
"An error happened in server. The HTTP status code is " +
error.status + " and the error returned is " + error.message);
}
return throwError("Error occurred. Pleas try again");
}
Here,
- getExpenseEntries() calls the get() method using expense end point and also configures the error handler. Also, it configures httpClient to try for maximum of 3 times in case of failure. Finally, it returns the response from server as typed (ExpenseEntry[]) Observable object.
- getExpenseEntry is similar to getExpenseEntries() except it passes the id of the ExpenseEntry object and gets ExpenseEntry Observable object.
expense-entry.ts
The complete coding of ExpenseEntry Service is as follows:
import { Injectable } from '@angular/core';
import { Observable, throwError } from 'rxjs';
import { catchError, retry } from 'rxjs/operators';
import { HttpClient, HttpHeaders, HttpErrorResponse } from '@angular/common/http';
import { Expense } from './expense';
@Injectable({
providedIn: 'root'
})
export class ExpenseEntry {
private expenseRestUrl = 'http://localhost:8000/api/expense';
private httpOptions = {
headers: new HttpHeaders( { 'Content-Type': 'application/json' })
};
constructor(private httpClient : HttpClient) { }
getExpenseEntries() : Observable<Expense[]> {
return this.httpClient.get<Expense[]>(this.expenseRestUrl, this.httpOptions)
.pipe(
retry(3),
catchError(this.httpErrorHandler)
);
}
getExpenseEntry(id: number) : Observable<Expense> {
return this.httpClient.get<Expense> (this.expenseRestUrl + "/" + id, this.httpOptions)
.pipe(
retry(3),
catchError(this.httpErrorHandler)
);
}
private httpErrorHandler (error: HttpErrorResponse) {
if (error.error instanceof ErrorEvent) {
console.error("A client side error occurs. The error message is " + error.message);
} else {
console.error(
"An error happened in server. The HTTP status code is "
+ error.status + " and the error returned is " + error.message);
}
return throwError("Error occurred. Pleas try again");
}
}
Open theExpenseEntryList and go to the "src-entry-list-entry-list.ts" file and inject ExpenseEntry Service through the constructor as specified below:
constructor(private debugService: Debug, private restService : ExpenseEntry ) { }
Change thegetExpenseEntries()method, and call the "getExpenseEntries()" method from ExpenseEntry Service instead of returning the mock items:
getExpenseItems() {
this.restService.getExpenseEntries()
.subscribe( data =− this.expenseEntries = data );
}
The completeExpenseEntryListcodes are as follows −
expense-entry-list.ts
import { Component, OnInit } from '@angular/core';
import { Debug } from '../debug';
import { Expense } from '../expense';
import { ExpenseEntry } from '../expense-entry';
@Component({
selector: 'app-expense-entry-list',
templateUrl: './expense-entry-list.html',
styleUrls: ['./expense-entry-list.css'],
providers: [Debug, ExpenseEntry]
})
export class ExpenseEntryList implements OnInit {
title: string = '';
expenseEntries: Expense[] = [];
constructor(
private debugService: Debug,
private restService : ExpenseEntry
) { }
ngOnInit() {
this.debugService.info("Expense Entry List component initialized");
this.title = "Expense Entry List";
this.getExpenseItems();
}
getExpenseItems() {
this.restService.getExpenseEntries()
.subscribe( data => this.expenseEntries = data );
}
}
Finally, check the application and you will see the below response:

HTTP POST
The HTTP POST is similar to HTTP GET except that the post request will send the necessary data as posted content along with the request. HTTP POST is used to insert new records into the system. HttpClientprovidesthe post()method, which is similar toget(), except it supports an extra argument to send the data to the server.
Let us add a new method, addExpenseEntry() in our ExpenseEntry Service to add new expense entry as mentioned below:
addExpenseEntry(expenseEntry: Expense): Observable<Expense> {
return this.httpClient.post<ExpenseEntry>(this.expenseRestUrl, expenseEntry, this.httpOptions)
.pipe(
retry(3),
catchError(this.httpErrorHandler)
);
}
HTTP PUT
The HTTP PUT is similar to HTTP POST requests. This is used to update existing records in the system. The HttpClient provides a put()method, which is similar topost().
Update expense entry
Let us add a new method, updateExpenseEntry() in our ExpenseEntry Service to update existing expense entry as mentioned below:
updateExpenseEntry(expenseEntry: Expense): Observable<Expense> {
return this.httpClient.put<Expense>(this.expenseRestUrl + "/" + expenseEntry.id, expenseEntry, this.httpOptions)
.pipe(
retry(3),
catchError(this.httpErrorHandler)
);
}
HTTP DELETE
The HTTP DELETE is similar to the HTTP GET request. It is used to delete entries in the system. The HttpClient provides a delete()method, which is similar toget().
Delete expense entry
Let us add a new method, deleteExpenseEntry() in our ExpenseEntry Service to delete existing expense entries as mentioned below:
deleteExpenseEntry(expenseEntry: Expense | number) : Observable<Expense> {
const id = typeof expenseEntry == 'number' ? expenseEntry : expenseEntry.id
const url = `${this.expenseRestUrl}/${id}`;
return this.httpClient.delete<Expense>(url, this.httpOptions)
.pipe(
retry(3),
catchError(this.httpErrorHandler)
);
}
Multiple Choice Questions (MCQ's):
Here we have mentioned a few MCQs to test your knowledge on the current concept:
Q 1 − What does HttpClient in Angular do?
Answer : C
Explanation:
In Angular, the HttpClient performs HTTP requests to communicate with backend services.
Q 2 − What does HttpClient return when making requests?
Answer : D
Explanation:
In Angular, the HttpClient returns an Observable, allowing for asynchronous data handling.
Q 3 − Which method is provided by HttpClient to make HTTP requests?
Answer : B
Explanation:
The get() method is one of the methods provided by HttpClient to make HTTP requests in Angular.
Angular - Creating Express Based REST API
The prerequisite for HTTP programming is a basic understanding of the HTTP protocol and REST API techniques. HTTP programming involves two parts: the server and the client. Angular provides support for creating client-side applications, while Express (a popular web framework) provides support for creating server-side applications.
Let us create anExpense Rest APIusing the express framework and then access it from ourExpenseManagerapplication using the Angular HttpClient service.
Open a command prompt and create a new folder, express-rest-api.
cd /go/to/workspace mkdir express-rest-api cd expense-rest-api
Initialize a new node application using the below command −
npm init
After running the npm init commond will ask some basic questions like project name (express-rest-API), entry point (server.js), etc., as mentioned below −
This utility will walk you through creating a package.json file.
It only covers the most common items, and tries to guess sensible defaults.
See 'npm help json' for definitive documentation on these fields and
exactly what they do.
Use 'npm install <pkg>' afterwards to install a package and save
it as a dependency in the package.json file.
Press ^C at any time to quit.
package name: (expense-rest-api)
version: (1.0.0)
description: Rest api for Expense Application
entry point: (index.js) server.js
test command:
git repository:
keywords:
author:
license: (ISC)
About to write to \path\to\workspace\expense-rest-api\package.json: {
"name": "expense-rest-api",
"version": "1.0.0",
"description": "Rest api for Expense Application",
"main": "server.js",
"scripts": {
"test": "echo \"Error: no test specified\" && exit 1"
},
"author": "",
"license": "ISC",
"type": "commonjs"
}
Is this OK? (yes) yes
Installexpress, SQLite, andcorsmodules using the below command −
npm install express sqlite3 cors
Create a new filewith the name sqlitedb.jsand place the below code −
sqlitedb.js
var sqlite3 = require('sqlite3').verbose()
const DBSOURCE = "expensedb.sqlite"
let db = new sqlite3.Database(DBSOURCE, (err) => {
if (err) {
console.error(err.message)
throw err
}else{
console.log('Connected to the SQLite database.')
db.run(`CREATE TABLE expense (
id INTEGER PRIMARY KEY AUTOINCREMENT,
item text,
amount real,
category text,
location text,
spendOn text,
createdOn text
)`,
(err) => {
if (err) {
console.log(err);
}else{
var insert = 'INSERT INTO expense (item, amount, category, location, spendOn, createdOn) VALUES (?,?,?,?,?,?)'
db.run(insert, ['Pizza', 10, 'Food', 'KFC', '2020-05-26 10:10', '2020-05-26 10:10'])
db.run(insert, ['Pizza', 9, 'Food', 'Mcdonald', '2020-05-28 11:10', '2020-05-28 11:10'])
db.run(insert, ['Pizza', 12, 'Food', 'Mcdonald', '2020-05-29 09:22', '2020-05-29 09:22'])
db.run(insert, ['Pizza', 15, 'Food', 'KFC', '2020-06-06 16:18', '2020-06-06 16:18'])
db.run(insert, ['Pizza', 14, 'Food', 'Mcdonald', '2020-06-01 18:14', '2020-05-01 18:14'])
}
}
);
}
});
module.exports = db
Here, we are creating a new SQLite database and loading some sample data.
Now, open server.js and place the below code (if you are not able to see the file in your application create it manually within the root directory) −
server.js
var express = require("express")
var cors = require('cors')
var db = require("./sqlitedb.js")
var app = express()
app.use(cors());
var bodyParser = require("body-parser");
app.use(bodyParser.urlencoded({ extended: false }));
app.use(bodyParser.json());
var HTTP_PORT = 8000
app.listen(HTTP_PORT, () => {
console.log("Server running on port %PORT%".replace("%PORT%",HTTP_PORT))
});
app.get("/", (req, res, next) => {
res.json({"message":"Ok"})
});
app.get("/api/expense", (req, res, next) => {
var sql = "select * from expense"
var params = []
db.all(sql, params, (err, rows) => {
if (err) {
res.status(400).json({"error":err.message});
return;
}
res.json(rows)
});
});
app.get("/api/jsonp/expense", (req, res, next) => {
var sql = "select * from expense"
var params = []
db.all(sql, params, (err, rows) => {
if (err) {
res.status(400).json({ "error": err.message });
return;
}
res.jsonp(rows)
});
});
app.get("/api/expense/:id", (req, res, next) => {
var sql = "select * from expense where id = ?"
var params = [req.params.id]
db.get(sql, params, (err, row) => {
if (err) {
res.status(400).json({"error":err.message});
return;
}
res.json(row)
});
});
app.post("/api/expense/", (req, res, next) => {
var errors=[]
if (!req.body.item){
errors.push("No item specified");
}
var data = {
item : req.body.item,
amount: req.body.amount,
category: req.body.category,
location : req.body.location,
spendOn: req.body.spendOn,
createdOn: req.body.createdOn,
}
var sql = 'INSERT INTO expense (item, amount, category, location, spendOn, createdOn) VALUES (?,?,?,?,?,?)'
var params =[data.item, data.amount, data.category, data.location, data.spendOn, data.createdOn]
db.run(sql, params, function (err, result) {
if (err){
res.status(400).json({"error": err.message})
return;
}
data.id = this.lastID;
res.json(data);
});
})
app.put("/api/expense/:id", (req, res, next) => {
var data = {
item : req.body.item,
amount: req.body.amount,
category: req.body.category,
location : req.body.location,
spendOn: req.body.spendOn
}
db.run(
`UPDATE expense SET
item = ?,
amount = ?,
category = ?,
location = ?,
spendOn = ?
WHERE id = ?`,
[data.item, data.amount, data.category, data.location,data.spendOn, req.params.id],
function (err, result) {
if (err){
console.log(err);
res.status(400).json({"error": res.message})
return;
}
res.json(data)
});
})
app.delete("/api/expense/:id", (req, res, next) => {
db.run(
'DELETE FROM expense WHERE id = ?',
req.params.id,
function (err, result) {
if (err){
res.status(400).json({"error": res.message})
return;
}
res.json({"message":"deleted", changes: this.changes})
});
})
app.use(function(req, res){
res.status(404);
});
Here, we create a basic CURD rest API to select, insert, update, and delete expense entries.
Output
Run the application using the below command −
npm run start
Open a browser, enter http://localhost:8000/ and press enter. You will see below response −
{
"message": "Ok"
}
The above message confirms that our application is working fine.
Change the URL tohttp://localhost:8000/api/expense, and you will see all the expense entries in JSON format.
[
{
"id": 1,
"item": "Pizza",
"amount": 10,
"category": "Food",
"location": "KFC",
"spendOn": "2020-05-26 10:10",
"createdOn": "2020-05-26 10:10"
},
{
"id": 2,
"item": "Pizza",
"amount": 14,
"category": "Food",
"location": "Mcdonald",
"spendOn": "2020-06-01 18:14",
"createdOn": "2020-05-01 18:14"
},
{
"id": 3,
"item": "Pizza",
"amount": 15,
"category": "Food",
"location": "KFC",
"spendOn": "2020-06-06 16:18",
"createdOn": "2020-06-06 16:18"
},
{
"id": 4,
"item": "Pizza",
"amount": 9,
"category": "Food",
"location": "Mcdonald",
"spendOn": "2020-05-28 11:10",
"createdOn": "2020-05-28 11:10"
},
{
"id": 5,
"item": "Pizza",
"amount": 12,
"category": "Food",
"location": "Mcdonald",
"spendOn": "2020-05-29 09:22",
"createdOn": "2020-05-29 09:22"
}
]
Finally, we created a simple CURD REST API for expense entry, and we can access the REST API from our Angular application to learn the HttpClient module.
Here, the code will create six REST API endpoints as mentioned below:
/ endpoint returns an OK message to make sure the application is working fine.
/api/expense endpoint returns all expense items available in the database.
/api/jsonp/expense endpoint returns all expense items available in the database in JSONP format.
/api/expense/:id endpoint returns the expense entry based on the expense entry id.
/api/expense/:id endpoint with put verb will update the expense entry based on the expense entry id.
/api/expense endpoint with post verb will add a new expense entry into the database.
/api/expense/:id/update_amount endpoint with post verb will update the amount of the expense entry specified in the URL.
/api/expense/:id endpoint with delete verb will delete the expense entry based on the expense entry id.
Angular - Request
What is HTTP Request?
In HTTP protocol,the requestis a process of starting communication with the server by the client application or browser. In Angular, a request refers to making HTTP calls to a server to fetch, send, or manipulate data. These requests are handled by the Angular HttpClient module.
The following diagram will give you a clear understanding of the HTTP Request:

Let's see how to send a request (HTTP calls) to the server in the Angular framework, there are various options available in the request phase in this chapter. We will discuss them one by one.
Create a Server for Expense REST APISetting up the HttpClient service
Before making HTTP requests, we need to properly set up the HttpClient service in our Angular application. You need to import the HttpClient in App Config:
provideHttpClient(withInterceptorsFromDi())
app.config.ts
import { ApplicationConfig, provideBrowserGlobalErrorListeners } from '@angular/core';
import { provideRouter } from '@angular/router';
import { routes } from './app.routes';
import { provideHttpClient, withInterceptorsFromDi } from '@angular/common/http';
export const appConfig: ApplicationConfig = {
providers: [
provideBrowserGlobalErrorListeners(),
provideRouter(routes),
provideHttpClient(withInterceptorsFromDi())
]
};
Now HttpClient can be injected into any Angular component when necessary, as shown below:
import { Injectable } from '@angular/core';
import { HttpClient } from '@angular/common/http';
@Injectable()
export class MyService {
constructor(private http: HttpClient) { }
}
Request Response Workflow
Working example
Let us create a working angular example to get all expense items from the server by using the HttpClient service class and the HttpRequest option.
Step 1: Create a new angular application by running ng new command as shown below:
ng new my-http-app
Enable angular routing and CSS as shown below −
? Would you like to add Angular routing? Yes ? Which stylesheet format would you like to use? CSS
Step 2: Enable HTTP communication in the application by configuring HttpClient in the configuration (app.config.ts):
import { ApplicationConfig, provideBrowserGlobalErrorListeners } from '@angular/core';
import { provideRouter } from '@angular/router';
import { routes } from './app.routes';
import { provideHttpClient, withInterceptorsFromDi } from '@angular/common/http';
export const appConfig: ApplicationConfig = {
providers: [
provideBrowserGlobalErrorListeners(),
provideRouter(routes),
provideHttpClient(withInterceptorsFromDi())
]
};
Step 3: Create a new interface, Expense to represent our expense item:
interface Expense {
id: Number,
item: String,
amount: Number,
category: String,
location: String,
spendOn: Date
}
export default Expense;
Step 4: Create a new component, ListExpenses to show the expense items from the server:
ng generate component ListExpenses
It will create the component as shown below −
CREATE src/app/list-expenses/list-expenses.css (0 bytes) CREATE src/app/list-expenses/list-expenses.html (28 bytes) CREATE src/app/list-expenses/list-expenses.spec.ts (602 bytes) CREATE src/app/list-expenses/list-expenses.ts (229 bytes) UPDATE src/app/app.module.ts (581 bytes)
Step 5: Include our new component into the App root components view, app.component.html as shown below:
<app-list-expenses></app-list-expenses> <router-outlet></router-outlet>
Step 6: Inject theHttpClientinto the ListExpenses component through the constructor as shown below:
import { Component } from '@angular/core';
import { HttpClient } from '@angular/common/http';
@Component({
selector: 'app-list-expenses',
templateUrl: './list-expenses.component.html',
styleUrls: ['./list-expenses.component.css']
})
export class ListExpensesComponent {
constructor(private http: HttpClient) { }
}
Step 7: Implement the OnInit life cycle hook to request the server for expenses after the initialization of the ListExpenses component:
export class ListExpenses implements OnInit{
constructor(private http: HttpClient) { }
ngOnInit(): void {
}
}
Step 8: Create a local variable,expensesto hold our expenses from the server:
export class ListExpensesComponent implements OnInit{
expenses: Expense[] = [];
constructor(private http: HttpClient) { }
ngOnInit(): void {
}
}
Step 9: Create a HttpRequest object and set the URL of the expenses endpoint:
export class ListExpensesComponent implements OnInit{
expenses: Expense[] = [];
constructor(private http: HttpClient) { }
ngOnInit(): void {
let req = new HttpRequest(
'GET',
'http://localhost:8000/api/expense',{
responseType: 'json'
}
)
}
}
Here,
- Set GET as the http method of our endpoint.
- Set http://localhost:8000/api/expense as the URL of our endpoint.
- Set JSON as responseType. This will parse the response of the body as JSON.
Step 10: Call therequestmethod of this.HTTP (HttpClientinstance) object by passing theHttpRequestobject and getting the expense object from the server. Then, set the expenses into our local variable,expenses.
export class ListExpensesComponent implements OnInit{
expenses: Expense[] = [];
constructor(private http: HttpClient) { }
ngOnInit(): void {
let req = new HttpRequest(
'GET',
'http://localhost:8000/api/expense',{
responseType: 'json'
}
)
this.http.request<Expense[]>(req)
.subscribe((data : HttpEvent<Expense[]> )=> {
this.expenses = (data as HttpResponse<Expense[]>).body as Expense[]
console.log(this.expenses)
})
}
}
Here,
- Sets theExpense[]as the type of the object returned by the server. The server will send the array of expense objects in its body in JSON format.
- Subscribed to the request (this.http.request) object. Then parsed the subscribed data as an array of expense objects and set it to a local expense variable (this.expenses).
Step 11: The complete code of the ListExpensesComponent is as follows −
import { Component, OnInit } from '@angular/core';
import { HttpClient, HttpRequest, HttpResponse, HttpEvent } from '@angular/common/http';
import Expense from '../Expense';
@Component({
selector: 'app-list-expenses',
templateUrl: './list-expenses.html',
styleUrls: ['./list-expenses.css']
})
export class ListExpenses implements OnInit{
expenses: Expense[] = [];
constructor(private http: HttpClient) { }
ngOnInit(): void {
let req = new HttpRequest(
'GET',
'http://localhost:8000/api/expense',{
responseType: 'json'
}
)
this.http.request<Expense[]>(req)
.subscribe((data : HttpEvent<Expense[]> )=> {
this.expenses = (data as HttpResponse<Expense[]>).body as Expense[]
console.log(this.expenses)
})
}
}
Step 12: Next, get the expenses object from the component and render it in our component template page (list-expenses.component.html)
<div><h3>Expenses</h3></div>
<ul>
@for(expense of expenses; track $index){
<li>
{{expense.item}} @ {{expense.location}} for {{expense.amount}} USD on {{expense.spendOn | date:'shortDate' }}
</li>
}
</ul>
Step 13: Finally, run the application using below command:
ng serve
Step 14: Open the browser and navigate to http://localhost:4200/ URL and check the output:

Here, the output shows our expenses as a list of items.
Step 15: Let us modify the above sample application by changing the HttpRequest option to a generic option.
Step 16: Change the ngOnInit method as shown below:
ngOnInit(): void {
this.http.request<Expense[]>('GET', 'http://localhost:8000/api/expense', {
observe : 'body',
responseType : 'json'
})
.subscribe( data => {
this.expenses = data as Expense[]
console.log(this.expenses)
})
}
Here,
- Removed the HttpRequest object.
- Changed the argument of the request method by incorporating the generic options.
- Set the observe option in the third argument as body. This will parse the body and return the body only instead of the whole response.
- Changed the subscribe() method and set the returned data as the array of expenses (Expense[]).
Step 17: Run the application and confirm the output. The output is the same as the above sample:
Conclusion
An Angular provides an easy way to request a HTTP calls to the server through the HttpClient service and HttpRequest objects.request() method is a generic method to support all HTTP verbs like GET, POST, PUT, DELETE, etc. We will learn more methods to target particular HTTP verbs in the upcoming chapters.
Angular - Request Response Workflow
The HttpClient provides several methods to start an HTTP request. All methods return an observable with an optional type variable (Observable<T>).
The observable need to be subscribed to to start the request. Once the observable is subscribed, it starts the request, passes it through a series of registered interceptors, and finally reaches the server. The response is then received from the server and published to the subscribed function.
The workflow of the request is as follows −
- The user creates a new HttpClient instance, say HTTP through the component constructor:
constructor(private http: HttpClient) { }
- The user calls any one of the HttpClient methods, say request() by passing the resource information:
let req = this.http.request(<action>, <url>, <body>, <option>)
- The request() method will create an observable, say request (req) using the given resource information:
let req = this.http.request(<action>, <url>, <body>, <option>)
- The user will subscribe a callback function to the observable using the subscribe() method:
req.subscribe((data) => console.log(data));
Once a user subscribes to the Observable, it passes the request to the registered interceptors in the order in which the interceptors are registered.
Once the request passes all registered interceptors, Observable will send the request to the server.
Observable waits for the server response, and once receives the response from the server, it returns the response to the subscribed function.
The subscribed function will do the necessary business logic and set the output to the components variable.
The component will render its template using the output of the HttpClient.
A sample request is as follows −
let req = this.http.request('GET', 'http://localhost:8000/api/expense/1')
req.subscribe(data => this.myexpense = data);
Here,
The this.http is the HttpClient instance
The request()is the method use to create observable, when subscribed, starts the request.
The subscribe() is the method use to subscribe to the returned observable and to subsequently start the request and fetch the response.
Finally, the argument to the subscribe method is the callback function used to get the actual responses body content.
HttpClient Arguments
Arguments supported by HttpClients methods are as follows −
- Resource URI − It is the URL / endpoint representing the resource.
- Request body − It is the data to be sent to the server along with the request. The data can be either in query string format or JSON format.
- Request options − It is all other data sent along with the request. It contains query strings, headers, cookies, etc.
Resource URI
All method accept url / endpoint as one of the argument. It represents the resource to be fetched from the server. In our sample application, the url starts with http://localhost:8000/ and one of the possible option is http://localhost:8000/api/expenses. This endpoint will fetch all expenses from the server and send it back to the client in json format.
Request body
All methods accept URL / endpoint as one of the arguments. It represents the resource to be fetched from the server. In our sample application, the URL starts with http://localhost:8000/, and one of the possible options is http://localhost:8000/api/expenses. This endpoint will fetch all expenses from the server and send it back to the client in JSON format −
Form data. MIME-type is application/x-www-form-URL-encoded
Form data with uploads. MIME type is multipart/form-data
Plain text. MIME-type is text/plain
JSON. MIME-type is application/json
HttpParams class
Form data can be created using the HttpParams class provided by Angular. HttpParams accepts data in query string format (key/value as key=value and each key/value separated by &). It has methods to add one or more parameters as a sequence by chaining methods together. All methods create a copy of the instance add/remove the parameter (key/value pair) in the copied instance, and return it.
The signature of the HttpParams constructor is as follows −
constructor(options: HttpParamsOptions = {} as HttpParamsOptions)
Where,
The HttpParamsOptionsobject can be created using the below properties:
- fromString?: string
- fromObject?: {}
The sample code to create a HttpParams object using a constructor is as follows −
/* using fromString option */
let httpParams = new HttpParams( { fromString: 'a=b*b=c' } )
/* using fromObject option */
let httpParams = new HttpParams( { fromObject: { a: "b", c: "d" } )
The methods supported by HttpParams are as follows −
set(): Accepts a parameter and value. Add a new parameter with the given value.
delete(): Accepts a parameter. Delete the given parameter.
has(): Accepts a parameter. Returns true/false based on the availability of the given parameter.
keys(): Accepts nothing. Returns all parameters.
get(): Accepts a parameter. Returns the first value of the given parameter.
getAll(): Accepts a parameter. Returns all values of the given parameter.
append(): Accepts a parameter. Append the value to the given parameter.
appendAll(): Accepts an object with multiple parameters. Append the value to all parameters.
toString(): Accepts nothing. Returns the object in query string format.
The sample code to create a HttpParams object is as follows −
let formData = new HttpParams();
formData = formData
.set('item', 'Modified')
.set('amount', 25);
console.log(formData.toString()) // item=Modified&amount=25
Request options
Irrespective of the method, options are one common argument accepted by all methods and used to represent the request options. Option is a JavaScript object (or hash) with a standard set of request data. Options can have the below entries and represent different aspects of the request and response:
- observe
- responseType
- headers
- params
- context
- reportProgress
- withCredentials
- transferCache
Let us learn one by one in the upcoming chapters:
observe
Theobserveoption is used to specify which part of the response has to be observed during the server communication and send back the data to the subscribed function.
Based on the observe option, either the full or part of the response will be returned. The possible values are events, body, and response.
events
Theeventsare used to return the events fired in the response stream from the server. It will return the response as Observable<HttpEvent<R>> type. Here, R is the type of the actual data (response body) to be returned.
let req = this.http.request<Expense>( 'GET', 'http://localhost:8000/api/expense/1', {
observe: 'events',
responseType : 'json'
});
Here,
- JSONis the format used to interpret the response body.
- Expenseis the type used to convert and return the responses body. Otherwise, it will return the responses body as a generic JavaScript object.
response
The response option is used to return the complete response from the server. It will return the response as Observable<HttpResponse<R>> type. Here, R is the type of the actual data (responses body) to be returned.
let req = this.http.request<Expense>( 'GET', 'http://localhost:8000/api/expense/1', {
observe: 'response',
responseType : 'json'
});
Here,
- JSONis the format used to interpret the responses body.
- Expenseis the type used to convert and return the responses body. Otherwise, it will return the responses body as a generic JavaScript object.
body
The body is used to return only the body content of the response from the server. It will return the response asObservable<HttpResponse<R>>type, Here, R is a type of the actual data (responses body) to be returned.
let req = this.http.request<Expense>( 'GET','http://localhost:8000/api/expense/1', {
observe: 'body',
responseType : 'json'
});
Here,
- JSONis the format used to interpret the response's body
- Expenseis the type used to convert and return the responses body. Otherwise, it will return the response's body as a generic JavaScript object.
responseType
The responseType is used to interpret the response's body. It can have four possible values as shown below −
- arraybuffer
- blob
- text
- json
Let us understand the values and their usage one by one:
arraybuffer
The arraybuffer interprets the response's body as a generic raw binary data buffer and returns Observable. It can be used to stream audio/video content.
let req = this.http.request<Expense>( 'GET', 'http://localhost:8000/api/expense/1', {
observe: 'body',
responseType : 'arraybuffer'
});
blob
The blob interprets the response's body as the binary format and returns Observable. It can be used to download large files.
let req = this.http.request<Expense>( 'GET', 'http://localhost:8000/api/expense/1', {
observe: 'body',
responseType : 'blob'
});
text
The text interprets the response's body as plain text format and returns Observable. It can be used to represent text-based data.
let req = this.http.request<Expense>( 'GET', 'http://localhost:8000/api/expense/1', {
observe: 'body',
responseType : 'text'
});
json
The JSON interprets the response's body in JSON format and returns Observable, where R is the requested type (Expense) of data. It can be used to represent the result in JSON format. It can be further encoded into any type by specifying the type variable (R) in the method as shown below −
let req = this.http.request<Expense>( 'GET', 'http://localhost:8000/api/expense/1', {
observe: 'body',
responseType : 'json'
});
Based on the observe and responseType, Httpclient will return Observable with a different type variable. Let us check a few combinations of observe and responseType to better understand the concept.
-
observe => body and responseType => JSON
Returns the Observable R represents the type variable.
-
observe => response and responseType => JSON
Returns the Observable<HttpResponse>. R represents the type variable and encodes the response body.
-
observe => events and responseType => JSON
Returns the Observable<HttpEvent>. R represents the type variable and encodes the response body.
-
observe => events and responseType => arraybuffer
Returns the Observable<HttpEvent>. The Response body is encoded as ArrayBuffer.
-
observe => response and responseType => blob
Returns the Observable<HttpEvent>. The Response body is encoded as ArrayBuffer.
-
observe => response and responseType => text
Returns the Observable<HttpResponse>. The Response body is encoded as ArrayBuffer.
We can combineobserveandresponseTypeto create many more combinations as we need.
headers
The headers specify the HTTP headers. It can include a standard HTTP header as a key/value pair or can encode the data using the HttpHeaders class. A sample header as a key/value pair is as follows:
{ 'Content-type': 'application/json' }
It specifies that the request content type is JSON.
Angular provides a special class,HttpHeadersto compose header details. It accepts header information as an anonymous object and initializes it.
It has methods (set(), append(), and delete()) to add/remove one or more headers in a sequence by chaining methods together.
All methods create a copy of the instance add/remove the header information in the copied instance, and return it.
let httpHeaders = new HttpHeaders( { 'Content-Type': 'application/json' })
httpHeaders = httpHeaders
.set('Accept-Language', 'en-US,en;q=0.5')
.set('Accept-Encoding', 'gzip, deflate, br');
let options = { 'headers': httpHeaders }
let req = this.http.request<Expense>( 'GET', 'http://localhost:8000/api/expense/1', options );
req.subscribe( (data: Expense) => this.myexpense = data );
Here,
- httpHeaders is an object used to enclose the HTTP header information to be send to the server. It was created using HttpHeaders class.
- options is an object enhanced with header information.
The methods supported by HttpHeaders are as follows −
- set(): Accepts a header and value. Add a new header with the given value.
- delete(): Accepts a header. Delete the given parameter.
- has(): Accepts a parameter. Returns true / false based on the availability of the given header.
- keys(): Accepts nothing. Returns all parameters.
- get(): Accepts a parameter. Returns first value of the given parameter.
- getAll(): Accepts a header. Returns all values of the given parameter.
- append(): Accepts a parameter. Append the value to the given header.
- appendAll(): Accepts an object with multiple parameter. Append the value to all header.
- toString(): Accepts nothing. Returns the object in query-string format.
params
Theparamsallow the query string to be set using the HttpParams class. Please check the Request body section for more aboutthe "HttpParams"class.
The sample code to create a HttpParams object and set it in the request is as follows −
let formData = new HttpParams();
formData = formData
.set('item', 'Modified')
.set('amount', 25);
console.log(formData.toString()) // item=Modified&amount=25
let req = this.http.request<Expense>('GET', 'http://localhost:8000/api/expense/1', {
observe: 'body',
responseType : 'json',
params: formData
});
context
The Context is used to send arbitrary values as key/value pairs with type safety and without key conflict. It is used as a source of information for interceptors acting as middleware between client and server. Angular provides a special class, HttpContext to encode the context information. A sample context is as follows −
// create a key using HttpContextToken
export const IS_AUTH_ENABLED = new HttpContextToken<boolean>(() => false);
// set data for the context
let authContext = new HttpContext().set(IS_AUTH_ENABLED, true)
let req = this.http.request<Expense>('GET', 'http://localhost:8000/api/expense/1', {
observe: 'body',
responseType : 'json',
context: authContext
});
Here,
- HttpContextToken class is used to create the key of the context. It has the option to specify the value type as well.
- IS_AUTH_ENABLED is the key, and its type is boolean.
- IS_AUTH_ENABLED is set to true.
We can get the context value using the get() method by passing the token as shown below −
let contextValue = req.context.get<boolean>(IS_AUTH_ENABLED) // true
reportProgress
The reportProgress specifies whether to get the progress of the request (communication) from the server. It can be used to show the progress of large file uploads through web API.
let req = this.http.request<Expense>( 'GET', 'http://localhost:8000/api/expense/1', {
observe: 'events',
responseType : 'json',
reportProgress: true
});
withCredentials
The withCredential specifies whether the request should be sent with outgoing credentials (cookies). It accepts a boolean value.
this.http.request<Expense>( 'GET', 'http://localhost:8000/api/expense/1', {
observe: 'body',
responseType : 'json'
withCredentials: true
});
transferCache
The transferCache specifies whether the request should be cached. It accepts the boolean value orHttpTransferCacheOptionsvalue. HttpTransferCacheOptions is used to encode dynamic logic to filter requests to be cached based on a custom filter function and override default cache behavior.
let req = this.http.request<Expense>( 'GET', 'http://localhost:8000/api/expense/1', {
observe: 'body',
responseType : 'json',
transferCache: true
});
HttpClient methods
Methods provided by the HttpClient class for client-server communication are as follows −
- request()
- head()
- get()
- post()
- put()
- patch()
- delete()
- jsonp()
- options()
Let us learn generic request() method in this chapter and other method in subsequent chapters.
The request() method
The request()is the generic method that sends a request to the server with every possible HTTP verb like get, post, patch, etc. It has many overloads. Let us check two main overload functions, one using the Generic option and another one using the HttpRequest object.
- Generic option − Accepts url, http verb, body content and options object.
- HttpRequest option − Accepts HttpRequest object
HttpRequest option
Angular provides a class, HttpRequest to represent the complete HTTP request. It has the built-in option to include URL, HTTP method/verb, response type, headers, params, etc.
var httpRequest = new HttpRequest<Expense>('GET', 'https://localhost:8000/api/expense/1', {
responseType : 'json'
});
Here,
- The this.http is HttpClient instance.
- GET method is used as HTTP verbs.
- The endpoint (http://localhost/api/expense/1) will return the expense with an id equal to 1 from the server.
- The responseType is set as JSON. This will return the body of the response as JSON.
The above sample request object can be used as below to send the request to the server:
var req = this.http.request<Expense>(httpRequest);
req.subscribe(data : HttpEvent<Expense> => {
this.myexpense = (data as HttpResponse<Expense>).body as Expense;
}
Here,
- The request returns the HttpEvent, which is the union of multiple type as shown below −
type HttpEvent<T> = HttpSentEvent | HttpHeaderResponse | HttpResponse<T> | HttpProgressEvent | HttpUserEvent<T>;
- As we have provided responseType as JSON and set Expense as an object to return, the observable will return HttpResponse<Expense> in the body. So, we converted the returned data object into a HttpResponse<Expense> object and then got the expense from the body property.
Generic option
It accepts four arguments as shown below in the given order:
- HTTP method / verb
- url
- body (optional)
- options
A sample request is as follows −
let req = this.http.request<Expense>('GET', 'http://localhost:8000/api/expense/1', {
observe: 'body',
responseType : 'json',
});
req.subscribe(data => { this.myexpense = data });
Angular - Response
What is HTTP Response?
In the HTTP protocol, the response is the process by which the server returns data to the client (application or browser) after receiving a request.
In Angular, a response refers to the data received from the server following an HTTP call made by the client to fetch, send, or manipulate data. These responses are handled by the Angular HttpClient module.
The following diagram will give you a clear understanding of the HTTP Request and Response calls −
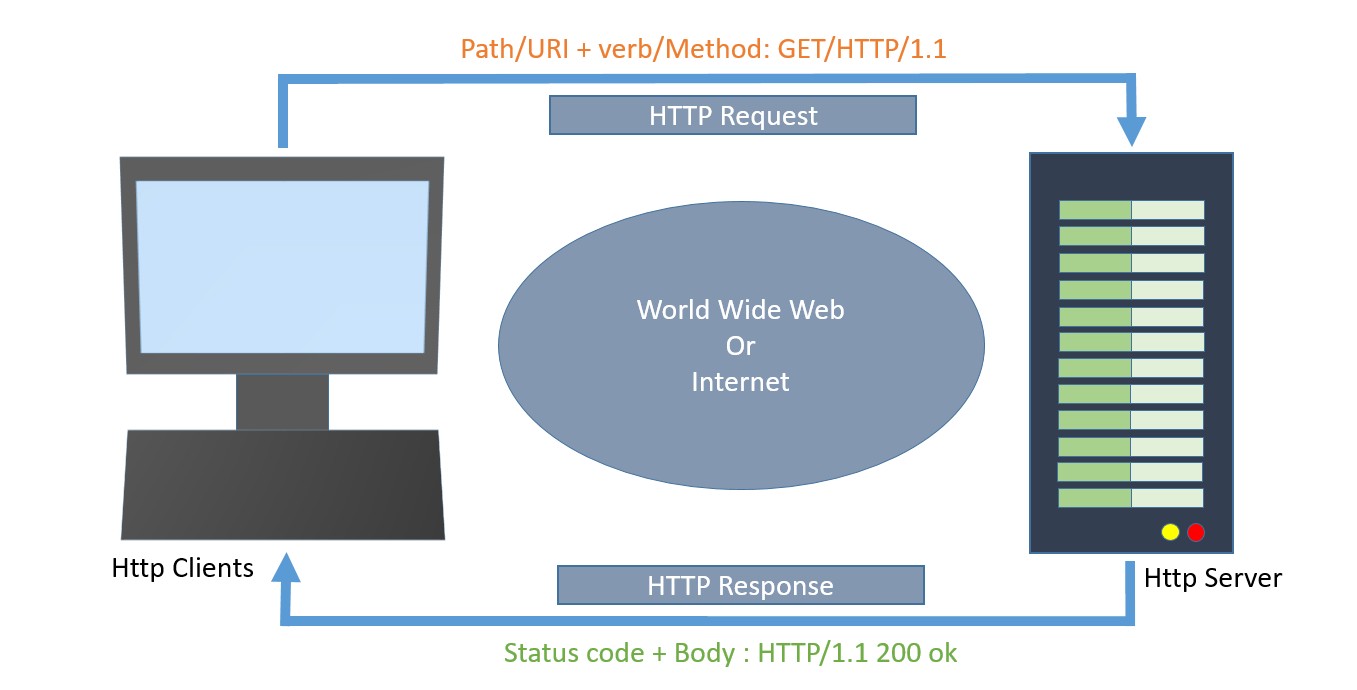
Now, let's discuss the various events of the HttpEvent class that allow you to handle different phases of an HTTP request/response in Angular:
HttpEvent Class
The HttpEvent class is a key part of the Angular HttpClient module, which provides a way to monitor the progress of HTTP requests.
HttpClientwill send the request to the server and capture the response from the server. Then, based on the request configuration, it will enclose the response in an object with the below possible types:
- HttpEvent
- HttpSentEvent
- HttpUserEvent
- HttpProgressEvent
- HttpResponseBase
- HttpHeaderResponse
- HttpResponse
Actually, the HttpEvent is the union of all possible event classes in the response stream, as shown below −
type HttpEvent<T> = HttpSentEvent | HttpHeaderResponse | HttpResponse<T> | HttpProgressEvent | HttpUserEvent<T>;
Let us learn the response types provided by Angular one by one −
HttpSentEvent
TheHttpSentEventis used to specify that the request is sent to the server, and it will be useful when the request is retried multiple times.
Syntax for the HttpSentEvent −
interface HttpSentEvent {
type: HttpEventType.Sent
}
HttpUserEvent
The HttpUserEvent is used to identify that the response event is user-defined. It will be useful to group all custom events into one category. It will ensure that the event is properly handled and forwarded by all interceptors.
Syntax for the HttpUserEvent −
interface HttpUserEvent<T> {
type: HttpEventType.User
}
HttpProgressEvent
TheHttpProgressEventis used to identify whether the request is download-based or upload-based. Also, it will enclose the currently loaded bytes during download/upload functionality.
Syntax for the HttpProgressEvent −
interface HttpProgressEvent {
type: HttpEventType.DownloadProgress | HttpEventType.UploadProgress
loaded: number
total?: number
}
Here,
- loaded is used to refer to the number of bytes uploaded / downloaded
- total is used to refer to the total data to be downloaded / uploaded
HttpResponseBase
The HttpResponseBase is the base class for both HttpHeaderResponse and HttpResponse. It has basic information about the response.
Syntax for the HttpResponseBase −
abstract class HttpResponseBase {
constructor() // have not shown full details for understanding purpose
headers: HttpHeaders
status: number
statusText: string
url: string | null
ok: boolean
type: HttpEventType.Response | HttpEventType.ResponseHeader
}
Here,
- headers − A response header information as HttpHeaders object.
- status − The number (code) is used to refer to the different status of the request.
- statusText − Text used to refer to different status of the request (default: 'ok').
- url − Url of the request.
- ok − Success / failure of the request.
- type − Type of the event (Response or ResponseHeader).
HttpHeaderResponse
TheHttpHeaderResponseinherits fromHttpResponseBaseand includes an option to clone the response. The purpose of this class is to enclose the response with header and status information, skipping the actual body of the response.
class HttpHeaderResponse extends HttpResponseBase {
type: HttpEventType.ResponseHeader;
clone(): HttpHeaderResponse;
headers: HttpHeaders;
status: number;
statusText: string;
url: string | null;
ok: boolean;
}
Here,
- type − Type of the event (Response or ResponseHeader).
- clone() − A method, which copy this HttpHeaderResponse, overriding its contents with the given parameter hash.
let response = res.clone(update: { })
Here,
- headers − A response header information as HttpHeaders object.
- status − The number (code) is used to refer to the different status of the request.
- statusText − Text used to refer to different status of the request (default: 'ok').
- url − Url of the request.
- ok − Success / failure of the request.
HttpResponse
TheHttpResponseinherits fromHttpResponseBaseclass and includes response body and option to clone the response. The purpose of the class is to enclose the response with body, header and status information.
The responsed body can be fetched by using body property as shown below −
class HttpResponse<T> extends HttpResponseBase {
body: T | null;
type: HttpEventType.Response;
clone(): HttpResponse<T>;
clone(update): HttpResponse<T>;
clone(update)<V>: HttpResponse<V>;
headers: HttpHeaders;
status: number;
statusText: string;
url: string | null;
ok: boolean;
}
Here,
- body − The response body, or null if one was not returned.
- type − Type of the event (Response or ResponseHeader).
- clone() − A method, which copy this HttpHeaderResponse, overriding its contents with the given parameter hash.
@returnsHttpResponse<T>
-------------------------------------
@paramupdate{ headers?: HttpHeaders | undefined;
status?: number | undefined;
statusText?: string | undefined;
url?: string | undefined;
@returnsHttpResponse<T>
-------------------------------------
@paramupdate{ body?: V | null | undefined;
headers?: HttpHeaders | undefined;
status?: number | undefined;
statusText?: string | undefined;
url?: string | undefined; }
@returnsHttpResponse<V>
Here,
- headers − A response header information as HttpHeaders object.
- status − The number (code) is used to refer to the different status of the request.
- statusText − Text used to refer to different status of the request (default: 'ok').
- url − Url of the request.
- ok − Success / failure of the request.
Cloning the response can be done similarly toHttpHeaderResponse class as shown below −
let response = res.clone(update: { })
Here,
- res is the response object returned from the server.
Working Example
Let us create a working angular example to get all expense item from server by using HttpClient service class and using HttpRequest option.
Step 1: Create a new angular application by running ng new command as shown below −
ng new my-upload-app
Enable angular routing and CSS as shown below −
? Would you like to add Angular routing? Yes ? Which stylesheet format would you like to use? CSS
Step 2: Setting up the HttpClient service
Before making HTTP requests, we need to properly set up the HttpClient service in our Angular application. You need to import the HttpClient in App Config:
provideHttpClient(withInterceptorsFromDi())
app.config.ts
import { ApplicationConfig, provideBrowserGlobalErrorListeners } from '@angular/core';
import { provideRouter } from '@angular/router';
import { routes } from './app.routes';
import { provideHttpClient, withInterceptorsFromDi } from '@angular/common/http';
export const appConfig: ApplicationConfig = {
providers: [
provideBrowserGlobalErrorListeners(),
provideRouter(routes),
provideHttpClient(withInterceptorsFromDi())
]
};
Step 3: Create new component, Upload to show the expense items from the server −
ng generate component upload
It will create the component as shown below −
CREATE src/app/upload/upload.css (0 bytes) CREATE src/app/upload/upload.html (21 bytes) CREATE src/app/upload/upload.spec.ts (559 bytes) CREATE src/app/upload/upload.ts (202 bytes)
Step 4: Include our new component into the app root component view, app.html as shown below −
<app-upload></app-upload> <router-outlet></router-outlet>
Step 5: Inject theHttpClientinto the Upload component through the constructor and import necessary classes from the rxjsand angular modules as shown below −
upload.ts
import { Component } from '@angular/core';
import { HttpClient, HttpEvent, HttpEventType } from '@angular/common/http';
import { Observable, map } from 'rxjs';
@Component({
selector: 'app-upload',
templateUrl: './upload.html',
styleUrls: ['./upload.css']
})
export class Upload {
constructor(private http: HttpClient) { }
}
Step 6: Create a variable for the file to be uploaded and another variable for upload message −
file?: File | null = null; message : String | null = null;
Step 7: Create a function to get the file uploaded by the user from the form (to be created) and store it inthe filevariable −
onFilechange(event: any) {
let files = event.target.files
this.file = files.item(0)
console.log(this.file)
}
Here,
- event is the object holding upload event information. The event.target.files holds the uploaded document.
Step 8: Create a function,getEventMessage()to print the uploaded event information −
private getEventMessage(event: HttpEvent<any>, file?: File) {
let message : String | null = null;
switch (event.type) {
case HttpEventType.Sent:
message = `Uploading file "${file?.name}" of size ${file?.size}.`;
console.log(message);
return message;
case HttpEventType.UploadProgress:
// Compute and show the % done:
const percentDone =
event.total ? Math.round(100 * event.loaded / event.total) : 0;
message =
`File "${file?.name}" is ${percentDone}% uploaded.`;
console.log(message);
return message;
case HttpEventType.Response:
message =
`File "${file?.name}" was completely uploaded!`;
console.log(message);
return message;
default:
message =
`File "${file?.name}" surprising upload event: ${event.type}.`;
console.log(message);
return message;
}
}
Here,
- The switch statement is used to capture different events and print them accordingly.
- The HttpEventType holds the type of information.
Step 9: Create a function, upload() to upload the user-selected files to the server −
upload() {
const formData: FormData = new FormData();
formData.append('photo', this.file as Blob, this.file?.name);
const myObservable: Observable<HttpEvent<any>> =
this.http.post<any>('http://localhost:8000/upload', formData, {
observe: 'events',
reportProgress: true });
myObservable.pipe(
map(data => { console.log(data); return data; }),).subscribe(
evt => {
this.message = this.getEventMessage(evt, this.file as File)
});
}
Here,
- formData holds the user uploaded file.
- post() method send the data in formData to the server.
- myObservable will print the data returned by server using map function and print the event information using getEventMessage() function.
Step 10: The complete source code of the upload component (upload.ts) is as follows −
upload.ts
import { Component } from '@angular/core';
import { HttpClient, HttpEvent, HttpEventType } from '@angular/common/http';
import { Observable, map } from 'rxjs';
@Component({
selector: 'app-upload',
imports: [],
templateUrl: './upload.html',
styleUrls: ['./upload.css']
})
export class Upload {
file?: File | null = null;
message : String | null = null;
constructor(private http: HttpClient) { }
onFilechange(event: any) {
let files = event.target.files
this.file = files.item(0)
console.log(this.file)
}
upload() {
const formData: FormData = new FormData();
formData.append('photo', this.file as Blob, this.file?.name);
const myObservable: Observable<HttpEvent<any>> =
this.http.post<any>('http://localhost:8000/api/upload',
formData, { observe: 'events', reportProgress: true });
console.log('Hi');
myObservable.pipe(
map(data => { console.log(data); return data; }),
).subscribe(
evt => {
this.message = this.getEventMessage(evt, this.file as File)
});
}
private getEventMessage(event: HttpEvent<any>, file?: File) {
let message : String | null = null;
switch (event.type) {
case HttpEventType.Sent:
message =
`Uploading file "${file?.name}" of size ${file?.size}.`;
console.log(message);
return message;
case HttpEventType.UploadProgress:
// Compute and show the % done:
const percentDone =
event.total ? Math.round(100 * event.loaded / event.total) : 0;
message = `File "${file?.name}" is ${percentDone}% uploaded.`;
console.log(message);
return message;
case HttpEventType.Response:
message =
`File "${file?.name}" was completely uploaded!`;
console.log(message);
return message;
default:
message =
`File "${file?.name}" surprising upload event: ${event.type}.`;
console.log(message);
return message;
}
}
}
Step 11: Create an upload form in the component template (upload.html) and set theupload()method for upload buttonclickevent −
upload.html
<div><h3>Uploads</h3></div>
<form enctype="multipart/form-data">
<label for="formFile" class="form-label">Upload file example</label>
<input type="file"
name="photo" id="file" (change)="this.onFilechange($event)"
/>
@if (file) {
<div>
<section class="file-info">
File details:
<ul>
<li>Name: {{file.name}}</li>
<li>Type: {{file.type}}</li>
<li>Size: {{file.size}} bytes</li>
</ul>
</section>
@if(message){
<p>{{message}}</p>
}
<button (click)="this.upload()" type="button">Upload</button>
</div>
}
</form>
Step 12: Finally, run the application using the below command −
ng serve
Output
Step 13: Here, the output shows the form. Select a large file of around 30 MB and try to upload it as shown below −

Here, the output shows the form. Select a large file around 30 MB and try to upload it as shown below −
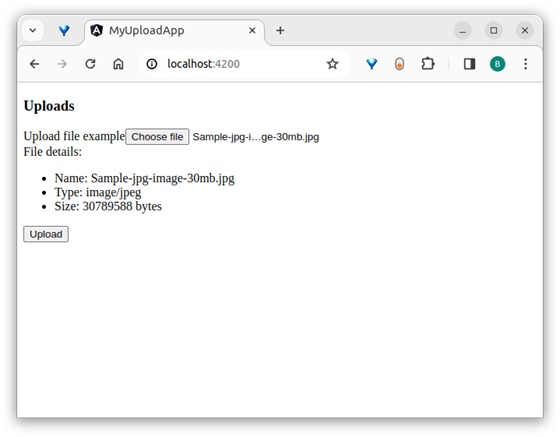
After uploading, inspect the application page and see in the console −
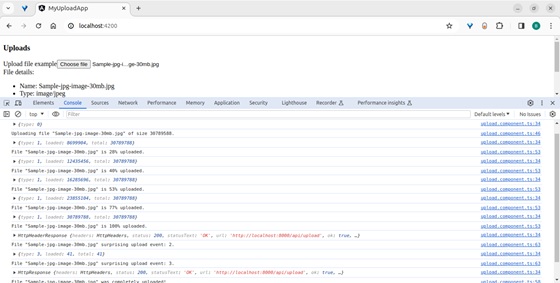
If the image fails to upload correctly, the following message will appear −
Note: The output shows all the events returned by the server in the browser and its console.
Conclusion
Angular provides different classes and types to properly enclose the response data from the server. All classes are simple to learn, understand, and manipulate the response before showing it on the website/app.
Angular - Creating Express based Upload API
Let's create a "sample web application" to upload a file to the server. We will develop an API for file uploads and then call this API from the Angular front-end application. Throughout this process, we will learn and handle different types of responses.
First, let's create a new express app to upload a file to the server by executing the following steps:
Step 1: Go to your favorite workspace as shown below −
cd /go/to/your/favorite/workspace
Step 2: Create a new folder with the name expense-rest-api and move into the folder −
mkdir upload-rest-api && cd upload-rest-api
Step 3: Create a new application using the init subcommand provided by the npm command as shown below −
npm init
Once you hit the above command, it will ask a few questions and answer all of them with default answers.
Step 4: Install express and cors packages to create node-based web applications −
npm install express cors multer --save
Here,
- express is a web framework to create a web application.
- cors is a middleware used to handle CORS concept in HTTP application.
- multer is an another middleware used to handling file upload.
Step 5: Open index.js and place the below code (if not found create it manually within the root folder) −
index.js
var express = require("express")
var cors = require('cors')
const multer = require('multer');
var app = express()
app.use(cors());
var bodyParser = require("body-parser");
app.use(express.urlencoded({ extended: true }));
app.use(express.json());
var HTTP_PORT = 8000
app.listen(HTTP_PORT, () => {
console.log("Server running on port %PORT%".replace("%PORT%", HTTP_PORT))
});
const storage = multer.diskStorage({
destination: (req, file, cb) => {
cb(null, "uploads/")
},
filename: (req, file, cb) => {
cb(null, Date.now() + "-" + file.originalname)
},
})
const upload = multer({ storage: storage });
app.post('/api/upload', upload.single('photo'), (req, res) => {
console.log(req.file)
res.json({ message: 'File uploaded successfully!' });
});
Here,
Configured a simple express app by enabling cors, multi, and body-parser middleware.
Created a new API/api/uploadto accept a file and store it in the uploads folder on the server.
Configured the upload folder as uploads.
The API will accept a file input with the name photo.
Step 6: Create a directory for storing uploads −
mkdir uploads
Step 7: Now, run the application by executing the below command −
node index.js
Step 8: To test the application, you can use the Postman, Curl, or any other HTTP client toolkit. Here is how you can do it −
- Create a new request to the API endpoint: http://localhost:8000/api/upload.
- Set the request method to post.
- Add a form-data field with the key photo, set its type to file, and attach the file you want to upload.
Output
Once request is sent, and file is uploaded, you will receive a success message.
{
"message": "File uploaded successfully!"
}
Angular - HTTP Get Request
The HTTP standard verb GET can be used in HTTP protocol to get (retrieve) a resource (data) from the server. The purpose of theGET method is to request data from the server. The server will check for the specified resource in the server and send it back if it is available.
In Angular, the HttpClient service class provides a get() method to request data from the server using the HTTP GET verb. Let's learn more about this method, including it's signature, parameters, and real-time usage:
Signature of the get() Method
Following is the signature (different from syntax) of the HttpClient get() method −
get<T>(url: string, options?: Object): Observable<T>
Here,
- url − The URL to which the GET request is sent.
- options − represents the options to be send along with the resource URL.
- Observable<T> − The return type, where 'T' represents the expected response type.
To work out the HTTP client-server communication, we need to set up a web application and need to exposes a set of web API. The web API can be requested from the client. Let us create a sample server application, Expense API App, and provide CRUD REST API (mainly GET requests) for expenses.
Create a Server for Expense REST APILet us create a working angular example to get all expense items from the above server application by using the HttpClient service class and get() method −
Angular Sample Application
Step 1: Run the below command to create an angular application −
ng new my-http-app
Enable angular routing and CSS as shown below −
? Would you like to add Angular routing? Yes ? Which stylesheet format would you like to use? CSS
Step 2: Configure Http client
Let's learn how to configure the HttpClientservice. You need to import the HttpClient in App Config:
provideHttpClient(withInterceptorsFromDi())
app.config.ts
import { ApplicationConfig, provideBrowserGlobalErrorListeners } from '@angular/core';
import { provideRouter } from '@angular/router';
import { routes } from './app.routes';
import { provideHttpClient, withInterceptorsFromDi } from '@angular/common/http';
export const appConfig: ApplicationConfig = {
providers: [
provideBrowserGlobalErrorListeners(),
provideRouter(routes),
provideHttpClient(withInterceptorsFromDi())
]
};
Step 3: Create a new interface, Expense to show the expense items from the server −
interface Expense {
id: Number,
item: String,
amount: Number,
category: String,
location: String,
spendOn: Date
}
export default Expense;
Step 4: Create a new component, ListExpenses to show the expense items from the server −
ng generate component ListExpenses
It will create a new component as shown below −
CREATE src/app/list-expenses/list-expenses.css (0 bytes) CREATE src/app/list-expenses/list-expenses.html (28 bytes) CREATE src/app/list-expenses/list-expenses.spec.ts (602 bytes) CREATE src/app/list-expenses/list-expenses.ts (229 bytes)
Step 5: Include our new component into the App root component view, app.component.html as shown below −
<app-list-expenses></app-list-expenses> <router-outlet></router-outlet>
Step 6: Inject the HttpClient into the ListExpenses component through the constructor as shown below −
import { Component } from '@angular/core';
import { HttpClient } from '@angular/common/http';
@Component({
selector: 'app-list-expenses',
imports: [],
templateUrl: './list-expenses.html',
styleUrls: ['./list-expenses.css']
})
export class ListExpenses {
constructor(private http: HttpClient) { }
}
Step 7: Implement the OnInit life cycle hook to request the server for expenses after the initialization of the ListExpenses component −
export class ListExpenses implements OnInit{
constructor(private http: HttpClient) { }
ngOnInit(): void {
}
}
Step 8: Create a local variable, expenses to hold our expenses from the server −
export class ListExpenses implements OnInit{
expenses: Expense[] = [];
constructor(private http: HttpClient) { }
ngOnInit(): void {
}
}
Step 9: Call the get method of this.http (HttpClient instance) object by passing the URL and options to get the expense object from the server. Then, set the expenses into our local variable, expenses −
export class ListExpenses implements OnInit{
expenses: Expense[] = [];
constructor(private http: HttpClient) { }
ngOnInit(): void {
this.http.get<Expense[]>('http://localhost:8000/api/expense', {
'observe': 'body',
'responseType': 'json'
})
.subscribe( data => {
this.expenses = data as Expense[]
console.log(this.expenses)
})
}
}
Here,
Sets the Expense[] as the type of the object returned by the server. The server will send the array of expense objects in its body in JSON format.
Subscribed to the request (this.http.get) object. Then parsed the subscribed data as an array of expense objects and set it to a local expense variable (this.expenses).
Step 10: The complete code of the ListExpenses is as follows −
list-expenses.ts
import { Component, OnInit } from '@angular/core';
import { HttpClient, HttpRequest, HttpResponse, HttpEvent } from '@angular/common/http';
import Expense from '../Expense';
@Component({
selector: 'app-list-expenses',
imports:[],
templateUrl: './list-expenses.html',
styleUrls: ['./list-expenses.css']
})
export class ListExpenses implements OnInit {
expenses: Expense[] = [];
constructor(private http: HttpClient) { }
ngOnInit(): void {
this.http.get<Expense[]>('http://localhost:8000/api/expense', {
'observe': 'body',
'responseType': 'json'
})
.subscribe( data => {
this.expenses = data as Expense[]
console.log(this.expenses)
})
}
}
Step 11: Next, get the expenses object from the component and render it in our component template page (list-expenses.html) −
list-expenses.html
<div><h3>Expenses</h3></div>
<ul>
@for(expense of expenses; track $index){
<li>
{{expense.item}} @ {{expense.location}} for {{expense.amount}} USD on {{expense.spendOn | date:'shortDate' }}
</li>
}
</ul>
Output
Step 12: Finally, run the application using the below command −
ng serve
Step 13: Now, open your friendly (chrome) browser navigate to http://localhost:4200/ URL, and check the output −
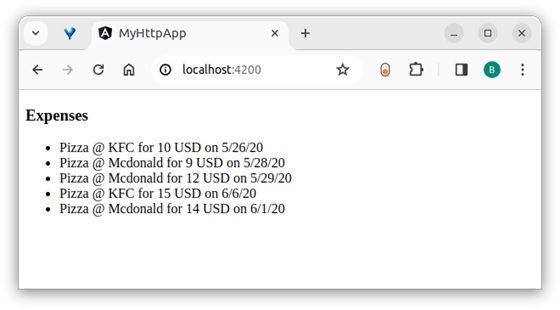
Here, the output shows our expenses as a list of items.
Conclusion
Angular provides an easy way to request the server through the HttpClient object.get() is a specific method used to get resources from the server. We will learn more HTTP methods to target other HTTP verbs in the upcoming chapters.
Multiple Choice Questions (MCQ's):
Here we have mentioned a few MCQs to test your knowledge on the current concept:
Q 1 − What is the primary purpose of an HTTP GET request in Angular?
A − To submit data to a server
B − To retrieve data from a server
Answer : B
Explanation:
The primary purpose of an HTTP GET request is to request data from a specified resource on the server.
Q 2 − Which Angular service is commonly used to make HTTP GET requests?
Answer : C
Explanation:
The HttpClient service is commonly used to make HTTP GET requests in Angular applications.
Q 3 − Which method is used to handle the response of an HTTP GET request in Angular?
Answer : A
Explanation:
The subscribe method is used to handle the response of an HTTP GET request in Angular.
Angular - HTTP POST Request
The HTTP standard verb POST can be used in the HTTP protocol to add (create) a new resource (data) on the server. The purpose of the POST method is to request the creation of new data (records) on the server.
In Angular, theHttpClientservice class provides aPOST()method to add (create) new data on the server using the HTTP POST verb. Let's learn more about this method, including its signature, parameters, and real-time usage:
Signature of the POST() Method
Following is the signature (different from syntax) of the HttpClient POST() method −
POST<T>(url: string, body: any, options?: Object): Observable<T>
Here,
- url − The URL to which the POST request is sent.
- body − The data to be sent to the server.
- options − Represents the options to be sent along with the resource URL.
- Observable<T> − The return type, where 'T' represents the expected response type.
To work out the HTTP client-server communication, we need to set up a web application and need to exposes a set of web API. The web API can be requested from the client. Let us create a sample server application, Expense API App, and provide CRUD REST API (mainly POST requests) for expenses.
Create a Server for Expense REST APILet us create a working angular example to add (create) a new expense item on the server by using the HttpClient service class and POST() method −
Angular Sample Application
Step 1: Run the below command to create an angular application −
ng new my-http-app
Enable angular routing and CSS as shown below −
? Would you like to add Angular routing? Yes ? Which stylesheet format would you like to use? CSS
Step 2: Configure Http client
Let's learn how to configure the HttpClientservice. You need to import the HttpClient in App Config:
provideHttpClient(withInterceptorsFromDi())
app.config.ts
import { ApplicationConfig, provideBrowserGlobalErrorListeners } from '@angular/core';
import { provideRouter } from '@angular/router';
import { routes } from './app.routes';
import { provideHttpClient, withInterceptorsFromDi } from '@angular/common/http';
export const appConfig: ApplicationConfig = {
providers: [
provideBrowserGlobalErrorListeners(),
provideRouter(routes),
provideHttpClient(withInterceptorsFromDi())
]
};
Step 3: Create a new interface, Expense to show the expense items from the server −
interface Expense {
id: Number,
item: String,
amount: Number,
category: String,
location: String,
spendOn: Date
}
export default Expense;
Step 4: Create a new component, ListExpenses to show the expense items from the server −
ng generate component ListExpenses
It will create a new component as shown below −
CREATE src/app/list-expenses/list-expenses.css (0 bytes) CREATE src/app/list-expenses/list-expenses.html (28 bytes) CREATE src/app/list-expenses/list-expenses.spec.ts (602 bytes) CREATE src/app/list-expenses/list-expenses.ts (229 bytes)
Step 5: Include our new component into the App root component view, app.component.html as shown below −
<app-list-expenses></app-list-expenses> <router-outlet></router-outlet>
Step 6: Inject the HttpClient into the ListExpenses component through the constructor as shown below −
import { Component } from '@angular/core';
import { HttpClient } from '@angular/common/http';
@Component({
selector: 'app-list-expenses',
imports: [],
templateUrl: './list-expenses.html',
styleUrls: ['./list-expenses.css']
})
export class ListExpenses {
constructor(private http: HttpClient) { }
}
Step 7: Implement the OnInit life cycle hook to request the server for expenses after the initialization of the ListExpenses component −
export class ListExpenses implements OnInit{
constructor(private http: HttpClient) { }
ngOnInit(): void {
}
}
Step 8: Create a local variable, expenses to hold our expenses from the server −
export class ListExpenses implements OnInit{
expenses: Expense[] = [];
constructor(private http: HttpClient) { }
ngOnInit(): void {
}
}
Step 9: Create a local variable, expense to hold the new expenses created in the server −
export class ListExpensesComponent implements OnInit{
expenses: Expense[] = [];
newexpense: Expense | null = null;
constructor(private http: HttpClient) { }
ngOnInit(): void {
}
}
Step 10: Set the new expense item with sample data as shown below −
export class ListExpensesComponent implements OnInit {
expenses: Expense[] = [];
newexpense: Expense | null = null;
constructor(private http: HttpClient) { }
ngOnInit(): void {
var spend_date = new Date();
spend_date.setDate(spend_date.getDate() - 1);
this.newexpense = {
'item': 'new item ' + Math.floor(Math.random() * 10),
'amount': Math.floor(Math.random() * 100),
'category': 'Food',
'location': 'KFC',
'spendOn': spend_date
}
}
}
Here,
- Used random method to set item name and amount.
- Set spend date as yesterday.
Step 11: Call the POST method of the this.http (HttpClient instance) object by passing the post URL & our new expense item and get the updated expense object from server.
export class ListExpenses implements OnInit {
expenses: Expense[] = [];
newexpense: Expense | null = null;
constructor(private http: HttpClient) { }
ngOnInit(): void {
var spend_date = new Date();
spend_date.setDate(spend_date.getDate() - 1);
this.newexpense = {
'item': 'new item ' + Math.floor(Math.random() * 10),
'amount': Math.floor(Math.random() * 100),
'category': 'Food',
'location': 'KFC',
'spendOn': spend_date
}
this.http.post<Expense>('http://localhost:8000/api/expense/1', this.newexpense,{
'observe': 'body',
'responseType': 'json'
})
.subscribe( data => {
this.newexpense = data as Expense;
console.log(data)
});
}
}
Step 12: Now, call the GET method of the this.http (HttpClient instance) object by passing the list expenses URL & options and get the expense object from server. Then, set the expenses into our local variable, expenses.
export class ListExpenses implements OnInit {
expenses: Expense[] = [];
newexpense: Expense | null = null;
constructor(private http: HttpClient) { }
ngOnInit(): void {
var spend_date = new Date();
spend_date.setDate(spend_date.getDate() - 1);
this.newexpense = {
'item': 'new item ' + Math.floor(Math.random() * 10),
'amount': Math.floor(Math.random() * 100),
'category': 'Food',
'location': 'KFC',
'spendOn': spend_date
}
this.http.post<Expense>('http://localhost:8000/api/expense/1',
this.newexpense,{
'observe': 'body',
'responseType': 'json'
})
.subscribe( data => {
this.newexpense = data as Expense;
console.log(data)
});
this.http.get<Expense[]>('http://localhost:8000/api/expense',{
'observe': 'body',
'responseType': 'json'
})
.subscribe( data => {
this.expenses = data as Expense[]
console.log(this.expenses)
})
}
}
Step 13: Next, get the expenses list object and new expense object from the component and render it in our component template page (list-expenses.component.html) −
<div>Expense item (id = 1) updated in the server is as follows:</div>
<div>Item: {{newexpense?.item}}</div>
<div>Amount: {{newexpense?.amount}}</div>
<div>Location: {{newexpense?.location}}</div>
<div>Spend On: {{newexpense?.spendOn | date:'short'}}</div>
<div><h3>Expenses</h3></div>
<ul>
@for(expense of expenses; track $index){
<li>
{{expense.item}} @ {{expense.location}} for {{expense.amount}}
USD on {{expense.spendOn | date:'shortDate' }}
</li>
}
</ul>
Here,
- Expense with id = 1 will get updated in the server.
- The returned expenses will have the updated expense from the server.
Step 14: Finally, run the application using below command −
ng serve
Step 13: Now, open your friendly (such as Chrome) browser navigate to http://localhost:4200/ URL, and check the output −
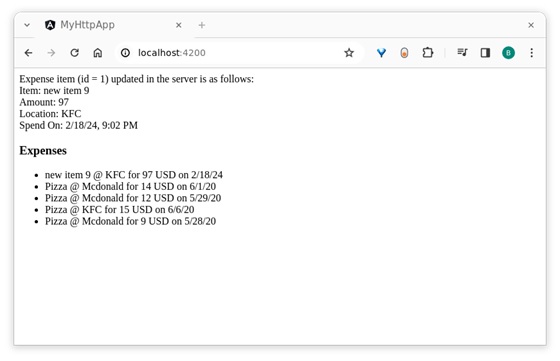
Here, the output shows our expenses as a list of items.
Conclusion
Angular provides an easy way to add data to the server through the HttpClient object. The post() is a specific method used to add new data to the server. We will learn more HTTP methods to target other HTTP verb in the upcoming chapters.
Multiple Choice Questions (MCQ's):
Here we have mentioned a few MCQs to test your knowledge on the current concept:
Q 1 − What is the primary purpose of an HTTP POST request in Angular?
A − To retrieve data from a server
B − To submit data to a server
Answer : B
Explanation:
The primary purpose of an HTTP POST request is to send data to a server to create or update a resource.
Q 2 − What type of data does the HttpClient.post method return by default?
Answer : A
Explanation:
The HttpClient.post method returns an Observable by default.
Q 3 − What is the correct syntax to make an HTTP POST request using HttpClient?
A − this.httpClient.post(this.url, id)
B − this.httpClient.post('https://api.example.com/data', { name: 'abc' })
C − this.httpClient.get('https://api.example.com/data', { name: 'abc' })
D − this.httpClient.fetch('https://api.example.com/data', { name: 'abc' })
Answer : B
Explanation:
The post method of the HttpClient service is used to make HTTP POST requests. The correct syntax is this.httpClient.post('https://api.example.com/data', { name: 'abc' });
Angular - HTTP PUT Request
The HTTP standard verb PUT can be used in the HTTP protocol to request the creation or update of a resource (data) on the server. The purpose of the PUT method is to send data to the server to create or update the resource based on the provided data.
The server processes the data and either "creates or updates" the requested resource. Once the data is created or updated, the server returns a response to the client.
In Angular, theHttpClientservice class provides aput()method to send data to the server using the HTTP PUT verb. Let us learn more about this method, including its signature, options, and real-time usage.
Signature of the put() Method
The signature (different from syntax) of the HttpClient put() method is as follows −
put<T>(url: string, body: any, options?: Object): Observable<T>
Here,
- URL − The URL to which the PUT request is sent.
- body − It represents the data to be sent (updated) to the server. Normally, it will be in JSON format.
- options − It represents the options to be sent along with the request, such as headers, query parameters, etc.
- Observable<T> − The return type, where 'T' represents the expected response type.
Options
Here are the available options for the HttpClient method −
observe
Observe is used to specify which part of the response has to be observed during the server communication. Based on the observe option, either the full or part of the response will be returned as Observable. The possible values are body, events, and response.
body: Retrieves only the body content of the response from the HTTP request as Observable<R>, where R is based on the responseType option and the requested type (e.g., Expense) of data.
this.http.put<Expense>(<url>, {
'observe': 'body',
'responseType' : 'json'
})
Here,
- JSON is the format used to interpret the response body.
- Expense is the requested type used to format the response body and returns as Observable<Expense>.
events: Retrieves the events fired in a response stream along with the corresponding response body as Observable<HttpEvent><R>>, where R is based on the responseType option and the requested type (e.g., Expense) of data.
this.http.put<Expense>(<url>,
{ 'observe': 'events',
'responseType' : 'json'
})
Here,
- JSON is the format used to interpret the response body.
- Expense is the requested type used to format the response body and returns Observable<HttpEvent<Expense>>.
response: Retrieves the complete response from the HTTP request as Observable<HttpResponse<R>>, where R is based on the responseType option (which we will check in the next section) and the requested type (e.g., Expense) of data.
this.http.put<Expense>(<url>, {
'observe': 'response',
'responseType' : 'json'
})
Here,
- JSON is the format used to interprets the response body.
- The Expense is the requested type used to format the response body and returns Observable<HttpResponse<Expense>>.
responseType
TheresponseTypeinterprets the response body. It can have four possible values as shown below −
- arraybuffer
- blob
- text
- json
Let us understand these four options one by one:
arraybuffer: Interprets the response body as a generic raw binary data buffer and returns Observable. It can be used to stream audio/video content −
this.http.put(<url>, {
'observe': 'body',
'responseType' : 'arraybuffer'
})
blob: Interprets the response body as the binary format and returns Observable<blob>. It can be used to download large files −
this.http.put(<url>, {
'observe': 'body',
'responseType' : 'blob'
})
text: Interprets the response body as plain text format and returns Observable<String>. It can be used to represent text-based data −
this.http.put(<url>, {
'observe': 'body',
'responseType' : 'json'
})
JSON: Interprets the response body in JSON format and returns Observable<R>, where R is the requested type (e.g., Expense) of data. It can be further encoded into any type by specifying the type variable (R) in the method as shown below −
this.http.put<Expense>(<url>, {
'observe': 'body',
'responseType' : 'json' }
)
Based on the observe and responseType, HttpClient will return Observable with a different type variable. Let us check a few combinations of observation and responseType to better understand the concept:
-
observe => body and responseType => JSON
Returns the Observable. R represents the type variable.
-
observe => response and responseType => JSON
Returns the Observable<HttpResponse>. R represents the type variable and encodes the response body.
-
observe => events and responseType => JSON
Returns the Observable<HttpEvent>. The response body is encoded as ArrayBuffer.
-
observe => events and responseType => arraybuffer
Returns the Observable<HttpEvent>. Responses body is encoded as ArrayBuffer.
-
observe => response and responseType => blob
Returns the Observable<HttpEvent>. The response body is encoded as ArrayBuffer.
-
observe => response and responseType => text
Returns the Observable<HttpResponse>. The response body is encoded as ArrayBuffer.
-
We can combine observe and responseType to create many more combinations as necessary.
headers
Theheaders are specified as the HTTP headers. It can include a standard HTTP header as a key/value pair or can encode the data in the HttpHeaders class. A sample header as a key/value pair is as follows:
{ 'Content-type': 'application/json' }
It specifies that the request content type is JSON. We can also use the HttpHeaders class provided by angular to create HTTP headers. A sample set of header information using HttpHeaders is as follows −
// create header using `HttpHeaders`
const headers = new HttpHeaders()
.set('content-type', 'application/json')
.set('Access-Control-Allow-Origin', '*');
this.http.put<Expense>(<url>, {
'observe': 'body',
'responseType' : 'json',
'headers': headers
})
params
Theparamsrepresent the serialized request parameter in application/x-www-form-urlencoded format. It can include params as a key/value pair or can encode the data in the HttpParams class. A sample parameter as a key/value pair is as follows −
{ 'name': 'john' }
It specifies that the request param key is a name, and its value is "john". We can also use the HttpParams class provided by angular to create parameters. A sample set of parameters using HttpParams is as follows −
// create parameters using `HttpParams`
const params = new HttpParams()
.set('name', 'john')
.set('age', 25)
.set('active', true;
this.http.put<Expense>(<url>, {
'observe': 'body',
'responseType' : 'json',
params: params
})
context
Thecontextsends arbitrary values as key/value pairs with type safety and without key conflict. It is used as a source of information for interceptors acting as middle-ware between client and server. Angular provides a special class, HttpContext to encode the context information. A sample context is as follows −
// create a key using HttpContextToken
export const IS_AUTH_ENABLED = new HttpContextToken<boolean>(() => false);
// set data for the context
let authContext = new HttpContext().set(IS_AUTH_ENABLED, true)
this.http.request<Expense>('GET', <url>, {
'observe': 'body',
'responseType' : 'json',
context: authContext
})
Here,
- HttpContextToken is used to create the key along the value type.
- IS_AUTH_ENABLED is the key, and its type is boolean.
reportProgress
The reportProgressspecifies whether to send back the progress of the request (communication) from the server. It can be used to show the progress of large file uploads through web API.
this.http.put<Expense>(<url>, {
'observe': 'events',
'responseType' : 'json',
reportProgress: true
})
withCredentials
The withCredentials is used to specify whether the request should be sent with outgoing credentials (cookies). It accepts the boolean value.
this.http.put<Expense>(<url>, {
'observe': 'body',
'responseType' : 'json',
withCredentials: true
})
transferCache
ThetransferCachespecifies whether the request should be cached. It accepts the boolean value or HttpTransferCacheOptions value. HttpTransferCacheOptions encode dynamic logic to filter requests to be cached based on a custom filter function and override default cache behavior.
this.http.put<Expense>(<url>, {
'observe': 'body',
'responseType' : 'json',
transferCache: true
})
To work out the HTTP client-server communication, we need to set up a web application and need to exposes a set of web API. The web API can be requested from the client. Let us create a sample server application, Expense API App, and provide CRUD REST API (mainly PUT requests) for expenses.
Create a Server for Expense REST APILet's create a working angular application to put a resource into the above server application and then get all expense items from the server including the new resource by using the HttpClient service class.
Angular Sample Application
Step 1: Run the below command to create an angular application −
ng new my-http-app
Enable angular routing and CSS as shown below −
? Would you like to add Angular routing? Yes ? Which stylesheet format would you like to use? CSS
Step 2: Configure Http client
Let's learn how to configure the HttpClientservice. You need to import the HttpClient in App Config:
provideHttpClient(withInterceptorsFromDi())
app.config.ts
import { ApplicationConfig, provideBrowserGlobalErrorListeners } from '@angular/core';
import { provideRouter } from '@angular/router';
import { routes } from './app.routes';
import { provideHttpClient, withInterceptorsFromDi } from '@angular/common/http';
export const appConfig: ApplicationConfig = {
providers: [
provideBrowserGlobalErrorListeners(),
provideRouter(routes),
provideHttpClient(withInterceptorsFromDi())
]
};
Step 3: Create a new interface, Expense to show the expense items from the server −
interface Expense {
id: Number,
item: String,
amount: Number,
category: String,
location: String,
spendOn: Date
}
export default Expense;
Step 4: Create a new component, ListExpenses to show the expense items from the server −
ng generate component ListExpenses
It will create a new component as shown below −
CREATE src/app/list-expenses/list-expenses.css (0 bytes) CREATE src/app/list-expenses/list-expenses.html (28 bytes) CREATE src/app/list-expenses/list-expenses.spec.ts (602 bytes) CREATE src/app/list-expenses/list-expenses.ts (229 bytes)
Step 5: Include our new component into the App root component view, app.component.html as shown below −
<app-list-expenses></app-list-expenses> <router-outlet></router-outlet>
Step 6: Inject the HttpClient into the ListExpenses component through the constructor as shown below −
import { Component } from '@angular/core';
import { HttpClient } from '@angular/common/http';
@Component({
selector: 'app-list-expenses',
imports: [],
templateUrl: './list-expenses.html',
styleUrls: ['./list-expenses.css']
})
export class ListExpenses {
constructor(private http: HttpClient) { }
}
Step 7: Implement the OnInit life cycle hook to request the server for expenses after the initialization of the ListExpenses component −
export class ListExpenses implements OnInit{
constructor(private http: HttpClient) { }
ngOnInit(): void {
}
}
Step 8: Create a local variable, expenses to hold our expenses from the server −
export class ListExpenses implements OnInit{
expenses: Expense[] = [];
constructor(private http: HttpClient) { }
ngOnInit(): void {
}
}
Step 9: Create a local variable, a newexpense to hold the new expense created in the server −
export class ListExpenses implements OnInit{
expenses: Expense[] = [];
newexpense: Expense | null = null;
constructor(private http: HttpClient) { }
ngOnInit(): void {
}
}
Step 10: Set the new expense item with sample data as shown below −
export class ListExpenses implements OnInit {
expenses: Expense[] = [];
newexpense: Expense | null = null;
constructor(private http: HttpClient) { }
ngOnInit(): void {
var spend_date = new Date();
spend_date.setDate(spend_date.getDate() - 1);
this.newexpense = {
'item': 'new item ' + Math.floor(Math.random() * 10),
'amount': Math.floor(Math.random() * 100),
'category': 'Food',
'location': 'KFC',
'spendOn': spend_date
}
}
}
Here,
- Used random method to set item name and amount.
- set spend date as yesterday.
Step 11: Call the put() method of this.http (HttpClient instance) object by passing the put url & our new expense item and get the updated expense object from the server −
export class ListExpenses implements OnInit {
expenses: Expense[] = [];
newexpense: Expense | null = null;
constructor(private http: HttpClient) { }
ngOnInit(): void {
var spend_date = new Date();
spend_date.setDate(spend_date.getDate() - 1);
this.newexpense = {
'item': 'new item ' + Math.floor(Math.random() * 10),
'amount': Math.floor(Math.random() * 100),
'category': 'Food',
'location': 'KFC',
'spendOn': spend_date
}
this.http.put<Expense>('http://localhost:8000/api/expense/1', this.newexpense,{
'observe': 'body',
'responseType': 'json'
})
.subscribe( data => {
this.newexpense = data as Expense;
console.log(data)
});
}
}
Step 12: Call the get() method of this.http (HttpClient instance) object by passing the list expenses URL and options and retrieving the expense object from the server. Then, set the expenses into our local variable, expenses −
export class ListExpenses implements OnInit {
expenses: Expense[] = [];
newexpense: Expense | null = null;
constructor(private http: HttpClient) { }
ngOnInit(): void {
var spend_date = new Date();
spend_date.setDate(spend_date.getDate() - 1);
this.newexpense = {
'item': 'new item ' + Math.floor(Math.random() * 10),
'amount': Math.floor(Math.random() * 100),
'category': 'Food',
'location': 'KFC',
'spendOn': spend_date
}
this.http.put<Expense>('http://localhost:8000/api/expense/1',
this.newexpense,{
'observe': 'body',
'responseType': 'json'
})
.subscribe( data => {
this.newexpense = data as Expense;
console.log(data)
});
this.http.get<Expense[]>('http://localhost:8000/api/expense',{
'observe': 'body',
'responseType': 'json'
})
.subscribe( data => {
this.expenses = data as Expense[]
console.log(this.expenses)
})
}
}
Here,
- Sets the Expense[] as the type of the object returned by the server. The server will send the array of expense objects along with a new expense object in its body in the JSON format.
- Subscribed to the request (this.http.get) object. Then parsed the subscribed data as an array of expense objects and set it to a local expense variable (this.expenses).
The complete code of the ListExpenses is as follows −
import { Component, OnInit } from '@angular/core';
import { HttpClient, HttpRequest, HttpResponse, HttpEvent, HttpParams }
from '@angular/common/http';
import Expense from '../Expense';
@Component({
selector: 'app-list-expenses',
imports:[],
templateUrl: './list-expenses.html',
styleUrls: ['./list-expenses.css']
})
export class ListExpenses implements OnInit {
expenses: Expense[] = [];
newexpense: Expense | null = null;
constructor(private http: HttpClient) { }
ngOnInit(): void {
var spend_date = new Date();
spend_date.setDate(spend_date.getDate() - 1);
this.newexpense = {
'item': 'new item ' + Math.floor(Math.random() * 10),
'amount': Math.floor(Math.random() * 100),
'category': 'Food',
'location': 'KFC',
'spendOn': spend_date
}
this.http.put<Expense>('http://localhost:8000/api/expense/1',
this.newexpense,{
'observe': 'body',
'responseType': 'json'
})
.subscribe( data => {
this.newexpense = data as Expense;
console.log(data)
});
this.http.get<Expense[]>('http://localhost:8000/api/expense',{
'observe': 'body',
'responseType': 'json'
})
.subscribe( data => {
this.expenses = data as Expense[]
console.log(this.expenses)
})
}
}
Step 14: Next, get the expenses list object and new expense object from the component and render it in our component template page (list-expenses.component.html) −
<div>Expense item (id = 1) updated in the server is as follows:</div>
<div>Item: {{newexpense?.item}}</div>
<div>Amount: {{newexpense?.amount}}</div>
<div>Location: {{newexpense?.location}}</div>
<div>Spend On: {{newexpense?.spendOn | date:'short'}}</div>
<div><h3>Expenses</h3></div>
<ul>
@for(expense of expenses; track $index){
<li>
{{expense.item}} @ {{expense.location}} for {{expense.amount}}
USD on {{expense.spendOn | date:'shortDate' }}
</li>
}
</ul>
Here,
- Expense with id = 1 will get updated in the server.
- The returned expenses will have the updated expense from the server.
Step 15: Finally, run the application using below command −
ng serve
Step 16: Open the browser and navigate to http://localhost:4200/ URL and check the output−
Here, the output shows the our expenses as a list of items.
Conclusion
Angular provides an easy way to send data to the server through the HttpClient object.put()is a specific method used to send data to the server. We will learn more HTTP methods to target other HTTP verbs in the upcoming chapters.
Multiple Choice Questions (MCQ's):
Here we have mentioned a few MCQs to test your knowledge on the current concept:
Q 1 − What is the primary purpose of an HTTP POST request in Angular?
A − To retrieve data from a server
B − To submit data to a server
Answer : B
Explanation:
The primary purpose of an HTTP POST request is to send data to a server to create or update a resource.
Q 2 − In the HttpClient.put() method, what does the body parameter represent?
B − The data to be sent to the server
Answer : B
Explanation:
The body parameter in the HttpClient.put() method is where you define the data that you want to send to the server.
Q 3 − Which option of the HttpClient.put() method is used to specify additional settings like headers?
Answer : C
Explanation:
The options parameter allows you to include additional settings like HTTP headers, query parameters, or other configuration options.
Q 4 − What type of data is sent in the body of the HttpClient.put() request?
Answer : B
Explanation:
When using the HttpClient.put() method, the data sent to the server is in JSON format. This is because JSON is a commonly used JSON format for exchanging data between a client (Angular) and a server.
Angular - HTTP DELETE Request
The HTTP standard verb DELETE can be used in the HTTP protocol to request the deletion of a specific resource (data) on the server. The purpose of the DELETE method is to ask the server to remove a particular piece of data.
In Angular, the HttpClient service class provides a delete() method to delete data on the server. Let's learn more about this method, including its signature, various options, real-time usage, etc.
Signature of the delete() Method
Following is the signature (different from syntax) of the HttpClient delete() method −
delete<T>(url: string, options?: Object): Observable<T>
Here,
- URL − The URL to which the delete request is sent.
- options − An object containing HTTP options such as headers, query parameters, etc.
- Observable<T> − The return type, where 'T' represents the expected response type.
Options
Following is a list of the available options −
observe
The observe specifies which part of the response has to be observed during the server communication. Based on the observe option, either the full or part of the response will be returned as Observable. The possible values are body, events, and response.
body: Retrieves only the body content of the response from the HTTP request as Observable<R>, where R is based on the responseType option and the requested type (e.g., Expense) of data.
this.http.delete<Expense>(<url>, {
'observe': 'body',
'responseType' : 'json'
})
Here,
- JSON is the format used to interprets the response body
- Expense is the requested type used to format the response body and returns as Observable<Expense>.
events: Retrieves the events fired in a response stream along with the corresponding response body as Observable<HttpEvent><R>>, where R is based on the responseType option and the requested type (e.g., Expense) of data.
this.http.delete<Expense>(<url>, {
'observe': 'events',
'responseType' : 'json'
})
Here,
- JSON is the format used to interprets the response body.
- Expense is the requested type used to format the response body and returns Observable<HttpEvent<Expense>>.
response: It is used to retrieve the complete response from the HTTP request as Observable<HttpResponse<R>>, where R is based on the responseType option (which we will check in the next section) and the requested type (e.g., Expense) of data. The purpose of the HttpResponse class is to represent the complete HTTP response from the server.
this.http.delete<Expense>(<url>, {
'observe': 'response',
'responseType' : 'json'
})
Here,
- JSON is the format used to interprets the response body.
- Expense is the requested type used to format the response body and returns Observable<HttpResponse<Expense>>.
responseType
The responseType is used to interpret the response body. It can have four possible values as shown below −
- arraybuffer
- blob
- text
- json
Let's understand the above options one by one:
arraybuffer: Interprets the response body as a generic raw binary data buffer and returns Observable. It can be used to stream audio/video content.
this.http.delete(<url>, {
'observe': 'body',
'responseType' : 'arraybuffer'
})
blob: Interprets the response body as the binary format and returns Observable<blob>. It can be used to download large files.
this.http.delete(<url>, {
'observe': 'body',
'responseType' : 'blob'
})
text: Interprets the response body as plain text format and returns Observable<String>. It can be used to represent text-based data.
this.http.delete(<url>, {
'observe': 'body',
'responseType' : 'json'
})
JSON: Interprets the response body as JSON format and returns Observable<R>, where R is the requested type (e.g., Expense) of data. It can be used to represent the result in JSON format.
this.http.delete<Expense>(<url>, {
'observe': 'body',
'responseType' : 'json'
})
Based on the observe and responseType, HttpClient returns Observable with a different type variable. Let's check a few combinations of observe and responseType to better understand this concept.
- observe => body and responseType => JSON
Returns the Observable. R represents the type variable.
- observe => response and responseType => JSON
Returns the Observable<HttpResponse>. R represents the type variable and encodes response body.
- observe => events and responseType => JSON
Returns the Observable<HttpEvent>. R represents the type variable and encodes the response body.
- observe => events and responseType => arraybuffer
Returns the Observable<HttpEvent>. The response body is encoded as ArrayBuffer.
- observe => response and responseType => blob
Returns the Observable<HttpEvent>. The Response body is encoded as ArrayBuffer.
- observe => response and responseType => text
Returns the Observable<HttpResponse>. The Response body is encoded as ArrayBuffer.
We can combine observe and responseType to create many more combinations as necessary.
headers
Theheadersspecify the HTTP headers. It can include a standard HTTP header as a key/value pair or can encode the data in the HttpHeaders class. A sample header as a key/value pair is as follows:
{ 'Content-type': 'application/json' }
It specifies that the request content type is JSON. We can also use the HttpHeaders class provided by angular to create HTTP headers. A sample set of header information using HttpHeaders is as follows −
// create header using `HttpHeaders`
const headers = new HttpHeaders().set('content-type', 'application/json')
.set('Access-Control-Allow-Origin', '*');
this.http.delete<Expense>(<url>, {
'observe': 'body',
'responseType' : 'json',
headers: headers
})
params
Theparamsrepresent the serialized request parameter in application/x-www-form-urlencoded format. It can include params as a key/value pair or can encode the data in the HttpParams class. A sample parameter as a key/value pair is as follows:
{ 'name': 'john' }
It specifies that the request param key is the name, and its value is john. We can also use the HttpParams class provided by angular to create parameters. A sample set of parameters using HttpParams is as follows −
// create parameters using `HttpParams`
const params = new HttpParams().set('name', 'john').set('age', 25)
.set('active', true;
this.http.delete<Expense>(<url>, {
'observe': 'body',
'responseType' : 'json',
params: params
})
context
Thecontextsends arbitrary values as key/value pairs with type safety and without key conflict. It is used as a source of information for interceptors acting as middle-ware between client and server. Angular provides a special class, HttpContext to encode the context information. A sample context is as follows:
// create a key using HttpContextToken
export const IS_AUTH_ENABLED = new HttpContextToken<boolean>(() => false);
// set data for the context
let authContext = new HttpContext().set(IS_AUTH_ENABLED, true)
this.http.request<Expense>('GET', <url>, {
'observe': 'body',
'responseType' : 'json',
context: authContext
})
Here,
- HttpContextToken is used to create the key along with the value type.
- IS_AUTH_ENABLED is the key, and its type is boolean.
reportProgress
The reportProgress is used to specify whether to send back the progress of the request (communication) from the server. It can be used to show the progress of large file uploads through web API:
this.http.delete<Expense>(<url>, {
'observe': 'events',
'responseType' : 'json',
reportProgress: true
})
withCredentials
The withCredentials is used to specify whether the request should be sent with outgoing credentials (cookies). It accepts the boolean value:
this.http.delete<Expense>(<url>, {
'observe': 'body',
'responseType' : 'json',
withCredentials: true
})
transferCache
ThetransferCache specifies whether the request should be cached. It accepts the boolean value or HttpTransferCacheOptions value. HttpTransferCacheOptions encode dynamic logic to filter requests to be cached based on a custom filter function and override default cache behavior:
this.http.delete<Expense>(<url>, {
'observe': 'body',
'responseType' : 'json',
transferCache: true
})
To work out the HTTP client-server communication, we need to set up a web application and need to exposes a set of web API. The web API can be requested from the client. Let us create a sample server application, Expense API App, and provide CRUD REST API (mainly DELETE requests) for expenses.
Create a Server for Expense REST APILet's create a working angular application to put a resource into the above server application and then get all expense items from the server including the new resource by using the HttpClient service class.
Angular Sample Application
Step 1: Run the below command to create an angular application −
ng new my-http-app
Enable angular routing and CSS as shown below −
? Would you like to add Angular routing? Yes ? Which stylesheet format would you like to use? CSS
Step 2: Configure Http client
Let's learn how to configure the HttpClientservice. You need to import the HttpClient in App Config:
provideHttpClient(withInterceptorsFromDi())
app.config.ts
import { ApplicationConfig, provideBrowserGlobalErrorListeners } from '@angular/core';
import { provideRouter } from '@angular/router';
import { routes } from './app.routes';
import { provideHttpClient, withInterceptorsFromDi } from '@angular/common/http';
export const appConfig: ApplicationConfig = {
providers: [
provideBrowserGlobalErrorListeners(),
provideRouter(routes),
provideHttpClient(withInterceptorsFromDi())
]
};
Step 3: Create a new interface, Expense to show the expense items from the server −
interface Expense {
id: Number,
item: String,
amount: Number,
category: String,
location: String,
spendOn: Date
}
export default Expense;
Step 4: Create a new component, ListExpenses to show the expense items from the server −
ng generate component ListExpenses
It will create a new component as shown below −
CREATE src/app/list-expenses/list-expenses.css (0 bytes) CREATE src/app/list-expenses/list-expenses.html (28 bytes) CREATE src/app/list-expenses/list-expenses.spec.ts (602 bytes) CREATE src/app/list-expenses/list-expenses.ts (229 bytes)
Step 5: Include our new component into the App root component view, app.component.html as shown below −
<app-list-expenses></app-list-expenses> <router-outlet></router-outlet>
Step 6: Inject the HttpClient into the ListExpenses component through the constructor as shown below −
import { Component } from '@angular/core';
import { HttpClient } from '@angular/common/http';
@Component({
selector: 'app-list-expenses',
imports: [],
templateUrl: './list-expenses.html',
styleUrls: ['./list-expenses.css']
})
export class ListExpenses {
constructor(private http: HttpClient) { }
}
Step 7: Implement the OnInit life cycle hook to request the server for expenses after the initialization of the ListExpenses component −
export class ListExpenses implements OnInit{
constructor(private http: HttpClient) { }
ngOnInit(): void {
}
}
Step 8: Create a local variable, expenses to hold our expenses from the server −
export class ListExpenses implements OnInit{
expenses: Expense[] = [];
constructor(private http: HttpClient) { }
ngOnInit(): void {
}
}
Step 9: Create a local variable, a newexpense to hold the new expense created in the server −
export class ListExpenses implements OnInit{
expenses: Expense[] = [];
newexpense: Expense | null = null;
constructor(private http: HttpClient) { }
ngOnInit(): void {
}
}
Step 10: Call the get method of this.http (HttpClient instance) object by passing the list expenses URL and options and getting the expense object from the server. Then, set the expenses into our local variable, expenses −
export class ListExpenses implements OnInit {
expenses: Expense[] = [];
newexpense: Expense | null = null;
constructor(private http: HttpClient) { }
ngOnInit(): void {
this.http.get<Expense[]>('http://localhost:8000/api/expense',
{
'observe': 'body',
'responseType': 'json'
}).subscribe( data => {
this.expenses = data as Expense[]
console.log(this.expenses)
})
}
}
Here,
- Sets the Expense[] as the type of the object returned by the server. The server will send the array of expense objects along with a new expense object in its body in the JSON format.
- Subscribed to the request (this.http.get) object. Then parsed the subscribed data as an array of expense objects, and set it to a local expense variable (this.expenses).
Step 11: Add a new delete method and call thedelete()method of this.http (HttpClient instance) object by passing the delete URL −
export class ListExpenses implements OnInit {
expenses: Expense[] = [];
newexpense: Expense | null = null;
constructor(private http: HttpClient) { }
delete(id? : Number) : void {
if (id) {
this.http.delete<Expense>('http://localhost:8000/api/expense/' + id,{
'observe': 'body',
'responseType': 'json'
}).subscribe( data => {
console.log(data)
this.http.get<Expense[]>('http://localhost:8000/api/expense',{
'observe': 'body',
'responseType': 'json'
}).subscribe( data => {
this.expenses = data as Expense[]
console.log(this.expenses)
})
});
}
}
ngOnInit(): void {
this.http.get<Expense[]>('http://localhost:8000/api/expense',{
'observe': 'body',
'responseType': 'json'
})
.subscribe( data => {
this.expenses = data as Expense[];
console.log(this.expenses);
})
}
}
Step 12: Next, get the expenses list object and render it in our component template page (list-expenses.component.html). Also, add an anchor tag for each expense and set the delete method by passing the corresponding expense ID −
<div><h3>Expenses</h3></div>
<ul>
@for(expense of expenses; track $index;){
<li>
{{expense.item}} @ {{expense.location}} for {{expense.amount}} USD on {{expense.spendOn | date:'shortDate' }} <a href="delete(expense.id)">delete</a>
</li>
}
</ul>
Here,
- When the user clicks the delete link, it will call the delete expense endpoint and delete the expense from the server.
Step 13: The complete code of the ListExpenses is as follows −
list-expenses.ts
import { Component, OnInit } from '@angular/core';
import { HttpClient, HttpRequest, HttpResponse, HttpEvent, HttpParams } from '@angular/common/http';
import Expense from '../Expense';
@Component({
selector: 'app-list-expenses',
imports:[],
templateUrl: './list-expenses.html',
styleUrls: ['./list-expenses.css']
})
export class ListExpenses implements OnInit {
expenses: Expense[] = [];
newexpense: Expense | null = null;
constructor(private http: HttpClient) { }
ngOnInit(): void {
var spend_date = new Date();
spend_date.setDate(spend_date.getDate() - 1);
this.newexpense = {
'item': 'new item ' + Math.floor(Math.random() * 10),
'amount': Math.floor(Math.random() * 100),
'category': 'Food',
'location': 'KFC',
'spendOn': spend_date
}
this.http.delete<Expense>('http://localhost:8000/api/expense/1',
this.newexpense,{
'observe': 'body',
'responseType': 'json'
}).subscribe( data => {
this.newexpense = data as Expense;
console.log(data)
});
this.http.get<Expense[]>('http://localhost:8000/api/expense',{
'observe': 'body',
'responseType': 'json'
}).subscribe( data => {
this.expenses = data as Expense[]
console.log(this.expenses)
});
}
}
Step 14: Finally, run the application using the below command −
ng serve
Step 15: Open the browser and navigate to http://localhost:4200/ URL and check the output −
Here, the output shows our expenses as a list of items except item 1.
Conclusion
Angular provides an easy way to send data to the server through the HttpClient object.delete()is a specific method used to send data to the server. We will learn more HTTP methods to target other HTTP verbs in the upcoming chapters.
Multiple Choice Questions (MCQ's):
Here we have mentioned a few MCQs to test your knowledge on the current concept:
Q 1 − What is the main purpose of the HTTP DELETE method in Angular?
A − To delete a resource on the server
B − To send data to the server to create or update a resource
Answer : A
Explanation:
The DELETE method is used to request the removal of a specific resource on the server.
Q 2 − Which option in HttpClient.delete() allows you to specify query parameters in the request?
Answer : C
Explanation:
The params option allows you to add query parameters to the request URL.
Q 3 − In the HttpClient.delete() method, what does the URL parameter represent?
A − The data to be sent to the server
B − The server address for the DELETE request
Answer : B
Explanation:
In the HttpClient.delete() method, the URL parameter represents the server address or endpoint to which the DELETE request will be sent in order to delete a specific resource.
Angular - HTTP JSONP Method
The JSONP is a special technique (of feature) used to bypass the cross-domain (CORS) policies enforced by web browsers. Generally, browsers only support AJAX calls within the same domain. To make AJAX calls to another domain, CORS policies need to be enabled on both the server and the client (browser).
Instead of enabling the CORS policy, the server can send the response in JSONP format. JSONP format is JSON enclosed in a callback function. When the browser receives the response, it executes it as a script. The callback function then processes the response and performs the necessary business logic.
Syntax for the JSONP callback function −
mycallback({
//...json data ...
});
Here,
- mycallback is the name of the function sent by the browser (client).
In Angular, thejsonp()is the method available in theHttpClient service class used to request the server using the JSONP technique. It is similar to the HttpClient get()method with an additional option to set the name of the query parameter used to get the callback function by the server.
An Angular will auto-generate a function to parse the JSON on the client side. Then, it will add a new query parameter to the URL. The name of the query parameter will be the name set in the JSONP call. The value of the query parameter is the name of the function auto-generate by angular.
Signature of the jsonp() Method
The signature (different from syntax) of the HttpClient jsonp() method is as follows −
jsonp(url: string, callback: string): Observable<any>
Here,
- url − The URL endpoint to which the JSONP request is made.
- callback − It represents the callback function name (which will be auto-generated) to be invoked after the JSONP server call.
- Observable<any> − The method returns an Observable that emits the JSONP response.
A simple code to demonstrate the JSONP method is as follows −
let jsonp_req = this.http.jsonp<Expense[]>
('http://localhost:8000/api/jsonp/expense', 'callback');
jsonp_req.subscribe(data => this.expenses = data);
Here,
- The this.http is the HttpClient instance.
- The jsonp()is a method used to request the server. It does not request the server directly. Instead, it returns an Observable, which can be used to request a server by subscribing to it and getting the actual response in the subscribed function.
- The http://localhost/api/jsonp/expenseis the URI (Uniform resource identifier) of the resource.
- Angular will auto-generate a function, sayng_jsonp_callback_0, and attach it to the request URL using the second argument of the jsonp() method.
http://localhost:8000/api/jsonp/expense?callback=ng_jsonp_callback_0
To work out the HTTP client-server communication, we need to set up a web application and need to exposes a set of web API. The web API can be requested from the client. Let us create a sample server application, Expense API App, and provide CRUD REST API (mainly JSONP requests) for expenses.
Create a Server for Expense REST APILet's create a working angular application to put a resource into the above server application and then get all expense items from the server including the new resource by using the HttpClient service class.
Angular Sample Application
Step 1: Run the below command to create an angular application −
ng new my-http-app
Enable angular routing and CSS as shown below −
? Would you like to add Angular routing? Yes ? Which stylesheet format would you like to use? CSS
Step 2: Configure Http client
Let's learn how to configure the HttpClientservice. You need to import the HttpClient in App Config:
provideHttpClient(withInterceptorsFromDi())
app.config.ts
import { ApplicationConfig, provideBrowserGlobalErrorListeners } from '@angular/core';
import { provideRouter } from '@angular/router';
import { routes } from './app.routes';
import { provideHttpClient, withInterceptorsFromDi } from '@angular/common/http';
export const appConfig: ApplicationConfig = {
providers: [
provideBrowserGlobalErrorListeners(),
provideRouter(routes),
provideHttpClient(withInterceptorsFromDi())
]
};
Step 3: Create a new interface, Expense to show the expense items from the server −
interface Expense {
id: Number,
item: String,
amount: Number,
category: String,
location: String,
spendOn: Date
}
export default Expense;
Step 4: Create a new component, ListExpenses to show the expense items from the server −
ng generate component ListExpenses
It will create a new component as shown below −
CREATE src/app/list-expenses/list-expenses.css (0 bytes) CREATE src/app/list-expenses/list-expenses.html (28 bytes) CREATE src/app/list-expenses/list-expenses.spec.ts (602 bytes) CREATE src/app/list-expenses/list-expenses.ts (229 bytes)
Step 5: Include our new component into the App root component view, app.component.html as shown below −
<app-list-expenses></app-list-expenses> <router-outlet></router-outlet>
Step 6: Inject the HttpClient into the ListExpenses component through the constructor as shown below −
import { Component } from '@angular/core';
import { HttpClient } from '@angular/common/http';
@Component({
selector: 'app-list-expenses',
imports: [],
templateUrl: './list-expenses.html',
styleUrls: ['./list-expenses.css']
})
export class ListExpenses {
constructor(private http: HttpClient) { }
}
Step 7: Implement the OnInit life cycle hook to request the server for expenses after the initialization of the ListExpenses component −
export class ListExpenses implements OnInit{
constructor(private http: HttpClient) { }
ngOnInit(): void {
}
}
Step 8: Create a local variable, expenses to hold our expenses from the server −
export class ListExpenses implements OnInit{
expenses: Expense[] = [];
constructor(private http: HttpClient) { }
ngOnInit(): void {
}
}
Step 9 : Call the get() method of this.http (HttpClient instance) object by passing the URL & options and retrieving the expense object from the server. Then, set the expenses into our local variable, expenses −
export class ListExpenses implements OnInit{
expenses: Expense[] = [];
constructor(private http: HttpClient) { }
ngOnInit(): void {
this.http.jsonp<Expense[]>
('http://localhost:8000/api/jsonp/expense','callback').subscribe(data =>{
this.expenses = data as Expense[]
console.log(this.expenses)
})
}
}
Here,
- Sets the Expense[] as the type of the object returned by the server. The server will send the array of expense objects in its body in JSON format.
- Subscribed to the request (this.http.jsonp) object. Then parsed the subscribed data as an array of expense objects and set it to a local expense variable (this.expenses).
Step 10: The complete code of the ListExpenses is as follows −
list-expenses.ts
import { Component, OnInit } from '@angular/core';
import { HttpClient, HttpRequest, HttpResponse, HttpEvent } from '@angular/common/http';
import Expense from '../Expense';
@Component({
selector: 'app-list-expenses',
templateUrl: './list-expenses.component.html',
styleUrls: ['./list-expenses.component.css']
})
export class ListExpenses implements OnInit {
expenses: Expense[] = [];
constructor(private http: HttpClient) { }
ngOnInit(): void {
this.http.jsonp<Expense[]>
('http://localhost:8000/api/jsonp/expense','callback').subscribe( data =>{
this.expenses = data as Expense[]
console.log(this.expenses)
})
}
}
Step 11: Next, get the expenses object from the component and render it in our component template page (list-expenses.html) −
list-expenses.html
<div><h3>Expenses</h3></div>
<ul>
@for(expense of expenses; track $index){
<li>
{{expense.item}} @ {{expense.location}} for {{expense.amount}} USD on {{expense.spendOn | date:'shortDate' }}
</li>
}
</ul>
Output
Step 12: Finally, run the application using the below command −
ng serve
Step 13: Open the browser and navigate to http://localhost:4200/ url and check the output

Here, the output shows our expenses as a list of items.
Conclusion
Angular provides an easy way to request the server through the HttpClient object.jsonp() is a specific method used to get resources from the server even if the server does not support cross-domain API calls (CORS).
Angular - CRUD Operations Using HTTP
What are CRUD Operations?
CRUD is an acronym (a shortened name) that stands for Create, Read, Update, and Delete. These are the four basic operations performed on data in most databases and web applications such as Employee Management System, LMS, etc. Each operation has its own functionality as follows:
- Create: This operation is used to add (create) a new record to the database.
- Read: This operation is used to retrieve (view) existing data from the database.
- Update: This operation is used to modify (edit) existing data in the database.
- Delete: This operation is used to remove (delete) existing data from the database.
Now that we have a basic understanding of CRUD operations. Let's learn about implementing CRUD operations in Angular and how to perform them using HTTP (HyperText Transfer Protocol).
CRUD Operations in Angular
In Angular, the CRUD (Create, Read, Update, and Delete) operations play an important role in managing data and performing specific tasks. These operations are handled using the Angular HttpClient service class to interact with HTTP RESTful APIs.
These operations allows you as follows:
- Create new records (POST requests).
- Read existing data (GET requests).
- Update existing data (PUT/PATCH requests).
- Delete records (DELETE requests).
Let's discuss these angular operations one by one:
Create Operation
In Angular, the Create operation involves sending a POST request to add (create) a new record to the server. This is done using the HttpClient service class, which provides an easy way to communicate with a RESTful API's.
Signature
Following is the signature (different from syntax) of the Create operation (which is POST a method) −
post<T>(url: string, body: any | null, options?: Object): Observable<T>
Here,
- URL − The URL to which the Create (POST) request is sent.
- body − It represents the data to be sent (updated) to the server. Normally, it will be in JSON format.
- options − It represents the options to be sent along with the request, such as headers, query parameters, etc.
- Observable<T> − The return type, where 'T' represents the expected response type.
Read Operation
In Angular, theRead operation involves sending aGET request toretrieve (get)an existing record from the server. This is done using theHttpClientservice class, which provides an easy way to communicate with RESTfulAPI's.
Signature
Following is the signature (different from syntax) of the Read operation (which is GET a method) −
get<T>(url: string, options?: Object): Observable<T>
Here,
- url − The URL to which the Read (GET) request is sent.
- options − represents the options to be send along with the resource URL.
- Observable<T> − The return type, where 'T' represents the expected response type.
Update Operation
In Angular, theUpdate operation involves sending aPUT/PATCH request tomodify (update) an existing record on the server. This is done using theHttpClient service class, which provides an easy way to communicate with RESTful API's.
Signature
Following is the signature (different from syntax) of the Update operation (which is PUT/PATCH a method) −
put<T>(url: string, body: any, options?: Object): Observable<T>
Here,
- URL − The URL to which the Update (PUT) request is sent.
- body − It represents the data to be sent (updated) to the server. Normally, it will be in JSON format.
- options − It represents the options to be sent along with the request, such as headers, query parameters, etc.
- Observable<T> − The return type, where 'T' represents the expected response type.
Delete Operation
In Angular, theDelete operation involves sending aDELETErequest toremove (delete)an existing record on the server. This is done using theHttpClient service class, which provides an easy way to communicate with RESTfulAPI's.
Signature
Following is the signature (different from syntax) of the Delete operation (which is DELETE a method) −
delete<T>(url: string, options?: Object): Observable<T>
Here,
- URL − The URL to which the Delete (DELETE) request is sent.
- options − An object containing HTTP options such as headers, query parameters, etc.
- Observable<T> − The return type, where 'T' represents the expected response type.
Sample Example
We will create an Angular application named EMS (Employee Management System), where we will implement all four CRUD operations to 'create', 'read', 'update', and 'delete' employee data.
Now, let's see the step-by-step guides for setting up a mini Angular project and implementing all four CRUD operations:
Project Setup
Step 1: Open your friendly IDE's terminal (e.g, vs code) or node.js command, and go to your favorite workspace as follows:
cd /go/to/your/favorite/workspace
Step 2: To manage your Angular application via commands, install the Angular CLI using the following command:
npm install @angular/cli //for latest version npm install @angular/cli@latest
Step 3: Create a new Angular application using the following command (see more):
ng new my-crud-app
Once you run the above command, it will ask you a few questions. You can reply with the default answers as shown below:
? Which stylesheet format would you like to use? (Use arrow keys) > CSS SCSS [ https://sass-lang.com/documentation/syntax#scss ] Sass [ https://sass-lang.com/documentation/syntax#the-indented-syntax ] Less [ http://lesscss.org .... ? Which stylesheet format would you like to use? CSS ? Do you want to enable Server-Side Rendering (SSR) and Static Site Generation (SSG/Prerendering)? Yes
Step 4: Navigate to your "application directory" and run the following commands one by one to create the four components:
cd my-crud-app ------ ng generate component dashboard ng generate component create ng generate component update ng generate component view ng generate interface employee
Step 5: Now, open the app.html file, remove everything, and leave only the following:
app.html
<router-outlet></router-outlet>
Step 6: Finally, run the application using the following command:
ng serve
Setting up Database
As we set up the application, we are ready to implement the CRUD operations in our Angular my-crud-app application. Let's set up the database too.
Step 7: Go to your assets folder (cd src/assets), create a .json file (e.g., db.json), and place the dummy data below:
{
"employees": [
{
"id": "1",
"name": "Employee1",
"email": "employee1@gmail.com",
"mobile": 9034123334,
"department": "XYZ"
}
]
}
The above data will be treated as the application database (endpoint URL), where we will send all the requests to manipulate data.
Step 8: Now, install the JSON-Server to access the above database as follows:
npm install json-server
Step 9: Run the following command to start the JSON-Server:
cd src -> assets ------- npx json-server --watch db.json JSON Server started on PORT :3000 Press CTRL-C to stop Watching db.json... (˶ᵔ ᵕ ᵔ˶) Index: http://localhost:3000/ Static files: Serving ./public directory if it exists Endpoints: http://localhost:3000/employees
Open your browser and navigate to http://localhost:3000 (default port) to see the JSON-Server data. To see the employee's data, navigate to http://localhost:3000/employees.
Setting up Service
Step 10: Install the service to communicate over the HTTP protocol for performing CRUD operations:
ng generate service services/auth
Once the above command is executed successfully, you will be able to see a folder named services containing two files: auth.ts and auth.spec.ts. We will implement all the CRUD operations in our "auth.ts" file.
Let's learn how to configure the HttpClientservice. You need to import the HttpClient in App Config:
provideHttpClient(withInterceptorsFromDi())
app.config.ts
import { ApplicationConfig, provideBrowserGlobalErrorListeners } from '@angular/core';
import { provideRouter } from '@angular/router';
import { routes } from './app.routes';
import { provideHttpClient, withInterceptorsFromDi } from '@angular/common/http';
export const appConfig: ApplicationConfig = {
providers: [
provideBrowserGlobalErrorListeners(),
provideRouter(routes),
provideHttpClient(withInterceptorsFromDi())
]
};
Create an Interface Employee. Open employee.ts file and place the below code:
employee.ts
export interface Employee {
id: string,
name: string,
email: string,
mobile: number,
department: string
}
Step 11: Open your auth.ts file and place the below code:
auth.ts
import { HttpClient } from '@angular/common/http';
import { Injectable } from '@angular/core';
import { Employee } from '../employee';
import { Observable } from 'rxjs';
@Injectable({
providedIn: 'root'
})
export class Auth {
private baseURL: string = "http://localhost:3000/employees";
constructor(private http: HttpClient) { }
//read employees data ( Read operation)
getAllEmployees(): Observable<Employee[]>{
return this.http.get<Employee[]>(this.baseURL);
}
//get employee by id (read operation)
getEmployeeById(id: string): Observable<Employee>{
return this.http.get<Employee>(this.baseURL + "/" + id);
}
//create or add new employee (Post operation)
createEmployee(obj: Employee){
return this.http.post(this.baseURL + "/", obj);
}
//update employee data (Put operation)
updateEmployee(id: string, obj: Employee) {
return this.http.put(this.baseURL + '/' + id , obj);
}
//delete employee (Delete operation)
deleteEmployee(id: string){
return this.http.delete(this.baseURL + "/" + id);
}
}
The above service class code will implement all four operations to "read", "update", "delete", and "create" employee data.
Setting up Routing
We need to set up routing that defines the paths for each component so that when the links or buttons are clicked, we can navigate through the different components.
Step 12: Open the app.routes.ts file, and place the below code to navigate to the respective component:
app.routes.ts
import { Routes } from '@angular/router';
import { Dashboard } from './dashboard/dashboard';
import { View } from './view/view';
import { Update } from './update/update';
import { Create } from './create/create';
export const routes: Routes = [
{path: '', redirectTo: 'dashboard', pathMatch: 'full'},
{path: 'dashboard', component: Dashboard},
{path: 'create', component: Create},
{path: 'view/:id', component: View},
{path: 'update/:id', component: Update},
];
Reading Employees Data
To retrieve (read) all the employee data from the JSON-server, we will use the HTTP GET operation.
Step 13: Open the respective files of the dashboard component in your angular application i.edashboard.html,dashboard.ts, anddashboard.cssfiles, and place the respective code below:
dashboard.html
<div class="dashboard">
<div class="header">
<h2>Welcome to EMS</h2>
</div>
<div class="add">
<a routerLink="/create">Add Employee</a>
</div>
<table>
<tbody>
<tr>
<th>ID</th>
<th>Name</th>
<th>Email</th>
<th>Actions</th>
</tr>
@for(employee of allEmployees; track $index){
<tr>
<td>{{employee.id}}</td>
<td>{{employee.name}}</td>
<td>{{employee.email}}</td>
<td>
<a [routerLink]="['/view', employee.id]" id="view">View</a>
<a [routerLink]="['/update', employee.id]" id="update">Update</a>
<a [routerLink]="['/delete', employee.id]" id="delete" (click)="delete(employee.id)">Delete</a>
</td>
</tr>
}
</tbody>
</table>
<div class="center">{{message}}</div>
</div>
dashboard.ts
import { Component, OnInit } from '@angular/core';
import { CommonModule } from '@angular/common';
import { ActivatedRoute, RouterModule } from '@angular/router';
import { Auth } from '../services/auth';
import { Employee } from '../employee';
@Component({
selector: 'app-dashboard',
imports: [CommonModule, RouterModule],
templateUrl: './dashboard.html',
styleUrl: './dashboard.css'
})
export class Dashboard implements OnInit{
constructor(private auth: Auth, private router: ActivatedRoute){}
allEmployees: Employee[] = [];
message:string = '';
ngOnInit(): void {
this.auth.getAllEmployees().subscribe(res=>{
this.allEmployees = res;
console.log(this.allEmployees);
});
}
delete(id: any){
if(confirm("Are you sure?") == false){
this.message = "Canceled....!";
setTimeout(()=>{
this.message = "";
}, 2000);
return;
}
this.auth.deleteEmployee(id).subscribe(res=>{
this.message = "Deleted.....!";
this.allEmployees = this.allEmployees.filter((emp: Employee) => emp.id !== id);
setTimeout(()=>{
this.message = "";
}, 2000);
})
}
}
dashboard.css
*{
font-family: sans-serif;
}
.dashboard{
width: 70%;
margin: 20px auto;
box-shadow: 1px 3px 4px;
padding: 10px;
}
.header{
width: 100%;
text-align: center;
background-color: gainsboro;
position: relative;
padding: 8px 0px;
}
.add{
float: right;
position: relative;
top: 20px;
right: 55px;
}
.add a{
text-decoration: none;
background-color: rgb(133, 142, 142);
padding: 10px;
color: white;
border-radius: 5px;
cursor: pointer;
}
table{
position: relative;
width: 90%;
border-collapse: collapse;
margin: 50px auto;
border-collapse: collapse;
padding: 10px;
}
table th, td{
border: 1px solid black;
text-align: center;
padding: 10px;
}
table th{
padding: 10px;
}
table a{
text-decoration: none;
margin: 0px 10px;
padding: 8px;
border-radius: 5px;
color: white;
}
#view{
background-color: rgb(63, 147, 196);
}
#update{
background-color: rgb(54, 101, 68);
}
#delete{
background-color: red;
}
.center{
text-align: center;
}
Output
The dashboard (landing) page will look like this:

Adding New Employee
To create (add) a new employee record in our JSON-server (i.e., database), we will use the HTTP POST operation.
Step 14: Now open create.html, create.ts, and create.css files and place the code below:
create.html
<div class="myForm">
<div class="header">
<h2>Create Employee Form</h2>
</div>
<form [formGroup]="createForm">
<input type="text" placeholder="Name" formControlName="name" required>
<input type="text" placeholder="Email" formControlName="email" required>
<input type="text" placeholder="Mobile" formControlName="mobile" required>
<input type="text" placeholder="Department" formControlName="department" required>
<button type="button" (click)="createEmp()">Create</button>
<a routerLink = "/dashboard">Go to Dashboard</a>
<p>{{message}}</p>
</form>
</div>
create.ts
import { Component, OnInit } from '@angular/core';
import { RouterModule, Router } from '@angular/router';
import { FormBuilder, FormControl, FormGroup, FormsModule, ReactiveFormsModule } from '@angular/forms';
import { Auth } from '../services/auth';
@Component({
selector: 'app-create',
imports: [RouterModule, FormsModule, ReactiveFormsModule],
templateUrl: './create.html',
styleUrls: ['./create.css']
})
export class Create implements OnInit {
createForm: FormGroup = new FormGroup({});
message: string = '';
constructor(private auth: Auth, private fb: FormBuilder, private router: Router) {}
ngOnInit(): void {
this.createForm = this.fb.group({
name: new FormControl(''),
email: new FormControl(''),
mobile: new FormControl(''),
department: new FormControl('')
});
}
createEmp(): void {
const name = this.createForm.get('name')?.value;
if (name.trim().length == 0) {
alert("Name can't be empty");
} else {
this.auth.createEmployee(this.createForm.value).subscribe(res => {
this.message = "Employee created successfully...!";
setTimeout(()=>{
this.router.navigate(['/dashboard']);
}, 1000);
});
}
}
}
create.css
*{
font-family: sans-serif;
}
.myForm{
width: 70%;
margin: 20px auto;
box-shadow: 1px 3px 4px;
padding: 10px;
}
.header{
width: 100%;
text-align: center;
background-color: gainsboro;
position: relative;
display: block;
padding: 8px 0px;
}
.myForm form{
width: 90%;
margin: 30px auto;
}
.myForm form input{
width: 90%;
display: block;
padding: 14px;
margin: 20px 0px;
border-radius: 5px;
}
.myForm form button{
padding: 10px 30px;
cursor: pointer;
background-color: rgb(56, 82, 130);
font-size: 18px;
border: none;
color: white;
border-radius: 5px;
}
a{
margin: 0px 10px;
}
Output
The employee create page will look like:

Once the new employee is created, the dashboard will look like this:

Updating Employee Data
To update the employee record (data), we will use the HTTP PUT operation.
Step 15: Open the update.html, update.ts, and update.css files and place the respective code below:
update.html
<div class="myForm" *ngIf="isLoaded">
<div class="header">
<h2>Create Employee Form</h2>
</div>
<form [formGroup]="updateForm">
<input type="text" placeholder="Name" formControlName="name" required>
<input type="text" placeholder="Email" formControlName="email" required>
<input type="text" placeholder="Mobile" formControlName="mobile" required>
<input type="text" placeholder="Department" formControlName="department" required>
<button type="button" (click)="UpdateEmp()">Update</button>
<a routerLink = "/dashboard">Go to Dashboard</a>
<p>{{message}}</p>
</form>
</div>
update.ts
import { CommonModule } from '@angular/common';
import { Component, OnInit } from '@angular/core';
import { FormBuilder, FormControl, FormGroup, FormsModule, ReactiveFormsModule } from '@angular/forms';
import { ActivatedRoute, RouterModule, Router } from '@angular/router';
import { Auth } from '../services/auth';
@Component({
selector: 'app-update',
imports: [FormsModule, ReactiveFormsModule, CommonModule, RouterModule],
templateUrl: './update.html',
styleUrl: './update.css'
})
export class Update implements OnInit{
constructor(private route: ActivatedRoute, private fb: FormBuilder, private auth: Auth, private router: Router){}
empId: any;
empDetails: any;
isLoaded: boolean = false;
updateForm: FormGroup = new FormGroup({});
ngOnInit(): void {
this.route.params.subscribe(res=>{
this.empId = res['id'];
console.log(this.empId);
});
if(this.empId !== ''){
this.auth.getEmployeeById(this.empId)
.toPromise()
.then(res=>{
this.empDetails = res;
this.updateForm = this.fb.group({
'name': new FormControl(this.empDetails.name),
'email': new FormControl(this.empDetails.email),
'mobile': new FormControl(this.empDetails.mobile),
'department': new FormControl(this.empDetails.department)
});
this.isLoaded = true;
});
}
}
message: any;
UpdateEmp(){
this.auth.updateEmployee(this.empId, this.updateForm.value).subscribe(res=>{
this.message = "Employee updated successfully..!";
setTimeout(()=>{
this.router.navigate(['/view/' + this.empId]);
}, 1000);
});
}
}
update.css
*{
font-family: sans-serif;
}
.myForm{
width: 70%;
margin: 20px auto;
box-shadow: 1px 3px 4px;
padding: 10px;
}
.header{
width: 100%;
text-align: center;
background-color: gainsboro;
position: relative;
display: block;
padding: 8px 0px;
}
.myForm form{
width: 90%;
margin: 30px auto;
}
.myForm form input{
width: 90%;
display: block;
padding: 14px;
margin: 20px 0px;
border-radius: 5px;
}
.myForm form button{
padding: 10px 30px;
cursor: pointer;
background-color: rgb(56, 82, 130);
font-size: 18px;
border: none;
color: white;
border-radius: 5px;
}
a{
margin: 0px 10px;
}
Output
The employee update page looks like:

Deleting Employee
To delete an employee, we will use the HTTP DELETE operation.
Step 16: Simply add the function below to your dashboard.ts file:
dashboard.ts
delete(id: any){
if(confirm("Are you sure?") == false){
this.message = "Canceled....!";
setTimeout(()=>{
this.message = "";
}, 2000);
return;
}
this.auth.deleteEmployee(id).subscribe(res=>{
this.message = "Deleted.....!";
this.allEmployees = this.allEmployees.filter((emp: Employee) => emp.id !== id);
setTimeout(()=>{
this.message = "";
}, 2000);
})
}
Output
After deleting an employee, the dashboard will look like this:

Multiple Choice Questions (MCQ's):
Here we have mentioned a few MCQs to test your knowledge on the current concept:
Q 1 − What does the CRUD stand for?
A − To delete a resource on the server
B − To send data to the server to create or update a resource
Answer : A
Explanation:
The DELETE method is used to request the removal of a specific resource on the server.
Q 2 − Which HTTP method is used to update an existing record in Angular?
Answer : C
Explanation:
The PUT HTTP method is used to update an existing record on the server in Angular.
Q 3 − In Angular, which HTTP method is used to send data to the server for the creation of a new record?
Answer : A
Explanation:
The POST method is used to send data to the server to create a new record in Angular.
Q 4 − Which of the following is the correct signature of the put() method in Angular's HttpClient?
A − put(url: string, body: any, options?: Object): Observable<any>
B − put(url: string, body: any): Observable<any>
Answer : A
Explanation:
The signature of the put() method is put(url: string, body: any, options?: Object): Observable<any>, where URL is the destination URL, body is the data being updated, and options are the optional configurations.
Angular - Introduction to Modules
Angular modules are core concepts in Angular application, which help to organize the application structure by grouping the related components, services, etc.
In this chapter, we will learn about the angular module, its importance in the application, how to create a module, and how to use it in our application in detail.
What are Angular Modules?
In Angular, a module refers to a place or container where you can group the components, directives, pipes, and services, which are related to the application. This helps organize the application, making it easier to understand and manage dependencies efficiently.
For example, if you are developing a website or an application, the header, footer, left, center, and right sections become part of a module. However, they are not modules themselves, they are individual components that belong to that module.
Types of Angular Modules
Following is a list of commonly used Angular modules −
Importance of Angular Modules
In Angular, a module plays an important role in "structuring an Angular application", making it easier for others to understand by simply viewing the application's hierarchy. An application is considered well-structured if each concern (say component or section) is separated into its own module.
For example, login and signup components can belong to an Authentication module.
How to Create an Angular Module?
To create an Angular module, you must have a basic understanding of thefirst Angular applicationcreation and about CLI, etc. Here are the step-by-step guides to creating an Angular module in an application:
Step 1: In your code editor (such as VS Code) open any existing angular application or create new one. (See how to...)
Step 2: Open the "terminal" in your code editor and go to your application directory as follows:
cd application_directory e.g.... cd myapp
Step 3: Now create a new module using the following command:
ng generate module auth
Here, auth is your "module name".
Once the above command is executed successfully, you may see:
CREATE src/app/auth/auth.module.ts (202 bytes)
Step 4: Toggle the Auth folder you may able to see the auth.module.ts file with some default code as follows:
auth.module.ts
import { NgModule } from '@angular/core';
import { CommonModule } from '@angular/common';
@NgModule({
declarations: [],
imports: [
CommonModule
]
})
export class AuthModule { }
How to use Angular Module?
As we have already created a new module named "auth" in our application. To use it properly in our angular application follow the steps below:
Step 1: Import Module
Import the newly created module within your root module (older version) or in the component (recent version) of your application as follows:
app.ts
import { Component } from '@angular/core';
import { CommonModule } from '@angular/common';
import { AuthModule } from './auth/auth-module';
@Component({
selector: 'app-root',
imports: [CommonModule, AuthModule],
templateUrl: './app.html',
styleUrl: './app.css',
})
export class App {
}
Step 2: Create Components
Now create "two" different components named login and signup as follows:
ng g c auth/login --no-standalone CREATE src/app/auth/login/login.spec.ts (552 bytes) CREATE src/app/auth/login/login.ts (199 bytes) CREATE src/app/auth/login/login.css (0 bytes) CREATE src/app/auth/login/login.html (21 bytes) UPDATE src/app/auth/auth-module.ts (255 bytes) ng g c auth/signup --no-standalone CREATE src/app/auth/signup/signup.spec.ts (559 bytes) CREATE src/app/auth/signup/signup.ts (203 bytes) CREATE src/app/auth/signup/signup.css (0 bytes) CREATE src/app/auth/signup/signup.html (22 bytes) UPDATE src/app/auth/auth-module.ts (310 bytes)
Note: Make sure that the component within the @NgModule should be "no standalone", otherwise, you may get an "error".
Step 3: Import and Export the components
Open the auth.module.ts file and import both the components within the @NgModule as follows:
auth.module.ts
import { NgModule } from '@angular/core';
import { CommonModule } from '@angular/common';
import { Login } from './login/login';
import { Signup } from './signup/signup';
@NgModule({
declarations: [
Login,
Signup
],
imports: [
CommonModule
],
exports:[
Login, Signup
]
})
export class AuthModule { }
Step 4: Use Components in your Templates
You can now use the LoginComponent and SignupComponent in your templates. For example, in the app.component.html file, you can include the following:
<app-login></app-login> <app-signup></app-signup>
Step 5: Run Application
Output
Finally, run the application to see the output:
ng serve
Step 6: Navigate to localhost:4200
Open your friendly browser (e.g chrome) and navigate through the localhost:4200.

As you can see in the above picture the the login and signup components belongs to AuthModule.
Conclusion
In conclusion, the Angular modules are important for building "scalable", "maintainable", and structured applications. Modules in Angular help organize and structure your code, making it easier to manage and understand.
Angular - Root Module
This chapter will cover the root module, standalone applications, and key parts of Angular root modules. It will also explain how to ensure that the root module is correctly implemented within your Angular application.
Angular Root Module
In Angular, the root module is named AppModule, which is the entry point of the angular application. It is a class defined with decorator @NgModule, which provides metadata (data about data) to configure the module.
In addition, the AppModule is a place or container where we group all the other modules, components, directives, pipes, services, etc.
Note: In the latest Angular version, applications are standalone by default and no longer depend on @NgModule. However, if you choose to use "@NgModule" in your application, ensure that neither the "application nor the components" are "standalone".
What is Standalone Application?
In Angular, a standalone application is an application that does not contain the @NgModule, in which all the "components", "directives", and "services" are independent. If the project is standalone, the app.module.ts file will not be available in your Angular application.
If your Angular application is no-standalone, you will be able to see the AppModule within your Angular application, but if not, you may not be able to see it. However, you can create your custom module using the command "ng generate module module_name". But that will not be considered a root module.
Creating No Standalone Application
In case to work with the root module or AppModule, we need to create a no standalone application. Use the following command to create a "no-standalone" angular application:
ng new myApp --no-standalone
Once you hit the above command in your code editor terminal, it will ask you a few questions and reply with a default answer.
Go to your src->app folder, you will able to see the app.module.ts file as follows:

Open the app.module.ts file in your code editor; you may able to see the code below:
import { NgModule } from '@angular/core';
import { BrowserModule, provideClientHydration } from '@angular/platform-browser';
import { AppRoutingModule } from './app-routing.module';
import { AppComponent } from './app.component';
@NgModule({
declarations: [
AppComponent
],
imports: [
BrowserModule,
AppRoutingModule
],
providers: [
provideClientHydration()
],
bootstrap: [AppComponent]
})
export class AppModule { }
The above code is the default code, automatically added when a new application (no standalone) is created. Let's discuss a few of the key parts of the root module, which are:
- Declarations
- Imports
- Providers
- Bootstrap
Declarations
The declarations are an array that contains a list of components, directives, and pipes that belong to this module. For example, the AppComponent is a part of this module, so it is included in the declarations.
Imports
The imports are an array, which lists out all the other modules whose exported classes are needed by the components in this module. As you can see, the imports contain the AppRoutingModule and BrowserModule.
Providers
Theprovidersare anarray, which lists the services available to the injector and can be used throughout the module.
Bootstrap
The bootstrap is also an array in @NgModule, it specifies the root component that Angular should create and insert into the index.html host web page.
As you can see, the AppComponent is listed within the bootstrap array, which specifies that it is the application's root component.bootstrap: [AppComponent]
Angular - Feature Module
This chapter will discuss the Angular feature module. It is a module that is not generated automatically, we need to create it manually to organize similar data in the application.
Feature Module in Angular
In Angular, a feature module is a "custom module" created by "developers" once the application is built or initiated. This module helps partition the application into focused areas for better organization. It shares a common features or functionalities across the application.
You can create different feature modules for various functionalities. For example, an authentication module to handle user "login" and "signup", while an admin module provides a separate dashboard for "user management". Additionally, a shared module can include common elements like the "header" and "footer".
Important! To use the feature module in your application, make sure that the feature module is imported into the root module (older version) and AppComponent (latest version).
Feature Module vs Root Module
Here are the few differences between the feature and root modules −
| Feature Module | Root Module |
|---|---|
| It is mostly created by Users to organize the application structure. | Generally automatically created by Angular CLI while creating the application (in older version). |
| It provides a way to organize code into a structured way of the related functionality. | Serves as the application entry point and sets a basic structure and configuration. |
| Can be a lazy-loaded module that enhances the application performance. | Eagerly loaded as it is required to bootstrapping the application. |
| It contains various declarations such as directives, components, and pipes. | It contains the declarations, imports, and root-level providers which are necessary for running the application. |
Important! As per the latest angular version, the application are created as standalone, so the applications are no more depend on the root module (i.e., AppModule).
How to Create a Feature Module in Angular?
To create a feature module in your Angular application, you need to create a "custom module" and generate some components, directives, services, and routing that belong to this module. So this module can share its features throughout the entire application.
Follow and implement the steps given below in any existing application, if not create a new application and implement the same.
Step 1: Open any existing project in your preferred code editor (e.g., vs code) or create a new project using the following command:
ng new myApp
Redirect to the application directory by using the cd myApp command.
Step 2: Create a Module
Create a new module (that will be considered as a feature module), Admin using the following command:
ng generate module admin --routing
Here,
The --routing flag will create its own routing file, where you can define routes for all its related components.
Let's create the components and services within the admin module, which will include the related functionality for the admin.
Step 3: Create Components
Create two components, About and Contact using the following command:
ng generate component admin/About ng generate component admin/Contact
Here,
The admin/ path specifies that the component will be created within the Admin module.
Step 3: Create a Service
Create a service class, adminService, using the following command:
ng generate service adminService
Note: After executing all the above "components" and 'services" within the admin module, you will be able to see all the admin-related components, services, and routing functionalities organized within the admin module. This will give you a clear understanding of the application structure.

Step 4: Define routes
Open the admin-routing.module.ts file and define the routes to navigate the admin components:
admin-routing.module.ts
import { NgModule } from '@angular/core';
import { RouterModule, Routes } from '@angular/router';
import { About } from './about/about';
import { Contact } from './contact/contact';
const routes: Routes = [
{path: 'about', component: About},
{path: 'contact', component: Contact}
];
@NgModule({
imports: [RouterModule.forChild(routes)],
exports: [RouterModule]
})
export class AdminRoutingModule { }
Let's see how to use the created feature module in our angular application, myApp.
How to use a Feature Module in Angular?
In this section, we will discuss how to use the Admin feature module we created in our Angular application.
Step 1: Importing Feature Module
Open the app.ts file in your code editor, import the AdminModule, and add it to the imports array:
app.ts
import { Component } from '@angular/core';
import { CommonModule } from '@angular/common';
import { RouterModule, RouterOutlet } from '@angular/router';
import { AdminModule } from './admin/admin.module';
@Component({
selector: 'app-root',
imports: [CommonModule, RouterOutlet, AdminModule, RouterModule],
templateUrl: './app.html',
styleUrl: './app.css'
})
export class App {
title = 'myApp';
}
Step 2: Define Routes for Admin Module
Open the app-routing.module.ts file and define routes for the Admin module to navigate through its components when the admin route is active:
app-rounting.module.ts
import { Routes } from '@angular/router';
export const routes: Routes = [
{
path: 'admin',
loadChildren:() => import('./admin/admin.module').then(m => m.AdminModule)
}
];
Important! The above routing strategy performs lazy loading, which means it will load the individual admin components only when required.
Step 3: Rendering Feature module Component Template
Open the app.html file and create links to click to navigate to the respective component template:
app.html
<h3>Welcome to Angular Feature Module</h3> <hr> <p>MyLinks</p> <a routerLink="admin/about">About</a> <a routerLink="admin/contact">Contact</a> <br><br><hr> <router-outlet></router-outlet>
Step 4: Run the application using the following command:
ng serve
Output
Step 5: Open your preferred browser and navigate to the localhost:4200 URL.
The application will look like:
Advantages of Feature Module
Here are some of the advantages of the feature module:
- Reusability: Feature modules can be reused across different applications or in different parts of the same application.
- Organized structure: By partitioning the application into different parts based on roles and functionalities, you can create a well-organized application structure.
- Improved testing: Testing becomes more straightforward by using feature modules.
- Consistent Dependencies: Each module can manage its own dependencies.
Conclusion
In conclusion, the feature modules offer some key benefits that enhance the development and maintenance of large applications. Their reusability allows for efficient use across different projects, while an organized structure helps maintain a clean and manageable codebase that anyone can understand very easily.
Angular - Sharing Module
This Angular tutorial chapter will cover the Shared Module, including how to create it, how to use it, and its advantages and disadvantages.
Shared Module in Angular
In Angular, the Shared Module is a custom module designed or created by the developer based on the requirements of the application. The Shared module allows developers to access its components, directives, pipes, etc., throughout the application.
A Module itself is not a shared module until it is properly exported and imported into other modules where its components are needed.
Creating a Shared Module
Creating a shared module allows you to organize and simplify your code, reducing the redundancy of repeating the same things within the same application.
Use the following command to create a module in your Angular application, and this module will be used as a shared module in the application. We import export this module within the other module where it's component are needed.
Step 1: Open the project
Open your application in any code editor (such as VS code).
Step 2: Navigate to the Application Directory
Open the code editor terminal and navigate to your application directory as follows:
cd your_application_directory e.g. cd myapp
Step 3: Create a new module (i.e., consider it a shared module) named Shared as follows:
ng generate module shared
Once the above command is executed successfully, you should be able to see the shared folder. Within this folder, there will be a file named shared.module.ts with a default code:
shared.module.ts
import { NgModule } from '@angular/core';
import { RouterModule, Routes } from '@angular/router';
const routes: Routes = [];
@NgModule({
imports: [RouterModule.forRoot(routes)],
exports: [RouterModule]
})
export class AppRoutingModule { }
How to Use Shared Module?
To use the Shared Module in our Angular application, the first step is to import it into our root module, which is named AppModule in our application.
Step 1: Open the app.module.ts file and import the shared module as follows:
app.module.ts
import { NgModule } from '@angular/core';
import { BrowserModule, provideClientHydration } from '@angular/platform-browser';
import { AppRoutingModule } from './app-routing.module';
import { AppComponent } from './app.component';
import { SharedModule } from './shared/shared.module';
@NgModule({
declarations: [
AppComponent
],
imports: [
BrowserModule,
AppRoutingModule,
SharedModule
],
providers: [
provideClientHydration()
],
bootstrap: [AppComponent]
})
export class AppModule { }
We have already created a shared module in our Angular application and imported it into the AppModule (i.e., root module). Now, let's create two components within the Shared Module to use throughout the entire application.
Step 2: Create a Header Component
Create a new component, Header within the shared module as follows:
ng generate component shared/header
Step 3: Open the header.html file and place the below code:
header.html
<h2>This his Header</h2> <p>A component from Shared Module</p>
Step 4: Create another component, Footer.
Create one more component, Footer within the shared module as follows:
ng generate component shared/footer
Step 5: Open the footer.html file and place the below code:
footer.html
<h2>This his Footer</h2> <p>A component from Shared Module</p>
Step 6: Update the Shared Module
To use the "components" of the Shared Module outside of this module, you need to export the Header and Footer components in the shared.module.ts file as follows:
shared.module.ts
import { NgModule } from '@angular/core';
import { CommonModule } from '@angular/common';
import { Header } from './header/header';
import { Footer} from './footer/footer';
@NgModule({
declarations: [
Header,
Footer
],
imports: [
CommonModule
],
exports: [Header, Footer]
})
export class SharedModule { }
Step 7: Update App Component
Open the app.html and place the code below:
app.html
<app-header></app-header> <hr> <p>This is the loaded area</p> <hr> <app-footer></app-footer>
Step 8: Run the application using the following command:
ng serve
Step 9: Open your friendly browser (chrome) and navigate to localhost:4200:

Advantages of Shared Module
The following is a list of the advantages of the Shared Modules:
- It increases application performance by using "reusable" components, directives, etc.
- Organizes the application, streamlining the code.
- Increases application modularity.
- Decreases redundancy.
Conclusion
In conclusion, observing the above output should provide you with a complete understanding of how the Shared Modules operates. By sharing this module, we can use its "components", "directives", and "pipes" across the entire application rather than creating them multiple times within the same application.
Angular - Routing Module
This chapter will discuss the "Angular Routing Module". It is quite similar to routing concepts, which we have already covered in the previous angular chapter.
Routing Module in Angular
In Angular, a Routing Module is a special module that handles the configuration and management of routes within an application. It defines the routes (paths) for the various components to navigate between views or components.
You can define application routing logic separately from the rest of the application, which will react to the user interaction.
Important Points of Routing Module
Following are a few important points about the Routing Module you must know:
- In older angular version, the CLI automatically created a routing module named as app-routing.module.ts while creating a new application, where you can define routes to navigate between various components.
- In latest angular version, the CLI does not automatically create a routing module but instead creates a file named app.routes.ts to define the routes but it is not a routing module.
- This file contains the route configuration array, which is then imported into a separate routing module, such as AppRoutingModule, to configure the RouterModule.
Older Angular Version:
Latest Angular Version:
Important! The following creation steps of the routing module will be followed as per the "latest Angular version".
Creating Routing Module in Angular
To create a routing module in your existing or new Angular application, follow and implement the steps given below:
Step 1: Open or Create a new Angular project
Open any existing angular project in your preferred code editor (e.g., vs code) or create a new application by running the following command:
ng new myapp
Step 2: Create app.routes.ts
Create a new file named app.routes.ts within the src/app folder (if it is not already created by Angular CLI):
src/app -> app.routes.ts
Step 3: Update the app.routes.ts
Open the app.routes.ts file in your code editor. If it is empty, add the given code below:
import { Routes } from '@angular/router';
export const routes: Routes = [
];
Step 4: Create Standalone Components
Create two standalone components named Home and About using the following commands:
ng generate component Home ng generate component About
Step 5: Define routes
Update the app.routes.ts to define the routing paths for the new components:
import { Routes } from '@angular/router';
import { Home } from './home/home';
import { About } from './about/about';
export const routes: Routes = [
{path: 'home', component: Home},
{path: 'about', component: About}
];
How to use Routing Module in Angular?
We have created a routing module and defined the routes for the Home and About components to navigate when the URL changes. As the routing module is ready to use, we need to import some necessary modules, directives, and components to use it in our application.
Follow the steps given below to make it ready for use in your application:
Step 1: Configure routing in AppConfiguration
Open the app.config.ts file in your code editor import routes and add the same in the providers array:
app.config.ts
import { ApplicationConfig } from '@angular/core';
import { provideRouter } from '@angular/router';
import { routes } from './app.routes';
export const appConfig: ApplicationConfig = {
providers: [provideRouter(routes)]
};
Step 2: Update the app.ts
Open the app.component.ts file in your code editor import the necessary modules (e.g., RouterModule, RouterOutlet directive, and components), and add the same within the imports array:
app.ts
import { Component } from '@angular/core';
import { CommonModule } from '@angular/common';
import { RouterModule, RouterOutlet } from '@angular/router';
import { Home } from './home/home';
import { About } from './about/about';
@Component({
selector: 'app-root',
imports: [
CommonModule,
RouterOutlet,
RouterModule,
Home,
About
],
templateUrl: './app.html',
styleUrl: './app.css'
})
export class App {
title = 'myApp';
}
Step 3: Update the app.html
Open the app.html file and update it with the following code:
app.html
<h3>Routing Module Example</h3> <a routerLink="home">Home</a> <a routerLink="about">About</a> <hr> <router-outlet></router-outlet>
Step 4: Update the app.css
Open the app.css file and place the code below:
app.css
a{
text-decoration: none;
margin: 10px 10px;
background-color: green;
padding: 10px ;
color: white;
}
hr{
margin: 20px 0px;
padding: 2px;
}
Output
Step 5: Run the Application:
Now open your preferred browser (e.g., chrome) and navigate to the localhost:4200 URL to see the output:

Angular - NgModule
This chapter will discuss the NgModule in Angular. NgModule is a key component of every custom or root module, which plays an important role in structuring and organizing an Angular application.
Important!! As per the latest Angular version, the application and components created are standalone by default, which means they do not depend on @NgModule. So, the Angular team recommends using the standalone component instead of NgModule.
Angular NgModule
In Angular, the NgModule is a class marked (or defined) with the @NgModule decorator, which specifies it as an Angular module. This decorator provides metadata that tells Angular how to compile and run the module code and configure the DI (dependency injection).
Here is the snippet of the @NgModule in Angular:
import { NgModule } from '@angular/core';
import { BrowserModule } from '@angular/platform-browser';
import { App} from './app';
import { MyFeatureModule } from './my-feature/my-feature.module';
import { MyService } from './my-service';
@NgModule({
declarations: [
App,
],
imports: [
BrowserModule,
MyFeatureModule
],
providers: [
MyService
],
bootstrap: [
App
]
})
export class AppModule { }
Note: The NgModule has two main responsibilities:
- Declaring components, directives, and pipes that belong to the NgModule
- Add providers to the injector for components, directives, and pipes that import the NgModule
Important Properties of @NgModule
The @NgModule class has several important properties which are:
- Declarations
- Imports
- Exports
- Providers
- Bootstrap
Declarations
The declarations are an array, that contains the list of components, directives, and pipes that belong to this module.
@NgModule({
// Signup and Login are components.
declarations: [Signup, Login],
})
export class AuthModule { }
In the example above, the components SignupComponent and LoginComponent belong to AuthModule.
Note: If Angular finds any components, directives, or pipes declared in more than one NgModule, it reports an error.
Any components, directives, or pipes must be explicitly marked as standalone: false, to be declared in an NgModule.
@Component({
// mark is false so that it can be declared in @NgModule
standalone: false,
})
export class CustomMenu { }
Imports
The imports are an array, which lists out the other modules whose exported classes are needed by the components in this module.
The components may depend on other components, directives, and pipes. Add these dependencies in the imports property of @NgModule.
@NgModule({
imports: [CommomModule, AppRoutingModule],
// Signup and Login are components.
declarations: [Signup, Login],
})
export class AuthModule { }
The imports array accepts other NgModules, as well as standalone components, directives, and pipes.
Exports
The exports are an array, which defines the components, directives, and pipes that can be used in the templates of other modules.
@NgModule({
imports: [CommomModule, AppRoutingModule],
// Signup and Login are components.
declarations: [Signup, Login],
exports: [Login, Signup]
})
export class AuthModule { }
The exports property is not limited to declarations. However, a NgModule can also export any other components, directives, pipes, and NgModules that it imports.
NgModule Providers
The providers are also an array, which lists out the services that are available to the injector and can be used throughout the module.
@NgModule({
// Signup and Login are components.
declarations: [Signup, Login],
providers: [MyService],
})
export class AuthModule { }
@NgModule({
imports [AuthModule],
declarations: [UserProfile],
providers: [UserData],
})
export class UserProfileModule { }
Here, in the example above:
- The AuthModule provides the MyService.
- The Login and SignUp components can inject MyService because they're declared in AuthModule.
- UserProfile can inject MyService because its NgModule imports AuthModule.
- UserData can inject MyService because its NgModule imports AuthModule.
The forRoot and forChild Pattern
In Angular, a few NgModule define a static forRoot() method that accepts some configuration and returns an array of providers.
If any providers are included this way will be eagerly loaded, and increases the JavaScript bundle size of your first loaded page.
boorstrapApplication(AppComponent, {
providers: [
AuthModule.forRoot(/* configuration */),
],
});
Similarly, some NgModules may define a staticforChild() methodthat indicates the providers are considered to be added to components within your application hierarchy.
@Component({
providers: [
CustomMenuModule.forChild(/*configuration */),
],
})
export class UserProfile { }
Bootstrapping Application
In Angular, the@NgModuledecorator accepts an optionalbootstraparray that may contain one or more components.
You can use thebootstrapModule()method from eitherplatformBrowser (i.e., a client)orplatformServer (i.e., a server)to start an Angular application.
import { BrowserModule } from '@angular/platform-browser';
@NgModule({
bootstrap: [AppComponent],
})
export class AppModule { }
BrowserModule().bootstrapModule(AppModule);
Angular - Service Workers & PWA
Progressive web apps (PWA) are normal web application with few enhancements and behaves like a native application. PWA apps does not depends on network to work. PWA caches the application and renders it from local cache. It regularly checks the live version of the application and then caches the latest version in the background.
PWA can be installed in the system like native application and shortcut can be shown in the desktop. Clicking the shortcut will open the application in browser with local cache even without any network available in the system.
Angular application can be converted into PWA application. To convert an Angular application, we need to use service worker API. Service worker is actually a proxy server, which sits in between the browser, application and the network.
Service workers is separate from web pages. It does not able to access DOM objects. Instead, Service Workers interact with web pages through PostMessage interface.
PWA application has two prerequisites. They are as follows,
Browser support − Even though lot of browser supports the PWA app, IE, Opera mini and few other does not provides the PWA support.
HTTPS delivery − The application needs to be delivered through HTTPS protocol. One exception of the https support is localhost for development purpose.
Let us create a new application and convert it into PWA application.
Create a new Angular application using below command −
cd /go/to/workspace ng new pwa-sample
Add PWA support using below command −
cd pwa-sample ng add @angular/pwa --project pwa-sample
Build the production version of the application,
ng build --prod
PWA application does not run under Angular development server. Install, a simple web server using below command −
npm install -g http-server
Run the web server and set our production build of the application as root folder.
f the application as root folder. http-server -p 8080 -c-1 dist/pwa-sample
Open browser and enter http://localhost:8080.
Now, go to Developer tools -> Network and select Offline option.
Normal application stops working if network is set to Offline but, PWA application works fine as shown below −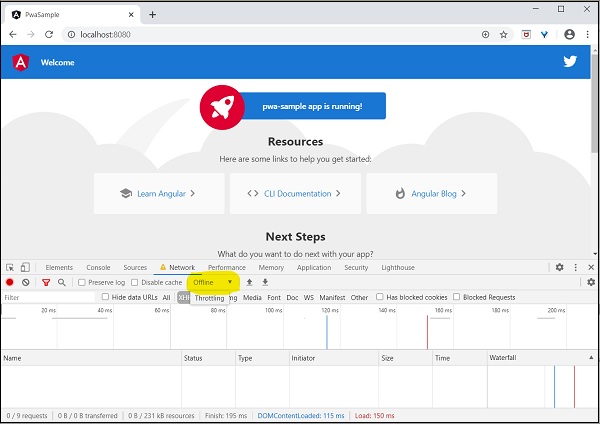
Angular - Design Patterns
This chapter will discuss Design Patterns in Angular. It includes an introduction, its types, and advantages. After reading the entire chapter, you will have a clear understanding of Design Patterns.
Design Patterns
In software engineering, design patterns are like a reusable blueprint or a template for solving common problems in software design. A few of them might also known as a "software design pattern".
Design patterns help developers to apply best practices in software development, which enhance the performance, maintainability, and scalability of software applications. By using the specified design patterns, developers can solve common design problems more easily, which can lead to higher-quality software.
Let's take a simple scenario in an Angular application to understand it better.
Scenario: Singleton Pattern in an Angular Application
Suppose you are developing an Angular application that needs to create a service. You want to ensure that only one instance of the service class is created and used throughout the application. This is where the Singleton pattern comes into action.
Design Patterns in Angular
In Angular, design patterns are known methods (or techniques) for solving common design problems. Applications built using design patterns are more scalable and reliable. Additionally, design patterns also improve the application's performance by decreasing redundancy and loading components and modules when they are required.
We will discuss some important design patterns in the further chapters in detail, including their usage, syntax to create, advantages, implementation examples, etc.
Types of Design Patterns in Angular
Below is a list of commonly used Design Patterns in Angular application:
Let's discuss them briefly with a simple code snippet one by one.
Dependency Injection (DI)
In Angular, Dependency Injection (in short, DI) is a "design pattern" in which a class receives its dependencies from an external source instead of creating them itself.
This approach helps applications achieve loose coupling and reduce tight coupling between different parts of the application. By injecting dependencies, applications become more flexible and adaptable to changes.
Example
In the following example, you can see that the CalculatorComponent injects the MyCalcService dependencies rather than creating them itself. This service already exists in the application, so we use the Dependency Injection design pattern, which allows us to use this pre-existing dependency.
calculator.ts
import { CommonModule } from '@angular/common';
import { Component } from '@angular/core';
import { MyCalc } from '../my-calc';
import { FormsModule } from '@angular/forms';
@Component({
selector: 'app-calculator',
imports: [CommonModule, FormsModule],
templateUrl: './calculator.html',
styleUrl: './calculator.css'
})
export class Calculator implements OnInit{
//injecting service
constructor(private myservice: MyCalc){}
n1: number = 10;
n2: number = 20;
add: number = 0;
subtract: number = 0;
multiply: number = 0;
divide: number = 0;
ngOnInit(): void(){
this.add = this.myservice.add(this.n1, this.n2);
this.subtract = this.myservice.subtract(this.n1, this.n2);
this.multiply = this.myservice.multiply(this.n1, this.n2);
this.divide = this.myservice.divide(this.n1, this.n2);
}
}
Click the link to read in more detail
Lazy Loading
In Angular, the Lazy-loading is a "design pattern" developed by the google angular team to "enhance the application performs". The "lazy-loading" technique loads only the required component and module at a time rather than loading all together.
For example, suppose you have an Angular application with multiple feature modules, like a "dashboard", "user profile", "settings", and "reports". Instead of loading all these modules when the application starts, you can configure lazy loading to load these modules only when the user navigates to them.
Example
In this example, we will define routes for the modules, "Auth" and "Dashboard". By using the loadChildren property, we will set them as lazy-loaded modules, so they will only load when the relevant route is active in the URL.
For example, if the URL localhost:4200/auth is active, only the "Auth" module will be loaded, and same for localhost:4200/dashboard URL.
app.routes.ts
import { Routes } from '@angular/router';
export const routes: Routes = [
{path: 'auth',
loadChildren:() => import('./auth/auth.module').then(m => m.AuthModule)},
{path: 'dashboard',
loadChildren:() => import('./dashboard/dashboard.module').then(m => m.DashboardModule)
}
];
Click the link to read in more detail
Singleton Pattern
In Angular, the Singleton Pattern is a "design pattern" having a single instance of a class throughout the entire application and provide the global point of access to it.
This design pattern is useful when you want to share a common (or single) resource to the entire application without recreating it; such as Angular services.
Example
In the following example, we create a service class (i.e., a class defined by the @Injectable decorator) named MyCalc, which has root-level access throughout the application.
The "MyCalcService" service class has a single instance within the entire application, which uses the singleton design pattern to share common logic throughout the entire application at the root level.
my-calc.ts
import { Injectable } from '@angular/core';
@Injectable({
providedIn: 'root'
})
export class MyCalc {
constructor() { }
add(n1: number, n2: number){
return n1 + n2;
}
subtract(n1: number, n2: number){
return n1 - n2;
}
multiply(n1: number, n2: number){
return n1 * n2;
}
divide(n1: number, n2: number){
return n1 / n2;
}
}
Click the link to read in more detail
Observer Pattern
In Angular, the Observer Pattern is a "design pattern" that allows an object to called the observable from RxJS library to "send notifications" to multiple observer objects that are interested in the state changes of the observable. This design pattern is useful in managing asynchronous data streams in Angular applications.
Example
In the example below, we will define a method, getRandColors() within the service class, which returns an observable.
It uses the Observer design pattern, which involves an "observable" (subject) and one or more "observers" (subscribers) that react to changes or updates when ever the method is called in the component.
observer.ts
import { Injectable } from '@angular/core';
import { Observable } from 'rxjs';
@Injectable({
providedIn: 'root'
})
export class Observer {
constructor() { }
getRandColors(): Observable<string> {
return new Observable<string>(observer => {
let colors = ["red", "green", "black", "yellow", "blue", "pink", "gray"];
let rand = Math.floor(Math.random() * colors.length);
observer.next(colors[rand]);
observer.complete(); });
}
}
Click the link to read in more detail
Advantages of Angular Design Patterns
Below is a list of some advantages of Angular Design Patterns −
- Scalability: Web applications developed using design patterns will be more scalable,
- Reliability: Angular design patterns help to ensure that web applications are reliable, reducing the risk of errors and improving overall stability.
- Maintainability: Angular design patterns promote code reusability and modularity, making it easier to maintain and update the application.
Conclusion
In conclusion, Design patterns in Angular are highly beneficial for developing and designing scalable applications. They help developers to solve complex design problems more easily and ensure the application remains maintainable and reliable.
Angular - Lazy Loading
This chapter will discuss Lazy Loading in Angular, including its advantages, usage, and an example that implements lazy loading in your application from scratch to provide you with a better understanding.
Lazy Loading in Angular
In Angular, Lazy Loading is a design pattern developed by the google angular team to "enhance the application performance". The lazy-loading technique loads only the required components and module at a time rather than loading all together.
For example, suppose you have an Angular application with multiple feature modules, like a dashboard, user profile, settings, and reports. Instead of loading all these modules when the application starts, you can "configure lazy loading" to load these modules only when the user navigates to them.
Implementing Lazy Loading in Angular Project
To implement lazy loading in your project, follow the steps given below:
- Application Setup
- Create Feature Module with Routing
- Configure Routing
- Verify Lazy-loading
- forRoot() and forChild()
Application Setup
Follow the steps given below to create an angular application to implement the lazy-loading.
Step 1: Open the node.js command or code editor (e.g., VS code) and go to your favorite workspace as follows:
cd /favourite/workspace/ folder_name
Step 2: Install CLI using the following command:
npm install @angular/cli
Step 3: Use the command below to create a new angular application:
ng new myApp
Here,
- myApp is your application name.
Note: Once you hit the above command, it will ask you a few questions and reply with the "default answer".
Step 4: Go to your application directory as follows:
cd myApp
Step 5: Open the app.component.html file, remove everything, and update with the code below:
<h2>Welcome to Angular Lazy-loading Application</h2>
Step 6: Run the application to verify whether it was created correctly:
ng serve
Step 7: Open your friendly browser and navigate to URL localhost:4200 to verify the application has been created successfully.
Create Feature Module with Routing
In Angular, a feature module is a "special module" that organizes reliable blocks of functionality, such as components, directives, services, and pipes, along with their separate routing configurations.
This modularity helps in lazy loading, "improving application performance" by loading feature "modules only when needed".
Step 1: Create a feature module, auth as follows:
ng generate module auth --routing
Here, the --routing flag enables "individual routing" for the Auth module. Once the above command is executed successfully, you will see two files within the auth folder:

Step 2: Create a component, login within the Auth module as:
ng generate component login
Create another Feature Module with Routing
Let's create one more feature module, Dashboard, to observe the changes when we load different modules.
Step 1: Create another feature module, dashboard as follows:
ng generate module dashboard --routing
Step 2: Create a component, home within the dashboard module:
ng generate component login
Handling UI
To make it more understandable, let's add some UI for different components that belong to individual feature modules.
Step 1: Open the app.html file and place the code below:
app.html
<h2>Welcome to Angular Lazy-loading Application</h2> <a routerLink="/auth">Login</a> <a routerLink="/dashboard">Home</a> <hr> <router-outlet></router-outlet>
Step 2: Open the app.css file and place the code below:
app.css
a{
text-decoration: none;
margin: 0px 10px;
background-color: green;
color: white;
border-radius: 10px;
padding: 10px 20px;
font-family: sans-serif;
}
Configure Routing
Enable lazy loading in Angular, you need to configure routing for both individual components within the feature module and the root routing for the feature modules.
To lazy load Angular modules, use the loadChildren property (instead of component) in your AppRoutingModule (e.g., app.routes.ts file) routes configuration as follows:
Step 1: Open the app.routes.ts file and define the routes for both the feature modules:
app.routes.ts
import { Routes } from '@angular/router';
export const routes: Routes = [
{path: 'auth',
loadChildren:() => import('./auth/auth.module').then(m => m.AuthModule)},
{path: 'dashboard',
loadChildren:() => import('./dashboard/dashboard.module').then(m => m.DashboardModule)
}
];
Here, the loadChildren property is a router configuration option that allows you to lazily load a module.
Step 2: Define the routes for the Login Component within the AuthModule as follows:
auth.module.ts
import { NgModule } from '@angular/core';
import { RouterModule, Routes } from '@angular/router';
import { Login } from './login/login';
const routes: Routes = [
{path: '', component: Login}
];
@NgModule({
imports: [RouterModule.forChild(routes)],
exports: [RouterModule]
})
export class AuthRoutingModule { }
Step 3: Define the routes for the Home within the DashboardModule as follows:
dashboard.module.ts
import { NgModule } from '@angular/core';
import { RouterModule, Routes } from '@angular/router';
import { Home } from './home/home';
const routes: Routes = [
{path: '', component: Home}
];
@NgModule({
imports: [RouterModule.forChild(routes)],
exports: [RouterModule]
})
export class DashboardRoutingModule { }
Step 4: Run the application using the following command:
ng serve
Step 5: Open your friendly browser and navigate to the URL localhost:4200 to get the first look of your application:

Verify Lazy-loading
To verify lazy loading, you need to follow a few steps in your browser where your application is currently running:
Step 1: Inspect (right-click on your page and click on inspect) the browser page where your application is running and navigate to the Network tab as follows:

Click on the Login or Home button. If you see a chunk (chunk.js) appear, everything is wired up properly, and the feature module is lazy-loaded. A chunk should appear for "Login" and "Home", but only once for each.
Step 2: Click the login button and recognize the changes:

To see it again or to test after making changes, click the circle with a line through it in the upper left of the Network Tab:

Then reload with "Cmd+r" or "Ctrl+r", depending on your platform.
If you try to filter the module, only the current loaded module will appear in the network section:

forRoot() and forChild()
The forRoot() function is not available in standalone applications. Because, instead of creating an app-routing.module.ts file, the standalone applications generate an app.routes.ts file, which does not require forRoot() function.
The forRoot() function specifies that this is the root routing module. It configures all the routes you pass to it, provides access to the router directives, and registers the Router service. Use forRoot() "only once" in your application within the AppRoutingModule.
The Angular CLI also adds RouterModule.forChild(routes) to your feature routing modules. This way, Angular knows that the route list is only responsible for providing extra routes and is intended for feature modules. You can use forChild() in "multiple" modules.
Advantages of Lazy Loading
Here is a list of advantages of lazy loading:
- Enhances Application Performance by loading only required data.
- Increases Modularity
- Decreases Redundancy
- Improves User Experience
- Reduces Server Load
Angular - Singleton Pattern
This Angular tutorial chapter will discuss the Singleton pattern and provide an example with steps that implement the Singleton pattern from scratch in your Angular application.
What is Singleton Pattern in Angular?
In Angular, the singleton pattern is a design pattern having a single instance of a class throughout the entire application and provide the global point of access to it.
This design pattern is useful when you want to share a single resource to the entire application such as without recreating it; such as services.
Singleton Services
In Angular, a singleton service is a class defined with the @Injectable decorator, which marks the class as a service in Angular. It is used to share "common logic", "data", and "functionality" across various components and services.
This angular feature "enhances" the application performance by reusing the existing code for "common logic" rather than defining the logic in multiple places, and it also decreases the redundancy of code.
To use the singleton service in another component within the same application, we need to use Dependency Injection (another design pattern) to inject and use the service.
Advantages of Singleton Service
Following is a list of advantages of a Angular Singleton Service −
- Enhance Application Performance
- Globally Access
- Dependency Injection Friendly
- Resource Management
- Easy to Share Data
Implementation
Following is a list of "objectives" that you need to follow to implement the "singleton pattern":
Application Setup
Let's create a "new application" using CLI from scratch to implement the singleton pattern (singleton service). This will help you understand the concept better.
Use the steps given below to create a new Angular application:
Step 1: Open the node.js command or code editor (e.g., VS code) terminal and go to your favorite workspace as:
cd /favourite/workspace/ folder_name
Step 2: Install Angular CLI using the following command:
npm install @angular/cli
Step 3: Create a new angular application, myApp as follows:
ng new myApp
Note: Once you hit the above command, it will ask you a few questions and reply with the default answers.
Step 4: Open the app.component.html file remove everything and place the code below:
<h2>Welcome to Angular Singleton Design Pattern</h2>
Step 5: Navigate to your "application directory" as:
cd myApp
Step 6: Run the application to verify it is created successfully:
ng serve
Step 7: Open your preferred browser (e.g., chrome) and navigate to localhost:4200 to see the output:

Create a Singleton Service
In Angular, a service is a class defined with the @Injectable decorator, which identifies it as a service in Angular. Additionally, services are a feature of a mechanism used to share common logic, data, and functionality that can be used across multiple components, directives, and other services.
Services are also used to communicate with servers via RESTful web services.
We will create an Angular service that has a single instance throughout the entire application, which is commonly known as a singleton service (or the singleton pattern).
Step 1: Create a service, myCalc in your angular application as follows:
ng generate service myCalc
Once the above command is executed successfully, you will able to see "two new files" in your Angular application:

Here,
- The first file, my-calc.service.spec.ts, is a unit testing file (we typically do not make changes in this file).
- The second file, my-calc.service.ts, is where we write all the "logic" and "functionalities".
Step 2: Open the my-calc.ts file and update with the given code below:
my-calc.ts
import { Injectable } from '@angular/core';
@Injectable({
providedIn: 'root'
})
export class MyCalc {
constructor() { }
add(n1: number, n2: number){
return n1 + n2;
}
subtract(n1: number, n2: number){
return n1 - n2;
}
multiply(n1: number, n2: number){
return n1 * n2;
}
divide(n1: number, n2: number){
return n1 / n2;
}
}
Here,
- The @Injectable makes it a service class.
- The providedIn: 'root', specifies that this service class has root-level access within the application.
Create a Component
Let's create a component, where we will inject our singleton service class via DI to use its functionality which was defined in the "service class".
Step 1: Create a component, Calculator, as follows:
ng generate component Calculator
Step 2: Open the calculator.html file and place the code below:
calculator.html
<div class="calc">
<h3>My Calculator</h3>
<form>
<input type="number" placeholder="First number" [(ngModel)]="n1" name="n1">
<input type="number" placeholder="Second number" [(ngModel)]="n2" name="n2">
</form>
<div class="btns">
<button (click)="add()">Add</button>
<button (click)="subtract()">Subtarct</button>
<button (click)="multiply()">Multiply</button>
<button (click)="divide()">Divide</button>
</div>
@if(result){
<div class="result">
{{result}}
</div>
}
</div>
Step 3: Open the calculator.css file and place the code below:
calculator.css
.calc{
width: 60%;
padding: 10px;
background-color: beige;
border-radius: 10px;
font-family: sans-serif;
}
.calc h3{
text-align: center;
font-size: 25px;
}
.calc input{
width: 90%;
padding: 10px;
margin: 10px auto;
display: flex;
font-size: 20px;
}
.btns{
width: 90%;
margin: 10px auto;
}
.btns button{
padding: 10px 32px;
border-radius: 5px;
border: none;
background-color: green;
color: white;
margin: 10px 10px;
cursor: pointer;
font-size: 16px;
}
.result{
text-align: center;
margin: 20px auto;
background-color: rgb(200, 210, 206);
padding: 10px;
width: 90%;
border-radius: 5px;
}
Inject Via Dependency Injection
The Dependency Injection (DI) is also a design pattern in Angular used to inject the other "dependencies" into a module or a component rather than creating them individually for each module or component.
Let's inject the singleton service via Dependency Injection (DI) into our myCalc component to use its functionality, as this component requires its dependencies.
Step 1: Open the calculator.ts file in your code editor and place the code below:
calculator.ts
import { CommonModule } from '@angular/common';
import { Component } from '@angular/core';
import { MyCalc } from '../my-calc';
import { FormsModule } from '@angular/forms';
@Component({
selector: 'app-calculator',
imports: [CommonModule, FormsModule],
templateUrl: './calculator.html',
styleUrl: './calculator.css'
})
export class Calculator{
//injecting service
constructor(private myservice: MyCalc){}
n1: number = 0;
n2: number = 0;
result : any = "";
add(){
this.result = "Sum is (n1+n2): " + this.myservice.add(this.n1, this.n2);
}
subtract(){
this.result = "Subtraction is(n1-n2): " + this.myservice.subtract(this.n1, this.n2);
}
multiply(){
this.result = "Multiplication is(n1xn2): " + this.myservice.multiply(this.n1, this.n2);
}
divide(){
this.result = "Division is(n1/n2): " + this.myservice.divide(this.n1, this.n2);
}
}
Step 2: Open the app.html file and update it with the code below
app.html
<h2>Welcome to Angular Singleton Design Pattern</h2> <app-calculator></app-calculator>
Step 3: Now run the application using the following command to see the changes:
ng serve
Here is the first expression of the application:

Here, we calculate the "addition" of "two numbers" by clicking on the add button:

Conclusion
The Singleton pattern in Angular is a design pattern for managing shared states, configurations, or data across an application by ensuring a service has a single instance. This pattern is achieved through the Angular dependency injection system, typically by providing the service at the root level.
Angular - Observer Pattern
This chapter will discuss the Observer Pattern in Angular, its advantages, and its complete implementation with an appropriate example that will give you a clear understanding. The Observer Pattern from the RxJS library is used to synchronize the fetched data on the screen.
What is RxJS?
The RxJS is a library that stands for Reactive Extensions JavaScript. It allows you to work with the synchronized data stream.
It is used for "reactive programming", which is a way to develop an application that reacts to changes instead of explicitly writing code to handle them.
What is Observer Pattern in Angular?
In Angular, the Observer Pattern is a design pattern that allows an object to called the observable from RxJS library to send notifications to multiple observer objects that are interested in the state changes of the observable. This design pattern is useful in managing asynchronous data streams in Angular applications.
The following diagram of the observer pattern will provide you with a clear understanding of how the "publisher" (service) returns the "observable". The "observable" emits data, and the "subscriber" subscribes to the data to react to changes or updates.

Note: You can have multiple subscribers listening to the same observable
Here,
- The publisher is a service that generates data or events. It is responsible for creating and maintaining the Observable.
- The observable is an entity that emits the data or events. It represents the data stream that other components can subscribe to.
- The subscription is a process by which other components subscribe to the Observable to receive updates. Each subscriber gets notified whenever the Observable emits new data.
- The subscriber is a component that subscribes and reacts to the data emitted by the Observable.
Advantages of Observer Pattern
Following is a list of advantages of the Angular Observer Pattern −
- Reactive Programming
- Event Handling
- Error Handling
- Improved Testablity
Implementation
Follow the process below to implement the observer pattern in an Angular application:
- Application setup
- Create Observable Service
- Implement Observable in Service
- Use the Observable Service in Component
- Update the Template
- Display the Observer value in Template
Application Setup
Let's set up an angular application using CLI (command line interace) to implement the observer pattern from scratch within this newly created application.
Use the steps given below to create a new Angular application:Step 1: Open the node.js command or code editor (e.g., VS code) terminal and go to your favorite workspace as:
cd /favourite/workspace/ folder_name
Step 2: Install Angular CLI using the following command (see more):
npm install @angular/cli
Step 3: Create a new angular application, myApp as follows:
ng new myApp
Note: Once you hit the above command, it will ask you a few questions and reply with the default answers.
Step 4: Open the AppComponent (app.component.html) file remove everything and place the code below:
<h2>Welcome to Angular Observer Design Pattern</h2>
Step 5: Navigate to your "application directory" as:
cd myApp
Step 6: Run the application to verify it is created successfully:
ng serve
Step 7: Open your preferred browser (e.g., chrome) and navigate to localhost:4200 URL to see the output:

Create Observable Service
Let's create an Observable service to implement the Observable from the RxJS library. This service will allow you to share data across different components in the application.
Step 1: Create a service, observer, as follows:
ng generate service observer
Once the above command is executed successfully, you might be able to see "two new files" within your application:

Here,
- The first file, observer.spec.ts, is a unit testing file (we typically do not make changes in this file).
- The second file, observer.ts, is where we write all the "logic" and "functionalities".
Implement Observable in Service
We will define a method, getRandColors() within the service class, which returns an observable. This method will pick and return a random color from the given array when this method is called in the component each time.
Step 1: Open the observer.ts file in your code editor and implement the getRandColors() method:
observer.ts
import { Injectable } from '@angular/core';
import { Observable } from 'rxjs';
@Injectable({
providedIn: 'root'
})
export class Observer {
constructor() { }
getRandColors(): Observable<string> {
return new Observable<string>(observer => {
let colors = ["red", "green", "black", "yellow", "blue", "pink", "gray"];
let rand = Math.floor(Math.random() * colors.length);
observer.next(colors[rand]);
observer.complete(); });
}
}
Note: To work with the Observable pattern, make sure the RxJS library is imported into your service class.
Use the Observable Service in Component
As we have implemented the observable in the service class, we will now use the observable service within our root component to access its methods to retrieve the observer value.
Step 1: Open the app.ts file, import, and inject the observable service.
app.ts
import { Component } from '@angular/core';
import { CommonModule } from '@angular/common';
import { RouterOutlet } from '@angular/router';
import { Observer } from './observer';
@Component({
selector: 'app-root',
standalone: true,
imports: [CommonModule, RouterOutlet],
templateUrl: './app.html',
styleUrl: './app.css'
})
export class App{
constructor(private myService: Observer) {}
}
Step 2: As the service is already injected via Dependency Injection, now define a method, changeBackground(), access the service method within it, and assign the returned color value to the variable background:
app.ts
import { Component } from '@angular/core';
import { CommonModule } from '@angular/common';
import { RouterOutlet } from '@angular/router';
import { Observer } from './observer';
@Component({
selector: 'app-root',
imports: [CommonModule, RouterOutlet],
templateUrl: './app.html',
styleUrl: './app.css'
})
export class App{
constructor(private myService: Observer) {}
//variable to store the color
background: any;
changeBackground(){
this.myService.getRandColors().subscribe(color =>{
//assigning value
this.background = color;
});
}
}
Update the Template
Now, let's update the template (app.html) to display the observer value initially when the component loads and update it dynamically when the value changes.
Step 1: Open the app.html file in your code editor, bind the background variable with the div element using style binding, and create a button to change the background on click:
app.html
<div [ngStyle]="{background: background}">
<h2>Welcome to Angular Observer Design Pattern</h2>
<button (click)="changeBackground()">Change Background</button>
<p>Color (Observer value): {{background}}</p>
</div>
Step 2: Open the app.css file and place the given code below in it:
app.css
div{
height: 95vh;
padding: 0;
margin: 0;
font-family: sans-serif;
color: rgb(32, 76, 76);
padding: 10px;
}
button{
padding: 15px 50px;
cursor: pointer;
background-color: antiquewhite;
border: 1px solid white;
color: rgb(30, 76, 11);
border-radius: 5px;
font-weight: bold;
font-size: 18px;
}
Display the Observer value in Template
We have used the observable service in our app component. Now, let's run the application to display the observer value in the template.
Output
Step 1: Run the application using the following command:
ng serve
Step 2: Open your preferred browser (e.g., Chrome) and navigate to the http://localhost:4200 URL.
Once you navigate to the above URL, you will be able to see the following:

Conclusion
In conclusion, the Angular observer design pattern is a powerful approach for managing data flow and communication between different parts of an application. This is widely applied in the Angular application and with RxJS, we can elegantly sync the fetched data on the screen. Although starting from Angular 17.2, the RxJS becomes optional and were moving to the signals, its still a good way to learn and apply the observer pattern in Angular.
Angular - Libraries
This chapter provides an overview of Angular libraries and commonly used other libraries in Angular projects, including their purposes, advantages, usage, and relevant examples.
Overview of Angular Libraries
Many applications face similar challenges, like providing a consistent user interface, displaying data, and enabling data input. To resolve this issue, developers create universal solutions for specific domains that can be customized and reused across different applications.
Such a solution can be built as Angular libraries and these libraries can be published and shared as npm packages.
An Angular library is a collection of reusable code, components, services, and modules that are packaged together for easy integration into Angular applications. A library is designed to provide functionality that must be imported and used in an application to work.
Unlike the Angular application, a library can not run individual, we need to import and use in our Angular application.
Note! Libraries extend Angular base features. For example, to add reactive forms to our angular application, add the library package using the ng add @angular/forms command, then import the ReactiveFormsModule from the @angular/forms library in your application code.
Why use a Library in Angular?
Using libraries in Angular provides several advantages which are:
- Code Reusability: Libraries allow developers to write reusable code, making it easier to maintain and update across multiple applications.
- Modularity: Libraries help keep applications modular by encapsulating specific functionality, which can be imported only when needed.
- Ready-to-use Code: Libraries provide ready-to-use code, which saves developers time, especially when building large-scale and complex applications.
List of Libraries used with Angular Project
Here, we have listed a few of Angular and other libraries which were commonly used with Angular projects:
Using Angular Material in Angular
Angular Material is a UI library developed by the Angular team to integrate easily with Angular applications. This library is specific to the Angular framework, providing global and accessible components for everyone. It is well-tested to ensure performance and reliability.
It is also provides tools that help developers to build their own custom components with common interaction patterns. The Angular applications developed using Angular Material components ensure "responsiveness" across various screen sizes, such as "phones", "tablets", and "laptops".
Before proceeding with the example, the Angular Material library should be installed in your Angular project. See how to install?
Example - Usage of Angular Material
Here is a basic example of using the Angular Material input component.
Step 1: Import the material component API in your component or module where you want to use it (e.g., import in the app module or component):
app.ts
import { Component} from '@angular/core';
import {MatInputModule} from '@angular/material/input';
@Component({
selector: 'app-root',
imports: [MatInputModule],
templateUrl: './app.html',
styleUrl: './app.css'
})
export class App{
title = 'my-crud-app';
}
Step 2: Use the Material input component in your template (e.g. app.html):
app.html
<h3>Angular Material Input Component Example</h3>
<label for="">Favorite Fruit:</label>
<mat-form-field class="example-full-width">
<input matInput placeholder="Ex. Apple">
</mat-form-field>
Output
The output will appear as follows:

Using PrimeNG in Angular
PrimeNG is a popular UI component library for Angular. Similar to Angular Material, it provides a wide range of ready-to-use, customizable UI components designed to help developers build modern, responsive, and featured web applications quickly.
PrimeNG includes components like "buttons", "data tables", "form controls", "charts", and more, making it a universal choice for Angular development.
Before proceeding with the example, the PrimeNG library should be installed in your Angular project. See how to install?
To properly add the necessary PrimeNG styles in your angular.json file, you should add the following in the styles sections under the build options
"styles": [ "@angular/material/prebuilt-themes/indigo-pink.css", "src/styles.css", "node_modules/primeng/resources/themes/lara-light-indigo/theme.css", "node_modules/primeng/resources/primeng.min.css", "node_modules/primeicons/primeicons.css" ],
Example - Usage of PrimeNG Style
The following example will add an input PrimeNG component to your Angular project. For that, we need to import the necessary dependencies as follows:
app.ts
import { Component } from '@angular/core';
import { CommonModule } from '@angular/common';
import { RouterOutlet } from '@angular/router';
import { InputTextModule } from 'primeng/inputtext';
@Component({
selector: 'app-root',
imports: [CommonModule, RouterOutlet, InputTextModule],
templateUrl: './app.html',
styleUrl: './app.css'
})
export class App {
title = 'myApp';
}
Add the input component to your template (e.g., app.html):
app.html
<h1>Welcome to Angular Application</h1> <p>This is the example of primeng input component</p> <input type="text" pInputText />
Output
The output of the added component will appear as follows:

Using RxJS in Angular
The RxJS stands for "Reactive Extensions for JavaScript", which is a library for "reactive programming" using observable's that make easier to compose "asynchronous" or "callback-based" code.
In addition, the RxJS library is used to compose the "asynchronous" and "event-based" programs by using observable sequences. It provides one core type, the "Observable", "satellite" types (Observer, Schedulers, Subjects), and "operators" inspired by Array methods (map, filter, reduce, every, etc) to allow handling asynchronous events as collections.
Note!1. Asynchronous data refers to data that is processed or retrieved at different times, rather than in a sequential or synchronous manner.
2. The RxJS (Reactive Extensions for JavaScript) is not an Angular library, but it is heavily used within Angular.
Example
Here is a simple example that will help you understand reactive programming:
Let's add an event listener the way you normally register in JavaScript:
document.addEventListener('click', () => console.log('You Clicked!'));
Here, let's see how we can add the same event listener using the "RxJS library":
import { fromEvent } from 'rxjs';
fromEvent(document, 'click').subscribe(() => console.log('You Clicked!'));
As you can see in JavaScript, you directly tell the browser what to do when an event happens (like clicking), while in RxJS, you create an "event stream" that you can "subscribe" to, allowing more flexibility and easier management of events.
The RxJS library also makes it easier to handle complex event scenarios, such as filtering or modifying events and automatically cleans up after itself when no longer needed, unlike regular event listeners where you manually need to handle memory and cleanup.
Angular - Angular Material
This chapter will guide you through setting up your Angular project to start using Angular Material. It includes prerequisites, installing Angular Material, and an example of using a sample material component in your project to verify your setup.
What is Angular Material?
Angular Material is a UI component library developed by the Angular team to integrate easily with your Angular applications. This library is "specific" to the Angular framework and provides a set of reusable, accessible, well-tested components that help create a responsive modern user interface (UI).
It also provides tools that help developers to create custom UI components with common interaction patterns. Angular applications developed using Angular Material components ensure "responsiveness" on different screen sizes, such as "phones", "tablets", and "laptops".
Notes! Angular Material provides a huge collection of high-quality and ready-made Angular components based on Material Design, such as input fields, forms, buttons, cards, tables, lists, etc.
Let us learn how to install Angular Material Library in your Angular project and how to use its components.
Important! This guide assumes that an Angular application has already been created and the Angular CLI has already been installed.
How to Install Angular Material in an Angular Project?
To install Angular Material Library in your Angular project or application, ensure that the Angular CLI is already installed and that the application has been created successfully.
Follow the steps given below and implement each step in your existing project one by one to install Angular Material Library:
Step 1: Open any "existing Angular project" in your preferred code editor (e.g., vs code) −
cd /go/to/materialApp
Here, materialApp is your project folder name.
Step 2: Open the terminal in your editor and go to the application directory −
cd material-app
Step 3: Add Angular Material to your application by running the following command −
ng add @angular/material
The ng add command will "install Angular Material" in your application.
Once you run the above command, Angular CLI will ask certain questions regarding "theme", "gesture recognition", and "browser animations".
Select any theme of your choice and then answer positively for gesture recognition and browser animation.
Packages successfully installed. ? Choose a prebuilt theme name, or "custom" for a custom theme: (Use arrow keys) > Indigo/Pink [Preview: https://material.angular.io?theme=indigo-pink] Deep Purple/Amber [Preview: https://material.angular.io?theme=deeppurple-amber] Pink/Blue Grey [Preview: https://material.angular.io?theme=pink-bluegrey] Purple/Green [Preview: https://material.angular.io?theme=purple-green] Custom ? Choose a prebuilt theme name, or "custom" for a custom theme: Indigo/Pink
Set up "global Angular Material typography" styles:
? Set up global Angular Material typography styles? Yes
Include browser animations for Angular Material:
? Include the Angular animations module? (Use arrow keys) > Include and enable animations Include, but disable animations Do not include
Hint! To choose different options use thedown arrow key in your keyboard.
Set up "browser animations" for Angular Material:
Importing the BrowserAnimationsModule into your application enables Angular's animation system.
Once the Material gets installed successfully you will be able to see the message below:
UPDATE package.json (1111 bytes) Packages installed successfully. UPDATE src/app/app.config.ts (338 bytes) UPDATE angular.json (2795 bytes) UPDATE src/index.html (520 bytes) UPDATE src/styles.css (181 bytes)
The ng add command will additionally perform the following actions:
- Add project dependencies to package.json.
"@angular/material": "^17.3.10"
<link href="https://fonts.googleapis.com/css2?family=Roboto:wght@300;400;500&display=swap" rel="stylesheet">
<link href="https://fonts.googleapis.com/icon?family=Material+Icons" rel="stylesheet">
- Remove margins from "body".
- Set height 100% on HTML and body.
- Set Roboto as the default application font.
html, body { height: 100%; }
body { margin: 0; font-family: Roboto, "Helvetica Neue", sans-serif; }
Completed! Angular Material is now configured to be used in your Angular application.
How to use Angular Material in Angular Project?
To use the Angular Material Components in your Angular project implement the following steps:
Step 1: Open the "Angular Material" website on your browser:
Angular Material Components
Step 2: Open the component (e.g., button) which you want to use:

Step 3: Go to the API section and copy the import:

Step 4: Import the "relevant API" in your component or module where you want to use:
app.ts
import { Component } from '@angular/core';
import { CommonModule } from '@angular/common';
import { RouterOutlet } from '@angular/router';
import { MatButtonModule } from '@angular/material/button';
@Component({
selector: 'app-root',
imports: [CommonModule, RouterOutlet, MatButtonModule],
templateUrl: './app.html',
styleUrl: './app.css'
})
export class App {
title = 'material-app';
}
Step 5: Go to the examples section and you will see various examples of button components:

Step 6: Open the App Component (i.e., app.htm) and place the code below to see the different types of buttons:
app.htm
<h2>Welcome to Angular Material Example</h2> <button mat-button>Basic</button> <button mat-raised-button>Basic</button> <button mat-button disabled>Disabled</button> <button mat-flat-button>Basic</button>
Here,
- mat-button is the class name for the "basic button".
- mat-button disabled is the class name for the 'disabled button.
Step 6: Run your application to see the changes:
ng serve
Then navigate your browser to http://localhost:4200 URL.

Here, the application clearly shows the Angular different Material buttons.
List of Common used Components
Below is the some of the important UI elements provided by Angular Material package:
| UI Element | Description |
|---|---|
| Form field | The <mat-form-field> is a component used to wrap several Angular Material components. |
| Input | The matInput is a directive that allows native <input> and <textarea> elements to work with <mat-form-field>. |
| Checkbox | The <mat-checkbox> provides the same functionality as a native <input type="checkbox"> enhanced with Material Design styling and animations. |
| Radio button | The <mat-radio-button> provides the same functionality as a native <input type="radio"> enhanced with Material Design styling and animations. |
| Select | The <mat-select> is a form control for selecting a value from a set of options, similar to the native <select> element. |
| Button | The Angular Material buttons are native <button> or <a> elements enhanced with Material Design styling and ink ripples. |
| DatePicker | The datepicker allows users to enter a date either through text input, or by choosing a date from the calendar. |
| List | The <mat-list> is a container component that wraps and formats a series of <mat-list-item>. |
| Card | The <mat-card> is a content container for text, photos, and actions in the context of a single subject. |
| Grid list | The mat-grid-list is a "two-dimensional" list view that arranges cells into "grid-based" layout. |
| Table | The mat-table provides a Material Design styled data-table that can be used to display rows of data. |
| Paginator | The <mat-paginator> provides navigation for paged information, typically used with a table. |
| Tabs | Angular Material tabs organize content into separate views where only one view can be visible at a time. |
| Toolbar | The <mat-toolbar> is a container for "headers", "titles", or "actions". |
| Menu | The <mat-menu> is a floating panel containing list of options. |
| Dialog | The MatDialog service can be used to "open modal dialogs" with Material Design styling and animations. |
| Snackbar | The MatSnackBar is a service for displaying snack-bar notifications. |
| Progress bar | The <mat-progress-bar> is a horizontal progress-bar for indicating progress and activity. |
| Icon | The mat-icon makes it easier to use vector-based icons in your app. |
| Divider | The <mat-divider> is a component that allows for Material styling of a line separator with various orientation options. |
Why to use Angular Material?
Use Angular Material because it provides built-in UI components that are easy to integrate with Angular applications, saving developers time by offering ready-to-use elements like "buttons", "cards", and "input" fields. It also ensures the application is "responsive" and fully functional across various screen sizes.
Advantages of Angular Material
Here is a list of some "key" advantages of the Angular Material:
- In-built Components: It provides In-built wide range of UI component that are ready-to-use.
- Responsive Layouts: It helps create responsive layouts that work well on different devices and screen sizes.
- Easy Integration: It is very easy to integrate with any Angular Application new as well as existing.
Angular - PrimeNG
The chapter will discuss the Angular PrimeNG library, including installation and setups, how to use it, examples, advantages, etc.
What is PrimeNG?
PrimeNG is a cohesiveUI component library specifically designed for Angular applications. It provides a collection of ready-to-use UI components (e.g., themes, icons, and components) such as "input fields," "buttons," "tables," "lists," "cards," etc, for building user interfaces. It allows developers to integrate these into their applications rather than building them from scratch.
However, PrimeNG is not directly compatible with "React", "Vue", or other front-end frameworks, as it is designed for Angular.
Here are a few UI components of the PrimeNG library which code you can directly use in your angular application:
Why to use a PrimeNG in Angular?
Here are several reasons to use the PrimeNG library in your Angular project:
- Easy Integration: PrimeNG is very easy to integrate with your Angular application.
- Responsive and Mobile-friendly: Angular applications developed using PrimeNG UI components are very compatible and responsive across various screen sizes.
- OpenSource & paid version: PrimeNG offers a free version with many useful and powerful components and a premium version (i.e., paid) as well for the advanced features.
- Frequent Updates: The library is actively maintained and regularly updated, which enables the latest features with best practices.
Installations and Setups
The PrimeNG UI Component library is a third-party library. To use its components in your application or project, you need to install it and add all the required dependencies first; only then can you use it.
Here is a step-by-step process for installing the PrimeNG library in your project:
Step 1: Use the following command to install the PrimeNG library in your Angular project:
npm install primeng@<version>
Here, @<version> refers to the version you want to install, which should be compatible with your project. For example: npm install primeng@17.0.0.
Important! If you do not specify a specific version, it might throw an error because the project version could be different from the version of the library you are installing when using the simple npm install primeNG command without specifying a version.
Step 2: Open the angular.json file and add the code below within the styles section, in both the build and test sections:
"node_modules/primeng/resources/themes/lara-light-indigo/theme.css", "node_modules/primeng/resources/primeng.min.css",
After completing the above steps, the installation is done, and now we are ready to use the PrimeNG library components in our project.
Use the following command to install PrimeNG icons, which provide different icons such as "social media icons", "trash", "view", "edit" icons, etc., and add the same inside the styles section:
npm install primeng@version primeicons
How to use PrimeNG in our Project?
Follow these steps to use the PrimeNG components in your application as needed:
Step 1: Open the primeNG website and explore all the components:
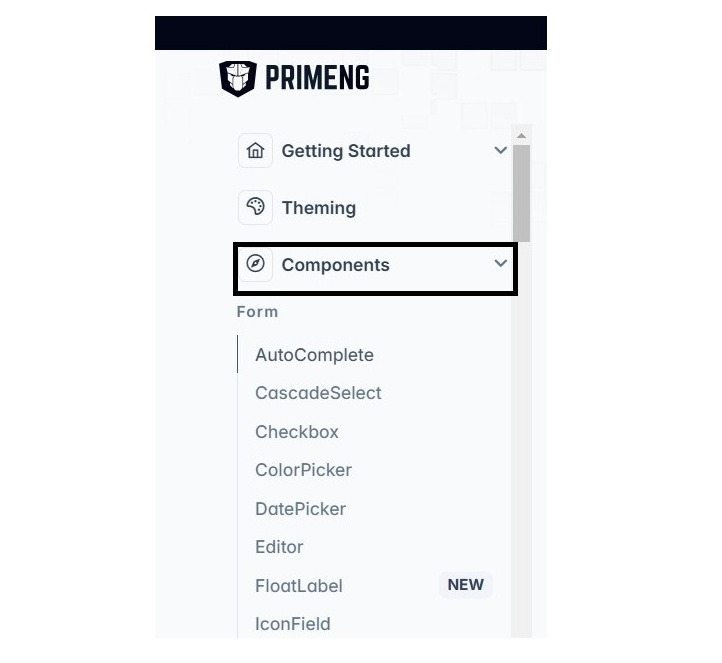
Adding InputText Component
InputText is an extension to a standard input element with "theming" and "keyfiltering". To add the InputText component to your project template, you need to follow these steps:
Step 2: Open the InputText component documentation on the PrimeNG website that you want to use it in your template:
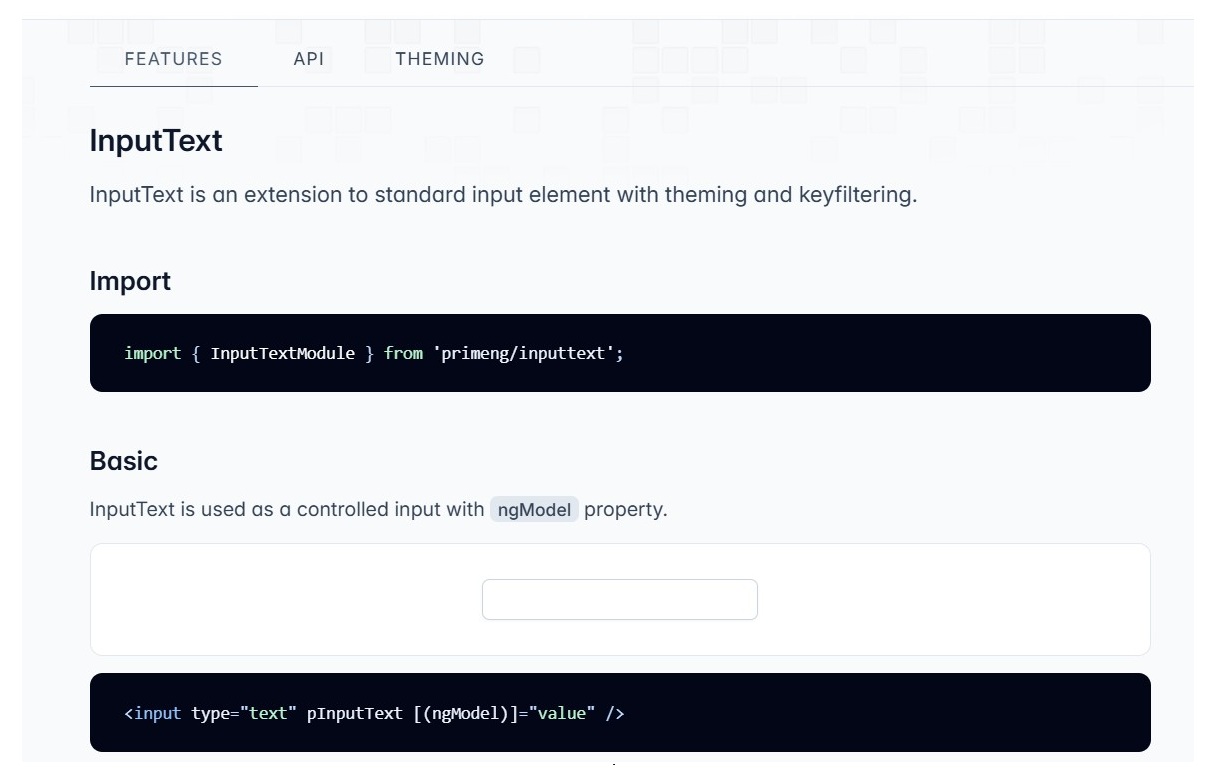
Step 3: Import and add the InputText component API in your component or module to access and use it in your template:
app.ts
import { Component } from '@angular/core';
import { CommonModule } from '@angular/common';
import { RouterOutlet } from '@angular/router';
import { InputTextModule } from 'primeng/inputtext';
@Component({
selector: 'app-root',
imports: [CommonModule, RouterOutlet, InputTextModule],
templateUrl: './app.html',
styleUrl: './app.css'
})
export class App {
title = 'myApp';
}
Step 4: Add the below InputText inbuilt code in your template (e.g., app.component.html):
<h3>Angular with PrimeNG</h3> <input type="text" pInputText placeholder="Input text....."/>
Step 5: After adding the above code, run the application using the following command:
ng serve
Output
Navigate the URL localhost:4200 to see the output of the above code:
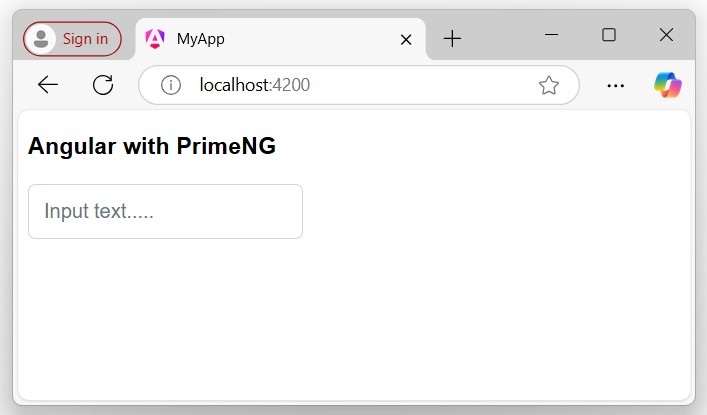
Adding Button Component
Let's see how to add a Button component to your project template:
Step 1: Just like the InputText component, open the Button component on the PrimeNG website and go to the features section:
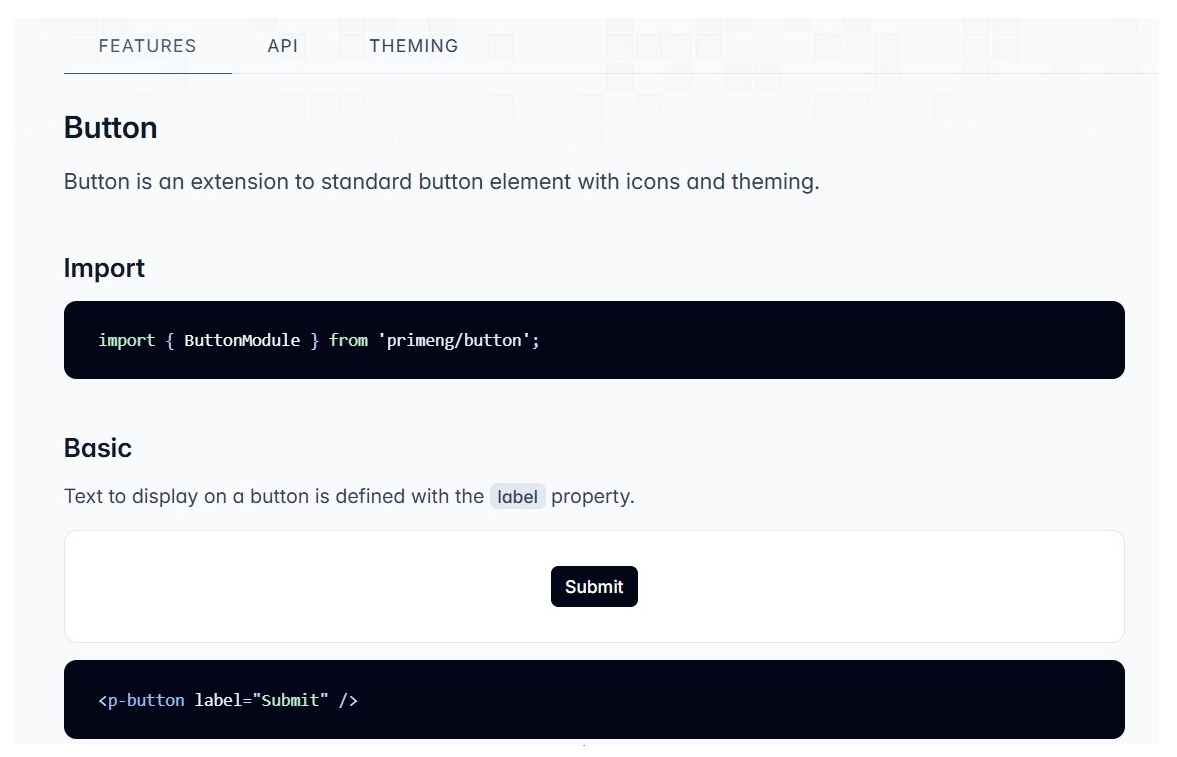
Step 2: Import and add the API in your component or module that you want to use (e.g., app.ts):
app.ts
import { Component } from '@angular/core';
import { CommonModule } from '@angular/common';
import { RouterOutlet } from '@angular/router';
import { InputTextModule } from 'primeng/inputtext';
import { ButtonModule } from 'primeng/button';
@Component({
selector: 'app-root',
standalone: true,
imports: [CommonModule, RouterOutlet, InputTextModule, ButtonModule],
templateUrl: './app.html',
styleUrl: './app.css'
})
export class App {
title = 'myApp';
}
Step 3: Add the Button Component in your template (e.g., app.html):
app.html
<h3>Angular with PrimeNG</h3> <input type="text" pInputText placeholder="Input text....."/> <p-button label="Submit" />
Output
The output of the above code will be displayed as follows:

Angular - RxJS
This chapter will discuss the RxJS Library and Reactive programming, including their importance, key concepts, and working examples, how the RxJS library is used in the Angular project.
Before proceeding with the RxJS library, you should know about the Reactive programming, which will help you to understand it easily.
What is Reactive Programming?
In computing, Reactive programming is a way of writing code, where you deal with "data streams" and "changes automatically". It is telling the computer what you want to do, rather than how to do it step by step. This approach helps you to keep your program structured and easier to understand for others.
Example - Usage of Reactive Programming
In the following example we use the reactive programming, so the value of variable a is automatically updated whenever the values of b or c change, without the program having to explicitly re-state the statement a := b + c to re-assign the value of a:
//normal program var b = 5; var c = 7; var a = b + c; b = 5; console.log(a); // 12 //reactive program var b = 5; var c = 7; var a $= b + c; b = 5; console.log(a); // 17
The other one is a reactive program, which emits real-time updates when the related or its own value propagates (changed).
How does Reactive Programming work?
Reactive programming is a programming paradigm that deals with asynchronous data streams and the propagation of changes. It allows developers to model and manage data flows in a better way. It is simplifying the handling of asynchronous tasks such as UI updates, event handling, and managing data that changes over time.
What is RxJS?
The RxJS stands for "Reactive Extensions for JavaScript", which is a library for "reactive programming" using observable's that make easier to compose "asynchronous" or "callback-based" code.
In addition, the RxJS library is used to compose the "asynchronous" and "event-based" programs by using observable sequences. It provides one core type, the "Observable", "satellite" types (Observer, Schedulers, Subjects), and "operators" inspired by Array methods (map, filter, reduce, every, etc) to allow handling asynchronous events as collections.
Note! Asynchronous data refers to data that is processed or retrieved at different times, rather than in a sequential or synchronous manner.
Key Concepts
Here are some key concepts of the RxJS library that solve Async event management:
- Observable: An Observable in Angular is a key part of reactive programming, providing support for passing messages (data) between publishers and subscribers asynchronously.
- Observer: It is a collection of callbacks that knows how to "listen" to values delivered by the Observable.
- Subscription: It represents the "execution of an Observable" and is primarily used to cancel the execution.
- Operators: These are the pure functions that enable a functional programming style of dealing with collections with operations like map, filter, concat, reduce, etc.
- Subject It's "equivalent to an EventEmitter", and it is the only way of multicasting a value or event to multiple Observers.
- Schedulers: These are "centralized dispatchers" that control concurrency, allowing us to coordinate when computation happens.
This library also provides utility functions for creating and working with "observables". These utility functions can be used for:
- Converting existing code for async operations into observables.
- Iterating through the values in a stream.
- Mapping values to different types.
- Filtering streams.
- Composing multiple streams.
Here are a few examples that help you understand the "RxJS library", "observable concept", and "reactive programming" better:
Example: Register Event Listener
In HTML, you normally register an event listener using the addEventListener() method as:
document.addEventListener('click', () => console.log('You Clicked!'));
But in the RxJS, you can create an observable instead of registering an "eventListener":
import { fromEvent } from 'rxjs';
fromEvent(document, 'click').subscribe(() => console.log('You Clicked!'));
Here, the subscribe() method is used to access the observable data. No changes will be reflected until you subscribe to it.
Example: Purity (using the pure functions)
What makes RxJS powerful is its ability to generate values using pure functions. This means your code will have fewer errors.
In RxJS, a pure function is one that, given the "same inputs", always produces the "same outputs" and has no side effects.
Usually, you would create an impure function, where other pieces of your code can mess up your state (fields).
Here, is how you implement in JavaScript −
let count = 0; // initial value 0
//adding event listener
document.addEventListener('click', () => console.log(`Clicked ${++count} times`));
The above snippet of code will "count" the "number of clicks" on the "document" and log the count each time the document is clicked.
Using RxJS you isolate the state (field):
import { fromEvent, scan } from 'rxjs';
fromEvent(document, 'click')
.pipe(scan((count) => count + 1, 0))
.subscribe((count) => console.log(`Clicked ${count} times`));
Here,
- The scan operator in RxJS works similarly to the reduce() function for arrays. It takes an initial value and a callback. Each time the callback runs, it returns a value that will be used as the input for the next iteration.
Using RxJS with Angular
The RxJS library provides several functions that can be used to "create new Observable" in Angular Project.
These functions can simplify the process of creating observables from various sources such as events, timers, and promises. For example:
Create an observable from a promise
In the following snippet of code, we create an observable using the from operator with a promise returned by the "fetch API" in Angular −
import { from, Observable } from 'rxjs';
// Create an Observable from out of promise
const data = from(fetch('/api/endpoint'));
// Subscribe to start listening for async output
data.subscribe({
next(res) { console.log(res); },
error(err) { console.error('Error: ' + err); },
complete() { console.log('Completed'); }
});
Create an observable from a counter
In this example, we will create an observable that emits incrementing numbers every 1000 milliseconds (1 second) in Angular −
import { interval } from 'rxjs';
// Create an Observable
const secondsCounter = interval(1000);
// Subscribe to start interval values
const subscription = secondsCounter.subscribe(n =>
console.log(`It's been ${n + 1} seconds since the subscription started!`));
Why to use RxJS in Angular?
Below is the list of several benefits that define why to use RxJS Library in Angular:
- Reactive Programming: It allows for Reactive programming, which makes it easier to simplify the asynchronous code.
- Error Handling: RxJS provides robust error-handling mechanisms, allowing you to smoothly handle and recover from errors in your asynchronous operations.
- Data Transfer: Using the RxJS operators, you can easily transform data streams, such as mapping, filtering, and reducing data.
- Angular Integration: Angular has built-in support for RxJS, and many Angular modules, such as HttpClient, are designed to work easily with observables.
Conclusion
In Angular, the RxJS library provides powerful tools for managing asynchronous data and events. It helps you to write clean, concise, and maintainable code by allowing you to handle complex data streams and errors. Using RxJS, you can easily manage state, handle user interactions, and perform various tasks reactively and functionally, making your Angular applications more scalable.
Angular - Signals
This chapter will discuss Angular Signals, a new way to build Angular applications. In this, we will discuss what exactly Signals are, why they are really useful in Angular, and how they can improve your application by providing a simpler and more efficient approach.
The chapter will also highlight the advantages of using Signals in Angular development.
What are Signals in Angular?
A Signal is a wrapper around a value that notifies interested consumers when that value changes. A signal can contain any value, from primitives to complex data structures.
In Angular, Signals are a system (or reactive primitives) that granularly (closely) tracks and updates how and where your state is used throughout the application, allowing the framework to optimize rendering updates.
When a signal value changes, it automatically triggers updates to any dependent components or services that are observing it. For example:
// Declaring a regular variable count1: number = 0; // Declaring a variable using signals count2 = signal(0);
In this case, count1 will not automatically reflect the latest value when it changes. However, count2, which is a signal, will automatically update and reflect the latest value whenever it changes.
Important! In Angular, the signals were introduced in version 16.0 and became stable in version 17.0.
Note: To read a signal, you need to call its getter function, which allows angular to track where the signal is used. The signals in angular may be either writable or read-only.
Reactive Primitives in Angular Signals
Here is a list of the commonly used Signals or reactive primitives (constructs) in Angular:
Writable Signals
In Angular, the writable signals are specific types of signals that allow you to "modify the value directly". In addition, they are used to represent the value that can be changed.
These signals provide an API for "updating their values directly". You can create writable signals by calling the signal function with the signal's initial value.
Syntax
Following is the syntax of the Angular Writable Signal −
count = signal(initial_value = 0);
Here,
- The count is a variable whose "initial signal value" is 0 (can be any value).
- Signal() is a constructor that "defines the writable signal".
Here are "two" commonly used methods to set or update the writable signal value:
- set()
- update()
The set() method
To "change" the value of the writable signal, you can use the set() method to set it directly.
Syntax
Below is the syntax of the set() method −
//Initializing a signal with an initial value count.set(initial_value);
Here, count is a variable for which we 'set' the initial_value.
The update() method
You can use the update() method or operation to compute a "new value" from the "previous one".
Syntax
Below is the syntax of the update() method −
count.update(value => value + new_value);
Here, the value is the previous "value", which will be updated by adding a new_value in it.
Note! The writable signals have the type WritableSignal.
Example - Writable Signal in Angular
We create a Signal with an initial value of 0 using the signal(0) constructor. We will use the set() and update() methods in different functions to "increase" and "decrease" the count value on each click of the given button −
app.ts
import { Component, OnInit, Signal, signal } from '@angular/core';
import { CommonModule } from '@angular/common';
import { RouterOutlet } from '@angular/router';
@Component({
selector: 'app-root',
imports: [CommonModule, RouterOutlet],
templateUrl: './app.html',
styleUrl: './app.css'
})
export class App{
//declaring a signal
count = signal(0);
increase(){
//using .set() method to increase count value
this.count.set(this.count()+1);
}
decrease(){
//using .update() method to decrease count value
this.count.update(value => this.count()-1);
}
}
app.html
<div>
<div class="count">
<h3>{{count()}}</h3>
</div>
<div class="btn">
<button (click)="increase()">Increase count</button>
<button (click)="decrease()">Decrease count</button>
</div>
</div>
app.css
.main{
width: 300px;
}
.count{
font-size: 40px;
font-weight: bold;
font-family: sans-serif;
text-align: center;
}
button{
padding: 10px 4px;
margin: 0px 5px auto;
background-color: green;
color: white;
border-radius: 5px;
cursor: pointer;
}
Output
Following is the output of the above code:

Computed Signals
In Angular, the Computed Signals are read-only signals, which means they "can't be edited" by the user. The computed signals drive their values from other signals (e.g., writable signals).
You can define the Computed signal using the computed() function by specifying the derivation.
Syntax
Following is the syntax of the Angular Computed Signal −
// Initializing a signal with an initial value count = signal(initial_value); // Creating a computed signal new_count: Signal<number> = computed(() => count() + new_value);
Here,
In the above snippet of code, the new_count signal depends on the count signal, so whenever the count signal updates, angular knows that the new_count also needs to be updated.
Important Points of the Computed Signals
1. Computed signals are both lazily evaluated and memorized.
In angular, the Computed (read-only) signals are both lazily evaluated and memorized, so the new_count derivation function does not run to calculate its value until the first time you read the "new_count".
2. Computed signals are not writable signals
The Computed signals are "not writable signals", because you can not directly assign values to them as:
new_count.set(10);
The above snippet of code in the application will produce a compilation error because new_count is "not" a Writable Signal.
Example - Computed Signal in Angular
We will create two writable signals named length and breadth with initial values of 20 and 40. Then we will create a Computed signal named area, which will be the "product" of both writable signal −
app.ts)
import { Component, computed, signal, WritableSignal } from '@angular/core';
import { CommonModule } from '@angular/common';
import { RouterOutlet } from '@angular/router';
@Component({
selector: 'app-root',
imports: [CommonModule, RouterOutlet],
templateUrl: './app.html',
styleUrl: './app.css'
})
export class App{
length: WritableSignal<number> = signal(20);
breadth: WritableSignal<number> = signal(40);
area:any = 0;
calculate(){
this.area = computed(()=> this.length() * this.breadth());
}
}
app.html
<div class="main">
<div class="count">
<h3>{{area()}}</h3>
</div>
<div class="btn">
<button (click)="calculate()">Calculate area</button>
</div>
</div>
Output
The output of the above code −

Note: When the Writable signals (length and breadth) values will change the Computed signal (area) value will change automatically.
Effects
In Angular, the effects is an "operation" that "runs" when "one or more signal values changed" at a time. The effect always runs at least once.
Similar to the Angular signals, effects keep track of their dependencies dynamically.
Hint: The good place to create effects is within the constructor because the effect function requests an "injection context".
Syntax
Following is the syntax of the Angular effects −
effect(() => {
//statement or expressions....
})
effect accepts a "function", within which will perform all the tasks.
Example - Effect in Angular Signal
We will create "two effects" for count and color signal within the constructor, which will run when one or more signal values change or at least once when the application runs −
app.ts
import { Component, effect, signal } from '@angular/core';
import { CommonModule } from '@angular/common';
import { RouterOutlet } from '@angular/router';
@Component({
selector: 'app-root',
imports: [CommonModule, RouterOutlet],
templateUrl: './app.html',
styleUrl: './app.css'
})
export class App{
constructor( ){
//count signal
effect(()=>{
console.log("Effect due to count signal is trigger: " + this.count());
});
//color signal
effect(()=>{
console.log("Effect due to color signal is trigger: " + this.color());
});
}
count = signal(0);
color = signal(["red", "green"]);
display(){
this.count.set(30);
this.color.update(value => [...value, "Yellow"]);
}
}
app.html
<div class="main">
<div class="count">
<h3>{{count()}}</h3>
</div>
<div class="btn">
<button (click)="display()">Display</button>
</div>
</div>
Output
When the signal "values are not changed", the effect runs at least once:

When signal "values changed":

Why to use Signals in Angular?
Here are some points that tell about why to use the Signals in Angular project:
- Automatic updates: Signals are automatically update any dependent computed signals or view when their values changes.
- Efficient Change Detection: Signals are optimized for minimal change detection cycles, which enhance the application performance.
- Composable Logic: Signals and computed signals can be used together to build complex reactive logic in a flexible and reusable manner.
Advantages of Signals in Angular
Below is a list of the advantages of the Angular Signals −
- Signals make Angular lighter and point the way to a future without Zone.js (used for change detection). They enable Angular to find out about components that need to be updated directly.
- We will be notified when the signal value changes, and then do something in response to the new signal value.
- It is avoiding unnecessary checks of components whose data didn't change.
Angular - Authentication and Authorization
Authentication is the process matching the visitor of a web application with the pre-defined set of user identity in the system. In other word, it is the process of recognizing the users identity. Authentication is very important process in the system with respect to security.
Authorization is the process of giving permission to the user to access certain resource in the system. Only the authenticated user can be authorized to access a resource.
Let us learn how to do Authentication and Authorization in Angular application in this tutorial.
Guards in Routing
In a web application, a resource is referred by url. Every user in the system will be allowed access a set of urls. For example, an administrator may be assigned all the url coming under administration section.
As we know already, URLs are handled by Routing. Angular routing enables the urls to be guarded and restricted based on programming logic. So, a url may be denied for a normal user and allowed for an administrator.
Angular provides a concept called Router Guards which can be used to prevent unauthorized access to certain part of the application through routing. Angular provides multiple guards and they are as follows:
CanActivate: Used to stop the access to a route.
CanActivateChild: Used to stop the access to a child route.
CanDeactivate: Used to stop ongoing process getting feedback from user. For example, delete process can be stop if the user replies in negative.
Resolve: Used to pre-fetch the data before navigating to the route.
CanLoad: Used to load assets.
Working Example
In this example, we are going to add login and logout functionality to an angular application and secure it using CanActivate guard. Follow the given steps:
Step 1: Create an angular application using the following command −
ng new new-app
Step 2: Now, navigate to project root folder.
cd new-app
Step 3: Next, we include the Bootstrap into our new-app application using styles option and change the default template to use Bootstrap components. Use the below command to install Bootstrap and JQuery in the project −
npm install --save bootstrap jquery
Now, open angular.json file and set bootstrap and jquery library path −
{
"projects": {
"expense-manager": {
"architect": {
"build": {
"builder":"@angular-devkit/build-angular:browser", "options": {
"outputPath": "dist/expense-manager",
"index": "src/index.html",
"main": "src/main.ts",
"polyfills": "src/polyfills.ts",
"tsConfig": "tsconfig.app.json",
"aot": false,
"assets": [
"src/favicon.ico",
"src/assets"
],
"styles": [
"./node_modules/bootstrap/dist/css/bootstrap.css", "src/styles.css"
],
"scripts": [
"./node_modules/jquery/dist/jquery.js", "./node_modules/bootstrap/dist/js/bootstrap.js"
]
},
},
}
}},
"defaultProject": "expense-manager"
}
Here,
scripts option is used to include JavaScript library.
Step 4: Create a new service named Auth to authenticate the user. The command given below will create a service with the name auth inside Services folder.
ng generate service Services/auth
On successful creation of service, you may see the below output on Angular CLI −
CREATE src/app/Services/auth.spec.ts (363 bytes) CREATE src/app/Services/auth.ts (142 bytes)
Step 5: Open Auth and include below code:
import { Injectable } from '@angular/core';
import { Observable, of, BehaviorSubject } from 'rxjs';
import { tap, delay } from 'rxjs/operators';
@Injectable({
providedIn: 'root'
})
export class Auth {
// Track login state with BehaviorSubject
private isUserLoggedInSubject = new BehaviorSubject<boolean>(false);
constructor() {
// Only initialize sessionStorage on the client-side (browser)
if (typeof window !== 'undefined' && window.sessionStorage) {
const storedLoginState = sessionStorage.getItem('isUserLoggedIn') === 'true';
this.isUserLoggedInSubject.next(storedLoginState);
}
}
login(userName: string, password: string): Observable<boolean> {
const isLoggedIn = userName === 'admin' && password === 'admin';
if (typeof window !== 'undefined' && window.sessionStorage) {
sessionStorage.setItem('isUserLoggedIn', isLoggedIn ? 'true' : 'false');
}
// Update the BehaviorSubject with new login state
this.isUserLoggedInSubject.next(isLoggedIn);
return of(isLoggedIn).pipe(
delay(1000),
tap(val => console.log("Is User Authentication successful: " + val))
);
}
logout(): void {
if (typeof window !== 'undefined' && window.sessionStorage) {
sessionStorage.removeItem('isUserLoggedIn');
}
// Update the BehaviorSubject to false when logged out
this.isUserLoggedInSubject.next(false);
}
// Expose the login status as an observable
get isUserLoggedIn$(): Observable<boolean> {
return this.isUserLoggedInSubject.asObservable();
}
}
Here,
We have written two methods, login and logout.
The purpose of the login method is to validate the user and if the user successfully validated, it stores the information in localStorage and then returns true.
Authentication validation is that the user name and password should be admin.
We have not used any backend. Instead, we have simulated a delay of 1s using Observables.
The purpose of the logout method is to invalidate the user and removes the information stored in localStorage.
Step 6: Create a login component using below command −
ng generate component login
Following output will be produced on running the above code −
CREATE src/app/login/login.html (21 bytes) CREATE src/app/login/login.spec.ts (608 bytes) CREATE src/app/login/login.ts (242 bytes) CREATE src/app/login/login.css (0 bytes)
Step 7: Open Login and update the existing code with the below code −
login.ts
import { Component, OnInit } from '@angular/core';
import { FormGroup, FormControl, ReactiveFormsModule } from '@angular/forms';
import { Auth } from '../Services/auth';
import { Router } from '@angular/router';
@Component({
selector: 'app-login',
imports: [ReactiveFormsModule],
templateUrl: './login.html',
styleUrl: './login.css'
})
export class Login implements OnInit {
userName: string = "";
password: string = "";
formData!: FormGroup;
constructor(private Auth : Auth, private router : Router) { }
ngOnInit() {
this.formData = new FormGroup({
userName: new FormControl("admin"),
password: new FormControl("admin"),
});
}
onClickSubmit(data: any) {
this.userName = data.userName;
this.password = data.password;
console.log("Login page: " + this.userName);
console.log("Login page: " + this.password);
this.Auth.login(this.userName, this.password)
.subscribe( data => {
console.log("Is Login Success: " + data);
if(data) this.router.navigate(['/expenses']);
});
}
}
Here,
Used reactive forms.
Imported Auth and Router and configured it in constructor.
Created an instance of FormGroup and included two instance of FormControl, one for user name and another for password.
Created a onClickSubmit to validate the user using Auth and if successful, navigate to expense list.
Step 8: Open Login template and include below template code.
login.html
<div class="container">
<div class="row">
<div class="col-lg-12 text-center" style="padding-top: 20px;">
<div class="container box" style="margin-top: 10px; padding-left: 0px; padding-right: 0px;">
<div class="row">
<div class="col-12" style="text-align: center;">
<form [formGroup]="formData" (ngSubmit)="onClickSubmit(formData.value)" class="form-signin">
<h2 class="form-signin-heading">Please sign in</h2>
<label for="inputEmail" class="sr-only">Email address</label>
<input type="text" id="username" class="form-control" formControlName="userName" placeholder="Username" required autofocus>
<label for="inputPassword" class="sr-only">Password</label>
<input type="password" id="inputPassword" class="form-control" formControlName="password" placeholder="Password" required>
<button class="btn btn-lg btn-primary btn-block" type="submit">Sign in</button>
</form>
</div>
</div>
</div>
</div>
</div>
</div>
Here, we created a reactive form and designed a login form. And, attached the onClickSubmit method to the form submit action.
Step 9: Open Login CSS file and include below CSS Code.
login.css
.form-signin {
max-width: 330px;
padding: 15px;
margin: 0 auto;
}
input {
margin-bottom: 20px;
}
Here, some styles are added to design the login form.
Step 10: Create a logout component using below command −
ng generate component logout
You may see the below output −
CREATE src/app/logout/logout.html (22 bytes) CREATE src/app/logout/logout.spec.ts (615 bytes) CREATE src/app/logout/logout.ts (246 bytes) CREATE src/app/logout/logout.css (0 bytes)
Step 11: Open Logout and include below code.
logout.ts
import { Component, OnInit } from '@angular/core';
import { Auth } from '../Services/auth';
import { Router } from '@angular/router';
@Component({
selector: 'app-logout',
imports: [],
templateUrl: './logout.html',
styleUrl: './logout.css'
})
export class Logout implements OnInit {
constructor(private Auth : Auth, private router: Router) { }
ngOnInit() {
this.Auth.logout();
this.router.navigate(['/']);
}
}
Here,
- Used logout method of Auth.
- Once the user is logged out, the page will redirect to home page (/).
Step 12: Create a guard using below command −
ng generate guard authenticate
On running the above command, Angular CLI will ask "Which type of guard would you like to create?" Choose canActivate.
CREATE src/app/authenticate.spec.ts (510 bytes) CREATE src/app/authenticate.ts (141 bytes)
Step 13: Open authenticate and include below code −
authenticate.ts
import { Injectable } from '@angular/core';
import { CanActivate, ActivatedRouteSnapshot, RouterStateSnapshot, Router, UrlTree } from '@angular/router';
import { Auth } from './Services/auth';
@Injectable({
providedIn: 'root'
})
export class authenticate implements CanActivate {
constructor(private Auth: Auth, private router: Router) {}
canActivate(
next: ActivatedRouteSnapshot,
state: RouterStateSnapshot): boolean | UrlTree {
let url: string = state.url;
return this.checkLogin(url);
}
checkLogin(url: string): true | UrlTree {
console.log("Url: " + url);
// Check if sessionStorage is available (only in the browser)
if (typeof window !== 'undefined' && window.sessionStorage) {
let val = sessionStorage.getItem('isUserLoggedIn');
// Check if the value is 'true'
if (val === "true" && val != null) {
// If the user is already logged in and trying to access the login page, redirect to /expenses
if (url === "/login") {
return this.router.parseUrl('/expenses');
} else {
return true; // User is allowed to proceed
}
} else {
// If the user is not logged in, redirect to /login
return this.router.parseUrl('/login');
}
}
// In case sessionStorage isn't available (for SSR)
return this.router.parseUrl('/login');
}
}
Here,
- checkLogin will check whether the localStorage has the user information and if it is available, then it returns true.
- If the user is logged in and goes to login page, it will redirect the user to expenses page
- If the user is not logged in, then the user will be redirected to login page.
Step 14: Let's add a new component in our application. User will be redirected to this page on successful login.
ng generate component ExpenseEntryList
The output is as follows −
CREATE src/app/expense-entry-list/expense-entry-list.html (34 bytes) CREATE src/app/expense-entry-list/expense-entry-list.spec.ts (687 bytes) CREATE src/app/expense-entry-list/expense-entry-list.ts (292 bytes) CREATE src/app/expense-entry-list/expense-entry-list.css (0 bytes)
Here, the command creates the ExpenseEntryList Component and add the necessary code by default.
Step 15: Create a ExpenseEntry interface within src/app/expense-entry-list.ts file. Then, add a method named getExpenseEntries() to return list of expense entry (mock items) in ExpenseEntryList. Also, declare a local variable, expenseEntries and load the mock list of expense entries.
import { CommonModule } from '@angular/common';
import { Component } from '@angular/core';
export interface ExpenseEntry {
id: number;
item: string;
amount: number;
category: string;
location: string;
spendOn: Date;
createdOn: Date;
}
@Component({
selector: 'app-expense-entry-list',
imports: [CommonModule],
templateUrl: './expense-entry-list.html',
styleUrl: './expense-entry-list.css'
})
export class ExpenseEntryList {
getExpenseEntries() : ExpenseEntry[] {
let mockExpenseEntries : ExpenseEntry[] = [
{ id: 1,
item: "Pizza",
amount: Math.floor((Math.random() * 10) + 1),
category: "Food",
location: "Mcdonald",
spendOn: new Date(2020, 4, Math.floor((Math.random() * 30) + 1), 10, 10, 10),
createdOn: new Date(2020, 4, Math.floor((Math.random() * 30) + 1), 10, 10, 10) },
{ id: 1,
item: "Pizza",
amount: Math.floor((Math.random() * 10) + 1),
category: "Food",
location: "KFC",
spendOn: new Date(2020, 4, Math.floor((Math.random() * 30) + 1), 10, 10, 10),
createdOn: new Date(2020, 4, Math.floor((Math.random() * 30) + 1), 10, 10, 10) },
{ id: 1,
item: "Pizza",
amount: Math.floor((Math.random() * 10) + 1),
category: "Food",
location: "KFC",
spendOn: new Date(2020, 4, Math.floor((Math.random() * 30) + 1), 10, 10, 10),
createdOn: new Date(2020, 4, Math.floor((Math.random() * 30) + 1), 10, 10, 10)
},
];
return mockExpenseEntries;
}
title: string ="";
expenseEntries!: ExpenseEntry[];
constructor() { }
ngOnInit() {
this.title = "Expense Entry List";
this.expenseEntries = this.getExpenseEntries();
}
}
Step 16: Open the template file, src/app/expense-entry-list/expense-entry-list.html and show the mock entries in a table.
expense-entry-list.html
<!-- Page Content -->
<div class="container">
<div class="row">
<div class="col-lg-12 text-center" style="padding-top: 20px;">
<div class="container" style="padding-left: 0px; padding-right: 0px;">
<div class="row">
<div class="col-sm" style="text-align: left;">
{{ title }}
</div>
<div class="col-sm" style="text-align: right;">
<button type="button" class="btn btn-primary">Edit</button>
</div>
</div>
</div>
<div class="container box" style="margin-top: 10px;">
<table class="table table-striped">
<thead>
<tr>
<th>Item</th>
<th>Amount</th>
<th>Category</th>
<th>Location</th>
<th>Spent On</th>
</tr>
</thead>
<tbody>
<tr *ngFor="let entry of expenseEntries">
<th scope="row">{{ entry.item }}</th>
<th>{{ entry.amount }}</th>
<td>{{ entry.category }}</td>
<td>{{ entry.location }}</td>
<td>{{ entry.spendOn | date: 'short' }}</td>
</tr>
</tbody>
</table>
</div>
</div>
</div>
</div>
Here,
Used bootstrap table. table and table-striped will style the table according to Boostrap style standard.
Used ngFor to loop over the expenseEntries and generate table rows.
Step 17: Open src/app/app.routes.ts and update below code −
import { Routes } from '@angular/router';
import { Login } from './login/login';
import { Logout } from './logout/logout';
import { authenticate } from './authenticate.guard';
import { ExpenseEntryList } from './expense-entry-list/expense-entry-list';
export const routes: Routes = [
{ path: 'login', component: Login },
{ path: 'logout', component: Logout },
{ path: 'expenses', component: ExpenseEntryList, canActivate: [authenticate]},
{path: ' ', redirectTo: '/login', pathMatch: 'full'}
];
Here,
- Imported Login and Logout.
- Imported authenticate.
- Created routes, login and logout to access Login and Logout.
- Add new option canActivate for ExpenseEntryList.
Step 18: Open App template and add two login and logout link.
<nav class="navbar navbar-expand-lg navbar-dark bg-dark static-top">
<div class="container">
<a class="navbar-brand" href="#">{{ title }}</a>
<button class="navbar-toggler" type="button" data-toggle="collapse" data-target="#navbarResponsive" aria-controls="navbarResponsive" aria-expanded="false" aria-label="Toggle navigation">
<span class="navbar-toggler-icon"></span>
</button>
<div class="collapse navbar-collapse" id="navbarResponsive">
<ul class="navbar-nav ml-auto">
<li class="nav-item active">
<a class="nav-link" href="#">Home <span class="sr-only">(current)</span></a>
</li>
<li class="nav-item">
<a class="nav-link" href="#">Report</a>
</li>
<li class="nav-item">
<a class="nav-link" href="#">Add Expense</a>
</li>
<li class="nav-item">
<a class="nav-link" href="#">About</a>
</li>
<li class="nav-item">
<div *ngIf="isUserLoggedIn; else isLogOut">
<a class="nav-link" routerLink="/logout">Logout</a>
</div>
<ng-template #isLogOut>
<a class="nav-link" routerLink="/login">Login</a>
</ng-template>
</li>
</ul>
</div>
</div>
</nav>
<router-outlet></router-outlet>
Step 19: Open App and update below code −
app.ts
import { Component } from '@angular/core';
import { RouterOutlet } from '@angular/router';
import { ExpenseEntryList } from './expense-entry-list/expense-entry-list';
import { Login } from './login/login';
import { Logout } from './logout/logout';
import { Auth } from './Services/auth';
import { CommonModule } from '@angular/common';
@Component({
selector: 'app-root',
imports: [RouterOutlet, ExpenseEntryList, Login, Logout, CommonModule],
templateUrl: './app.html',
styleUrl: './app.css'
})
export class App {
title = 'Angular Authentication';
isUserLoggedIn: any = false;
router: any;
constructor(private Auth: Auth) {}
ngOnInit() {
// Subscribe to the isUserLoggedIn observable from Auth
this.Auth.isUserLoggedIn$.subscribe(status => {
this.isUserLoggedIn = status;
console.log("Is User Logged In: ", this.isUserLoggedIn);
});
}
logout(): void {
// Trigger logout in Auth
this.Auth.logout();
// Redirect to the homepage after logout
this.router.navigate(['/']);
}
}
Output
Here, we have added the logic to identify the user status so that we can show login/logout functionality.
Step 20: Start the application using following command −
ng serve
Enter admin as username and password and then, click submit. The application process the login and redirects the user to expense list page as shown below −

Finally, your can click logout and exit the application.
Angular - Internationalization (i18n)
Internationalization (i18n) is a must required feature for any modern web application. Internationalization enables the application to target any language in the world. Localization is a part of the Internationalization and it enables the application to render in a targeted local language. Angular provides complete support for internationalization and localization feature.
Let us learn how to use Internationalization in Angular by creating a simple hello world application in different languages.
Example - Internationalization in Angular
Follow the steps given below to enable internationalization in Angular:
Step 1: Create a new Angular application using below command −
ng new i18n-sample
Step 2: Navigate to the app folder using the given command −
cd i18n-sample
Step 3: Change the App Component's template as specified below −
app.html
<h2>{{ title }}</h2>
<div>Hello</div>
<div>The Current time is {{ currentDate | date : 'medium' }}</div>
Step 4: Add localize module using below command −
ng add @angular/localize
Step 5: The LOCALE_ID is the Angular variable to refer the current locale. By default, it is set as en_US. Let us change the locale by using useValue: 'hi' (for Hindi) in the providers array of app.component.ts. Import the locale data from @angular/common/locales/hi and then, register it using registerLocaleData method. Also, define a local variable named CurrentDate and set current time using Date.now() as specified below:
app.ts
import { DatePipe, registerLocaleData } from '@angular/common';
import localeHi from '@angular/common/locales/hi';
import { Component, LOCALE_ID } from '@angular/core';
registerLocaleData(localeHi);
@Component({
selector: 'app-root',
imports: [DatePipe],
providers: [
{ provide: LOCALE_ID, useValue: 'hi' }
],
templateUrl: './app.html',
styleUrl: './app.css'
})
export class App {
title = 'Internationalization Sample';
currentDate: number = Date.now();
}
Output
Step 6: Now run the application using ng serve command and check the result. You will see the date is specified using hi locale.

Finally, we have created a localized application in Angular.
Angular - Standalone Component
This Angular chapter will discuss the Standalone component, including when it was introduced by the Angular team, its advantages, how to create standalone components and more.
Standalone Components in Angular
In Angular, Standalone components provide a simplified way to build Angular applications. As the name suggests, standalone components are independent and do not rely on other modules or components.
Note! Yes, standalone components are independent; they no longer depend on the @NgModule. If you try to import a standalone component into an @NgModule, you might encounter errors
Important! The Standalone components were introduced in Angular version 14. Learn more about Angular's various versions: See more
Standalone components are suitable for small applications that do not require module dependencies. However, when developing a large or complex application with mandatory dependencies for components, this becomes a drawback for standalone components.
Important! Any existing angular applications can optionally and incrementally adopt the new standalone style without any breaking changes.
Standalone vs Non-Standalone Components
Below is a list which differentiate between standalone and non-standalone component:
| Standalone | Non-Standalone |
|---|---|
| Independent: Standalone components do not depend on @NgModule. | Module Dependency: These components must be declared in an @NgModule to be used. |
| Simplified Structure: Ideal for creating reusable components, directives, or pipes without the need to involve Angular modules. | Complex Structure: Suitable for larger, more complex applications where components are part of a bigger module structure. |
| The standalone @Component directive contains standalone: true and imports: []. | The non-standalone component does not include these configurations. |
How to Create a Standalone Component?
To create an standalone component in your angular application, you need to run the following command:
ng generate component component_name
In the latest version of Angular, this command will automatically create a standalone component, as the application itself supports standalone components by default.
However, in older versions of Angular, running the above command may not create a standalone component. In that case, we need to use the following command or manually set the standalone property and specify the imports.
ng generate component component_name --standalone
The standalone component initial data will look like:
import { Component} from '@angular/core';
@Component({
selector: 'app-root',
imports: [],
templateUrl: './app.html',
styleUrl: './app.css'
})
export class App{
title = 'my-crud-app';
}
Here,
- The standalone: true property identifies this component as a standalone component.
- The imports array is where you can add all the required dependencies for this component.
Verify the Standalone Components
You might be wondering how to determine if a component is standalone. To verify if a component is standalone in Angular, you can check using the following guide lines:
- Standalone Property: Check the standalone property in the component's TypeScript file (.ts file). If the standalone property is set to true, then it's a standalone component.
@Component({
selector: 'app-root',
imports: [],
templateUrl: './app.html',
styleUrl: './app.css'
})
Component imports must be standalone component
Advantages of Standalone Components
Below is a list of some advantages of the Standalone components:
- Reusability: These components are self-contained, making them easy to reuse in different parts of the application without any module dependency.
- Faster Development: As there is no need to import within the modules, developers can quickly create and integrate new components, speeding up the development process.
- Modularity: The Standalone components enable a modular approach, allowing for better organization and maintainability of the codebase.
Angular - Accessibility
Accessibility support is one of the important feature of every UI based application. Accessibility is a way of designing the application so that, it is accessible for those having certain disabilities as well. Let us learn the support provided by Angular to develop application with good accessibility.
Accessibility Rules
While using attribute binding, use attr. prefix for ARIA attributes.
Use Angular material component for Accessibility. Some of the useful components are LiveAnnouncer and cdkTrapFocu.
Use native HTML elements wherever possible because native HTML element provides maximum accessibility features. When creating a component, select native html element matching your use case instead of redeveloping the native functionality.
Use NavigationEnd to track and control the focus of the application as it greatly helps in accessibility.
Angular - Web Workers
Web workers enables JavaScript application to run the CPU-intensive in the background so that the application main thread concentrate on the smooth operation of UI. Angular provides support for including Web workers in the application. Let us write a simple Angular application and try to use web workers.
Create a new Angular application using below command −
cd /go/to/workspace ng new web-worker-sample
Run the application using below command −
cd web-worker-sample npm run start
Add new web worker using below command −
ng generate web-worker app
The output of the above command is as follows −
CREATE src/app/app.worker.ts (163 bytes) CREATE tsconfig.worker.json (349 bytes) UPDATE angular.json (2246 bytes) UPDATE src/app/app.ts (893 bytes)
Here,
- app refers the location of the web worker to be created.
- Angular CLI will generate two new files, tsconfig.worker.json and src/app/app.worker.ts and update three files, angular.json and src/app/app.ts file.
Let us check the changes −
tsconfig.worker.json
// tsconfig.worker.json
{
"extends": "./tsconfig.json",
"compilerOptions": {
"outDir": "./out-tsc/worker",
"lib": [
"es2018",
"webworker"
],
"types": []
},
"include": [
"src/**/*.worker.ts"
]
}
Here,
tsconfig.worker.json extends tsconfig.json and includes options to compile web workers.
// tsconfig.app.json [only a snippet] "exclude": [ "src/test.ts", "src/**/*.spec.ts", "src/**/*.worker.ts" ]
Here,
Basically, it excludes all the worker from compiling as it has separate configuration.
// angular.json (only a snippet) "webWorkerTsConfig": "tsconfig.worker.json"
Here,
angular.json includes the web worker configuration file, tsconfig.worker.json.
// src/app/app.worker.ts
addEventListener('message', ({ data }) => {
const response = `worker response to ${data}`;
postMessage(response);
});
Here,
A web worker is created. Web worker is basically a function, which will be called when a message event is fired. The web worker will receive the data send by the caller, process it and then send the response back to the caller.
// src/app/app.component.ts [only a snippet]
if (typeof Worker !== 'undefined') {
// Create a new
const worker = new Worker('./app.worker', { type: 'module' });
worker.onmessage = ({ data }) => {
console.log(`page got message: ${data}`);
};
worker.postMessage('hello');
} else {
// Web Workers are not supported in this environment.
// You should add a fallback so that your program still executes correctly.
}
Here,
- AppComponent create a new worker instance, create a callback function to receive the response and then post the message to the worker.
Restart the application. Since the angular.json file is changed, which is not watched by Angular runner, it is necessary to restart the application. Otherwise, Angular does not identify the new web worker and does not compile it.
Let us create Typescript class, src/app/app.prime.ts to find nth prime numbers.
app.prime.ts
export class PrimeCalculator
{
static isPrimeNumber(num : number) : boolean {
if(num == 1) return true;
let idx : number = 2;
for(idx = 2; idx < num / 2; idx++)
{
if(num % idx == 0)
return false;
}
return true;
}
static findNthPrimeNumber(num : number) : number {
let idx : number = 1;
let count = 0;
while(count < num) {
if(this.isPrimeNumber(idx))
count++;
idx++;
console.log(idx);
}
return idx - 1;
}
}
Here,
- isPrimeNumber check whether the given number is prime or not.
- findNthPrimeNumber finds the nth prime number.
Import the new created prime number class into src/app/app.worker.ts and change the logic of the web worker to find nth prime number.
/// <reference lib="webworker" />
import { PrimeCalculator } from './app.prime';
addEventListener('message', ({ data }) => {
// const response = `worker response to ${data}`;
const response = PrimeCalculator.findNthPrimeNumber(parseInt(data));
postMessage(response);
});
Change App Component and include two function, find10thPrimeNumber and find10000thPrimeNumber.
app.ts
import { Component } from '@angular/core';
import { PrimeCalculator } from './app.prime';
@Component({
selector: 'app-root',
templateUrl: './app.html',
styleUrls: ['./app.css']
})
export class App {
title = 'Web worker sample';
prime10 : number = 0;
prime10000 : number = 0;
find10thPrimeNumber() {
this.prime10 = PrimeCalculator.findNthPrimeNumber(10);
}
find10000thPrimeNumber() {
if (typeof Worker !== 'undefined') {
// Create a new
const worker = new Worker('./app.worker', { type: 'module' });
worker.onmessage = ({ data }) => {
this.prime10000 = data;
};
worker.postMessage(10000);
} else {
// Web Workers are not supported in this environment.
// You should add a fallback so that your program still executes correctly.
}
}
}
Here,
find10thPrimeNumber is directly using the PrimeCalculator. But, find10000thPrimeNumber is delegating the calculation to web worker, which in turn uses PrimeCalculator.
Change the AppComponent template, src/app/app.commands.html and include two option, one to find 10th prime number and another to find the 10000th prime number.
<h1>{{ title }}</h1>
<div>
<a href="#" (click)="find10thPrimeNumber()">Click here</a> to find 10th prime number
<div>The 10<sup>th</sup> prime number is {{ prime10 }}</div> <br/>
<a href="#" (click)="find10000thPrimeNumber()">Click here</a> to find 10000th prime number
<div>The 10000<sup>th</sup> prime number is {{ prime10000 }}</div>
</div>
Here,
Finding 10000th prime number will take few seconds, but it will not affect other process as it is uses web workers. Just try to find the 10000th prime number first and then, the 10th prime number.
Since, the web worker is calculating 10000th prime number, the UI does not freeze. We can check 10th prime number in the meantime. If we have not used web worker, we could not do anything in the browser as it is actively processing the 10000th prime number.
Output
The result of the application is as follows −
Initial state of the application.
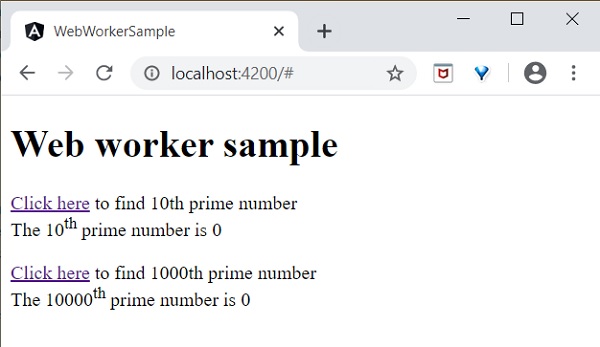
Click and try to find the 10000th prime number and then try to find the 10th prime number. The application finds the 10th prime number quite fast and shows it. The application is still processing in the background to find the 10000th prime number.
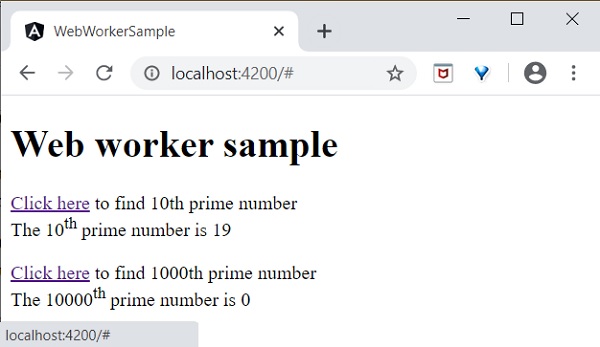
Both processes are completed.
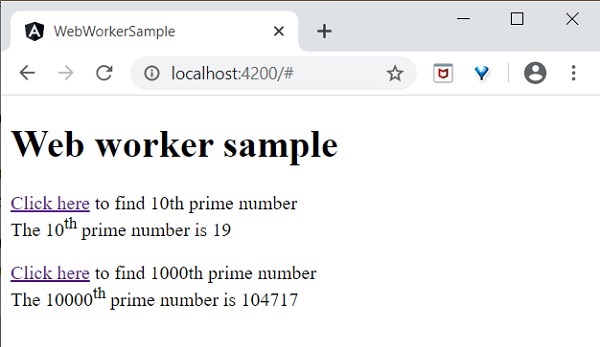
Web worker enhances the user experience of web application by doing the complex operation in the background and it is quite easy to do it in Angular Application as well.
Angular - Server Side Rendering
Server side Rendering (SSR) is a modern technique to convert a Single Page Application (SPA) running in the browser into a server based application. Usually, in SPA, the server returns a simple index.html file with the reference to the JavaScript based SPA app. The SPA app take over from there, configure the entire application, process the request and then send the final response.
But in SSR supported application, the server as well do all the necessary configuration and then send the final response to the browser. The browser renders the response and start the SPA app. SPA app takeover from there and further request are diverted to SPA app. The flow of SPA and SSR is as shown in below diagram.

Converting a SPA application to SSR provides certain advantages and they are as follows −
Speed: First request is relatively fast. One of the main drawback of SPA is slow initial rendering. Once the application is rendered, SPA app is quite fast. SSR fixes the initial rendering issue.
SEO Friendly: Enables the site to be SEO friendly. Another main disadvantage of SPA is not able to crawled by web crawler for the purpose of SEO. SSR fixes the issue.
Angular Universal
To enable SSR in Angular, Angular should be able to rendered in the server. To make it happen, Angular provides a special technology called Angular Universal. It is quite new technology and it is continuously evolving. Angular Universal knows how to render Angular application in the server. We can upgrade our application to Angular Universal to support SSR.
Angular - Ivy Compiler
Ivy Compiler is the latest compiler for Angular application released by Angular Team. Currently, Angular is using View Engine compiler to compile Angular application.
In general, Angular compiler has two options to compile an application.
Just In Time (JIT) Compiler
In Just In Time (JIT) compilation, the compiler will be bundled along with the application and send to the browser. Angular application will be compiled in the browser and run just before the execution of application.
Even though JIT provides certain advanced feature, JIT slows down the compilation and also the app bundle will be double the size produced by AOT compiler as it includes compiler as well.
Ahead Of Time (AOT) Compiler
In AOT compilation, the compiler will emit optimised code ready to run inside the browser without any addition step. It will reduce the size of the bundle as well as reduce the compilation time and startup time of the application.
Advantages of Ivy Compiler
Ivy Compiler is the optimised and advanced compiler for Angular. As of Angular, it is not yet complete even though it is useable at this stage. Angular Team is recommending the developer to use it in Angular.
The main advantages of Ivy Compiler are as follows −
- Optimized code.
- Faster build time.
- Reduced bundle size.
- Better performance.
How to use Ivy?
Ivy Compiler can be used in Angular application by changing the project setting as specified below −
Open angular.json and set the aot option (projects -> -> architect -> build -> configurations -> production) of the project to true.
{
"projects": {
"my-existing-project": {
"architect": {
"build": {
"options": {
...
"aot": true,
}
}
}
}
}
}
Open tsconfig.app.json and set enableIvy to true under angularCompilerOptions.
{
...
"angularCompilerOptions": {
"enableIvy": true
}
Compile and run the application and get benefited by Ivy Compiler.
Angular - Building with Bazel
Bazel is an open-source build and test tool developed by Google. You can use it to automate the building and testing of software. The reason to develop Bazel was to create a free and open-source build system that provides both speed and correctness. It uses a human-readable, high-level build language.
Angular is a front-end framework that can handle a large scale application, but as the size of your application grows, the build process can slow down significantly. To tackle this, Bazel can be used. Integrating it with Angular can provide several benefits that we are going to explore in this tutorial.
Build Process of Bazel
When Bazel is used, it works in the following steps −
- First, the BUILD files relevant to the target are loaded.
- In the second step, it creates an action graph after analyzing the inputs and their dependencies. It uses specified build rules during the process.
- Executes the build actions on the given inputs to produce the final build outputs.
Features of Bazel
Some of the features of Bazel are as follows:
- To describe build properties, Bazel uses abstract and human-readable language.
- To speed up the build process, it caches all previously done work and tracks changes to both file content and build commands.
- It supports multiple languages and platforms.
- Also, it supports multiple repositories.
- It is a high-level build language.
- Bazel is fast and reliable.
Using Bazel in Angular
Angular supports building the application using bazel. Let us see how to use it to compile and build Angular applications.
First, install @angular/bazel package.
npm install -g @angular/bazel
The above command will install the @angular/bazel package globally. However, note that the Angular team has shifted some of its focus to support Bazel as part of the official Angular CLI tooling. You may also install this package locally in your project if preferred, but the command above should work fine for most setups.
For existing applications, add @angular/bazel as mentioned below:
ng add @angular/bazel
This command adds the necessary Bazel configuration to your existing Angular application. It sets up the BUILD.bazel files and modifies the angular.json file accordingly.
For new application, use below mentioned command:
ng new --collection=@angular/bazel
To build an application using bazel, use below command:
ng new app-name --collection=@angular/bazel
Here,
leaveBazelFilesOnDisk option will leave the bazel files created during build process, which we can use to build the application directly using bazel.
To build an application using bazel directly, install @bazel/bazelisk and then, use bazelisk build command.
npm install -g @bazel/bazelisk bazelisk build //src:app-name
Angular - Backward Compatibility
Angular framework provides maximum compatibility with previous versions. If Angular Team deprecate a feature in a release, it will wait for 3 more release to completely remove the feature. Angular Team release a major version for every six months. Every version will have active maintenance period of six months and then Long Term Support (LTS) period for another one year. Angular does not introduce breaking changes during these 18 months. If Angular version deprecate a feature in version 5, then it will probably remove it in version 8 or in next releases.
Angular maintains documentation and guides of all version. For example, Angular documentation for version 7 can be checked @ https://v7.angular.io. Angular also provides a detailed upgrade path through https://update.angular.io/ site.
To update Angular application written from previous version, use below command inside the project directory:
ng update @angular/cli@8 @angular/core@8
Let us see some of the important changes introduced in Angular.
HttpModule module and its associated Http service is removed. Use HttpClient service from HttpClientModule module.
/deep/, >>> and :ng-deep component selectors are removed.
Angular default version of TypeScript is 3.4.
Node version supported by Angular is v10 and later.
@ViewChild() and ContentChild() decorator behaviour is changed from dynamic to static.
Lazy loading string syntax in router module is removed and only function based is supported.
loadChildren: './lazy/lazy.module#LazyModule'
loadChildren: () => import('./lazy/lazy.module'
Angular - Reactive Programming
Reactive programming is a programming paradigm dealing with data streams and the propagation of changes. Data streams may be static or dynamic. An example of static data stream is an array or collection of data. It will have an initial quantity and it will not change.
An example for dynamic data stream is event emitters. Event emitters emit the data whenever the event happens. Initially, there may be no events but as the time moves on, events happens and it will gets emitted.
Reactive programming enables the data stream to be emitted from one source called Observable and the emitted data stream to be caught by other sources called Observer through a process called subscription.
This Observable/Observer pattern or simple Observer pattern greatly simplifies complex change detection and necessary updating in the context of the programming.
Reactive Programming in Angular
JavaScript does not have the built-in support for Reactive Programming. RxJs is a JavaScript Library which enables reactive programming in JavaScript. Angular uses RxJs library extensively to do below mentioned advanced concepts −
- Data transfer between components.
- HTTP client.
- Router.
- Reactive forms.
Let us learn reactive programming using RxJs library in this chapter.
Observable
As learn earlier, Observable are data sources and they may be static or dynamic. Rxjs provides lot of method to create Observable from common JavaScript Objects. Let us see some of the common methods.
of(): Emit any number of values in a sequence and finally emit a complete notification.
const numbers$ = of(1, 2, 3, 4, 5, 6, 7, 8, 9, 10);
Here,
numbers$ is an Observable object, which when subscribed will emit 1 to 10 in a sequence.
Dollar sign ($) at the end of the variable is to identify that the variable is Observable.
range(): Emit a range of number in sequence.
const numbers$ = range(1,10)
from(): Emit array, promise or iterable.
const numbers$ = from([1,2,3,4,5,6,7,8,9,10]);
ajax(): Fetch a url through AJAX and then emit the response.
const api$ = ajax({ url: 'https://httpbin.org/delay/1', method: 'POST', headers: { 'Content-Type': 'application/text' }, body: "Hello" });
Here,
https://httpbin.org is a free REST API service which will return the supplied body content in the JSON format as specified below −
{
"args": {},
"data": "Hello",
"files": {},
"form": {},
"headers": {
"Accept": "text/html,application/xhtml+xml,application/xml;q=0.9,image/webp,image/apng,*/*;q=0.8,application/signed-exchange;v=b3;q=0.9",
"Accept-Encoding": "gzip, deflate, br",
"Accept-Language": "en-US,en;q=0.9",
"Host": "httpbin.org", "Sec-Fetch-Dest": "document",
"Sec-Fetch-Mode": "navigate",
"Sec-Fetch-Site": "none",
"Upgrade-Insecure-Requests": "1",
"User-Agent": "Mozilla/5.0 (Windows NT 10.0; Win64; x64) AppleWebKit/537.36 (KHTML, like Gecko) Chrome/83.0.4103.106 Safari/537.36",
"X-Amzn-Trace-Id": "Root=1-5eeef468-015d8f0c228367109234953c"
},
"origin": "ip address",
"url": "https://httpbin.org/delay/1"
}
fromEvent(): Listen to an HTML elements event and then emit the event and its property whenever the listened event fires.
const clickEvent$ = fromEvent(document.getElementById('counter'), 'click');
Angular internally uses the concept extensively to provide data transfer between components and for reactive forms.
Subscribing process
Subscribing to an Observable is quite easy. Every Observable object will have a method, subscribe for the subscription process. Observer need to implement three callback function to subscribe to the Observable object. They are as follows −
next: Receive and process the value emitted from the Observable
error: Error handling callback
complete: Callback function called when all data from Observable are emitted.
Once the three callback functions are defined, Observable's subscribe method has to be called as specified below −
const numbers$ = from([1,2,3,4,5,6,7,8,9,10]);
// observer
const observer = {
next: (num: number) => { this.numbers.push(num); this.val1 += num },
error: (err: any) => console.log(err),
complete: () => console.log("Observation completed")
};
numbers$.subscribe(observer);
Here,
next: method get the emitted number and then push it into the local variable, this.numbers.
next: method also adding the number to local variable, this.val1.
error: method just writes the error message to console.
complete: method also writes the completion message to console.
We can skip error and complete method and write only the next method as shown below −
number$.subscribe((num: number) => { this.numbers.push(num); this.val1 += num; });
Operations
Rxjs library provides some of the operators to process the data stream. Some of the important operators are as follows −
filter(): Enable to filter the data stream using callback function.
const filterFn = filter( (num : number) => num > 5 );
const filteredNumbers$ = filterFn(numbers$);
filteredNumbers$.subscribe( (num : number) => {
this.filteredNumbers.push(num); this.val2 += num } );
map(): Enables to map the data stream using callback function and to change the data stream itself.
const mapFn = map( (num : number) => num + num ); const mappedNumbers$ = mappedFn(numbers$);
pipe(): Enable two or more operators to be combined.
const filterFn = filter( (num : number) => num > 5 );
const mapFn = map( (num : number) => num + num ); const processedNumbers$ = numbers$.pipe(filterFn, mapFn);
processedNumbers$.subscribe( (num : number) => { this.processedNumbers.push(num); this.val3 += num } );
Working Example
Let us create a sample application to try out the reaction programming concept learned in this chapter.
Step 1: Create a new application, reactive using below command −
ng new reactive
Step 2: Change the directory to our newly created application.
cd reactive
Step 3: Run the application.
ng serve
Step 4: Change the AppComponent code (src/app/app.ts) as specified below −
app.ts
import { Component, OnInit } from '@angular/core'; import { Observable, of, range, from, fromEvent } from 'rxjs';
import { ajax } from 'rxjs/ajax';
import { filter, map, catchError } from 'rxjs/operators';
@Component({
selector: 'app-root',
imports:[],
templateUrl: './app.html',
styleUrls: ['./app.css']
})
export class App implements OnInit {
title = 'Reactive programming concept';
numbers : number[] = [];
val1 : number = 0;
filteredNumbers : number[] = [];
val2 : number = 0;
processedNumbers : number[] = [];
val3 : number = 0;
apiMessage : string;
counter : number = 0;
ngOnInit() {
// Observable stream of data Observable<number>
// const numbers$ = of(1, 2, 3, 4, 5, 6, 7, 8, 9, 10);
// const numbers$ = range(1,10);
const numbers$ = from([1,2,3,4,5,6,7,8,9,10]);
// observer
const observer = {
next: (num: number) => {this.numbers.push(num); this.val1 += num },
error: (err: any) => console.log(err),
complete: () => console.log("Observation completed")
};
numbers$.subscribe(observer);
const filterFn = filter( (num : number) => num > 5 );
const filteredNumbers = filterFn(numbers$);
filteredNumbers.subscribe( (num : number) => {this.filteredNumbers.push(num); this.val2 += num } );
const mapFn = map( (num : number) => num + num );
const processedNumbers$ = numbers$.pipe(filterFn, mapFn);
processedNumbers$.subscribe( (num : number) => {this.processedNumbers.push(num); this.val3 += num } );
const api$ = ajax({
url: 'https://httpbin.org/delay/1',
method: 'POST',
headers: {'Content-Type': 'application/text' },
body: "Hello"
});
api$.subscribe(res => this.apiMessage = res.response.data );
const clickEvent$ = fromEvent(document.getElementById('counter'), 'click');
clickEvent$.subscribe( () => this.counter++ );
}
}
Here,
- Used of, range, from, ajax and fromEvent methods to created Observable.
- Used filter, map and pipe operator methods to process the data stream.
- Callback functions catch the emitted data, process it and then store it in components local variables.
Change the App template, src/app/app.html as specified below −
app.html
<h1>{{ title }}</h1>
<div>
The summation of numbers ( <span *ngFor="let num of numbers"> {{ num }} </span> ) is {{ val1 }}
</div>
<div>
The summation of filtered numbers ( <span *ngFor="let num of filteredNumbers"> {{ num }} </span> ) is {{ val2 }}
</div>
<div>
The summation of processed numbers ( <span *ngFor="let num of processedNumbers"> {{ num }} </span> ) is {{ val3 }}
</div>
<div>
The response from the API is <em>{{ apiMessage }}</em> </div>
<div>
<a id="counter" href="#">Click here</a> to increment the counter value. The current counter value is {{ counter }}
<div>
Here,
Shown all the local variable processed by Observer callback functions.
Output
Open the browser, http://localhost:4200.
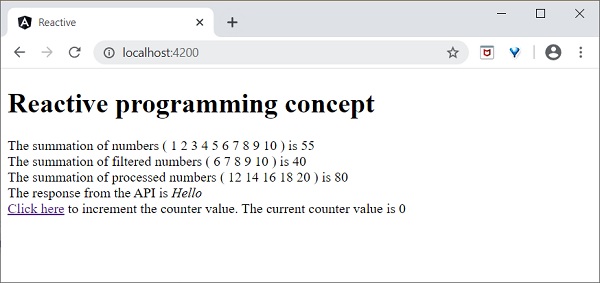
Click the Click here link for five times. For each event, the event will be emitted and forward to the Observer. Observer callback function will be called. The callback function increment the counter for every click and the final result will be as shown below −
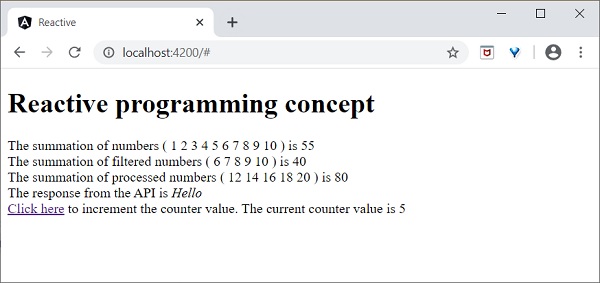
Angular - CLI Commands
Angular CLI, a short form of Angular Command Line Interface, is a tool used for creating and managing Angular applications. It is built on top of Node.js and installed from NPM. It provides a set of commands to generate, build, test, and deploy Angular projects.
With the help of Angular CLI, developers can quickly set up a new project, add components, services, directives and any other features. This tutorial explains all the Angular CLI commands in detail.
Node.js is a runtime environment that allows you to run JavaScript code outside of a web browser. NPM (Node Package Manager) is a tool that comes with Node.js and helps you manage packages and dependencies for your projects.
Verify CLI
Before moving to Angular CLI commands, we have to ensure that Angular CLI is installed on your machine. If it is installed, you can verify it by using the below command −
ng version
After running this command, you may see the following response −
_ _ ____ _ ___
/ \ _ __ __ _ _ _| | __ _ _ __ / ___| | |_ _|
/ △ \ | '_ \ / _` | | | | |/ _` | '__| | | | | | |
/ ___ \| | | | (_| | |_| | | (_| | | | |___| |___ | |
/_/ \_\_| |_|\__, |\__,_|_|\__,_|_| \____|_____|___|
|___/
Angular CLI : 21.0.0
Angular : 21.0.0
Node.js : 24.11.0
Package Manager : npm 11.6.1
Operating System : win32 x64
┌───────────────────────────┬───────────────────┬───────────────────┐
│ Package │ Installed Version │ Requested Version │
├───────────────────────────┼───────────────────┼───────────────────┤
│ @angular/build │ 21.0.0 │ ^21.0.0 │
│ @angular/cli │ 21.0.0 │ ^21.0.0 │
│ @angular/common │ 21.0.0 │ ^21.0.0 │
│ @angular/compiler │ 21.0.0 │ ^21.0.0 │
│ @angular/compiler-cli │ 21.0.0 │ ^21.0.0 │
│ @angular/core │ 21.0.0 │ ^21.0.0 │
│ @angular/elements │ 21.0.0 │ ^21.0.0 │
│ @angular/forms │ 21.0.0 │ ^21.0.0 │
│ @angular/localize │ 21.0.0 │ ^21.0.0 │
│ @angular/platform-browser │ 21.0.0 │ ^21.0.0 │
│ @angular/router │ 21.0.0 │ ^21.0.0 │
│ rxjs │ 7.8.2 │ ~7.8.0 │
│ typescript │ 5.9.3 │ ~5.9.2 │
│ vitest │ 4.0.12 │ ^4.0.8 │
└───────────────────────────┴───────────────────┴───────────────────┘
If CLI is not installed, then use the below command to install it −
npm install -g @angular/cli
For MAC or Linux operating systems, use the below command −
sudo npm install -g @angular/cli
Angular CLI Commands
There are a number of CLI commands used to manage Angular applications and all of them start with the prefix ng, which stands for Angular. Some of the Angular CLI are listed in the table given below −
| SNo. | Commands & Descriptions |
|---|---|
1. |
ng new <project-name> To create an Angular application. |
2. |
ng generate component <component-name> To create a component in Angular. |
3. |
ng generate class <class-name> To create a new class in Angular. |
4. |
ng generate pipe <pipe-name> It creates a custom pipe in Angular. |
5. |
ng generate directive <directive-name> It creates a new directive in Angular. |
6. |
ng generate module <module-name> To create a new module in Angular. |
7. |
ng generate interface <interface-name> It is used to create an interface in Angular. |
8. |
ng generate webWorker <webWorker-name> It creates a new web worker. |
9. |
ng generate service <service-name> It creates a new service. |
10. |
ng generate enum <enum-name> It generates a new enum. |
11. |
ng add [name] It is used to add support for an external library to your project. |
12. |
ng build It is used to compile or build your angular app. |
13. |
ng config It is used to retrieve or set Angular configuration values in the angular.json file for the workspace. |
14. |
ng config It is used to retrieve or set Angular configuration values in the angular.json file for the workspace. |
15. |
ng doc <keyword> This command opens the official Angular documentation in a browser, and searches for a given keyword. |
16. |
ng version Shows the Angular CLI version. |
17. |
ng update Updates your application and its dependencies. |
18. |
ng test Runs unit tests in a project. |
19. |
ng serve It is used to build and serve your app. Also, rebuilds on file changes. |
20. |
ng help It lists out available commands and their short descriptions. |
21. |
ng e2e <project> [options] It build and serves an Angular app, and then runs end-to-end tests using Protractor. |
22. |
ng deploy Deploy your Angular application to a specific hosting service, such as Firebase or GitHub Pages. |
23. |
ng cache clean Deletes the disk cache. |
24. |
ng cache info Displays the disk cache configuration and statistics. |
25. |
ng analytics disable It will disable the analytics gathering and reporting for the user. |
26. |
ng analytics info Displays the collected analytics. |
Angular - Paginator
What is Paginator?
A paginator is a user interface component that allows users to navigate through a large set of data by dividing it into multiple pages. It provides controls for moving between pages, such as next, previous, first, and last buttons, along with an indication of the current page number.
You can use paginator in your Angular application to show data tables, search results, and list views. It shows the data by breaking it into smaller chunks. It also reduces loading times and improves performance. Paginator makes your application user-friendly as it provides an organized way for users to navigate through data.
The paginator appears at the bottom of a data table, search result or list. It has buttons to move to the next or previous page, as well as buttons to jump to the first or last page. Additionally, it displays the current page number and the total number of pages.
Creating Paginator in Angular
To create a paginator in an Angular application, use its Material UI component library. It is developed by Google and follows its Material Design principles. It has a rich set of UI components, such as buttons, forms, dialogs, and more. With minimal code, you can add these ready-to-use components to your application.
The paginator can be added by following the two steps given below −
- First, import the MatPaginatorModule.
- Once imported, add the <mat-paginator> element to your template and configure it with properties like length, pageSize, and pageSizeOptions.
Example - Usage of Paginator
The following example illustrates how to add a paginator to your Angular application.
Step 1: Create a new Angular project. Give name of your choice, we are naming it paginator-app.
ng new paginator-app
Step 2: Now, navigate to the newly created app using the below command −
cd paginator-app
Step 3: Use the command given below to add Angular Material to your application −
ng add @angular/material
While adding the Angular Material, the CLI will ask for different configuration. Choose the default options for each configuration.
Step 4: Open app.html and add the code given below −
app.html
<mat-paginator
[length]="totalItems"
[pageSize]="pageSize"
[pageSizeOptions]="[5, 10]"
(page)="onPageChange($event)">
</mat-paginator>
<table mat-table [dataSource]="data">
<ng-container matColumnDef="item">
<th mat-header-cell *matHeaderCellDef> Item </th>
<td mat-cell *matCellDef="let element"> {{element}} </td>
</ng-container>
<tr mat-header-row *matHeaderRowDef="['item']"></tr>
<tr mat-row *matRowDef="let row; columns: ['item']"></tr>
</table>
<router-outlet />
Step 5: Open app.ts and add the following code −
app.ts
import { CommonModule } from '@angular/common';
import { Component, OnInit } from '@angular/core';
import { RouterOutlet } from '@angular/router';
import { MatPaginatorModule } from '@angular/material/paginator';
import { MatTableModule } from '@angular/material/table';
import { PageEvent } from '@angular/material/paginator';
@Component({
selector: 'app-root',
imports: [RouterOutlet, CommonModule, MatPaginatorModule, MatTableModule],
templateUrl: './app.html',
styleUrl: './app.css'
})
export class App implements OnInit {
totalItems = 10; // Total number of items
pageSize = 5; // Number of items per page
data: any[] = [];
currentPage = 0;
ngOnInit() {
this.loadData();
}
loadData() {
const start = this.currentPage * this.pageSize;
this.data = Array.from({ length: this.pageSize }, (_, i) => `Item ${start + i + 1}`);
}
onPageChange(event: PageEvent) {
this.pageSize = event.pageSize;
this.currentPage = event.pageIndex;
this.loadData();
}
}
Step 6: Open app.css and give margin to the paginator so that it looks good −
app.css
mat-paginator {
margin-top: 20px;
}
Output
Step 7: Finally, run the application using the below command −
ng serve
On running, the paginator will be displayed as shown below −

Angular - DatePicker
What is Datepicker?
A datepicker is a user interface component that allows users to select a date from a calendar-like visual representation. It has an input field clicking on which displays a calendar where users can navigate and choose a specific date. This UI component helps you to get accurate date without manual typing.
In booking and event scheduling forms datepickers are used for date input. In angular, you can configure additional functionalities in datepickers, such as date ranges and specific date formats.
A datepicker looks similar to an input field with a calendar icon. When the user clicks on the input field or the calendar icon, a calendar overlay appears. Users can then navigate through months and years to select a desired date. Once a date is chosen, it populates the input field, and the calendar overlay closes.
Creating Datepicker in Angular
For creating a datepicker, we are going to use Angular Material. It is a UI component library developed by Google that follows the principles of Material Design. It provides a rich set of reusable UI components such as buttons, forms, and dialog boxes.
Angular Material has a built-in responsive design feature so that the website created using this library will adjust its size as per the device size. This library is specially built for Angular applications.
To use the datepicker component in an Angular application, the steps are as follows −
- Import the MatDatepickerModule and MatNativeDateModule.
- Now, add the <mat-datepicker> element to your template and bind it to an input field.
Example - Usage of DatePicker
In the following example, we are showing how to use datepicker in an Angular application.
Step 1: Create a new Angular project. Give name of your choice, we are naming it datepicker-app.
ng new datepicker-app
Step 2: Now, navigate to the newly created app using the below command −
cd datepicker-app
Step 3: Use the command given below to add Angular Material to your datepicker-app application −
ng add @angular/material
While adding the Angular Material, the CLI will show different configurations. Choose the default options for each configuration.
Step 4: Open app.html and add the code given below −
app.html
<div>
<h3>{{ title }}</h3>
<mat-form-field appearance="fill">
<mat-label>Choose a date</mat-label>
<input matInput [matDatepicker]="picker" [(ngModel)]="selectedDate" />
<mat-hint>MM/DD/YYYY</mat-hint>
<mat-datepicker-toggle matIconSuffix [for]="picker"></mat-datepicker-toggle>
<mat-datepicker #picker></mat-datepicker>
</mat-form-field>
<p *ngIf="selectedDate">Selected Date: {{ selectedDate | date }}</p>
</div>
<router-outlet />
Where,
- mat-form-field defines the appearance of the form field.
- matInput creates an input field with Material Design styling.
- [matDatepicker]="picker" binds input field with the mat-datepicker component.
Step 5: Open app.ts and add the following code −
app.ts
import { Component, ChangeDetectionStrategy } from '@angular/core';
import { RouterOutlet } from '@angular/router';
import { MatDatepickerModule } from '@angular/material/datepicker';
import { MatFormFieldModule } from '@angular/material/form-field';
import { MatInputModule } from '@angular/material/input';
import { CommonModule } from '@angular/common';
import { FormsModule } from '@angular/forms';
import {provideNativeDateAdapter} from '@angular/material/core';
@Component({
selector: 'app-root',
providers: [provideNativeDateAdapter()],
imports: [RouterOutlet, MatDatepickerModule, MatFormFieldModule,
MatInputModule, CommonModule, FormsModule],
changeDetection: ChangeDetectionStrategy.OnPush,
templateUrl: './app.html',
styleUrl: './app.css'
})
export class App {
title = 'Datepicker Application';
selectedDate: Date | null = null;
}
Step 6: Open app.css and add the following CSS −
app.css
div {
margin-top: 20px;
display: flex;
align-items: center;
justify-content: center;
flex-direction: column;
}
mat-form-field {
width: 50%;
margin-top: 20px;
margin-bottom: 20px;
}
Output
Step 7: Now, run the application using the command given below −
ng serve
On running, following output will be displayed on the screen −
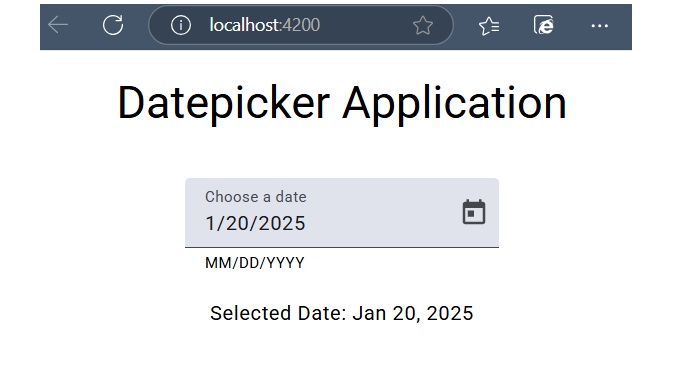
Angular - Select Dropdown
What is Select Dropdown?
A select dropdown (also called as a dropdown menu) is a user interface element that allows users to choose one option from a list of predefined options. Its usage can be seen in forms where users need to make a selection from a given set of choices.
In web applications built using frameworks like Angular, select dropdowns are widely used to select a single option from a long list of options, such as choosing a country or selecting a category. They hide the options until they are needed. They also prevent users from entering invalid data as users can make choices only from the predefined options.
When you use a select dropdown in your Angular application, it will appear as a compact box with default value. If the user clicks on it, it expands to show all available options. Each option is listed in a vertical stack, and the user can click on an option to select it. Once an option is selected, the dropdown collapses back to its compact form and displays the chosen option.
Creating Select Dropdown in Angular
For creating a select dropdown, we are going to use Angular Material. It is a UI component library developed by Google that follows the principles of Material Design. It provides a rich set of reusable UI components such as buttons, forms, and dialog boxes. With minimal code, you can add these ready-to-use components to your application.
To use the select dropdown component in an Angular application, follow the steps given below −
- First, import the MatSelectModule and MatFormFieldModule.
- Then, add the <mat-form-field> and <mat-select> elements to the template. This mat-select component provides a dropdown menu with a list of options. Use the two-way data binding to bind the selected value to a property in the component class.
Example - Usage of dropdown
In this example, we will show how to use select dropdown in an Angular application.
Step 1: Create a new Angular project. Give name of your choice, we are naming it dropdown-app.
ng new dropdown-app
Step 2: Now, navigate to the newly created app using the below command −
cd dropdown-app
Step 3: Use the command given below to add Angular Material to your dropdown-app application −
ng add @angular/material
While adding the Angular Material, the CLI will different configuration. Choose the default options for each configuration.
Step 4: Open app.html and add the code given below −
app.html
<div>
<h3> {{title}} </h3>
<mat-form-field appearance="fill">
<mat-label>Choose Color Name</mat-label>
<mat-select [(value)]="selectedValue">
<mat-option *ngFor="let option of options" [value]="option.value">
{{ option.viewValue }}
</mat-option>
</mat-select>
</mat-form-field>
</div>
<router-outlet />
Step 5: Open app.ts and add the following code −
app.ts
import { Component } from '@angular/core';
import { RouterOutlet } from '@angular/router';
import {FormsModule} from '@angular/forms';
import {MatInputModule} from '@angular/material/input';
import {MatSelectModule} from '@angular/material/select';
import {MatFormFieldModule} from '@angular/material/form-field';
import { CommonModule } from '@angular/common';
@Component({
selector: 'app-root',
imports: [RouterOutlet, MatFormFieldModule, MatSelectModule, MatInputModule, FormsModule, CommonModule],
templateUrl: './app.html',
styleUrl: './app.css'
})
export class App {
title = 'Dropdown Example';
selectedValue: string = "";
options = [
{ value: 'option1', viewValue: 'Red' },
{ value: 'option2', viewValue: 'Saffron' },
{ value: 'option3', viewValue: 'Violet' },
{ value: 'option4', viewValue: 'Gray' }
];
}
Step 6: Open app.css and add some margin to the component so that it looks good −
app.css
div{
margin-top: 25px;
margin-left: 25px;
}
Output
Step 7: Finally, run the application using the below command −
ng serve
On running, following output will be displayed on the screen −
Angular - Third Party Controls
Angular allows you to work with any third party controls. Once you decide on the control to implement, you need to perform the following steps −
Step 1 − Install the component using the npm command.
For example, we will install the ng2-pagination third party control via the following command.
npm install ng2-pagination --save

Once done, you will see that the component is successfully installed.

Step 2 − Finally, implement the component in your app.ts file.
app.ts
import { Component } from '@angular/core';
import {Ng2PaginationModule} from 'ng2-pagination';
import {PaginatePipe, PaginationService} from 'ng2-pagination';
@Component ({
selector: 'my-app',
imports:[Ng2PaginationModule]
template: '
<ul>
<li *ngFor = "let item of collection | paginate: {
itemsPerPage: 5, currentPage: p }"> ... </li>
</ul>
<pagination-controls (pageChange) = "p = $event"></pagination-controls>
'
})
export class App { }
Step 3 − Save all the code changes and refresh the browser, you will get the following output.


In the above picture, you can see that the images have been stored as One.jpg and two.jpg in the Images folder.
Step 4 − Change the code of the app.ts file to the following.
app.ts
import {
Component
} from '@angular/core';
@Component ({
selector: 'my-app',
imports:[],
templateUrl: 'app/app.html'
})
export class App {
appTitle: string = 'Welcome';
appList: any[] = [{
"ID": "1",
"Name": "One",
"url": 'app/Images/One.jpg'
},
{
"ID": "2",
"Name": "Two",
"url": 'app/Images/two.jpg'
} ];
}
Following points need to be noted about the above code.
We are defining an array called appList which is of the type any. This is so that it can store any type of element.
We are defining 2 elements. Each element has 3 properties, ID, Name and url.
The URL for each element is the relative path to the 2 images.
Step 5 − Make the following changes to the app/app.html file which is your template file.
app.html
@for(lst of appList; track $index){
<div>
<ul>
<li>{{lst.ID}}</li>
<li>{{lst.Name}}</li>
<img [src] = 'lst.url'>
</ul>
</div>
}
Following points need to be noted about the above program −
The ngFor directive is used to iterate through all the elements of the appList property.
For each property, it is using the list element to display an image.
The src property of the img tag is then bounded to the url property of appList in our class.
Step 6 − Save all the code changes and refresh the browser, you will get the following output. From the output, you can clearly see that the images have been picked up and shown in the output.

Angular - Configuration
This chapter will discuss the configuration of an Angular application, including important files, their specific role and usage in the Angular project, advantages, etc.
Angular Configuration
The Angular configuration is a set of instructions that defines how the Angular application is built and developed. It includes various information about the Angular application such as project files, tools, environments, and some other dependencies.
Important Configuration files in Angular
Here is a list of important configuration files that are automatically created when an Angular application is built using the Angular CLI. These files are important for running, deploying, and testing the application.
The angular.json Configuration File
In an Angular application, the angular.json file is a key configuration file that defines and manages all the settings for the Angular CLI (Command Line Interface). This file is necessary for customizing various aspects of your Angular project.
The angular.json file will look like:
"projects": {
"my-app": {
"architect": {
"build": {
"options": {
"outputPath": "dist/my-app",
"index": "src/index.html",
"main": "src/main.ts",
"polyfills": "src/polyfills.ts",
"tsConfig": "tsconfig.app.json",
"assets": [
"src/favicon.ico",
"src/assets"
],
"styles": [
"src/styles.css"
],
"scripts": []
}
}
}
}
}
This file contains key aspects of your Angular project, such as the "application name", "index.html", "main.ts", "assets", "styles", "scripts", "environment configurations", "build" and "test" options, and other settings important for your Angular application's build and deployment process.
Important Points of the angular.json File
Here are a few important aspects of the angular.json file that you should know:
- my-app: This is the name of your Angular project or application.
- index.html: The main HTML file that serves as the entry point for your application. It usually contains the "root" HTML element where the Angular app will be bootstrapped.
- main.ts: The main TypeScript file that acts as the entry point for the Angular application. It is responsible for bootstrapping the root module or component of the application.
- assets: A directory that contains static assets such as images, fonts, and other files that are needed by the application.
- styles: An array of global stylesheets that are included in the application. These stylesheets can be CSS or SCSS files and are applied to the entire application.
- scripts: An array of global scripts that are included in the application. These can be JavaScript files that need to be loaded before the Angular app starts.
The package.json Configuration File
In an Angular application, the package.json file serves as a fundamental part of managing the project's dependencies and scripts. It contains "metadata" about the project, including the project "name", "version", "scripts for starting', "building", "serving", and "watching the application", as well as the "dependencies" and "devDependencies".
The package.json file data will look like this:
{
"name": "my-crud-app",
"version": "0.0.0",
"scripts": {
"ng": "ng",
"start": "ng serve",
"build": "ng build",
"watch": "ng build --watch --configuration development",
"test": "ng test"
},
"prettier": {
"printWidth": 100,
"singleQuote": true,
"overrides": [
{
"files": "*.html",
"options": {
"parser": "angular"
}
}
]
},
"private": true,
"packageManager": "npm@11.6.1",
"dependencies": {
"@angular/cdk": "^21.0.1",
"@angular/common": "^21.0.0",
"@angular/compiler": "^21.0.0",
"@angular/core": "^21.0.0",
"@angular/elements": "^21.0.0",
"@angular/forms": "^21.0.0",
"@angular/material": "^21.0.1",
"@angular/platform-browser": "^21.0.0",
"@angular/router": "^21.0.0",
"rxjs": "~7.8.0",
"tslib": "^2.3.0"
},
"devDependencies": {
"@angular/build": "^21.0.0",
"@angular/cli": "^21.0.0",
"@angular/compiler-cli": "^21.0.0",
"@angular/localize": "^21.0.0",
"jsdom": "^27.1.0",
"typescript": "~5.9.2",
"vitest": "^4.0.8"
}
}
Important Points of the package.json File
Here are a few important aspects of the package.json file that you should know:
- name & version: The name and the version of your application, which is useful for identifying, and tracking updates and dependencies.
- scripts: It contains commands for common tasks such as "building", "serving", and "testing" the Angular project. These commands are executed using npm run <command>
- dependencies: It is a list of Angular packages and other libraries your project depends on. These are important for the application to run and are installed when you run the npm install command.
- devDependencies: It is a list of packages that are needed only for "development purposes", such as "testing tools" and "build tools".
The main.ts Configuration File
In an Angular application, the main.ts file serves as the entry point. It is responsible for "bootstrapping" the root module or component. When you run the ng serve command, it compiles the application and looks for the "main.ts" file first to initiate the "bootstrapping process".
If the main.ts file is missing or has issues, your application will fail to start, and you will face errors.
The main.ts file data will look like this:
import { bootstrapApplication } from '@angular/platform-browser';
import { appConfig } from './app/app.config';
import { App } from './app/app';
bootstrapApplication(App, appConfig)
.catch((err) => console.error(err));
Here,
- App: It is the main component that acts as the root component of your application.
The tsconfig.json Configuration File
A given Angular workspace contains several TypeScript configuration files. At the root tsconfig.json file specifies the base TypeScript and Angular compiler options that all projects in the workspace inherit.
Initially, the tsconfig.json file data will look like this:
{
"extends": "./tsconfig.json",
"compilerOptions": {
"outDir": "./out-tsc/app",
"types": [
"node"
]
},
"files": [
"src/main.ts",
"src/main.server.ts",
"server.ts"
],
"include": [
"src/**/*.d.ts"
]
}
Conclusion
In conclusion, Angular configuration plays an important role in ensuring that your Angular application runs smoothly without any lag or errors. It involves setting up various aspects of the application, such as "environment settings", "build configurations", "module imports", etc.
Angular - Displaying Data
This angular tutorial will discuss the various ways to display data, including how to display array data, object data, variables data, etc. A most common question in the minds of users who have just started learning an angular framework is, how do we display data in angular?
Displaying Data in Angular
Displaying data in Angular involves accessing the properties of a component class and rendering their values in the template. Angular provides various ways to display these data values (including variables, objects, arrays, etc.) in the template (HTML) using features such as interpolation, property binding, and structural directives.
Let's discuss a few different ways to display data in Angular, with appropriate examples to help you understand each of them clearly.
Displaying Data using Interpolation
In Angular, interpolation is one of the most common or basic ways to bind (display) data from your component to the HTML template. It allows you to embed expressions into marked-up text and uses the double curly {{}} as a delimiter.
Syntax
Following is the syntax of interpolation in Angular −
{{ <template expression> }}
Here, the template_expression can be any property (variable) of your component.
Example - Properties
In this example, we will create properties (variables) named title (string type), num (number type), and isTrue (boolean type). We will bind (display) them in the template using interpolation −
In the app.ts, declare the properties with some initial values:
app.ts
import { Component } from '@angular/core';
@Component({
selector: 'app-root',
imports: [],
templateUrl: './app.html',
styleUrl: './app.css'
})
export class App {
title: string = "Angular Application";
num: number = 10;
isTrue: boolean = true;
}
In the app.html, bind the declared properties using interpolation {{}} −
app.html
<h3>Displaying Angular Data with Interpolation</h3>
<p>{{title}}</p>
<p>Number value: {{num}}</p>
<p>Boolean value: {{isTrue}}</p>
Output
The displayed data will look like this −

Using Property Binding
This is another way to display data using Angular property bindings. In Angular, binding is a "technique" to "bind data between the component and the view".
Example - Property Binding
We create an input field and bind the [value] property to display the component data (i.e., variable "username") within the input field default when the page is loaded −
In the app.ts, create a variable named username with the value "user12@gmail.com" −
app.ts
import { Component } from '@angular/core';
@Component({
selector: 'app-root',
imports: [],
templateUrl: './app.html',
styleUrl: './app.css'
})
export class App {
username: string = "user12@gmail.com";
}
In the app.html, update the existing code with the code given below −
app.html
<h3>Displaying Angular Data with Property Binding</h3>
<input type="text" [value]="username">
<p>Welcome, {{username}}!!</p>
Output
The output of the above code will look like:

Using Structural Directives
In Angular, structural directives are built-in directives used to control the appearance and behavior of elements in the DOM. They can dynamically add, remove, or manipulate elements based on certain conditions. Common structural directives are:
- *ngIf
- *ngFor
- *ngSwitch
Example
In the example below, we will use the structural *ngFor directive to iterate through the object defined in the component and display all data in the template −
In the app.ts, create an array of objects with the keys id, name, and age as follows:
app.ts
import { CommonModule } from '@angular/common';
import { Component } from '@angular/core';
@Component({
selector: 'app-root',
imports: [CommonModule],
templateUrl: './app.html',
styleUrl: './app.css'
})
export class App {
myData = [
{
"id": 1,
"name": 'abc',
"age": 24
},
{
"id": 2,
"name": "xyz",
"age": 20,
},
{
"id": 3,
"name": "red",
"age": 30
}
]
}
In the app.html, use the *ngFor directive to iterate through the object data and display them in the template:
app.html
<h3>Displaying Angular Data with Stuctural Directive</h3>
<ul *ngFor="let data of myData;">
<li>Id: {{data.id}}</li&t;
<li>Name: {{data.name}}</li>
<li>Age: {{data.age}}</li>
</ul>
Output
Following is the output of the above code −

Note! In this tutorial, we have learned the various ways to display data in Angular. There are still more methods that you can explore in individual chapters. This tutorial provided a brief introduction to the concept of displaying data in Angular.
Angular - Decorators & Metadata
Decorators are special functions used to add metadata, modify behavior, or add some additional functionalities to classes, methods, properties, or parameters in programming languages like TypeScript or JavaScript.
In Angular, each decorator has a base configuration with some default values and you can change or update it according to the project's need. It is defined using the @ symbol followed by a function name. This symbol helps Angular to recognize decorators.
Decorators in Angular
Angular provides the following decorators −
- @Component decorator
- @Injectable decorator
- @NgModule decorator
- @Directive decorator
- @Input decorator
- @Output decorator
- @Pipe Decorator
Example - The @Component Decorator
The @Component decorator is used to define a component in Angular. A component generates a section of web page called View and this decorator helps Angular understand the metadata related to the component.
The following example shows @component decorator in an angular component.
import { Component } from '@angular/core';
import { CommonModule } from '@angular/common';
@Component({
selector: 'app-my-component',
imports: [CommonModule],
templateUrl: './my-component.html',
styleUrl: './my-component.css'
})
export class MyComponent {
// your code
}
The metadata included in the above example is selector, imports, templateUrl, and styleUrl. They define how the component should be displayed in the DOM.
Example - The @Injectable Decorator
If a TypeScript class in Angular is decorated by @Injectable decorator, Angular will consider it as a service that can be injected into other classes.
Let's see an example of @Injectable decorator.
import { Injectable } from '@angular/core';
@Injectable({
providedIn: 'root'
})
export class MyService {
// your service code
}
By marking a service with @Injectable, Angular knows to create and inject the service wherever it's needed in the application.
Example - The @NgModule Decorator
The @NgModule decorator is used to define an Angular module. A module is a collection of related components, services, pipes, and directives that are bundled together.
Here is an example of @NgModule decorator −
@NgModule({
declarations: [MyComponent],
imports: [CommonModule],
providers: [MyService]
})
export class MyModule {}
The @NgModule decorator tells Angular about which components, directives, and pipes are part of the module and which other modules are imported.
Example - The @Directive Decorator
The @Directive decorator is used to define a custom directive, which can modify the behavior or appearance of elements in the DOM.
The example given below shows a custom directive that modifies the background color of any element it's applied to.
import { Directive, ElementRef } from '@angular/core';
import { CommonModule } from '@angular/common';
@Directive({
selector: '[appHighlight]',
imports: [CommonModule]
})
export class HighlightDirective {
constructor(private el: ElementRef) {
this.el.nativeElement.style.backgroundColor = 'yellow';
}
}
Example - The @Input Decorator
The @Input decorator decorator is used in components to define inputs for property binding. It helps data to be passed into the component.
In the following, we will see how to use @Input decorator within a component.
@Component({
selector: 'app-child',
imports:[],
template: `<div>{{childData}}</div>`
})
export class Child {
@Input() childData: string;
}
Example - The @Output Decorator
Child component can send the data to parent component through the @Output decorator. This decorator is actually an event emitter that passes the data (output) along with event.
The following example shows the use of @Output decorator.
import { Component, Input, Output, EventEmitter } from '@angular/core';
@Component({
selector: 'app-child',
imports:[],
template: `
<div>{{childData}}</div>
<button (click)="sendData()">Send Data</button>
`
})
export class Child {
@Input() childData: string;
@Output() dataEmitter = new EventEmitter<string>();
sendData() {
this.dataEmitter.emit(this.childData);
}
}
Example - The @Pipe Decorator
The @Pipe decorator in Angular is used to define custom pipes, which transform data in templates.
Here is an example of @Pipe decorator.
import { Pipe, PipeTransform } from '@angular/core';
@Pipe({ name: 'capitalize' })
export class CapitalizePipe implements PipeTransform {
transform(value: string): string {
return value.charAt(0).toUpperCase() + value.slice(1).toLowerCase();
}
}
This CapitalizePipe transforms the first letter of a string to uppercase and the rest to lowercase.
What Is Metadata in Angular?
In Angular, Metadata is the information that is attached to classes and other elements to define their behavior. It is defined via decorators, as we saw earlier. When Angular processes a component or service, it reads the metadata to configure the element's behavior.
Example
Let's see the metadata mentioned inside an Angular @Component decorator −
@Component({
selector: 'app-my-component',
imports: [CommonModule],
templateUrl: './my-component.html',
styleUrls: ['./my-component.css'],
})
Here,
selector specifies the HTML tag to use for this component.
templateUrl points to the location of the HTML template file.
styleUrls specifies the location of the CSS files that define the component's styling.
Angular - Basic Example
In this tutorial, we will learn complete step-by-step working of an angular application. This chapter is part of the Angular Tutorial. We recommend you go through all the previous chapters before moving ahead in this chapter. We have covered all angular concepts from beginner to advanced.
Let us create an Angular application to check our day-to-day expenses. Let us give ExpenseManager as our choice for our new application.
We are going to implement the following concepts of Angular in our application −
Setting up the Angular Application
Use the below command to create the new application −
cd /path/to/workspace ng new expense-manager
Here,
new is one of the commands of the ng CLI. It is used to create new applications. It will ask some basic questions in order to create a new application. It is enough to let the application choose the default choices.
Once the basic questions are answered, a new Angular application will be created with the name expense-manager.
Let us move into the our newly created application folder using the following command −
cd expense-manager
Let us start the application using the below command −
ng serve
The application will start on the http://localhost:4200 port. Change the title of the application to better reflect our application. Open src/app/app.component.ts and rename the title as specified below −
export class AppComponent {
title = 'Expense Manager';
}
Our final application will be rendered in the browser as shown below −

Add a Component
To create a new component, we use ng generate component command. Write this command in Angular CLI as shown below −
ng generate component expense-entry
On running the above command, following output will be displayed in CLI −
CREATE src/app/expense-entry/expense-entry.html (29 bytes) CREATE src/app/expense-entry/expense-entry.spec.ts (658 bytes) CREATE src/app/expense-entry/expense-entry.ts (273 bytes) CREATE src/app/expense-entry/expense-entry.css (0 bytes)
Here,
- ExpenseEntry is created under src/app/expense-entry folder.
- Component class, Template and style sheet are created.
Add title property to ExpenseEntry. Its path is as follows: src/app/expense-entry/expense-entry.ts.
import { Component, OnInit } from '@angular/core';
@Component({
selector: 'app-expense-entry',
imports: [],
templateUrl: './expense-entry.html',
styleUrl: './expense-entry.css'
})
export class ExpenseEntry implements OnInit {
title: string = "";
constructor() { }
ngOnInit() {
this.title = "Expense Entry"
}
}
Update template, src/app/expense-entry/expense-entry.html with below code −
<p>{{ title }}</p>
Open src/app/app.html and include newly created component in it.
<h1>{{ title }}</h1>
<app-expense-entry></app-expense-entry>
Here,
app-expense-entry is the selector value and it can be used as regular HTML Tag.
We also need to import this component inside imports[] array of @component decorator.
import { Component } from '@angular/core';
import { RouterOutlet } from '@angular/router';
import { ExpenseEntry } from './expense-entry/expense-entry';
@Component({
selector: 'app-root',
imports: [RouterOutlet, ExpenseEntry],
templateUrl: './app.html',
styleUrl: './app.css'
})
export class App {
title = 'Expense Manager';
}
The output of the application is as shown below −

Adding Bootstrap
Let's include Bootstrap into our ExpenseManager application using styles option and change the default template to use bootstrap components. Open CLI and go to ExpenseManager application using the below command −
cd expense-manager
Install bootstrap and JQuery library using below commands −
npm install --save bootstrap jquery
To read more about using bootstrap in angular application, we recommend checking this chapter: Adding Bootstrap in Angular.
Now, open angular.json file and set bootstrap and jquery library path −
{
"projects": {
"expense-manager": {
"architect": {
"build": {
"builder":"@angular-devkit/build-angular:browser", "options": {
"outputPath": "dist/expense-manager",
"index": "src/index.html",
"main": "src/main.ts",
"polyfills": "src/polyfills.ts",
"tsConfig": "tsconfig.app.json",
"aot": false,
"assets": [
"src/favicon.ico",
"src/assets"
],
"styles": [
"./node_modules/bootstrap/dist/css/bootstrap.css", "src/styles.css"
],
"scripts": [
"./node_modules/jquery/dist/jquery.js", "./node_modules/bootstrap/dist/js/bootstrap.js"
]
},
},
}
}},
"defaultProject": "expense-manager"
}
Here,
scripts option is used to include JavaScript library. JavaScript registered through scripts will be available to all Angular components in the application.
Open app.html and change the content as specified below −
<!-- Navigation -->
<nav class="navbar navbar-expand-lg navbar-dark bg-dark static-top">
<div class="container">
<a class="navbar-brand" href="#">{{ title }}</a> <button class="navbar-toggler" type="button" data-toggle="collapse" data-target="#navbarResponsive" aria-controls="navbarResponsive" aria-expanded="false" aria-label="Toggle navigation">
<span class="navbar-toggler-icon">
</span>
</button>
<div class="collapse navbar-collapse" id="navbarResponsive">
<ul class="navbar-nav ml-auto">
<li class="nav-item active">
<a class="nav-link" href="#">Home
<span class="sr-only">(current)
</span>
</a>
</li>
<li class="nav-item">
<a class="nav-link" href="#">Report</a>
</li>
<li class="nav-item">
<a class="nav-link" href="#">Add Expense</a>
</li>
<li class="nav-item">
<a class="nav-link" href="#">About</a>
</li>
</ul>
</div>
</div>
</nav>
<app-expense-entry></app-expense-entry>
Here, we have used bootstrap navigation and containers.
Open src/app/expense-entry/expense-entry.html and place below content.
<!-- Page Content -->
<div class="container">
<div class="row">
<div class="col-lg-12 text-center" style="padding-top: 20px;">
<div class="container" style="padding-left: 0px; padding-right: 0px;">
<div class="row">
<div class="col-sm" style="text-align: left;"> {{ title }}
</div>
<div class="col-sm" style="text-align: right;">
<button type="button" class="btn btn-primary">Edit</button>
</div>
</div>
</div>
<div class="container box" style="margin-top: 10px;">
<div class="row">
<div class="col-2" style="text-align: right;">
<strong><em>Item:</em></strong>
</div>
<div class="col" style="text-align: left;">
Pizza
</div>
</div>
<div class="row">
<div class="col-2" style="text-align: right;">
<strong><em>Amount:</em></strong>
</div>
<div class="col" style="text-align: left;">
20
</div>
</div>
<div class="row">
<div class="col-2" style="text-align: right;">
<strong><em>Category:</em></strong>
</div>
<div class="col" style="text-align: left;">
Food
</div>
</div>
<div class="row">
<div class="col-2" style="text-align: right;">
<strong><em>Location:</em></strong>
</div>
<div class="col" style="text-align: left;">
Zomato
</div>
</div>
<div class="row">
<div class="col-2" style="text-align: right;">
<strong><em>Spend On:</em></strong>
</div>
<div class="col" style="text-align: left;">
June 20, 2020
</div>
</div>
</div>
</div>
</div>
</div>
Now, you can see the updated output which is as follows −

Add an Interface
Create Expense interface within src/app/expense-entry.ts file and add id, amount, category, Location, spendOn and createdOn. Also, create an object of Expense object. The updated code will look like −
import { Component, OnInit } from '@angular/core';
export interface Expense {
id: number;
item: string;
amount: number;
category: string;
location: string;
spendOn: Date;
createdOn: Date;
}
@Component({
selector: 'app-expense-entry',
standalone: true,
imports: [],
templateUrl: './expense-entry.html',
styleUrl: './expense-entry.css'
})
export class ExpenseEntry implements OnInit {
title: string = "";
expenseEntry!: Expense;
constructor() { }
ngOnInit() {
this.title = "Expense Entry";
this.expenseEntry = {
id: 1,
item: "Pizza",
amount: 21,
category: "Food",
location: "Zomato",
spendOn: new Date(2025, 6, 1, 10, 10, 10),
createdOn: new Date(2025, 6, 1, 10, 10, 10),
};
}
}
Update the component template also, src/app/expense-entry/expense-entry.html with the code specified below −
<!-- Page Content -->
<div class="container">
<div class="row">
<div class="col-lg-12 text-center" style="padding-top: 20px;">
<div class="container" style="padding-left: 0px; padding-right: 0px;">
<div class="row">
<div class="col-sm" style="text-align: left;">
{{ title }}
</div>
<div class="col-sm" style="text-align: right;">
<button type="button" class="btn btn-primary">Edit</button>
</div>
</div>
</div>
<div class="container box" style="margin-top: 10px;">
<div class="row">
<div class="col-2" style="text-align: right;">
<strong><em>Item:</em></strong>
</div>
<div class="col" style="text-align: left;">
{{ expenseEntry.item }}
</div>
</div>
<div class="row">
<div class="col-2" style="text-align: right;">
<strong><em>Amount:</em></strong>
</div>
<div class="col" style="text-align: left;">
{{ expenseEntry.amount }}
</div>
</div>
<div class="row">
<div class="col-2" style="text-align: right;">
<strong><em>Category:</em></strong>
</div>
<div class="col" style="text-align: left;">
{{ expenseEntry.category }}
</div>
</div>
<div class="row">
<div class="col-2" style="text-align: right;">
<strong><em>Location:</em></strong>
</div>
<div class="col" style="text-align: left;">
{{ expenseEntry.location }}
</div>
</div>
<div class="row">
<div class="col-2" style="text-align: right;">
<strong><em>Spend On:</em></strong>
</div>
<div class="col" style="text-align: left;">
{{ expenseEntry.spendOn }}
</div>
</div>
</div>
</div>
</div>
</div>
The output of the application is as follows −

Using ngFor Directive
Let's add a new component in our ExpenseManager application to list the expense entries.
Create a new component, ExpenseEntryList using below command −
ng generate component ExpenseEntryList
The output is as follows −
CREATE src/app/expense-entry-list/expense-entry-list.html (34 bytes) CREATE src/app/expense-entry-list/expense-entry-list.spec.ts (687 bytes) CREATE src/app/expense-entry-list/expense-entry-list.ts (292 bytes) CREATE src/app/expense-entry-list/expense-entry-list.css (0 bytes)
Here, the command creates the ExpenseEntryList Component and add the necessary code by default.
Create the same Expense interface within src/app/expense-entry-list.ts file. Then, add a method named getExpenseEntries() to return list of expense entry (mock items) in ExpenseEntryList. Also, declare a local variable, expenseEntries and load the mock list of expense entries.
import { CommonModule } from '@angular/common';
import { Component } from '@angular/core';
export interface Expense {
id: number;
item: string;
amount: number;
category: string;
location: string;
spendOn: Date;
createdOn: Date;
}
@Component({
selector: 'app-expense-entry-list',
standalone: true,
imports: [CommonModule],
templateUrl: './expense-entry-list.html',
styleUrl: './expense-entry-list.css'
})
export class ExpenseEntryListComponent {
getExpenseEntries() : Expense[] {
let mockExpenseEntries : Expense[] = [
{ id: 1,
item: "Pizza",
amount: Math.floor((Math.random() * 10) + 1),
category: "Food",
location: "Mcdonald",
spendOn: new Date(2020, 4, Math.floor((Math.random() * 30) + 1), 10, 10, 10),
createdOn: new Date(2020, 4, Math.floor((Math.random() * 30) + 1), 10, 10, 10) },
{ id: 1,
item: "Pizza",
amount: Math.floor((Math.random() * 10) + 1),
category: "Food",
location: "KFC",
spendOn: new Date(2020, 4, Math.floor((Math.random() * 30) + 1), 10, 10, 10),
createdOn: new Date(2020, 4, Math.floor((Math.random() * 30) + 1), 10, 10, 10) },
{ id: 1,
item: "Pizza",
amount: Math.floor((Math.random() * 10) + 1),
category: "Food",
location: "KFC",
spendOn: new Date(2020, 4, Math.floor((Math.random() * 30) + 1), 10, 10, 10),
createdOn: new Date(2020, 4, Math.floor((Math.random() * 30) + 1), 10, 10, 10)
},
];
return mockExpenseEntries;
}
title: string ="";
expenseEntries!: Expense[];
constructor() { }
ngOnInit() {
this.title = "Expense Entry List";
this.expenseEntries = this.getExpenseEntries();
}
}
Open the template file, src/app/expense-entry-list/expense-entry-list.html and show the mock entries in a table.
<!-- Page Content -->
<div class="container">
<div class="row">
<div class="col-lg-12 text-center" style="padding-top: 20px;">
<div class="container" style="padding-left: 0px; padding-right: 0px;">
<div class="row">
<div class="col-sm" style="text-align: left;">
{{ title }}
</div>
<div class="col-sm" style="text-align: right;">
<button type="button" class="btn btn-primary">Edit</button>
</div>
</div>
</div>
<div class="container box" style="margin-top: 10px;">
<table class="table table-striped">
<thead>
<tr>
<th>Item</th>
<th>Amount</th>
<th>Category</th>
<th>Location</th>
<th>Spent On</th>
</tr>
</thead>
<tbody>
<tr *ngFor="let entry of expenseEntries">
<th scope="row">{{ entry.item }}</th>
<th>{{ entry.amount }}</th>
<td>{{ entry.category }}</td>
<td>{{ entry.location }}</td>
<td>{{ entry.spendOn | date: 'short' }}</td>
</tr>
</tbody>
</table>
</div>
</div>
</div>
</div>
Here,
Used bootstrap table. table and table-striped will style the table according to Boostrap style standard.
Used ngFor to loop over the expenseEntries and generate table rows.
Open AppComponent template, src/app/app.html and include ExpenseEntryList and comment the ExpenseEntry as shown below −
... <!-- <app-expense-entry></app-expense-entry> --> <app-expense-entry-list></app-expense-entry-list>
Import the component inside AppComponent −
import { Component } from '@angular/core';
import { RouterOutlet } from '@angular/router';
import { ExpenseEntryList } from './expense-entry-list/expense-entry-list';
@Component({
selector: 'app-root',
imports: [RouterOutlet, ExpenseEntryList],
templateUrl: './app.html',
styleUrl: './app.css'
})
export class App {
title = 'Expense Manager';
}
Finally, run the application. The output of the application is as shown below −

Use of Pipes
Let us use the pipe in the our ExpenseManager application
Open ExpenseEntryList's template, i.e., src/app/expense-entry-list/expense-entry-list.html and include pipe in entry.spendOn as mentioned below −
<td>{{ entry.spendOn | date: 'short' }}</td>
Here, we have used the date pipe to show the spend on date in the short format.
Finally, the output of the application is as shown below −

Angular - Error Handling
Errors are the unexpected issue or problem that occurs during the execution of a program. Incorrect syntax, invalid input, system failures or bug in API logic could be the possible reasons for these errors. These errors may affect the user experience in negative way, hence, it is necessary to handle them at compile time.
Error handling is the process of detecting and resolving these errors or exceptions before execution. Angular provides a number of ways to handle the errors that we are going to learn in this tutorial.
Handling Errors in Angular
There are multiple ways to handle errors in Angular, which are given below −
Using ErrorHandler Class
The ErrorHandler is a built-in class of the Angular @angular/core package. It provides a hook to catch errors globally. When something goes wrong, like any unhandled exception occurs anywhere in the application, this class catches that exception and prints the error messages on console.
Remember! the ErrorHandler class simply prints the error message so that developers can see what went wrong and fix it. However, you can replace this default behavior by creating a custom ErrorHandler.
Extend the ErrorHandler class and override its handleError() method as shown below to create a custom behavior of this class −
import { Injectable, ErrorHandler } from '@angular/core';
@Injectable({
providedIn: 'root'
})
export class GlobalErrorHandler implements ErrorHandler {
handleError(error: any): void {
// Log the error to an external service or display a message
console.error("An error occurred:", error);
// Create any custom behavior
}
}
Using HttpInterceptor Interface
The HttpInterceptor is an interface that is used for handling HTTP-specific errors, such as network issues, server errors, etc. It can intercept and modify HTTP requests or responses. Think of it as a service that can check and change the data going to and coming from a server.
To use an HttpInterceptor, create a class that implements the HttpInterceptor interface and define the intercept() method. This method takes an HTTP request and a handler, and it returns an observable of the HTTP event. Inside this method, you can modify the request or response as needed.
import { Injectable } from '@angular/core';
import { HttpEvent, HttpInterceptor, HttpHandler, HttpRequest } from '@angular/common/http';
import { Observable } from 'rxjs';
import { catchError } from 'rxjs/operators';
import { throwError } from 'rxjs';
@Injectable({
providedIn: 'root'
})
export class ErrorInterceptor implements HttpInterceptor {
intercept(req: HttpRequest<any>, next: HttpHandler): Observable<HttpEvent<any>> {
return next.handle(req).pipe(
catchError((error) => {
// Handle error
console.error('HTTP Error:', error);
return throwError(error);
})
);
}
}
Using Try-Catch Blocks
In Angular, errors can occur during component lifecycle. To handle these errors, you can use the a try-catch block within the ngOnInit(), which is a component lifecycle hook defined by OnInit interface. It is important to implement this interface as it helps to check if component is properly initialized.
The try block is used to wrap the code that might throw an error during its execution. And, the catch block is used to handle any errors or exceptions that occur within the try block.
Here, you can see a component with try-catch block:
import { Component, OnInit } from '@angular/core';
import { CommonModule } from '@angular/common';
@Component({
selector: 'app-example',
imports: [CommonModule],
templateUrl: './example.html',
styleUrls: ['./example.css']
})
export class Example implements OnInit {
ngOnInit() {
try {
// code that might throw an error
throw new Error("Error message");
} catch (error) {
console.error("error caught", error);
}
}
}
Using Validation
Validation is used in Angular Forms to validate whether the user input is in the correct format or not before submission. The reactive forms and template-driven forms has built-in validators to handle validation errors.
With reactive forms, you can easily validate user input and display custom error messages as shown in the following code block −
import { Component } from '@angular/core';
import { FormBuilder, FormGroup, Validators } from '@angular/forms';
import { CommonModule } from '@angular/common';
@Component({
selector: 'app-registration',
imports: [CommonModule],
templateUrl: './registration.html',
styleUrls: ['./registration.css']
})
export class Registration {
registrationForm: FormGroup;
constructor(private fb: FormBuilder) {
this.registrationForm = this.fb.group({
username: ['', [Validators.required, Validators.minLength(4)]],
email: ['', [Validators.required, Validators.email]],
});
}
onSubmit() {
if (this.registrationForm.invalid) {
this.showValidationErrors();
return;
}
}
private showValidationErrors() {
Object.keys(this.registrationForm.controls).forEach(control => {
const formControl = this.registrationForm.get(control);
if (formControl?.invalid) {
console.error(`${control} is invalid`);
}
});
}
}
Angular - Testing & Building a Project
In this chapter will discuss the following topics −
- To test Angular Project
- To build Angular Project
Testing Angular Project
During the project setup, the required packages for testing are already installed. There is a .spec.ts file created for every new component, service, directive, etc. We are going to use jasmine to write our test cases.
For any changes added to your component, services, directives or any other files created, you can include your test cases in the respective .spec.ts files. So most of the unit testing can be covered at the beginning itself.
To run the test cases, the command used is as follows−
ng test
Below is the app.spec.ts file for app.ts −
app.spec.ts
import { TestBed } from '@angular/core/testing';
import { App } from './app';
describe('App', () => {
beforeEach(async () => {
await TestBed.configureTestingModule({
imports: [App],
}).compileComponents();
});
it('should create the app', () => {
const fixture = TestBed.createComponent(App);
const app = fixture.componentInstance;
expect(app).toBeTruthy();
});
it('should render title', async () => {
const fixture = TestBed.createComponent(App);
await fixture.whenStable();
const compiled = fixture.nativeElement as HTMLElement;
expect(compiled.querySelector('h1')?.textContent).toContain('Hello, angular-app');
});
});
app.ts
import { Component, signal } from '@angular/core';
import { RouterOutlet } from '@angular/router';
@Component({
selector: 'app-root',
imports: [RouterOutlet],
templateUrl: './app.html',
styleUrl: './app.css'
})
export class App {
protected readonly title = signal('angular-app');
}
Now let us run the command to see the test cases running.
ng test
Initial chunk files | Names | Raw size
spec-app.js | spec-app | 47.95 kB |
chunk-EYSVNVHY.js | - | 4.55 kB |
init-testbed.js | init-testbed | 1.20 kB |
styles.css | styles | 56 bytes |
| Initial total | 53.76 kB
Application bundle generation complete. [1.229 seconds] - 2025-12-02T06:41:43.957Z
Watch mode enabled. Watching for file changes...
DEV v4.0.14 D:/Projects/angular-app
✓ angular-app src/app/app.spec.ts (2 tests) 79ms
✓ App (2)
✓ should create the app 55ms
✓ should render title 23ms
Test Files 1 passed (1)
Tests 2 passed (2)
Start at 12:11:44
Duration 1.07s (transform 107ms, setup 238ms, import 112ms, tests 79ms, environment 495ms)
PASS Waiting for file changes...
press h to show help, press q to quit
Incase of any failure, it will show the details as follows −
To do that, let us change the app.spec.ts as follows −
import { TestBed, async } from '@angular/core/testing';
import { RouterTestingModule } from '@angular/router/testing';
import { AppComponent } from './app.component';
describe('AppComponent', () => {
beforeEach(async(() => {
TestBed.configureTestingModule({
imports: [
RouterTestingModule
],
declarations: [
AppComponent
],
}).compileComponents();
}));
it('should create the app', () => {
const fixture = TestBed.createComponent(AppComponent);
const app = fixture.debugElement.componentInstance;
expect(app).toBeTruthy();
});
it(`should have as title 'angular7-app'`, () => {
const fixture = TestBed.createComponent(AppComponent);
const app = fixture.debugElement.componentInstance;
expect(app.title).toEqual('Angular 7'); // change the
title from angular7-app to Angular 7
});
it('should render title in a h1 tag', () => {
const fixture = TestBed.createComponent(AppComponent);
fixture.detectChanges();
const compiled = fixture.debugElement.nativeElement;
expect(compiled.querySelector('h1').textContent).toContain(
'Welcome to angular7-app!');
});
});
In the above file, the test case checks for the title, Angular 21. ng test will rerun and shows failure result as shown below −
RERUN rerun test x1
❯ angular-app src/app/app.spec.ts (2 tests | 1 failed) 92ms
❯ App (2)
✓ should create the app 61ms
× should render title 30ms
⎯⎯⎯⎯⎯⎯⎯⎯⎯⎯⎯⎯⎯⎯⎯⎯⎯⎯⎯⎯⎯⎯⎯⎯⎯⎯⎯⎯⎯⎯⎯⎯⎯⎯⎯⎯⎯⎯⎯⎯⎯⎯⎯⎯⎯⎯⎯⎯⎯⎯⎯⎯ Failed Tests 1 ⎯⎯⎯⎯⎯⎯⎯⎯⎯⎯⎯⎯⎯⎯⎯⎯⎯⎯⎯⎯⎯⎯⎯⎯⎯⎯⎯⎯⎯⎯⎯⎯⎯⎯⎯⎯⎯⎯⎯⎯⎯⎯⎯⎯⎯⎯⎯⎯⎯⎯⎯⎯
FAIL angular-app src/app/app.spec.ts > App > should render title
AssertionError: expected 'Hello, angular-app' to contain 'Hello, angular-app 21'
Expected: "Hello, angular-app 21"
Received: "Hello, angular-app"
❯ src/app/app.spec.ts:22:55
20| const compiled = fixture.nativeElement as HTMLElement;
21| // add 21 to title
22| expect(compiled.querySelector('h1')?.textContent).toContain('Hello, angular-app 21');
| ^
23| });
24| });
⎯⎯⎯⎯⎯⎯⎯⎯⎯⎯⎯⎯⎯⎯⎯⎯⎯⎯⎯⎯⎯⎯⎯⎯⎯⎯⎯⎯⎯⎯⎯⎯⎯⎯⎯⎯⎯⎯⎯⎯⎯⎯⎯⎯⎯⎯⎯⎯⎯⎯⎯⎯⎯⎯⎯⎯⎯⎯⎯⎯⎯⎯⎯⎯⎯⎯⎯⎯⎯⎯⎯⎯⎯⎯⎯⎯⎯⎯⎯⎯⎯⎯⎯⎯⎯⎯⎯⎯⎯⎯⎯⎯⎯⎯⎯⎯⎯⎯⎯⎯⎯⎯⎯⎯⎯⎯⎯⎯⎯⎯⎯⎯⎯⎯[1/1]⎯
Test Files 1 failed (1)
Tests 1 failed | 1 passed (2)
Start at 12:16:23
Duration 434ms
FAIL Tests failed. Watching for file changes...
press h to show help, press q to quit
All the failed test-cases for your project will be displayed as shown above in command line.
Similarly, you can write test cases for your services, directives and the new components which will be added to your project.
Building Angular Project
Once you are done with the project in Angular, we need to build it so that it can be used in production or staging.
The configuration for build, i.e., production, staging, development, testing needs to be defined in your src/environments.
At present, we have the following environments defined in src/environment −

You can add files based on your build to src/environment, i.e., environment.staging.ts, enviornment.testing.ts, etc.
At present, we will try to build for production environment. The file environment.ts contains default environment settings and details of the file as follows −
export const environment = {
production: false
};
To build the file for production, we need to make the production: true in environment.ts as follows −
export const environment = {
production: true
};
The environment replacement from default to production which we are trying to do are defined inside angular.json fileReplacements section as follows −
"production": {
"fileReplacements": [
{
"replace": "src/environments/environment.ts",
"with": "src/environments/environment.prod.ts"
}
],
}
When the command for build runs, the file gets replaced to src/environments/environment.prod.ts. The additional configuration like staging or testing can be added here as shown in the below example −
"configurations": {
"production": { ... },
"staging": {
"fileReplacements": [
{
"replace": "src/environments/environment.ts",
"with": "src/environments/environment.staging.ts"
}
]
}
}
So the command to run the build is as follows −
ng build --configuration = production // for production environment ng build --configuration = staging // for stating environment
Now let us run the build command for production, the command will create a dist folder inside our project which will have the final files after build.

The final files are build inside dist/ folder which can be hosted on the production server at your end.

Angular - Lifecycle Hooks
Angular application goes through an entire set of processes or has a lifecycle right from its initiation to the end of the application.
The following diagram shows the entire processes in the lifecycle of the Angular 2 application.
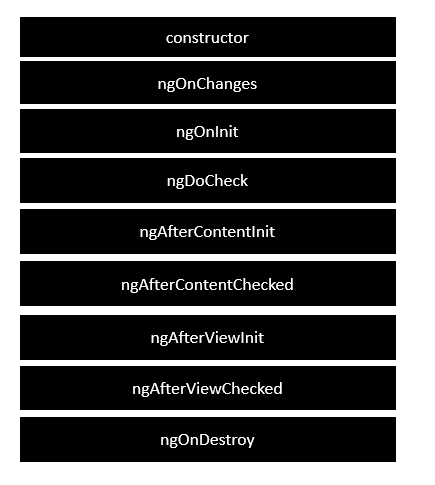
Following is a description of each lifecycle hook.
ngOnChanges − When the value of a data bound property changes, then this method is called.
ngOnInit − This is called whenever the initialization of the directive/component after Angular first displays the data-bound properties happens.
ngDoCheck − This is for the detection and to act on changes that Angular can't or won't detect on its own.
ngAfterContentInit − This is called in response after Angular projects external content into the component's view.
ngAfterContentChecked − This is called in response after Angular checks the content projected into the component.
ngAfterViewInit − This is called in response after Angular initializes the component's views and child views.
ngAfterViewChecked − This is called in response after Angular checks the component's views and child views.
ngOnDestroy − This is the cleanup phase just before Angular destroys the directive/component.
Following is an example of implementing one lifecycle hook. In the app.ts file, place the following code.
import {
Component
} from '@angular/core';
@Component ({
selector: 'my-app',
imports:[],
template: '<div> {{values}} </div> '
})
export class App {
values = '';
ngOnInit() {
this.values = "Hello";
}
}
In the above program, we are calling the ngOnInit lifecycle hook to specifically mention that the value of the this.values parameter should be set to Hello.
Once you save all the code changes and refresh the browser, you will get the following output.

Angular - User Input
The term user input in Angular refers to the data or information that users provide to an Angular application through various means such as typing, clicking, or speaking. It helps users to interact with and control the application. Furthermore, it is necessary for a user-friendly and dynamic experience.
In Angular, you can make use of the DOM element structure of HTML to change the values of the elements at run time. This change occurs based on user input. You can use it to gather feedback, make decisions, and perform tasks based on user preferences and needs.
Taking User Input in Angular
In Angular, we can get input from user through the following ways −
- Using Template-Driven Forms
- Using Reactive Forms
- Using Event Binding
- Using Template Reference Variables
Example - Using Template-Driven Forms
Template-driven forms are used for simple use cases where form validation and control are not too complex. These forms use the ngModel directive for two-way data binding between the form fields and the component class. Creating this type of form is very easy as it requires minimal setup.
Let's see an example of template driven form where we take input from user.
app.component.html
<form #userForm="ngForm"> <label for="name">Name:</label> <input type="text" id="name" [(ngModel)]="user.name" name="name" required> <label for="email">Email:</label> <input type="email" id="email" [(ngModel)]="user.email" name="email" required> <button (click)="submitForm()">Submit</button> </form>
app.ts
import { Component } from '@angular/core';
import { CommonModule } from '@angular/common';
import { FormsModule } from '@angular/forms';
@Component({
selector: 'app-root',
imports: [CommonModule, FormsModule],
templateUrl: './app.html',
styleUrls: ['./app.css']
})
export class App {
user = { name: '', email: '' };
submitForm() {
console.log(this.user);
}
}
Example - Using Reactive Forms
Reactive forms are used when you need more control over form validation, form elements, and form states. They are built using FormControl, FormGroup, and FormArray classes. These forms are used for larger, more complex forms.
In this example, we will see a reactive form where we take input from user.
app.html
<form [formGroup]="userForm" (ngSubmit)="submitForm()"> <label for="name">Name:</label> <input id="name" formControlName="name" required> <label for="email">Email:</label> <input id="email" formControlName="email" required> <button type="submit" [disabled]="!userForm.valid">Submit</button> </form>
app.ts
import { Component } from '@angular/core';
import { FormBuilder, FormGroup, Validators, ReactiveFormsModule } from '@angular/forms';
import { CommonModule } from '@angular/common';
@Component({
selector: 'app-root',
imports: [CommonModule, ReactiveFormsModule],
templateUrl: './app.html',
styleUrls: ['./app.css']
})
export class App {
userForm: FormGroup;
constructor(private fb: FormBuilder) {
this.userForm = this.fb.group({
name: ['', Validators.required],
email: ['', [Validators.required, Validators.email]],
});
}
submitForm() {
console.log(this.userForm.value);
}
}
Example - Using Event Binding
Angular provides option to listen and fire action for each user initiated event in a typical web application. Event binding is the process of targeting an event in a HTML element/component and set a responder for the target event. An event can be set for an HTML element/component by including the event name inside the bracket (( )) and assigning a template statement. The template statement will execute once the event is fired by the user.
Let us create a button and set an action to the button's click event.
Step 1: Create a submit button.
<button type="submit>Submit</button>
Step 2: Create an action method in the component.
myAction() {
alert('I am the action function for click event');
}
Step 3: Bind our myAction() method to click event of the button as shown below −
<button type="submit" (click)="myAction()">Submit</button>
Now, myAction() will execute whenever the submit button is clicked by the user.
Using Template Reference Variables
The syntax to declare a template reference variables is #var (# along with variable name). Angular allows the variable to be declared as attributes of an element available in the template. The type and value of the template reference variable depend on where it is declared.
1. If a variable is declared inside an element, then it refers to the HTML element.
<button #btn>Click Here</button>
Here, btn refers to the button object of type HtmlButtonElement
2. If a variable is declared inside a component, then it refers to the component instance.
<app-comp #mycomp></app-comp>
Here, mycomp refers to the component instance and can access the internal of the referenced component.
3. If a variable is declared inside a template (ng-template, a tag used to create template within a template), then it refers to the instance of the template.
<ng-template #mytemplate> <div>Hi, I am template within the template</div> </ng-template>
Here, mytemplate refers to the instance of the template.
4. If a variable is declared inside a custom web component, then it refers to the custom HTML element.
<my-card #mycard>Click Here</my-card>
Here, mycard refers to the custom web component, my-card
Let us see how to create a template reference variable, firstname to refer to an input element as shown below −
<input #firstname id="firstname" type="text" name="firstname" value="John" />
Here,
firstname is the template reference variable
firstname represents the instance of HtmlInputElement element. HtmlInputElement is a type in DOM to represent the input element.
firstname can access all properties and methods of HtmlInputElement element
The template reference variable can be used in template statement and text interpolation.
