- Angular Tutorial
- Angular - Home
- Angular - Overview
- Angular - Features
- Angular - Advantages & Disadvantages
- Angular Basics
- Angular - Environment setup
- Angular - First Application
- Angular - MVC Architecture
- Angular Components
- Angular - Components
- Angular - Component Lifecycle
- Angular - View Encapsulation
- Angular - Emulated Encapsulation
- Angular - ShadowDom Encapsulation
- Angular - Component Interaction
- Angular - Using @Input Decorator
- Angular - Using @Output Decorator
- Angular - Using Local Variable
- Angular - Using @ViewChild Decorator
- Angular - Using Services
- Angular - Component Styles
- Angular - Nested Components
- Angular - Content projection
- Angular - Single-slot Content Projection
- Angular - Multi-slot Content Projection
- Angular - Conditional Content Projection
- Angular - Dynamic components
- Angular - Using NgComponentOutlet
- Angular - Using ViewContainerRef
- Angular - Elements
- Angular Templates
- Angular - Templates
- Angular - Template statements
- Angular - Template Variables
- Angular - SVG as Templates
- Angular Binding
- Angular - Data Binding
- Angular - Interpolation
- Angular - Event Binding
- Angular - Property Binding
- Angular - Attribute Binding
- Angular - Class Binding
- Angular - Style Binding
- Angular - Two-way Binding
- Angular Directives
- Angular - Directives
- Angular - Attribute Directives
- Angular - Structural Directives
- Angular - Custom Directives
- Angular Pipes
- Angular - Pipes
- Angular - Built-in Pipes
- Angular - Custom Pipes
- Angular Forms
- Angular - Forms
- Angular - Template Driven Forms
- Angular - Reactive Forms
- Angular - Form Validation
- Angular - Dynamic Forms
- Angular Dependency Injection
- Angular - Dependency Injection
- Angular - Injectable Service
- Angular Routing
- Angular - Routing
- Angular - Dynamic Routes
- Angular - Wildcard Routes
- Angular - Nested Routes
- Angular - Navigation
- Angular - Routing in SPA
- Angular - Custom Route Matches
- Angular - Router Reference
- Angular HTTP Client programming
- Angular - Services
- Angular - HTTP Client
- Angular - Express based REST API
- Angular - Request
- Angular - Request Response Workflow
- Angular - Response
- Angular - Express based Upload API
- Angular - GET
- Angular - POST
- Angular - PUT
- Angular - DELETE
- Angular - JSONP
- Angular - CRUD Operations Using HTTP
- Angular Modules
- Angular - Introduction to Modules
- Angular - Root Module
- Angular - Feature Module
- Angular - Sharing Module
- Angular - Routing Module
- Angular - NgModules
- Angular Animation
- Angular - Animations
- Angular Service Workers & PWA
- Angular - Service Workers & PWA
- Angular Testing
- Angular - Testing Overview
- Angular Design Patterns
- Angular - Design Patterns
- Angular - Lazy Loading
- Angular - Singleton Pattern
- Angular - Observer Pattern
- Angular Libraries
- Angular - Libraries
- Angular - Angular Material
- Angular - PrimeNG
- Angular - RxJS
- Angular Advanced
- Angular - Signals
- Angular - Authentication & Authorization
- Angular - Internationalization
- Angular - Standalone Component
- Angular - Accessibility
- Angular - Web Workers
- Angular - Server Side Rendering
- Angular - Ivy Compiler
- Angular - Building with Bazel
- Angular - Backward Compatibility
- Angular - Reactive Programming
- Angular Tools
- Angular - CLI
- Angular Material UI Elements
- Angular - Paginator
- Angular - Datepicker
- Angular - Select Drop-down
- Angular Miscellaneous
- Angular - Third Party Controls
- Angular - Configuration
- Angular - Displaying Data
- Angular - Decorators & Metadata
- Angular - Basic Example
- Angular - Error Handling
- Angular - Testing & Building a Project
- Angular - Lifecycle Hooks
- Angular - User Input
- Angular - What's New?
- Angular Useful Resources
- Angular - Quick Guide
- Angular - Useful Resources
- Angular - Discussion
Angular - Response
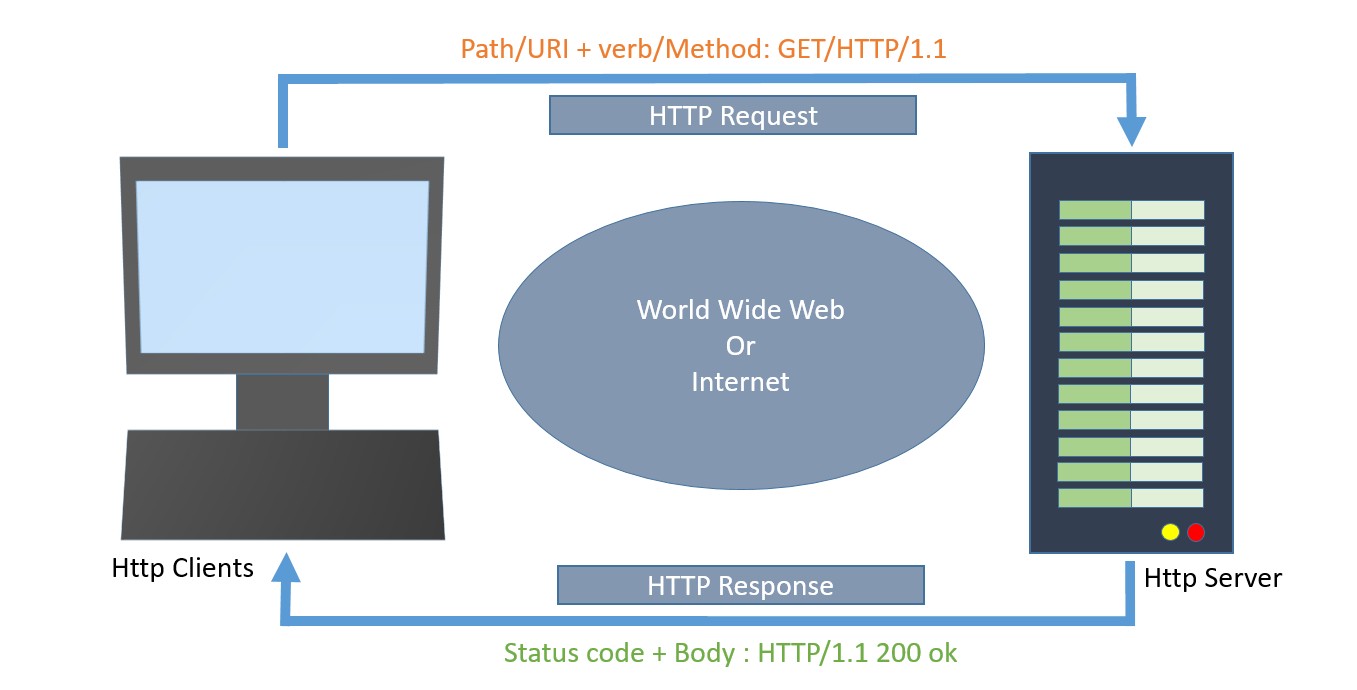
What is HTTP Response?
In the HTTP protocol, the response is the process by which the server returns data to the client (application or browser) after receiving a request.
In Angular, a response refers to the data received from the server following an HTTP call made by the client to fetch, send, or manipulate data. These responses are handled by the Angular HttpClient module.
The following diagram will give you a clear understanding of the HTTP Request and Response calls −
Now, let's discuss the various events of the HttpEvent class that allow you to handle different phases of an HTTP request/response in Angular:
HttpEvent Class
The HttpEvent class is a key part of the Angular HttpClient module, which provides a way to monitor the progress of HTTP requests.
HttpClientwill send the request to the server and capture the response from the server. Then, based on the request configuration, it will enclose the response in an object with the below possible types:
- HttpEvent
- HttpSentEvent
- HttpUserEvent
- HttpProgressEvent
- HttpResponseBase
- HttpHeaderResponse
- HttpResponse
Actually, the HttpEvent is the union of all possible event classes in the response stream, as shown below −
type HttpEvent<T> = HttpSentEvent | HttpHeaderResponse | HttpResponse<T> |
   HttpProgressEvent | HttpUserEvent<T>;
Let us learn the response types provided by Angular one by one −
HttpSentEvent
TheHttpSentEventis used to specify that the request is sent to the server, and it will be useful when the request is retried multiple times.
Syntax for the HttpSentEvent −
interface HttpSentEvent {
   type: HttpEventType.Sent
}
HttpUserEvent
The HttpUserEvent is used to identify that the response event is user-defined. It will be useful to group all custom events into one category. It will ensure that the event is properly handled and forwarded by all interceptors.
Syntax for the HttpUserEvent −
interface HttpUserEvent<T> {
   type: HttpEventType.User
}
HttpProgressEvent
TheHttpProgressEventis used to identify whether the request is download-based or upload-based. Also, it will enclose the currently loaded bytes during download/upload functionality.
Syntax for the HttpProgressEvent −
interface HttpProgressEvent {
   type: HttpEventType.DownloadProgress | HttpEventType.UploadProgress
   loaded: number
   total?: number
}
Here,
- loaded is used to refer to the number of bytes uploaded / downloaded
- total is used to refer to the total data to be downloaded / uploaded
HttpResponseBase
The HttpResponseBase is the base class for both HttpHeaderResponse and HttpResponse. It has basic information about the response.
Syntax for the HttpResponseBase −
abstract class HttpResponseBase {
   constructor() // have not shown full details for understanding purpose
   headers: HttpHeaders
   status: number
   statusText: string
   url: string | null
   ok: boolean
   type: HttpEventType.Response | HttpEventType.ResponseHeader
}
Here,
- headers − A response header information as HttpHeaders object.
- status − The number (code) is used to refer to the different status of the request.
- statusText − Text used to refer to different status of the request (default: 'ok').
- url − Url of the request.
- ok − Success / failure of the request.
- type − Type of the event (Response or ResponseHeader).
HttpHeaderResponse
TheHttpHeaderResponseinherits fromHttpResponseBaseand includes an option to clone the response. The purpose of this class is to enclose the response with header and status information, skipping the actual body of the response.
class HttpHeaderResponse extends HttpResponseBase {
  type: HttpEventType.ResponseHeader;
  clone(): HttpHeaderResponse;
  headers: HttpHeaders;
  status: number;
  statusText: string;
  url: string | null;
  ok: boolean;
}
Here,
- type − Type of the event (Response or ResponseHeader).
- clone() − A method, which copy this HttpHeaderResponse, overriding its contents with the given parameter hash.
let response = res.clone(update: { })
Here,
- headers − A response header information as HttpHeaders object.
- status − The number (code) is used to refer to the different status of the request.
- statusText − Text used to refer to different status of the request (default: 'ok').
- url − Url of the request.
- ok − Success / failure of the request.
HttpResponse
TheHttpResponseinherits fromHttpResponseBaseclass and includes response body and option to clone the response. The purpose of the class is to enclose the response with body, header and status information.
The responsed body can be fetched by using body property as shown below −
class HttpResponse<T> extends HttpResponseBase {
  body: T | null;
  type: HttpEventType.Response;
  clone(): HttpResponse<T>;
  clone(update): HttpResponse<T>;
  clone(update)<V>: HttpResponse<V>;
  headers: HttpHeaders;
  status: number;
  statusText: string;
  url: string | null;
  ok: boolean;
}
Here,
- body − The response body, or null if one was not returned.
- type − Type of the event (Response or ResponseHeader).
- clone() − A method, which copy this HttpHeaderResponse, overriding its contents with the given parameter hash.
@returnsHttpResponse<T>
-------------------------------------
@paramupdate{ headers?: HttpHeaders | undefined;
status?: number | undefined;
statusText?: string | undefined;
url?: string | undefined;
@returnsHttpResponse<T>
-------------------------------------
@paramupdate{ body?: V | null | undefined;
headers?: HttpHeaders | undefined;
status?: number | undefined;
statusText?: string | undefined;
url?: string | undefined; }
@returnsHttpResponse<V>
Here,
- headers − A response header information as HttpHeaders object.
- status − The number (code) is used to refer to the different status of the request.
- statusText − Text used to refer to different status of the request (default: 'ok').
- url − Url of the request.
- ok − Success / failure of the request.
Cloning the response can be done similarly toHttpHeaderResponse class as shown below −
let response = res.clone(update: { })
Here,
- res is the response object returned from the server.
Working Example
Let us create a working angular example to get all expense item from server by using HttpClient service class and using HttpRequest option.
Step 1: Create a new angular application by running ng new command as shown below −
ng new my-upload-app
Enable angular routing and CSS as shown below −
? Would you like to add Angular routing? Yes
? Which stylesheet format would you like to use? CSS
Step 2: Setting up the HttpClient service
Before making HTTP requests, we need to properly set up the HttpClient service in our Angular application. You need to import the HttpClient in App Config:
provideHttpClient(withInterceptorsFromDi())
app.config.ts
import { ApplicationConfig, provideBrowserGlobalErrorListeners } from '@angular/core';
import { provideRouter } from '@angular/router';

import { routes } from './app.routes';
import { provideHttpClient, withInterceptorsFromDi } from '@angular/common/http';

export const appConfig: ApplicationConfig = {
  providers: [
    provideBrowserGlobalErrorListeners(),
    provideRouter(routes),
    provideHttpClient(withInterceptorsFromDi())
  ]
};
Step 3: Create new component, Upload to show the expense items from the server −
ng generate component upload
It will create the component as shown below −
CREATE src/app/upload/upload.css (0 bytes)
CREATE src/app/upload/upload.html (21 bytes)
CREATE src/app/upload/upload.spec.ts (559 bytes)
CREATE src/app/upload/upload.ts (202 bytes)
Step 4: Include our new component into the app root component view, app.html as shown below −
<app-upload></app-upload>
<router-outlet></router-outlet>
Step 5: Inject theHttpClientinto the Upload component through the constructor and import necessary classes from the rxjsand angular modules as shown below −
upload.ts
import { Component } from '@angular/core';
import { HttpClient, HttpEvent, HttpEventType } from '@angular/common/http';
import { Observable, map } from 'rxjs';

@Component({
   selector: 'app-upload',
   templateUrl: './upload.html',
   styleUrls: ['./upload.css']
})
export class Upload {
   constructor(private http: HttpClient) { }
}
Step 6: Create a variable for the file to be uploaded and another variable for upload message −
file?: File | null = null;
message : String | null = null;
Step 7: Create a function to get the file uploaded by the user from the form (to be created) and store it inthe filevariable −
onFilechange(event: any) {
   let files = event.target.files
   this.file = files.item(0)
   console.log(this.file)
}
Here,
- event is the object holding upload event information. The event.target.files holds the uploaded document.
Step 8: Create a function,getEventMessage()to print the uploaded event information −
private getEventMessage(event: HttpEvent<any>, file?: File) {
   let message : String | null = null;
   switch (event.type) {
      case HttpEventType.Sent:
         message = `Uploading file "${file?.name}" of size ${file?.size}.`;
         console.log(message);
         return message;

      case HttpEventType.UploadProgress:
      // Compute and show the % done:
         const percentDone =
	     event.total ? Math.round(100 * event.loaded / event.total) : 0;
         message =
		 `File "${file?.name}" is ${percentDone}% uploaded.`;
         console.log(message);
         return message;

      case HttpEventType.Response:
         message =
		 `File "${file?.name}" was completely uploaded!`;
         console.log(message);
         return message;

      default:
         message =
		 `File "${file?.name}" surprising upload event: ${event.type}.`;
         console.log(message);
         return message;
   }
}
Here,
- The switch statement is used to capture different events and print them accordingly.
- The HttpEventType holds the type of information.
Step 9: Create a function, upload() to upload the user-selected files to the server −
upload() {
   const formData: FormData = new FormData();
   formData.append('photo', this.file as Blob, this.file?.name);
   const myObservable: Observable<HttpEvent<any>> =
      this.http.post<any>('http://localhost:8000/upload', formData, {
	  observe: 'events',
         reportProgress: true });

   myObservable.pipe(
      map(data => { console.log(data); return data; }),).subscribe(
         evt => {
            this.message = this.getEventMessage(evt, this.file as File)
      });
}
Here,
- formData holds the user uploaded file.
- post() method send the data in formData to the server.
- myObservable will print the data returned by server using map function and print the event information using getEventMessage() function.
Step 10: The complete source code of the upload component (upload.ts) is as follows −
upload.ts
import { Component } from '@angular/core';
import { HttpClient, HttpEvent, HttpEventType } from '@angular/common/http';
import { Observable, map } from 'rxjs';

@Component({
   selector: 'app-upload',
   imports: [],
   templateUrl: './upload.html',
   styleUrls: ['./upload.css']
})
export class Upload {

   file?: File | null = null;
   message : String | null = null;

   constructor(private http: HttpClient) { }

   onFilechange(event: any) {
      let files = event.target.files
      this.file = files.item(0)
      console.log(this.file)
   }

   upload() {
   const formData: FormData = new FormData();
   formData.append('photo', this.file as Blob, this.file?.name);
   const myObservable: Observable<HttpEvent<any>> =
      this.http.post<any>('http://localhost:8000/api/upload',
      formData, { observe: 'events', reportProgress: true });

   console.log('Hi');

   myObservable.pipe(
      map(data => { console.log(data); return data; }),
      ).subscribe(
         evt => {
            this.message = this.getEventMessage(evt, this.file as File)
         });
   }

   private getEventMessage(event: HttpEvent<any>, file?: File) {
      let message : String | null = null;
      switch (event.type) {
         case HttpEventType.Sent:
            message =
			`Uploading file "${file?.name}" of size ${file?.size}.`;
            console.log(message);
            return message;

         case HttpEventType.UploadProgress:
            // Compute and show the % done:
            const percentDone =
			event.total ? Math.round(100 * event.loaded / event.total) : 0;
            message = `File "${file?.name}" is ${percentDone}% uploaded.`;
            console.log(message);
            return message;

         case HttpEventType.Response:
            message =
			`File "${file?.name}" was completely uploaded!`;
            console.log(message);
            return message;

         default:
            message =
			`File "${file?.name}" surprising upload event: ${event.type}.`;
            console.log(message);
            return message;
      }
   }
}
Step 11: Create an upload form in the component template (upload.html) and set theupload()method for upload buttonclickevent −
upload.html
<div><h3>Uploads</h3></div>
<form enctype="multipart/form-data">
   <label for="formFile" class="form-label">Upload file example</label>
   <input type="file"
   name="photo" id="file" (change)="this.onFilechange($event)"
   />
   @if (file) {
   <div>
      <section class="file-info">
         File details:
         <ul>
            <li>Name: {{file.name}}</li>
            <li>Type: {{file.type}}</li>
            <li>Size: {{file.size}} bytes</li>
         </ul>
      </section>
      @if(message){
        <p>{{message}}</p>
        }
      <button (click)="this.upload()" type="button">Upload</button>
   </div>
   }
</form>
Step 12: Finally, run the application using the below command −
ng serve
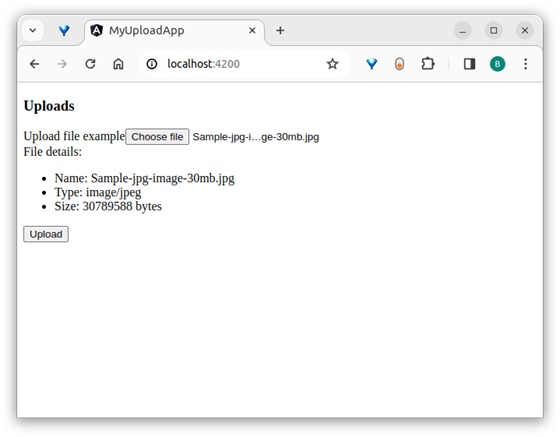
Output
Step 13: Here, the output shows the form. Select a large file of around 30 MB and try to upload it as shown below −

Here, the output shows the form. Select a large file around 30 MB and try to upload it as shown below −
After uploading, inspect the application page and see in the console −
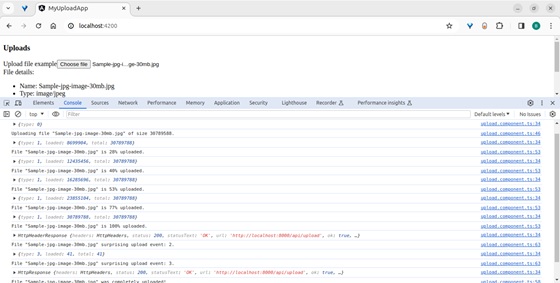
If the image fails to upload correctly, the following message will appear −

Note: The output shows all the events returned by the server in the browser and its console.
Conclusion
Angular provides different classes and types to properly enclose the response data from the server. All classes are simple to learn, understand, and manipulate the response before showing it on the website/app.
