- Angular Tutorial
- Angular - Home
- Angular - Overview
- Angular - Features
- Angular - Advantages & Disadvantages
- Angular Basics
- Angular - Environment setup
- Angular - First Application
- Angular - MVC Architecture
- Angular Components
- Angular - Components
- Angular - Component Lifecycle
- Angular - View Encapsulation
- Angular - Emulated Encapsulation
- Angular - ShadowDom Encapsulation
- Angular - Component Interaction
- Angular - Using @Input Decorator
- Angular - Using @Output Decorator
- Angular - Using Local Variable
- Angular - Using @ViewChild Decorator
- Angular - Using Services
- Angular - Component Styles
- Angular - Nested Components
- Angular - Content projection
- Angular - Single-slot Content Projection
- Angular - Multi-slot Content Projection
- Angular - Conditional Content Projection
- Angular - Dynamic components
- Angular - Using NgComponentOutlet
- Angular - Using ViewContainerRef
- Angular - Elements
- Angular Templates
- Angular - Templates
- Angular - Template statements
- Angular - Template Variables
- Angular - SVG as Templates
- Angular Binding
- Angular - Data Binding
- Angular - Interpolation
- Angular - Event Binding
- Angular - Property Binding
- Angular - Attribute Binding
- Angular - Class Binding
- Angular - Style Binding
- Angular - Two-way Binding
- Angular Directives
- Angular - Directives
- Angular - Attribute Directives
- Angular - Structural Directives
- Angular - Custom Directives
- Angular Pipes
- Angular - Pipes
- Angular - Built-in Pipes
- Angular - Custom Pipes
- Angular Forms
- Angular - Forms
- Angular - Template Driven Forms
- Angular - Reactive Forms
- Angular - Form Validation
- Angular - Dynamic Forms
- Angular Dependency Injection
- Angular - Dependency Injection
- Angular - Injectable Service
- Angular Routing
- Angular - Routing
- Angular - Dynamic Routes
- Angular - Wildcard Routes
- Angular - Nested Routes
- Angular - Navigation
- Angular - Routing in SPA
- Angular - Custom Route Matches
- Angular - Router Reference
- Angular HTTP Client programming
- Angular - Services
- Angular - HTTP Client
- Angular - Express based REST API
- Angular - Request
- Angular - Request Response Workflow
- Angular - Response
- Angular - Express based Upload API
- Angular - GET
- Angular - POST
- Angular - PUT
- Angular - DELETE
- Angular - JSONP
- Angular - CRUD Operations Using HTTP
- Angular Modules
- Angular - Introduction to Modules
- Angular - Root Module
- Angular - Feature Module
- Angular - Sharing Module
- Angular - Routing Module
- Angular - NgModules
- Angular Animation
- Angular - Animations
- Angular Service Workers & PWA
- Angular - Service Workers & PWA
- Angular Testing
- Angular - Testing Overview
- Angular Design Patterns
- Angular - Design Patterns
- Angular - Lazy Loading
- Angular - Singleton Pattern
- Angular - Observer Pattern
- Angular Libraries
- Angular - Libraries
- Angular - Angular Material
- Angular - PrimeNG
- Angular - RxJS
- Angular Advanced
- Angular - Signals
- Angular - Authentication & Authorization
- Angular - Internationalization
- Angular - Standalone Component
- Angular - Accessibility
- Angular - Web Workers
- Angular - Server Side Rendering
- Angular - Ivy Compiler
- Angular - Building with Bazel
- Angular - Backward Compatibility
- Angular - Reactive Programming
- Angular Tools
- Angular - CLI
- Angular Material UI Elements
- Angular - Paginator
- Angular - Datepicker
- Angular - Select Drop-down
- Angular Miscellaneous
- Angular - Third Party Controls
- Angular - Configuration
- Angular - Displaying Data
- Angular - Decorators & Metadata
- Angular - Basic Example
- Angular - Error Handling
- Angular - Testing & Building a Project
- Angular - Lifecycle Hooks
- Angular - User Input
- Angular - What's New?
- Angular Useful Resources
- Angular - Quick Guide
- Angular - Useful Resources
- Angular - Discussion
Angular - Using @Viewchild Decorator
Like the local variable, the @ViewChild decorator is also used to get complete access to the child component. However, along with template, the parent component will get access to the child component in its class environment as well. This makes a huge difference as the parent component can use the child component functionality in its methods as well.
Example - Usage of @ViewChild Decorator
To understand the @Viewchild decorator, let's change the parent component, i.e. AppComponent. Now, we will use @ViewChild concept instead of local variable. We don't need to make any changes in the child component.
Step 1: Import necessary classes from @angular/core module:
import { Component, ViewChild, AfterViewInit } from '@angular/core';
Step 2: Implement AfterViewInit life cycle hook as shown below:
export class VcParentCounterComponent implements AfterViewInit {
   ngAfterViewInit() {
      // ...
   }
}
Step 3: Access the child component using @ViewChild as shown below −
@ViewChild(ChildCounterComponent)
private child! : ChildCounterComponent;
Here, @ViewChild decorator accepts the type of the child component, which is in the component's template.
Step 4: Implement increment and decrement functionality by accessing the child component.
inc() { this.child.inc() }
dec() { this.child.dec() }
Here, we have used this.child variable to access the functionality from child component.
Step 5: Implement a counter functionality to retrieve the current counter value as shown below −
counter() { return 0; }

ngAfterViewInit() {
   setTimeout(() => this.counter = () => this.child.counter, 0)
}
Here, we have created a counter method in ngAterViewInit life cycle hook. The child component will be available only after this life cycle. So, we have created a dummy counter method (which needs to access child component's counter value ) during component initialization and the update the counter method in the hook method.
Step 6: The complete code of the App.ts is as follows −
App.ts
import { AfterViewInit, Component, signal, ViewChild } from '@angular/core';
import { RouterOutlet } from '@angular/router';
import { ChildCounter } from './child-counter/child-counter';

@Component({
   selector: 'app-root',
   imports: [RouterOutlet, ChildCounter],
   templateUrl: './app.html',
   styleUrl: './app.css'
})
export class App implements AfterViewInit {
   protected readonly title = signal('expense-manager');
   @ViewChild(ChildCounter)
   private child! : ChildCounter;
   inc() { this.child.inc() }
   dec() { this.child.dec() }
   counter() { return 0; }
   ngAfterViewInit() {
      setTimeout(() => this.counter = () => this.child.counter, 0)
   }
}
Step 7: Next, open the component's template file, app.html and add the child component along with button and method binding as shown below −
app.html
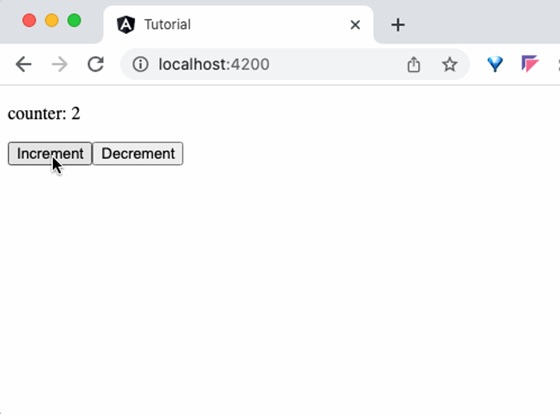
<p>counter: {{ counter() }}</p>

<button (click)="inc()">Increment</button>
<button (click)="dec()">Decrement</button>

<app-child-counter></app-child-counter>
Here, we have not included the identifier and used only the parent components functionality instead of child component (which we have done in previous example, local variable concept). The parent component will get the required functionality from child variable, which it got through @ViewChild decorator.
Output
Step 8: Finally, run the application and check that the counter shows that the value passed from parent component as shown below −