- Angular Tutorial
- Angular - Home
- Angular - Overview
- Angular - Features
- Angular - Advantages & Disadvantages
- Angular Basics
- Angular - Environment setup
- Angular - First Application
- Angular - MVC Architecture
- Angular Components
- Angular - Components
- Angular - Component Lifecycle
- Angular - View Encapsulation
- Angular - Emulated Encapsulation
- Angular - ShadowDom Encapsulation
- Angular - Component Interaction
- Angular - Using @Input Decorator
- Angular - Using @Output Decorator
- Angular - Using Local Variable
- Angular - Using @ViewChild Decorator
- Angular - Using Services
- Angular - Component Styles
- Angular - Nested Components
- Angular - Content projection
- Angular - Single-slot Content Projection
- Angular - Multi-slot Content Projection
- Angular - Conditional Content Projection
- Angular - Dynamic components
- Angular - Using NgComponentOutlet
- Angular - Using ViewContainerRef
- Angular - Elements
- Angular Templates
- Angular - Templates
- Angular - Template statements
- Angular - Template Variables
- Angular - SVG as Templates
- Angular Binding
- Angular - Data Binding
- Angular - Interpolation
- Angular - Event Binding
- Angular - Property Binding
- Angular - Attribute Binding
- Angular - Class Binding
- Angular - Style Binding
- Angular - Two-way Binding
- Angular Directives
- Angular - Directives
- Angular - Attribute Directives
- Angular - Structural Directives
- Angular - Custom Directives
- Angular Pipes
- Angular - Pipes
- Angular - Built-in Pipes
- Angular - Custom Pipes
- Angular Forms
- Angular - Forms
- Angular - Template Driven Forms
- Angular - Reactive Forms
- Angular - Form Validation
- Angular - Dynamic Forms
- Angular Dependency Injection
- Angular - Dependency Injection
- Angular - Injectable Service
- Angular Routing
- Angular - Routing
- Angular - Dynamic Routes
- Angular - Wildcard Routes
- Angular - Nested Routes
- Angular - Navigation
- Angular - Routing in SPA
- Angular - Custom Route Matches
- Angular - Router Reference
- Angular HTTP Client programming
- Angular - Services
- Angular - HTTP Client
- Angular - Express based REST API
- Angular - Request
- Angular - Request Response Workflow
- Angular - Response
- Angular - Express based Upload API
- Angular - GET
- Angular - POST
- Angular - PUT
- Angular - DELETE
- Angular - JSONP
- Angular - CRUD Operations Using HTTP
- Angular Modules
- Angular - Introduction to Modules
- Angular - Root Module
- Angular - Feature Module
- Angular - Sharing Module
- Angular - Routing Module
- Angular - NgModules
- Angular Animation
- Angular - Animations
- Angular Service Workers & PWA
- Angular - Service Workers & PWA
- Angular Testing
- Angular - Testing Overview
- Angular Design Patterns
- Angular - Design Patterns
- Angular - Lazy Loading
- Angular - Singleton Pattern
- Angular - Observer Pattern
- Angular Libraries
- Angular - Libraries
- Angular - Angular Material
- Angular - PrimeNG
- Angular - RxJS
- Angular Advanced
- Angular - Signals
- Angular - Authentication & Authorization
- Angular - Internationalization
- Angular - Standalone Component
- Angular - Accessibility
- Angular - Web Workers
- Angular - Server Side Rendering
- Angular - Ivy Compiler
- Angular - Building with Bazel
- Angular - Backward Compatibility
- Angular - Reactive Programming
- Angular Tools
- Angular - CLI
- Angular Material UI Elements
- Angular - Paginator
- Angular - Datepicker
- Angular - Select Drop-down
- Angular Miscellaneous
- Angular - Third Party Controls
- Angular - Configuration
- Angular - Displaying Data
- Angular - Decorators & Metadata
- Angular - Basic Example
- Angular - Error Handling
- Angular - Testing & Building a Project
- Angular - Lifecycle Hooks
- Angular - User Input
- Angular - What's New?
- Angular Useful Resources
- Angular - Quick Guide
- Angular - Useful Resources
- Angular - Discussion
Angular - Using @Input decorator
The parent component can pass the data to the child component through the @Input()decorator. The child component receives data during its entire life cycle from initialization to destruction. Angular is designed in such a way that the child component automatically intercepts the data changes from the parent component and does the necessary update. Angular also provides hooks to intercept the data changes and write custom processing.
Overall, we have three ways for the child component to intercept data from parent component −
- Auto interception
- Setter interception
- ngOnChanges hook
Auto Interception
Auto interception simplifies receiving the data from parent component. Angular provides a decorator @Input to receive data from parent component. It receives the data whenever the parent component updates the data Configuring Input decorator is very simple. Just append the input decorator to a property in the child component and then pass the data from parent component through child component attributes in the template.
Example - Usage of Auto Interception
Let us create a child component and then try to pass the data from parent to child and render it in the child component.
Step 1: Create a new child component, InOutChildSample using angular CLI as shown below −
ng generate component InOutChildSample
CREATE src/app/in-out-child-sample/in-out-child-sample.spec.ts (627 bytes)
CREATE src/app/in-out-child-sample/in-out-child-sample.ts (246 bytes)
CREATE src/app/in-out-child-sample/in-out-child-sample.css (0 bytes)
CREATE src/app/in-out-child-sample/in-out-child-sample.html (35 bytes)
Step 2: Add a counter property in the child component and decorate it with @Input() decorator as shown below −
in-out-child-sample.ts
import { Component, Input } from '@angular/core';

@Component({
   selector: 'app-in-out-child-sample',
   imports: [],
   templateUrl: './in-out-child-sample.html',
   styleUrl: './in-out-child-sample.css',
})
export class InOutChildSample {
   @Input() counter : number = 0;
}
Step 3: Open the child component template, in-out-child-sample.html and use the counter property as shown below −
in-out-child-sample.html
<div>
   <p>Counter: {{counter}}</p>
</div>
Step 4: Open the parent component template, app.html and render the child component along with counter attribute as shown below −
app.html
<app-in-out-child-sample [counter]="counter"></app-in-out-child-sample>
<router-outlet />
Step 5: Open the app.ts file and add the code given below −
app.ts
import { Component, signal } from '@angular/core';
import { RouterOutlet } from '@angular/router';
import { InOutChildSample } from './in-out-child-sample/in-out-child-sample';

@Component({
   selector: 'app-root',
   imports: [RouterOutlet, InOutChildSample],
   templateUrl: './app.html',
   styleUrl: './app.css'
})
export class App {
   protected readonly title = signal('expense-manager');
   counter = 10;
}
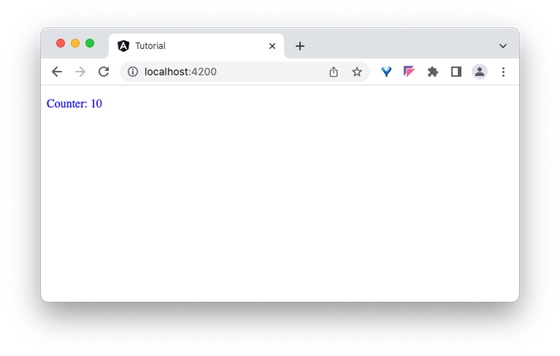
Output
Step 6: Finally, run the application and check that the counter shows whether the value passed from the parent component or not −
Setter Interception
The setter based interception is just an extension of the previous technique. It basically uses a getter and setter for the property used in @Input decorator.
Example - Usage of Setter Interception
Let us change our counter example, in-out-child-sample.ts to intercept the counter using setter and reset the counter to 1, if the counter value exceeds 25.
in-out-child-sample.ts
import { Component, Input } from '@angular/core';

@Component({
   selector: 'app-in-out-child-sample',
   imports: [],
   templateUrl: './in-out-child-sample.html',
   styleUrl: './in-out-child-sample.css',
})
export class InOutChildSample {
   @Input()
   get counter(): number { return this._counter; }
   set counter(val: number) {
      this._counter = val || 0;
      if(val > 25) this._counter = val % 25;
   }
   private _counter: number = 1;
}
Add a function to increment the counter value in the parent component as shown below −
inc() {
   this.counter++
}
Add a button in the parent components template and bind the function as shown below −
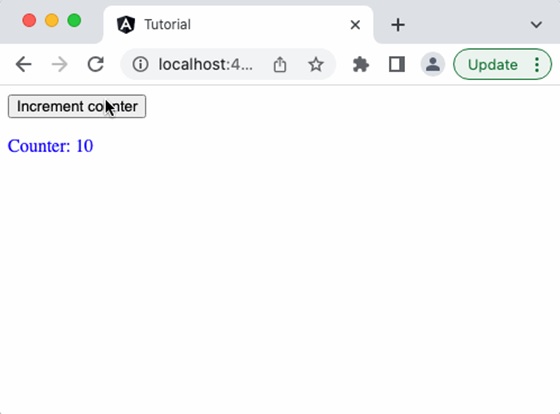
<button (click)="inc()">Increment counter</button>
<app-in-out-child-sample [counter]="counter" />
Output
Run the application, and you can see that the counter will reset to 1 once it reaches 25.
The ngOnChanges Hook Interception
As we learned in the life cycle of a component and its hook methods, ngOnChanges is a hook method, which will run whenever angular detects changes in its input.
ngOnChanges hook accepts an object of type SimpleChanges. SimpleChanges is a dictionary having all properties with changes. We can go through all the properties and find the latest value of the property. The pseudo-code to go through all changed properties is as follows −
ngOnChanges(changes: SimpleChanges) {
   for (const key in changes) {
      const prop = changes[key];

      const prevVal = prop.previousValue
      const currentVal = prop.currentValue
      cont isFirstChange = pop.isFirstChange()

      if (prop.isFirstChange()) {
         console.log("The current value is ${prop.currentValue}")
      } else {
         console.log(`${key} changed from ${prop.previousValue} to
         ${prop.currentValue}`);
      }
   }
}
