- Angular Tutorial
- Angular - Home
- Angular - Overview
- Angular - Features
- Angular - Advantages & Disadvantages
- Angular Basics
- Angular - Environment setup
- Angular - First Application
- Angular - MVC Architecture
- Angular Components
- Angular - Components
- Angular - Component Lifecycle
- Angular - View Encapsulation
- Angular - Emulated Encapsulation
- Angular - ShadowDom Encapsulation
- Angular - Component Interaction
- Angular - Using @Input Decorator
- Angular - Using @Output Decorator
- Angular - Using Local Variable
- Angular - Using @ViewChild Decorator
- Angular - Using Services
- Angular - Component Styles
- Angular - Nested Components
- Angular - Content projection
- Angular - Single-slot Content Projection
- Angular - Multi-slot Content Projection
- Angular - Conditional Content Projection
- Angular - Dynamic components
- Angular - Using NgComponentOutlet
- Angular - Using ViewContainerRef
- Angular - Elements
- Angular Templates
- Angular - Templates
- Angular - Template statements
- Angular - Template Variables
- Angular - SVG as Templates
- Angular Binding
- Angular - Data Binding
- Angular - Interpolation
- Angular - Event Binding
- Angular - Property Binding
- Angular - Attribute Binding
- Angular - Class Binding
- Angular - Style Binding
- Angular - Two-way Binding
- Angular Directives
- Angular - Directives
- Angular - Attribute Directives
- Angular - Structural Directives
- Angular - Custom Directives
- Angular Pipes
- Angular - Pipes
- Angular - Built-in Pipes
- Angular - Custom Pipes
- Angular Forms
- Angular - Forms
- Angular - Template Driven Forms
- Angular - Reactive Forms
- Angular - Form Validation
- Angular - Dynamic Forms
- Angular Dependency Injection
- Angular - Dependency Injection
- Angular - Injectable Service
- Angular Routing
- Angular - Routing
- Angular - Dynamic Routes
- Angular - Wildcard Routes
- Angular - Nested Routes
- Angular - Navigation
- Angular - Routing in SPA
- Angular - Custom Route Matches
- Angular - Router Reference
- Angular HTTP Client programming
- Angular - Services
- Angular - HTTP Client
- Angular - Express based REST API
- Angular - Request
- Angular - Request Response Workflow
- Angular - Response
- Angular - Express based Upload API
- Angular - GET
- Angular - POST
- Angular - PUT
- Angular - DELETE
- Angular - JSONP
- Angular - CRUD Operations Using HTTP
- Angular Modules
- Angular - Introduction to Modules
- Angular - Root Module
- Angular - Feature Module
- Angular - Sharing Module
- Angular - Routing Module
- Angular - NgModules
- Angular Animation
- Angular - Animations
- Angular Service Workers & PWA
- Angular - Service Workers & PWA
- Angular Testing
- Angular - Testing Overview
- Angular Design Patterns
- Angular - Design Patterns
- Angular - Lazy Loading
- Angular - Singleton Pattern
- Angular - Observer Pattern
- Angular Libraries
- Angular - Libraries
- Angular - Angular Material
- Angular - PrimeNG
- Angular - RxJS
- Angular Advanced
- Angular - Signals
- Angular - Authentication & Authorization
- Angular - Internationalization
- Angular - Standalone Component
- Angular - Accessibility
- Angular - Web Workers
- Angular - Server Side Rendering
- Angular - Ivy Compiler
- Angular - Building with Bazel
- Angular - Backward Compatibility
- Angular - Reactive Programming
- Angular Tools
- Angular - CLI
- Angular Material UI Elements
- Angular - Paginator
- Angular - Datepicker
- Angular - Select Drop-down
- Angular Miscellaneous
- Angular - Third Party Controls
- Angular - Configuration
- Angular - Displaying Data
- Angular - Decorators & Metadata
- Angular - Basic Example
- Angular - Error Handling
- Angular - Testing & Building a Project
- Angular - Lifecycle Hooks
- Angular - User Input
- Angular - What's New?
- Angular Useful Resources
- Angular - Quick Guide
- Angular - Useful Resources
- Angular - Discussion
Angular - HTTP POST Request
The HTTP standard verb POST can be used in the HTTP protocol to add (create) a new resource (data) on the server. The purpose of the POST method is to request the creation of new data (records) on the server.
In Angular, theHttpClientservice class provides aPOST()method to add (create) new data on the server using the HTTP POST verb. Let's learn more about this method, including its signature, parameters, and real-time usage:
Signature of the POST() Method
Following is the signature (different from syntax) of the HttpClient POST() method −
POST<T>(url: string, body: any, options?: Object): Observable<T>
Here,
- url − The URL to which the POST request is sent.
- body − The data to be sent to the server.
- options − Represents the options to be sent along with the resource URL.
- Observable<T> − The return type, where 'T' represents the expected response type.
To work out the HTTP client-server communication, we need to set up a web application and need to exposes a set of web API. The web API can be requested from the client. Let us create a sample server application, Expense API App, and provide CRUD REST API (mainly POST requests) for expenses.
Create a Server for Expense REST APILet us create a working angular example to add (create) a new expense item on the server by using the HttpClient service class and POST() method −
Angular Sample Application
Step 1: Run the below command to create an angular application −
ng new my-http-app
Enable angular routing and CSS as shown below −
? Would you like to add Angular routing? Yes
? Which stylesheet format would you like to use? CSS
Step 2: Configure Http client
Let's learn how to configure the HttpClientservice. You need to import the HttpClient in App Config:
provideHttpClient(withInterceptorsFromDi())
app.config.ts
import { ApplicationConfig, provideBrowserGlobalErrorListeners } from '@angular/core';
import { provideRouter } from '@angular/router';

import { routes } from './app.routes';
import { provideHttpClient, withInterceptorsFromDi } from '@angular/common/http';

export const appConfig: ApplicationConfig = {
  providers: [
    provideBrowserGlobalErrorListeners(),
    provideRouter(routes),
    provideHttpClient(withInterceptorsFromDi())
  ]
};
Step 3: Create a new interface, Expense to show the expense items from the server −
interface Expense {
   id: Number,
   item: String,
   amount: Number,
   category: String,
   location: String,
   spendOn: Date
}

export default Expense;
Step 4: Create a new component, ListExpenses to show the expense items from the server −
ng generate component ListExpenses
It will create a new component as shown below −
CREATE src/app/list-expenses/list-expenses.css (0 bytes)
CREATE src/app/list-expenses/list-expenses.html (28 bytes)
CREATE src/app/list-expenses/list-expenses.spec.ts (602 bytes)
CREATE src/app/list-expenses/list-expenses.ts (229 bytes)
Step 5: Include our new component into the App root component view, app.component.html as shown below −
<app-list-expenses></app-list-expenses>
<router-outlet></router-outlet>
Step 6: Inject the HttpClient into the ListExpenses component through the constructor as shown below −
import { Component } from '@angular/core';
import { HttpClient } from '@angular/common/http';

@Component({
   selector: 'app-list-expenses',
   imports: [],
   templateUrl: './list-expenses.html',
   styleUrls: ['./list-expenses.css']
})
export class ListExpenses {

   constructor(private http: HttpClient) { }
}
Step 7: Implement the OnInit life cycle hook to request the server for expenses after the initialization of the ListExpenses component −
export class ListExpenses implements OnInit{
   constructor(private http: HttpClient) { }
   ngOnInit(): void {

   }
}
Step 8: Create a local variable, expenses to hold our expenses from the server −
export class ListExpenses implements OnInit{
   expenses: Expense[] = [];
   constructor(private http: HttpClient) { }
   ngOnInit(): void {
   }
}
Step 9: Create a local variable, expense to hold the new expenses created in the server −
export class ListExpensesComponent implements OnInit{
   expenses: Expense[] = [];
   newexpense: Expense | null = null;
   constructor(private http: HttpClient) { }
   ngOnInit(): void {

   }
}
Step 10: Set the new expense item with sample data as shown below −
export class ListExpensesComponent implements OnInit {
   expenses: Expense[] = [];
   newexpense: Expense | null = null;
   constructor(private http: HttpClient) { }
   ngOnInit(): void {
      var spend_date = new Date();
      spend_date.setDate(spend_date.getDate() - 1);
      this.newexpense = {
         'item': 'new item ' + Math.floor(Math.random() * 10),
         'amount': Math.floor(Math.random() * 100),
         'category': 'Food',
         'location': 'KFC',
         'spendOn': spend_date
      }
   }
}
Here,
- Used random method to set item name and amount.
- Set spend date as yesterday.
Step 11: Call the POST method of the this.http (HttpClient instance) object by passing the post URL & our new expense item and get the updated expense object from server.
export class ListExpenses implements OnInit {
   expenses: Expense[] = [];
   newexpense: Expense | null = null;
   constructor(private http: HttpClient) { }
   ngOnInit(): void {
      var spend_date = new Date();
      spend_date.setDate(spend_date.getDate() - 1);
      this.newexpense = {
         'item': 'new item ' + Math.floor(Math.random() * 10),
         'amount': Math.floor(Math.random() * 100),
         'category': 'Food',
         'location': 'KFC',
         'spendOn': spend_date
      }

      this.http.post<Expense>('http://localhost:8000/api/expense/1', this.newexpense,{
         'observe': 'body',
         'responseType': 'json'
      })
      .subscribe( data => {
         this.newexpense = data as Expense;
         console.log(data)
      });
   }
}
Step 12: Now, call the GET method of the this.http (HttpClient instance) object by passing the list expenses URL & options and get the expense object from server. Then, set the expenses into our local variable, expenses.
export class ListExpenses implements OnInit {
   expenses: Expense[] = [];
   newexpense: Expense | null = null;
   constructor(private http: HttpClient) { }
   ngOnInit(): void {
      var spend_date = new Date();
      spend_date.setDate(spend_date.getDate() - 1);
      this.newexpense = {
         'item': 'new item ' + Math.floor(Math.random() * 10),
         'amount': Math.floor(Math.random() * 100),
         'category': 'Food',
         'location': 'KFC',
         'spendOn': spend_date
      }
      this.http.post<Expense>('http://localhost:8000/api/expense/1',
      this.newexpense,{
         'observe': 'body',
         'responseType': 'json'
      })
      .subscribe( data => {
         this.newexpense = data as Expense;
         console.log(data)
      });
      this.http.get<Expense[]>('http://localhost:8000/api/expense',{
         'observe': 'body',
         'responseType': 'json'
      })
      .subscribe( data => {
         this.expenses = data as Expense[]
         console.log(this.expenses)
      })
   }
}
Step 13: Next, get the expenses list object and new expense object from the component and render it in our component template page (list-expenses.component.html) −
<div>Expense item (id = 1) updated in the server is as follows:</div>
<div>Item: {{newexpense?.item}}</div>
<div>Amount: {{newexpense?.amount}}</div>
<div>Location: {{newexpense?.location}}</div>
<div>Spend On: {{newexpense?.spendOn | date:'short'}}</div>
<div><h3>Expenses</h3></div>
<ul>
   @for(expense of expenses; track $index){
   <li>
      {{expense.item}} @ {{expense.location}} for {{expense.amount}}
      USD on {{expense.spendOn | date:'shortDate' }}
   </li>
   }
</ul>
Here,
- Expense with id = 1 will get updated in the server.
- The returned expenses will have the updated expense from the server.
Step 14: Finally, run the application using below command −
ng serve
Step 13: Now, open your friendly (such as Chrome) browser navigate to http://localhost:4200/ URL, and check the output −
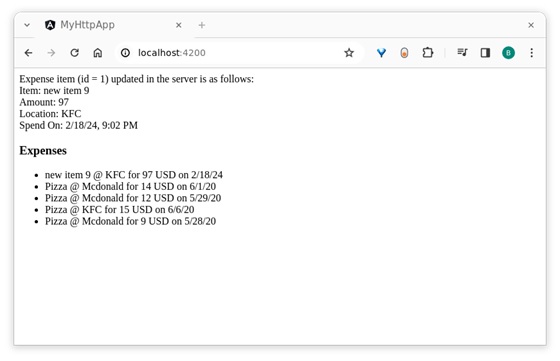
Here, the output shows our expenses as a list of items.
Conclusion
Angular provides an easy way to add data to the server through the HttpClient object. The post() is a specific method used to add new data to the server. We will learn more HTTP methods to target other HTTP verb in the upcoming chapters.
Multiple Choice Questions (MCQ's):
Here we have mentioned a few MCQs to test your knowledge on the current concept:
Q 1 − What is the primary purpose of an HTTP POST request in Angular?
A − To retrieve data from a server
B − To submit data to a server
Answer : B
Explanation:
The primary purpose of an HTTP POST request is to send data to a server to create or update a resource.
Q 2 − What type of data does the HttpClient.post method return by default?
Answer : A
Explanation:
The HttpClient.post method returns an Observable by default.
Q 3 − What is the correct syntax to make an HTTP POST request using HttpClient?
A − this.httpClient.post(this.url, id)
B − this.httpClient.post('https://api.example.com/data', { name: 'abc' })
C − this.httpClient.get('https://api.example.com/data', { name: 'abc' })
D − this.httpClient.fetch('https://api.example.com/data', { name: 'abc' })
Answer : B
Explanation:
The post method of the HttpClient service is used to make HTTP POST requests. The correct syntax is this.httpClient.post('https://api.example.com/data', { name: 'abc' });
