
- Angular Tutorial
- Angular - Home
- Angular - Overview
- Angular - Features
- Angular - Advantages & Disadvantages
- Angular Basics
- Angular - Environment setup
- Angular - First Application
- Angular - MVC Architecture
- Angular Components
- Angular - Components
- Angular - Component Lifecycle
- Angular - View Encapsulation
- Angular - Emulated Encapsulation
- Angular - ShadowDom Encapsulation
- Angular - Component Interaction
- Angular - Using @Input Decorator
- Angular - Using @Output Decorator
- Angular - Using Local Variable
- Angular - Using @ViewChild Decorator
- Angular - Using Services
- Angular - Component Styles
- Angular - Nested Components
- Angular - Content projection
- Angular - Single-slot Content Projection
- Angular - Multi-slot Content Projection
- Angular - Conditional Content Projection
- Angular - Dynamic components
- Angular - Using NgComponentOutlet
- Angular - Using ViewContainerRef
- Angular - Elements
- Angular Templates
- Angular - Templates
- Angular - Template statements
- Angular - Template Variables
- Angular - SVG as Templates
- Angular Binding
- Angular - Data Binding
- Angular - Interpolation
- Angular - Event Binding
- Angular - Property Binding
- Angular - Attribute Binding
- Angular - Class Binding
- Angular - Style Binding
- Angular - Two-way Binding
- Angular Directives
- Angular - Directives
- Angular - Attribute Directives
- Angular - Structural Directives
- Angular - Custom Directives
- Angular Pipes
- Angular - Pipes
- Angular - Built-in Pipes
- Angular - Custom Pipes
- Angular Forms
- Angular - Forms
- Angular - Template Driven Forms
- Angular - Reactive Forms
- Angular - Form Validation
- Angular - Dynamic Forms
- Angular Dependency Injection
- Angular - Dependency Injection
- Angular - Injectable Service
- Angular Routing
- Angular - Routing
- Angular - Dynamic Routes
- Angular - Wildcard Routes
- Angular - Nested Routes
- Angular - Navigation
- Angular - Routing in SPA
- Angular - Custom Route Matches
- Angular - Router Reference
- Angular HTTP Client programming
- Angular - Services
- Angular - HTTP Client
- Angular - Express based REST API
- Angular - Request
- Angular - Request Response Workflow
- Angular - Response
- Angular - Express based Upload API
- Angular - GET
- Angular - POST
- Angular - PUT
- Angular - DELETE
- Angular - JSONP
- Angular - CRUD Operations Using HTTP
- Angular Modules
- Angular - Introduction to Modules
- Angular - Root Module
- Angular - Feature Module
- Angular - Sharing Module
- Angular - Routing Module
- Angular - NgModules
- Angular Animation
- Angular - Animations
- Angular Service Workers & PWA
- Angular - Service Workers & PWA
- Angular Testing
- Angular - Testing Overview
- Angular Design Patterns
- Angular - Design Patterns
- Angular - Lazy Loading
- Angular - Singleton Pattern
- Angular - Observer Pattern
- Angular Libraries
- Angular - Libraries
- Angular - Angular Material
- Angular - PrimeNG
- Angular - RxJS
- Angular Advanced
- Angular - Signals
- Angular - Authentication & Authorization
- Angular - Internationalization
- Angular - Standalone Component
- Angular - Accessibility
- Angular - Web Workers
- Angular - Server Side Rendering
- Angular - Ivy Compiler
- Angular - Building with Bazel
- Angular - Backward Compatibility
- Angular - Reactive Programming
- Angular Tools
- Angular - CLI
- Angular Material UI Elements
- Angular - Paginator
- Angular - Datepicker
- Angular - Select Drop-down
- Angular Miscellaneous
- Angular - Third Party Controls
- Angular - Configuration
- Angular - Displaying Data
- Angular - Decorators & Metadata
- Angular - Basic Example
- Angular - Error Handling
- Angular - Testing & Building a Project
- Angular - Lifecycle Hooks
- Angular - User Input
- Angular - What's New?
- Angular Useful Resources
- Angular - Quick Guide
- Angular - Useful Resources
- Angular - Discussion
Angular - Sharing Modules
This chapter will discuss the Sharing Module in Angular, including how to create and use it in an Angular project, along with its advantages.
Sharing Module in Angular
In Angular, the Sharing Module is a custom module created by the developer based on the application's requirements. The developer can easily access its components, directives, pipes, etc.
Initially, a module is not considered a shared module until it is properly exported and imported into other modules where its components and dependencies are required.
Why use a Sharing Module?
The sharing module provides developers with reusable code that can be used across the entire Angular project, rather than recreating them in each module.
For example, if we need a header and footer for our project, instead of creating them in each component, we can create a shared module and place these components within that module. Then, we can use them across the entire application.
Creating Sharing Module
Creating a sharing module allows you to organize and simplify your code, by reducing the redundancy of repeating the same things within the same project.
Use the following command to create a module in your Angular application, and this module will be used as a shared module in the application. We import and export this module within the other module where it's component are needed.
Step 1: Open the project
Open your application in any code editor (such as VS code).
Step 2: Navigate to the Application Directory
Open the code editor terminal and navigate to your application directory as follows:
cd your_application_directory

e.g.
cd myapp
Step 3: Create a new module (i.e., consider it a sharing module) named Shared as follows:
ng generate module shared
Once the above command is executed successfully, you should be able to see the shared folder. Within this folder, there will be a file named shared.module.ts with a default code:
import { NgModule } from '@angular/core';
import { RouterModule, Routes } from '@angular/router';

const routes: Routes = [];

@NgModule({
  imports: [RouterModule.forRoot(routes)],
  exports: [RouterModule]
})
export class AppRoutingModule { }
How to Use Sharing Module?
To use the Sharing Module in our Angular application, the first step is to import it into our root module, which is named AppModule in our application.
Step 1: Open the app.module.ts file and import the shared module as follows:
import { NgModule } from '@angular/core';
import { BrowserModule, provideClientHydration } from '@angular/platform-browser';

import { AppRoutingModule } from './app-routing.module';
import { AppComponent } from './app.component';
import { SharedModule } from './shared/shared.module';

@NgModule({
  declarations: [
    AppComponent
  ],
  imports: [
    BrowserModule,
    AppRoutingModule,
    SharedModule
  ],
  providers: [
    provideClientHydration()
  ],
  bootstrap: [AppComponent]
})
export class AppModule { }
We have already created a sharing module in our Angular application and imported it into the AppModule (i.e., root module). Now, let's create two components within the Shared Module to use throughout the entire application.
Step 2: Create a Header Component
Create a new component, Header within the shared module as follows:
ng generate component shared/header
Step 3: Open the header.component.ts file and place the below code:
<h2>This his Header</h2>
<p>A component from Shared Module</p>
Step 4: Create another component, Footer.
Create one more component, Footer within the shared module as follows:
ng generate component shared/footer
Step 5: Open the footer.component.ts file and place the below code:
<h2>This his Footer</h2>
<p>A component from Shared Module</p>
Step 6: Update the Shared Module
To use the "components" of the Shared Module outside of this module, you need to export the Header and Footer components in the shared.module.ts file as follows:
import { NgModule } from '@angular/core';
import { CommonModule } from '@angular/common';
import { HeaderComponent } from './header/header.component';
import { FooterComponent } from './footer/footer.component';

@NgModule({
  declarations: [
    HeaderComponent,
    FooterComponent
  ],
  imports: [
    CommonModule
  ],
  exports: [HeaderComponent, FooterComponent]
})
export class SharedModule { }
Step 7: Update AppComponent
Open the app.component.html and place the code below:
<app-header></app-header>
<hr>
<p>This is the loaded area</p>
<hr>
<app-footer></app-footer>
Step 8: Run the application using the following command:
ng serve
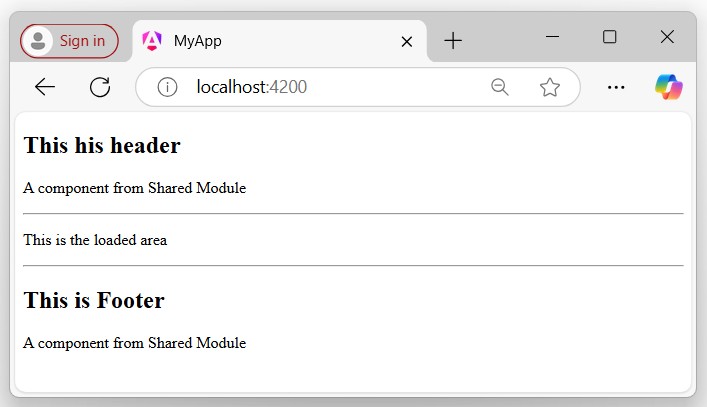
Step 9: Open your friendly browser (chrome) and navigate to localhost:4200:
Advantages of Sharing Module
The following is a list of the advantages of the Sharing Modules:
- It increases application performance by using "reusable" components, directives, etc.
- Organizes the application, streamlining the code.
- Increases application modularity.
- Decreases redundancy.
Conclusion
In conclusion, observing the above output should provide you with a complete understanding of how the Sharing Modules operates. By sharing this module, we can use its "components", "directives", and "pipes" across the entire application rather than creating them multiple times within the same application.