- Angular Tutorial
- Angular - Home
- Angular - Overview
- Angular - Features
- Angular - Advantages & Disadvantages
- Angular Basics
- Angular - Environment setup
- Angular - First Application
- Angular - MVC Architecture
- Angular Components
- Angular - Components
- Angular - Component Lifecycle
- Angular - View Encapsulation
- Angular - Emulated Encapsulation
- Angular - ShadowDom Encapsulation
- Angular - Component Interaction
- Angular - Using @Input Decorator
- Angular - Using @Output Decorator
- Angular - Using Local Variable
- Angular - Using @ViewChild Decorator
- Angular - Using Services
- Angular - Component Styles
- Angular - Nested Components
- Angular - Content projection
- Angular - Single-slot Content Projection
- Angular - Multi-slot Content Projection
- Angular - Conditional Content Projection
- Angular - Dynamic components
- Angular - Using NgComponentOutlet
- Angular - Using ViewContainerRef
- Angular - Elements
- Angular Templates
- Angular - Templates
- Angular - Template statements
- Angular - Template Variables
- Angular - SVG as Templates
- Angular Binding
- Angular - Data Binding
- Angular - Interpolation
- Angular - Event Binding
- Angular - Property Binding
- Angular - Attribute Binding
- Angular - Class Binding
- Angular - Style Binding
- Angular - Two-way Binding
- Angular Directives
- Angular - Directives
- Angular - Attribute Directives
- Angular - Structural Directives
- Angular - Custom Directives
- Angular Pipes
- Angular - Pipes
- Angular - Built-in Pipes
- Angular - Custom Pipes
- Angular Forms
- Angular - Forms
- Angular - Template Driven Forms
- Angular - Reactive Forms
- Angular - Form Validation
- Angular - Dynamic Forms
- Angular Dependency Injection
- Angular - Dependency Injection
- Angular - Injectable Service
- Angular Routing
- Angular - Routing
- Angular - Dynamic Routes
- Angular - Wildcard Routes
- Angular - Nested Routes
- Angular - Navigation
- Angular - Routing in SPA
- Angular - Custom Route Matches
- Angular - Router Reference
- Angular HTTP Client programming
- Angular - Services
- Angular - HTTP Client
- Angular - Express based REST API
- Angular - Request
- Angular - Request Response Workflow
- Angular - Response
- Angular - Express based Upload API
- Angular - GET
- Angular - POST
- Angular - PUT
- Angular - DELETE
- Angular - JSONP
- Angular - CRUD Operations Using HTTP
- Angular Modules
- Angular - Introduction to Modules
- Angular - Root Module
- Angular - Feature Module
- Angular - Sharing Module
- Angular - Routing Module
- Angular - NgModules
- Angular Animation
- Angular - Animations
- Angular Service Workers & PWA
- Angular - Service Workers & PWA
- Angular Testing
- Angular - Testing Overview
- Angular Design Patterns
- Angular - Design Patterns
- Angular - Lazy Loading
- Angular - Singleton Pattern
- Angular - Observer Pattern
- Angular Libraries
- Angular - Libraries
- Angular - Angular Material
- Angular - PrimeNG
- Angular - RxJS
- Angular Advanced
- Angular - Signals
- Angular - Authentication & Authorization
- Angular - Internationalization
- Angular - Standalone Component
- Angular - Accessibility
- Angular - Web Workers
- Angular - Server Side Rendering
- Angular - Ivy Compiler
- Angular - Building with Bazel
- Angular - Backward Compatibility
- Angular - Reactive Programming
- Angular Tools
- Angular - CLI
- Angular Material UI Elements
- Angular - Paginator
- Angular - Datepicker
- Angular - Select Drop-down
- Angular Miscellaneous
- Angular - Third Party Controls
- Angular - Configuration
- Angular - Displaying Data
- Angular - Decorators & Metadata
- Angular - Basic Example
- Angular - Error Handling
- Angular - Testing & Building a Project
- Angular - Lifecycle Hooks
- Angular - User Input
- Angular - What's New?
- Angular Useful Resources
- Angular - Quick Guide
- Angular - Useful Resources
- Angular - Discussion
Angular - RouterLink
This chapter will discuss RouterLink, including an introduction, its advantages, working examples with different scenarios, etc.
What is Angular RouterLink?
In Angular, the RouterLink is a directive that is used to create a link that initiates the navigation to a specific route (path) within your application.
Mostly, the RouterLink directive is used inside the <a> element to define its navigation behavior. When applied, it converts the HTML anchor tag into a dynamic link that navigates to a specified route within your Angular application. This allows for client-side routing without refreshing the main page.
Note! A directive in Angular adds behaviors to the DOM elements; it can handle their appearance, add new data, hide data, and more. Learn more
Syntax
To define a RouterLink directive inside an anchor element (<a>), use the following syntax:
<a routerLink="/path">Link Name</a>
Here,
- /path: The route to which you want to navigate.
- Link name: The text that will be displayed as the link.
If you want to pass parameter to a route using routerLink, you can include them in the routerLink array.
<a [routerLink]="['/path', parameter]">Link Name</a>
In this syntax, ['/path', parameter] is the array where '/path' is the route path and the parameter is the value. The parameter value can be dynamically set from your component.
You can also pass multiple parameters like this:
<a [routerLink]="['/path', param1, 'param2']">Link Name</a>
Note! These two syntaxes are mostly used when you want to, view, update, or delete specific or individual data.
Basic Example
Following is the basic example of the RouterLink directive in Angular −
<p>Angular RouterLink Directive Example</p>
<a routerLink="/home">Home</a>
When the user clicks the Home link, it will redirect them to the "HomeComponent". However, we need to define the routes for that in app.routes.ts as follows:
import { Routes } from '@angular/router';
import { HomeComponent } from './home/home.component';

export const routes: Routes = [
    { path: 'home', component: HomeComponent }
];
The above route configuration will redirect users to the "HomeComponent" when they navigate to the /home URL.
Relative link paths
The first segment in the relative path links can be '/', './', and '../'. Let's discuss them one by one:
- If the first segment begins with only with / forward slash, the router looks up the route (path) from the root of the application.
- If the first segment begins with ./, or doesn't begin with a slash, the router looks in the children of the current activated route.
- If the first segment begins with ../, the router goes up one level in the route tree.
Use RouterLink for Navigation
In the application's current state, the entire page reloads when you click on an internal link that is available within the app.
While this may not be recognized as significant with a small application, this can have performance implications for larger pages with more content or data where users have to redownload assets and run calculations again.
Example
We will create a "navigation bar" in Angular with "2-3 links" and use the routerLink (with and without params) directive inside the <a> tag to initiate navigation when users click on the links. Let's see the steps:
Step 1: Import the RouterLink directive
Open the app.component.ts add the RouterLink directive import to the existing import statement from the @angular/router and add it to the imports array of your @component decorator:
import { Component } from '@angular/core';
import { CommonModule } from '@angular/common';
import { RouterLink, RouterOutlet } from '@angular/router';

@Component({
  selector: 'app-root',
  standalone: true,
  imports: [CommonModule, RouterLink, RouterOutlet],
  templateUrl: './app.component.html',
  styleUrl: './app.component.css'
})
export class AppComponent {
  title = 'myApp';
}
Step 2: Create a Navigation Bar with RouterLink
In the app.component.html, create a navigation bar with four links as follows:
<nav>
  <ul>
    <li>
      <a routerLink="/home">Home</a>
      <a routerLink="/about">About</a>
      <a routerLink="/contactus">ContactUs</a>
	  <a [routerLink]="['/view/', 3]">View id 3 data</a>
    </li>
    <li><input type="text" placeholder="Search..."></li>
  </ul>
</nav>
<router-outlet></router-outlet>
Note! Rather than setting static parameters, you can set them dynamically:
let demoData = [{id: 1},{id: 2},{id: 3}];
<ul *ngFor="let data from demoData">
<li><a [routerLink]="['/view/', data.id]">View</a></li>
</ul>
Step 3: Style Navigation Bar
In the app.component.css, write CSS properties to style the navigation bar:
nav{
    width: 70%;
    margin: auto;
    background-color: green;
    color: white;
    padding: 10px;
    border-radius: 10px;
    font-family: sans-serif;
}
nav ul{
    list-style: none;
    justify-content: space-between;
    display: flex;
    flex-wrap: wrap;
}
nav ul li a{
    text-decoration: none;
    color: white;
    margin: 0px 20px;
}
nav ul li a:hover{
    border-bottom: 2px solid white;
}
nav ul li input{
    padding: 8px;
    position: relative;
    width: 200px;
    border: none;
    border-radius: 5px;
    margin: 10px 0px;
    display: flex;
}
Step 4: Define routes for RouterLink
In the app.routes.ts, define the routes for routerLink, home, about, contactus, and view/:id:
import { Routes } from '@angular/router';
import { HomeComponent } from './home/home.component';
import { AboutComponent } from './about/about.component';
import { ContactUsComponent } from './contact-us/contact-us.component';
import { ViewComponent } from './view/view.component';

export const routes: Routes = [
    {path: 'home', component: HomeComponent},
    {path: 'about', component: AboutComponent},
    {path: 'contactus', component: ContactUsComponent},
    {path: 'view/:id', component: ViewComponent}
];
Hint! Create four components, Home, About, ContactUs, and View, using the ng generate component component_name command.
Step 5: Run the application using the following command and navigate tolocalhost:4200URL to see the output on the browser:
ng serve
The following is the output:
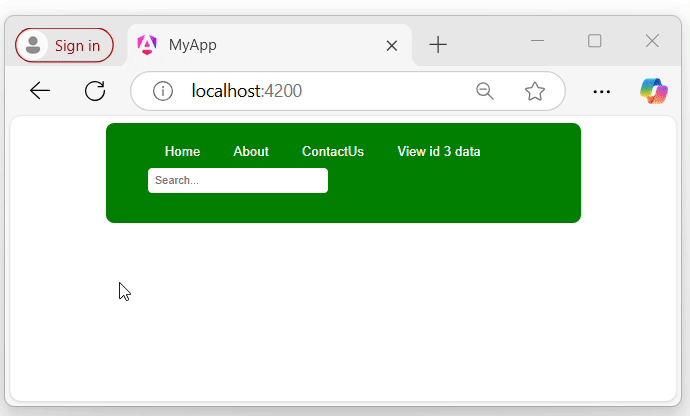
In the above GIF, you can see that we are navigating through different components within the application without the main page reloading when clicking on the links.
Advantages of the RouterLink
Below is a list of some advantages of the RouterLink directive:
- Easy navigation: It allows you to redirect from one page to another "without reloading" the whole website (SPA).
- Supports parameters in URL: This allows you to pass dynamic values (such as IDs) as part of the URL when navigating between pages.
- Improved user Experience: It makes the app more faster since only parts of the page are changed.
- Supports Lazy Loading: You can load parts of the app only when needed, saving time, resources, and enhances the application performance.
