- Angular Tutorial
- Angular - Home
- Angular - Overview
- Angular - Features
- Angular - Advantages & Disadvantages
- Angular Basics
- Angular - Environment setup
- Angular - First Application
- Angular - MVC Architecture
- Angular Components
- Angular - Components
- Angular - Component Lifecycle
- Angular - View Encapsulation
- Angular - Emulated Encapsulation
- Angular - ShadowDom Encapsulation
- Angular - Component Interaction
- Angular - Using @Input Decorator
- Angular - Using @Output Decorator
- Angular - Using Local Variable
- Angular - Using @ViewChild Decorator
- Angular - Using Services
- Angular - Component Styles
- Angular - Nested Components
- Angular - Content projection
- Angular - Single-slot Content Projection
- Angular - Multi-slot Content Projection
- Angular - Conditional Content Projection
- Angular - Dynamic components
- Angular - Using NgComponentOutlet
- Angular - Using ViewContainerRef
- Angular - Elements
- Angular Templates
- Angular - Templates
- Angular - Template statements
- Angular - Template Variables
- Angular - SVG as Templates
- Angular Binding
- Angular - Data Binding
- Angular - Interpolation
- Angular - Event Binding
- Angular - Property Binding
- Angular - Attribute Binding
- Angular - Class Binding
- Angular - Style Binding
- Angular - Two-way Binding
- Angular Directives
- Angular - Directives
- Angular - Attribute Directives
- Angular - Structural Directives
- Angular - Custom Directives
- Angular Pipes
- Angular - Pipes
- Angular - Built-in Pipes
- Angular - Custom Pipes
- Angular Forms
- Angular - Forms
- Angular - Template Driven Forms
- Angular - Reactive Forms
- Angular - Form Validation
- Angular - Dynamic Forms
- Angular Dependency Injection
- Angular - Dependency Injection
- Angular - Injectable Service
- Angular Routing
- Angular - Routing
- Angular - Dynamic Routes
- Angular - Wildcard Routes
- Angular - Nested Routes
- Angular - Navigation
- Angular - Routing in SPA
- Angular - Custom Route Matches
- Angular - Router Reference
- Angular HTTP Client programming
- Angular - Services
- Angular - HTTP Client
- Angular - Express based REST API
- Angular - Request
- Angular - Request Response Workflow
- Angular - Response
- Angular - Express based Upload API
- Angular - GET
- Angular - POST
- Angular - PUT
- Angular - DELETE
- Angular - JSONP
- Angular - CRUD Operations Using HTTP
- Angular Modules
- Angular - Introduction to Modules
- Angular - Root Module
- Angular - Feature Module
- Angular - Sharing Module
- Angular - Routing Module
- Angular - NgModules
- Angular Animation
- Angular - Animations
- Angular Service Workers & PWA
- Angular - Service Workers & PWA
- Angular Testing
- Angular - Testing Overview
- Angular Design Patterns
- Angular - Design Patterns
- Angular - Lazy Loading
- Angular - Singleton Pattern
- Angular - Observer Pattern
- Angular Libraries
- Angular - Libraries
- Angular - Angular Material
- Angular - PrimeNG
- Angular - RxJS
- Angular Advanced
- Angular - Signals
- Angular - Authentication & Authorization
- Angular - Internationalization
- Angular - Standalone Component
- Angular - Accessibility
- Angular - Web Workers
- Angular - Server Side Rendering
- Angular - Ivy Compiler
- Angular - Building with Bazel
- Angular - Backward Compatibility
- Angular - Reactive Programming
- Angular Tools
- Angular - CLI
- Angular Material UI Elements
- Angular - Paginator
- Angular - Datepicker
- Angular - Select Drop-down
- Angular Miscellaneous
- Angular - Third Party Controls
- Angular - Configuration
- Angular - Displaying Data
- Angular - Decorators & Metadata
- Angular - Basic Example
- Angular - Error Handling
- Angular - Testing & Building a Project
- Angular - Lifecycle Hooks
- Angular - User Input
- Angular - What's New?
- Angular Useful Resources
- Angular - Quick Guide
- Angular - Useful Resources
- Angular - Discussion
Angular - Built-in Directives
Angular provides have many built-in directives. The built-in directive can be categorized into two type −
- Attribute directive
- Structural directive
Some of the important directives are as follows −
- NgModel
- NgClass
- NgStyle
- NgNonBindable
- NgIf
- NgFor
- NgSwitch, NgSwitchCase and NgSwitchDefault
Let us learn how to use builtin directive in this chapter.
NgModel
NgModel is used to enable two-way data binding for HTML form elements. It is based on property and event binding. It is provided by a separate module, FormsModule. A simple example to do two way binding of a user object with name property is as follows −
<input type="text" [(ngModel)]="user.name" />
Whenever user change the input field, the updated user name will be reflected to the user.name variable in the component. Similarlly, if the components variable, user.name gets changed, the input fields value will be updated as well.
Let us create a simple registration form to understand NgModel directive. Our registration form will have three input field as shown below and a button to submit the registraion form.
- Username
- Password
- Confirm password
Step1: Create a new application, my-app using angular CLI as shown below −
ng new my-app
Step2: Create a new registration form component, RegisterForm using angular CLI as shown below −
ng generate component RegisterForm
Step3: Open the registration form components template and a user with username, password and confirm password.
<div>
   <form method="post">
      <div class="container">
         <label for="username"><b>Username</b></label>
         <input type="text" name="username" required>

         <label for="password"><b>Password</b></label>
         <input type="password" name="password" required>

         <label for="confirm_password"><b>Confirm Password</b></label>
         <input type="password" name="confirm_password" required>

         <button type="submit">Register</button>
      </div>
   </form>
</div>
Step4: Open the registration form components style and style the form using CSS as shown below −
.container {
   padding: 15px;
}

input[type=text], input[type=password] {
   width: 100%;
   padding: 10px 20px;
   margin: 10px 0;
   display: inline-block;
   border: 1px solid #ccc;
   box-sizing: border-box;
}

button {
   background-color: blue;
   color: white;
   padding: 15px 20px;
   margin: 10px 0;
   border: none;
   cursor: pointer;
   width: 100%;
}
Step5: Include our registration form component in the app template file, app.component.html
<app-register-form />
Step6: Run the application and test the registration form
Step7: Next, import the FormsModule in application module file, app.module.ts
import { NgModule } from '@angular/core';
import { BrowserModule } from '@angular/platform-browser';
import { FormsModule } from '@angular/forms'

import { AppComponent } from './app.component';
import { RegisterFormComponent } from './register-form/register-form.component';

@NgModule({
   declarations: [
      AppComponent,
      RegisterFormComponent
   ],
   imports: [
      BrowserModule,
      FormsModule
   ],
   providers: [],
   bootstrap: [AppComponent]
})
export class AppModule { }
Step8: Next, let us add an object, user with Username, password and confirmPassword properties. user object will have empty string initially. Once the user enter the data, it will get populated through NgModel directive.
user: any = {
   username: '',
   password: '',
   confirmPassword: ''
}
Step9: Assign the above declared components member variable to NgModel directive of username, password and confirm password input as shown below −
<input type="text" name="username" [(ngModel)]="user.username" required>

<input type="password" name="password" [(ngModel)]="user.password" required>

<input type="password" name="confirm_password" [(ngModel)]="user.confirmPassword" required>
Here,
ngModel sets the value from user object to HTML input element. It set the user entered value to the user object in the reverse direction as well.
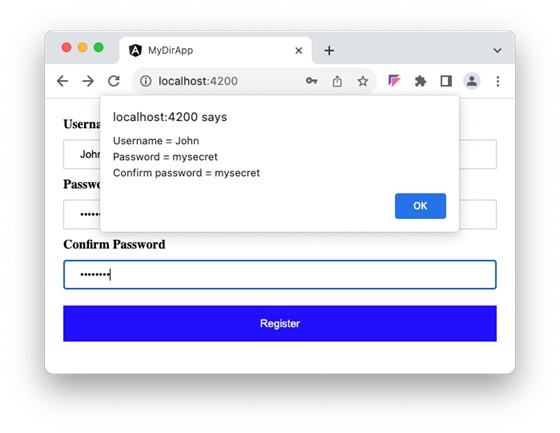
Step10: Create a new member method, showInfo in the component class. The purpose of the method is to collect the current user information and show it through alert() method.
showInfo(e: Event) {
   e.preventDefault();
   let info: string = '';
   info += 'Username = ' + this.user.username;
   info += '\nPassword = ' + this.user.password;
   info += '\nConfirm password = ' + this.user.confirmPassword;
   alert(info)
}
Here,
preventDefault() method of event object will prevent the default action of submit button.
alert() method will show the message to the user.
Step11: Assign the showInfo method to click event of the button using event binding.
<button type="submit" (click)="showInfo($event)">Register</button>
Step12: The complete listing of the component is as follows −
import { Component } from '@angular/core';

@Component({
   selector: 'app-register-form',
   templateUrl: './register-form.component.html',
   styleUrls: ['./register-form.component.css']
})
export class RegisterFormComponent {
   user: any = {
      username: '',
      password: '',
      confirmPassword: ''
   }

   showInfo(e: Event) {
      e.preventDefault();
      let info: string = '';
      info += 'Username = ' + this.user.username;
      info += '\nPassword = ' + this.user.password;
      info += '\nConfirm password = ' + this.user.confirmPassword;
      alert(info)
   }
}
Step13: The complete listing of the components template is as follows −
<div>
   <form method="post">
      <div class="container">
         <label for="username"><b>Username</b></label>
         <input type="text" name="username" [(ngModel)]="user.username" required>

         <label for="password"><b>Password</b></label>
         <input type="password" name="password" [(ngModel)]="user.password" required>

         <label for="confirm_password"><b>Confirm Password</b></label>
         <input type="password" name="confirm_password" [(ngModel)]="user.confirmPassword" required>

         <button type="submit" (click)="showInfo($event)">Register</button>
      </div>
   </form>
</div>
Step14: Next, run the application, fill the form and click the register button. It will collect the information through ngModel binding and show it through alert function.
NgStyle
NgStyle is used to add or remove a set of HTML Style to the host HTML element or component.
'''html <div NgStyle="stylelist">
Here, style-list is an object of type Record<string, string>. All keys represent CSS properties with its corresponding values representing it's CSS values. An example object is as follows −
classlist: Record<string, boolean> = {
   'color': 'red',
   'text-decoration': 'underline',
   'font-size': '12px'
}
Let us extend our registration form component to support validation and use ngStyle to highlight required field.
Step1: Add new member variable, inputStyle in the component.
inputStyle: Record<string, string> = {
   'border-color': '#ccc'
}
Step2: Update the showInfo() method to include validation logic and update the inputStyle object.
NgClass
NgClass is used to add or remove a set of classes to the host HTML element or component.
```html <div NgClass=classlist>
Here, classlist is an object of type Record<string, boolean>. All key having truth value will be set as class for the host element. An example object is as follows −
classlist: Record<string, boolean> = {
   'c1': true,
   'c2': false,
   'c3': true
}
NgNonBindable
NgNonBindable is used to prevent the processing of angular template for a piece of text. Just enclose the text with a HTML element with ngNonBindable attribute. It will just emit the template as received without processing the template expression, template statement, directives and components.
```html
<!-- any angular expression / directive / component -->
Hi, angular don't evaluate me and it can have any angular expression such
as {{ 1 + 1 }}, {{ name | uppercase }}. I can have any component as well.
<mycomp input="Hello" />
It will used to showcase the angular code in an angular appliation itself without getting affected by template processing.
NgIf
Angular tempalte does not has conditional logic. The conditional logic is done using NgIf directive. It either add / remove the host HTML element / component to the DOM layout based on the condition (template expression) it accepts as value.
<div *ngIf="canShow">
   <!-- content -->
</div>
if canShow is true, then inner content will be shown. Otherwise, the content will not be added to the DOM layout.
NgFor
Angular template does not have looping logic as well. To compensate the absence of looping logic, Angular provides NgFor directive to loop over an array of item and show it as a list, gallary, rows, etc.,
<ul *ngFor="let item of items">
   <li>{{ item }}</li>
</ul>
It will generate n item in unoredered list, where n refers the number of item available in the items array.
NgSwitch, NgSwitchCase and NgSwitchDefault
Angular template does not have switch statement as well. To compensate the absence of switching logic, Angular provides NgSwitch and its related directive to select any one of the item in a collection (of items).
<div [ngSwitch]="role">
   <div *ngSwitchCase="'admin'">
      Hi, I have access to admin items
   </div>
   <div *ngSwitchCase="'user'">
      Hi, I have access to user items only
   </div>
   <div *ngSwitchDefault>
      Hi, I have access to guest items only. Please login to access more
      items
   </div>
</div>
Here, any one of the section will be show based on the type of user.