- VB.Net Basic Tutorial
- VB.Net - Home
- VB.Net - Overview
- VB.Net - Environment Setup
- VB.Net - Program Structure
- VB.Net - Basic Syntax
- VB.Net - Data Types
- VB.Net - Variables
- VB.Net - Constants
- VB.Net - Modifiers
- VB.Net - Statements
- VB.Net - Directives
- VB.Net - Operators
- VB.Net - Decision Making
- VB.Net - Loops
- VB.Net - Strings
- VB.Net - Date & Time
- VB.Net - Arrays
- VB.Net - Collections
- VB.Net - Functions
- VB.Net - Subs
- VB.Net - Classes & Objects
- VB.Net - Exception Handling
- VB.Net - File Handling
- VB.Net - Basic Controls
- VB.Net - Dialog Boxes
- VB.Net - Advanced Forms
- VB.Net - Event Handling
- VB.Net Advanced Tutorial
- VB.Net - Regular Expressions
- VB.Net - Database Access
- VB.Net - Excel Sheet
- VB.Net - Send Email
- VB.Net - XML Processing
- VB.Net - Web Programming
- VB.Net Useful Resources
- VB.Net - Quick Guide
- VB.Net - Useful Resources
- VB.Net - Discussion
VB.Net - Advanced Form
In this chapter, let us study the following concepts −
Adding menus and sub menus in an application
Adding the cut, copy and paste functionalities in a form
Anchoring and docking controls in a form
Modal forms
Adding Menus and Sub Menus in an Application
Traditionally, the Menu, MainMenu, ContextMenu, and MenuItem classes were used for adding menus, sub-menus and context menus in a Windows application.
Now, the MenuStrip, the ToolStripMenuItem, ToolStripDropDown and ToolStripDropDownMenu controls replace and add functionality to the Menu-related controls of previous versions. However, the old control classes are retained for both backward compatibility and future use.
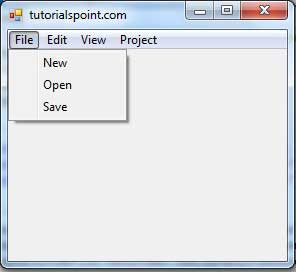
Let us create a typical windows main menu bar and sub menus using the old version controls first since these controls are still much used in old applications.
Following is an example, which shows how we create a menu bar with menu items: File, Edit, View and Project. The File menu has the sub menus New, Open and Save.
Let's double click on the Form and put the following code in the opened window.
Public Class Form1
   Private Sub Form1_Load(sender As Object, e As EventArgs) Handles MyBase.Load
      'defining the main menu bar
      Dim mnuBar As New MainMenu()
      'defining the menu items for the main menu bar
      Dim myMenuItemFile As New MenuItem("&File")
      Dim myMenuItemEdit As New MenuItem("&Edit")
      Dim myMenuItemView As New MenuItem("&View")
      Dim myMenuItemProject As New MenuItem("&Project")

      'adding the menu items to the main menu bar
      mnuBar.MenuItems.Add(myMenuItemFile)
      mnuBar.MenuItems.Add(myMenuItemEdit)
      mnuBar.MenuItems.Add(myMenuItemView)
      mnuBar.MenuItems.Add(myMenuItemProject)

     ' defining some sub menus
      Dim myMenuItemNew As New MenuItem("&New")
      Dim myMenuItemOpen As New MenuItem("&Open")
      Dim myMenuItemSave As New MenuItem("&Save")

      'add sub menus to the File menu
      myMenuItemFile.MenuItems.Add(myMenuItemNew)
      myMenuItemFile.MenuItems.Add(myMenuItemOpen)
      myMenuItemFile.MenuItems.Add(myMenuItemSave)

      'add the main menu to the form
      Me.Menu = mnuBar

      ' Set the caption bar text of the form.
      Me.Text = "tutorialspoint.com"
   End Sub
End Class
When the above code is executed and run using Start button available at the Microsoft Visual Studio tool bar, it will show the following window −
Windows Forms contain a rich set of classes for creating your own custom menus with modern appearance, look and feel. The MenuStrip, ToolStripMenuItem, ContextMenuStrip controls are used to create menu bars and context menus efficiently.
Click the following links to check their details −
| Sr.No. | Control & Description |
|---|---|
| 1 |
It provides a menu system for a form. |
| 2 |
It represents a selectable option displayed on a MenuStrip or ContextMenuStrip. The ToolStripMenuItem control replaces and adds functionality to the MenuItem control of previous versions. |
| 3 |
It represents a shortcut menu. |
Adding the Cut, Copy and Paste Functionalities in a Form
The methods exposed by the ClipBoard class are used for adding the cut, copy and paste functionalities in an application. The ClipBoard class provides methods to place data on and retrieve data from the system Clipboard.
It has the following commonly used methods −
| Sr.No. | Method Name & Description |
|---|---|
| 1 |
Clear Removes all data from the Clipboard. |
| 2 |
ContainsData Indicates whether there is data on the Clipboard that is in the specified format or can be converted to that format. |
| 3 |
ContainsImage Indicates whether there is data on the Clipboard that is in the Bitmap format or can be converted to that format. |
| 4 |
ContainsText Indicates whether there is data on the Clipboard in the Text or UnicodeText format, depending on the operating system. |
| 5 |
GetData Retrieves data from the Clipboard in the specified format. |
| 6 |
GetDataObject Retrieves the data that is currently on the system Clipboard. |
| 7 |
GetImage Retrieves an image from the Clipboard. |
| 8 |
GetText Retrieves text data from the Clipboard in the Text or UnicodeText format, depending on the operating system. |
| 9 |
GetText(TextDataFormat) Retrieves text data from the Clipboard in the format indicated by the specified TextDataFormat value. |
| 10 |
SetData Clears the Clipboard and then adds data in the specified format. |
| 11 |
SetText(String) Clears the Clipboard and then adds text data in the Text or UnicodeText format, depending on the operating system. |
Following is an example, which shows how we cut, copy and paste data using methods of the Clipboard class. Take the following steps −
Add a rich text box control and three button controls on the form.
Change the text property of the buttons to Cut, Copy and Paste, respectively.
Double click on the buttons to add the following code in the code editor −
Public Class Form1
   Private Sub Form1_Load(sender As Object, e As EventArgs) _
    Handles MyBase.Load
      ' Set the caption bar text of the form.
      Me.Text = "tutorialspoint.com"
   End Sub

   Private Sub Button1_Click(sender As Object, e As EventArgs) _
      Handles Button1.Click
      Clipboard.SetDataObject(RichTextBox1.SelectedText)
      RichTextBox1.SelectedText = ""
   End Sub

   Private Sub Button2_Click(sender As Object, e As EventArgs) _
       Handles Button2.Click
      Clipboard.SetDataObject(RichTextBox1.SelectedText)
   End Sub

   Private Sub Button3_Click(sender As Object, e As EventArgs) _
    Handles Button3.Click
      Dim iData As IDataObject
      iData = Clipboard.GetDataObject()
      If (iData.GetDataPresent(DataFormats.Text)) Then
         RichTextBox1.SelectedText = iData.GetData(DataFormats.Text)
      Else
         RichTextBox1.SelectedText = " "
      End If
   End Sub
End Class
When the above code is executed and run using Start button available at the Microsoft Visual Studio tool bar, it will show the following window −
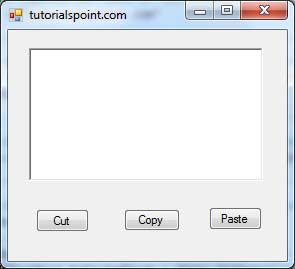
Enter some text and check how the buttons work.
Anchoring and Docking Controls in a Form
Anchoring allows you to set an anchor position for a control to the edges of its container control, for example, the form. The Anchor property of the Control class allows you to set values of this property. The Anchor property gets or sets the edges of the container to which a control is bound and determines how a control is resized with its parent.
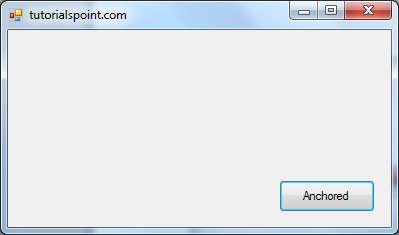
When you anchor a control to a form, the control maintains its distance from the edges of the form and its anchored position, when the form is resized.
You can set the Anchor property values of a control from the Properties window −
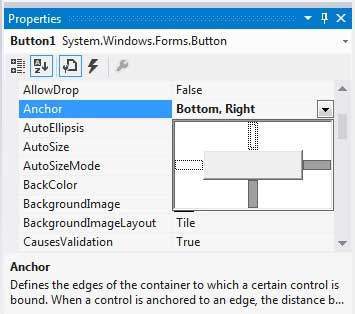
For example, let us add a Button control on a form and set its anchor property to Bottom, Right. Run this form to see the original position of the Button control with respect to the form.
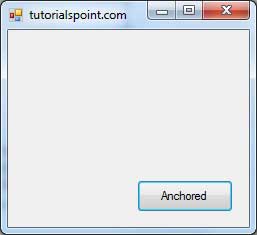
Now, when you stretch the form, the distance between the Button and the bottom right corner of the form remains same.
Docking of a control means docking it to one of the edges of its container. In docking, the control fills certain area of the container completely.
The Dock property of the Control class does this. The Dock property gets or sets which control borders are docked to its parent control and determines how a control is resized with its parent.
You can set the Dock property values of a control from the Properties window −
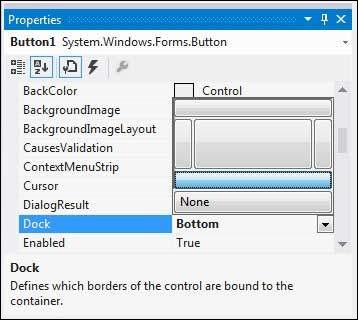
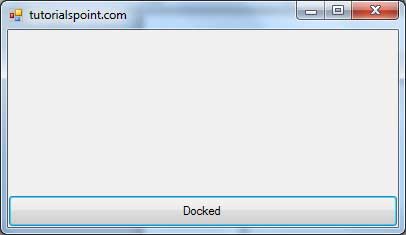
For example, let us add a Button control on a form and set its Dock property to Bottom. Run this form to see the original position of the Button control with respect to the form.
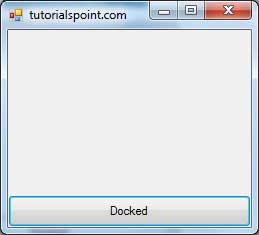
Now, when you stretch the form, the Button resizes itself with the form.
Modal Forms
Modal Forms are those forms that need to be closed or hidden before you can continue working with the rest of the application. All dialog boxes are modal forms. A MessageBox is also a modal form.
You can call a modal form by two ways −
Calling the ShowDialog method
Calling the Show method
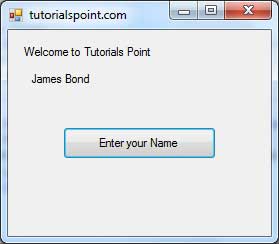
Let us take up an example in which we will create a modal form, a dialog box. Take the following steps −
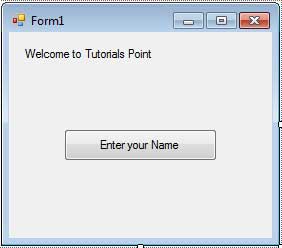
Add a form, Form1 to your application, and add two labels and a button control to Form1
Change the text properties of the first label and the button to 'Welcome to Tutorials Point' and 'Enter your Name', respectively. Keep the text properties of the second label as blank.
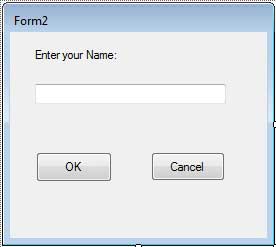
Add a new Windows Form, Form2, and add two buttons, one label, and a text box to Form2.
Change the text properties of the buttons to OK and Cancel, respectively. Change the text properties of the label to 'Enter your name:'.
Set the FormBorderStyle property of Form2 to FixedDialog, for giving it a dialog box border.
Set the ControlBox property of Form2 to False.
Set the ShowInTaskbar property of Form2 to False.
Set the DialogResult property of the OK button to OK and the Cancel button to Cancel.
Add the following code snippets in the Form2_Load method of Form2 −
Private Sub Form2_Load(sender As Object, e As EventArgs) _
   Handles MyBase.Load
   AcceptButton = Button1
   CancelButton = Button2
End Sub
Add the following code snippets in the Button1_Click method of Form1 −
Private Sub Button1_Click(sender As Object, e As EventArgs) _
   Handles Button1.Click
   Dim frmSecond As Form2 = New Form2()

   If frmSecond.ShowDialog() = DialogResult.OK Then
      Label2.Text = frmSecond.TextBox1.Text
   End If
End Sub
When the above code is executed and run using Start button available at the Microsoft Visual Studio tool bar, it will show the following window −
Clicking on the 'Enter your Name' button displays the second form −

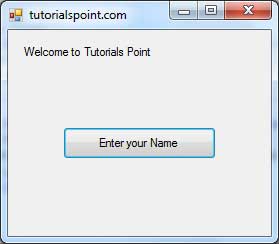
Clicking on the OK button takes the control and information back from the modal form to the previous form −