- Struts 2 Tutorial
- Struts2 - Home
- Struts2 - Basic MVC Architecture
- Struts2 - Overview
- Struts2 - Environment Setup
- Struts2 - Architecture
- Struts2 - Examples
- Struts2 - Configuration
- Struts2 - Actions
- Struts2 - Interceptors
- Struts2 - Result Types
- Struts2 - Value Stack/OGNL
- Struts2 - File Uploads
- Struts2 - Database Access
- Struts2 - Sending Email
- Struts2 - Validations
- Struts2 - Localization
- Struts2 - Type Conversion
- Struts2 - Themes/Templates
- Struts2 - Exception Handling
- Struts2 - Annotations
- Struts 2 Integrations
- Struts2 - Spring
- Struts2 - Tiles
- Struts2 - Hibernate
- Struts 2 Useful Resources
- Struts2 - Questions and Answers
- Struts2 - Quick Guide
- Struts2 - Useful Resources
- Struts2 - Discussion
Struts 2 - Themes & Templates
Before starting actual tutorial for this chapter, let us look into few definition as given by https://struts.apache.org−
| Sr.No | Term & Description |
|---|---|
| 1 | TAG A small piece of code executed from within JSP, FreeMarker, or Velocity. |
| 2 | TEMPLATE A bit of code, usually written in FreeMarker, that can be rendered by certain tags (HTML tags). |
| 3 | THEME A collection of templates packaged together to provide common functionality. |
I would also suggest going through the Struts2 Localization chapter because we will take same example once again to perform our excercise.
When you use a Struts 2 tag such as <s:submit...>, <s:textfield...> etc in your web page, the Struts 2 framework generates HTML code with a preconfigured style and layout. Struts 2 comes with three built-in themes −
| Sr.No | Theme & Description |
|---|---|
| 1 | SIMPLE theme A minimal theme with no "bells and whistles". For example, the textfield tag renders the HTML <input/> tag without a label, validation, error reporting, or any other formatting or functionality. |
| 2 | XHTML theme This is the default theme used by Struts 2 and provides all the basics that the simple theme provides and adds several features like standard two-column table layout for the HTML, Labels for each of the HTML, Validation and error reporting etc. |
| 3 | CSS_XHTML theme This theme provides all the basics that the simple theme provides and adds several features like standard two-column CSS-based layout, using <div> for the HTML Struts Tags, Labels for each of the HTML Struts Tags, placed according to the CSS stylesheet. |
As mentioned above, if you don’t specify a theme, then Struts 2 will use the xhtml theme by default. For example, this Struts 2 select tag −
<s:textfield name = "name" label = "Name" />
generates following HTML markup −
<tr>

   <td class="tdLabel">
      <label for = "empinfo_name" class="label">Name:</label>
   </td>
   <td>
      <input type = "text" name = "name" value = "" id = "empinfo_name"/>
   </td>

</tr>
Here empinfo is the action name defined in struts.xml file.
Selecting Themes
You can specify the theme on as per Struts 2, tag basis or you can use one of the following methods to specify what theme Struts 2 should use −
The theme attribute on the specific tag
The theme attribute on a tag's surrounding form tag
The page-scoped attribute named "theme"
The request-scoped attribute named "theme"
The session-scoped attribute named "theme"
The application-scoped attribute named "theme"
The struts.ui.theme property in struts.properties (defaults to xhtml)
Following is the syntax to specify them at tag level if you are willing to use different themes for different tags −
<s:textfield name = "name" label = "Name" theme="xhtml"/>
Because it is not very much practical to use themes on per tag basis, so simply we can specify the rule in struts.properties file using the following tags −
# Standard UI theme
struts.ui.theme = xhtml
# Directory where theme template resides
struts.ui.templateDir = template
# Sets the default template type. Either ftl, vm, or jsp
struts.ui.templateSuffix = ftl
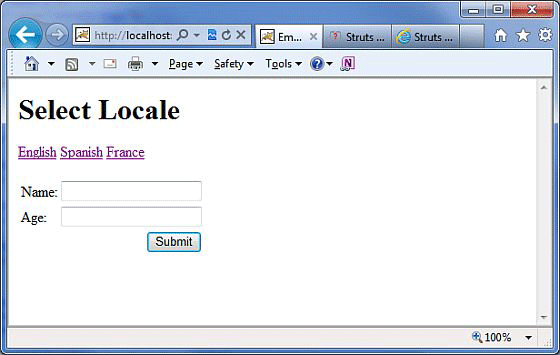
Following is the result we picked up from localization chapter where we used the default theme with a setting struts.ui.theme = xhtml in struts-default.properties file which comes by default in struts2-core.xy.z.jar file.
How a Theme Works?
For a given theme, every struts tag has an associated template like s:textfield → text.ftl and s:password → password.ftl etc.
These template files come zipped in struts2-core.xy.z.jar file. These template files keep a pre-defined HTML layout for each tag.
In this way, Struts 2 framework generates final HTML markup code using Sturts tags and associated templates.
Struts 2 tags + Associated template file = Final HTML markup code.
Default templates are written in FreeMarker and they have an extension .ftl.
You can also design your templates using velocity or JSP and accordingly set the configuration in struts.properties using struts.ui.templateSuffix and struts.ui.templateDir.
Creating New Themes
The simplest way to create a new theme is to copy any of the existing theme/template files and do required modifications.
Let us start with creating a folder called template in WebContent/WEBINF/classes and a sub-folder with the name of our new theme. For example, WebContent/WEB-INF/classes/template/mytheme.
From here, you can start building templates from scratch, or you can also copy the templates from the Struts2 distribution where you can modify them as required in future.
We are going to modify existing default template xhtml for learning purpose. Now, let us copy the content from struts2-core-x.y.z.jar/template/xhtml to our theme directory and modify only WebContent/WEBINF/classes/template/mytheme/control.ftl file. When we open control.ftl which will have the following lines −
<table class="${parameters.cssClass?default('wwFormTable')?html}"<#rt/>
<#if parameters.cssStyle??> style="${parameters.cssStyle?html}"<#rt/>
</#if>
>
Let us change above file control.ftl to have the following content −
<table style = "border:1px solid black;">
If you will check form.ftl then you will find that control.ftl is used in this file, but form.ftl is referring this file from xhtml theme. So let us change it as follows −
<#include "/${parameters.templateDir}/xhtml/form-validate.ftl" />
<#include "/${parameters.templateDir}/simple/form-common.ftl" />
<#if (parameters.validate?default(false))>
   onreset = "${parameters.onreset?default('clearErrorMessages(this);\
   clearErrorLabels(this);')}"

<#else>
   <#if parameters.onreset??>
      onreset="${parameters.onreset?html}"
   </#if>
</#if>
#include "/${parameters.templateDir}/mytheme/control.ftl" />
I assume that, you would not have much understanding of the FreeMarker template language, still you can get a good idea of what is to be done by looking at the .ftl files.
However, let us save above changes, and go back to our localization example and create the WebContent/WEB-INF/classes/struts.properties file with the following content
# Customized them
struts.ui.theme = mytheme
# Directory where theme template resides
struts.ui.templateDir = template
# Sets the template type to ftl.
struts.ui.templateSuffix = ftl
Now after this change, right click on the project name and click Export > WAR File to create a War file. Then deploy this WAR in the Tomcat's webapps directory. Finally, start Tomcat server and try to access URL http://localhost:8080/HelloWorldStruts2. This will produce the following screen −
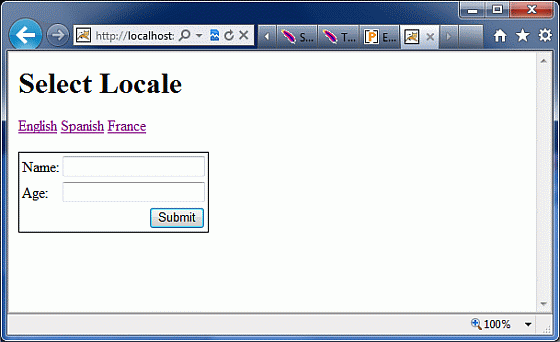
You can see a border around the form component which is a result of the change we did in out theme after copying it from xhtml theme. If you put little effort in learning FreeMarker, then you will be able to create or modify your themes very easily.
I hope that now you have a basic understanding on Sturts 2 themes and templates, isn't it?