- Struts 2 Tutorial
- Struts2 - Home
- Struts2 - Basic MVC Architecture
- Struts2 - Overview
- Struts2 - Environment Setup
- Struts2 - Architecture
- Struts2 - Examples
- Struts2 - Configuration
- Struts2 - Actions
- Struts2 - Interceptors
- Struts2 - Result Types
- Struts2 - Value Stack/OGNL
- Struts2 - File Uploads
- Struts2 - Database Access
- Struts2 - Sending Email
- Struts2 - Validations
- Struts2 - Localization
- Struts2 - Type Conversion
- Struts2 - Themes/Templates
- Struts2 - Exception Handling
- Struts2 - Annotations
- Struts 2 Integrations
- Struts2 - Spring
- Struts2 - Tiles
- Struts2 - Hibernate
- Struts 2 Useful Resources
- Struts2 - Questions and Answers
- Struts2 - Quick Guide
- Struts2 - Useful Resources
- Struts2 - Discussion
Struts 2 - Annotations
As mentioned previously, Struts provides two forms of configuration. The traditional way is to use the struts.xml file for all the configurations. We have seen so many examples of that in the tutorial so far. The other way of configuring Struts is by using the Java 5 Annotations feature. Using the struts annotations, we can achieve Zero Configuration.
To start using annotations in your project, make sure you have included the following jar files in your WebContent/WEB-INF/lib folder −
- struts2-convention-plugin-x.y.z.jar
- asm-x.y.jar
- antlr-x.y.z.jar
- commons-fileupload-x.y.z.jar
- commons-io-x.y.z.jar
- commons-lang-x.y.jar
- commons-logging-x.y.z.jar
- commons-logging-api-x.y.jar
- freemarker-x.y.z.jar
- javassist-.xy.z.GA
- ognl-x.y.z.jar
- struts2-core-x.y.z.jar
- xwork-core.x.y.z.jar
Now, let us see how you can do away with the configuration available in the struts.xml file and replace it with annotaions.
To explain the concept of Annotation in Struts2, we would have to reconsider our validation example explained in Struts2 Validations chapter.
Here, we shall take an example of an Employee whose name, age would be captured using a simple page, and we will put two validations to make sure that ÜSER always enters a name and age should be in between 28 and 65.
Let us start with the main JSP page of the example.
Create Main Page
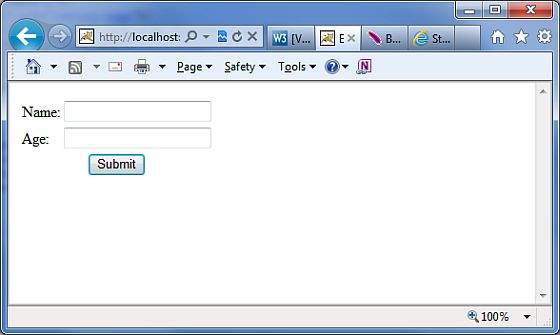
Let us write main page JSP file index.jsp, which is used to collect Employee related information mentioned above.
<%@ page language = "java" contentType = "text/html; charset = ISO-8859-1"
   pageEncoding = "ISO-8859-1"%>
<%@ taglib prefix = "s" uri = "/struts-tags"%>
<!DOCTYPE html PUBLIC "-//W3C//DTD HTML 4.01 Transitional//EN"
   "http://www.w3.org/TR/html4/loose.dtd">

<html>
   <head>
      <title>Employee Form</title>
   </head>

   <body>

      <s:form action = "empinfo" method = "post">
         <s:textfield name = "name" label = "Name" size = "20" />
         <s:textfield name = "age" label = "Age" size = "20" />
         <s:submit name = "submit" label = "Submit" align="center" />
      </s:form>

   </body>
</html>
The index.jsp makes use of Struts tag, which we have not covered yet but we will study them in tags related chapters. But for now, just assume that the s:textfield tag prints a input field, and the s:submit prints a submit button. We have used label property for each tag which creates label for each tag.
Create Views
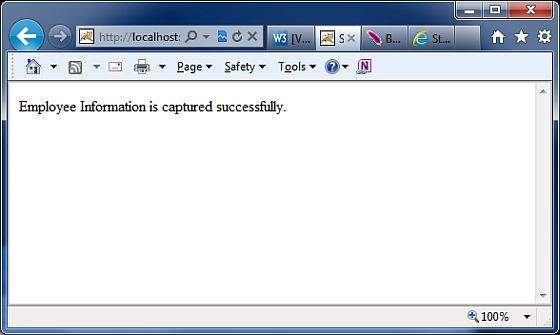
We will use JSP file success.jsp which will be invoked in case the defined action returns SUCCESS.
<%@ page language = "java" contentType = "text/html; charset = ISO-8859-1"
	pageEncoding = "ISO-8859-1"%>
<%@ taglib prefix = "s" uri = "/struts-tags"%>
<!DOCTYPE html PUBLIC "-//W3C//DTD HTML 4.01 Transitional//EN"
   "http://www.w3.org/TR/html4/loose.dtd">

<html>
   <head>
      <title>Success</title>
   </head>

   <body>
      Employee Information is captured successfully.
   </body>
</html>
Create Action
This is the place where annotation is used. Let us re-define action class Employee with annotation, and then add a method called validate () as shown below in Employee.java file. Make sure that your action class extends the ActionSupport class, otherwise your validate method will not be executed.
package com.tutorialspoint.struts2;
import com.opensymphony.xwork2.ActionSupport;
import org.apache.struts2.convention.annotation.Action;
import org.apache.struts2.convention.annotation.Result;
import org.apache.struts2.convention.annotation.Results;
import com.opensymphony.xwork2.validator.annotations.*;
@Results({
@Result(name = "success", Location = "/success.jsp"),
@Result(name = "input", Location = "/index.jsp")
})
public class Employee extends ActionSupport {
private String name;
private int age;
@Action(value = "/empinfo")
public String execute() {
return SUCCESS;
}
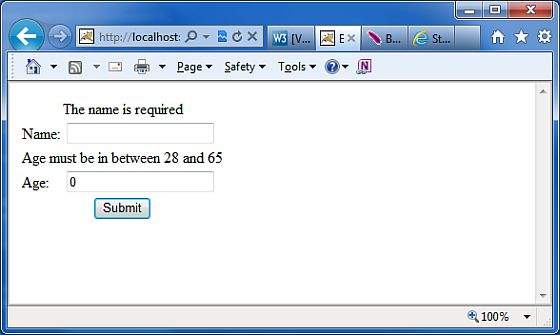
@RequiredFieldValidator( message = "The name is required" )
public String getName() {
return name;
}
public void setName(String name) {
this.name = name;
}
@IntRangeFieldValidator(message = "Age must be in between 28 and 65", min = "29", max = "65")
public int getAge() {
return age;
}
public void setAge(int age) {
this.age = age;
}
}
We have used few annotations in this example. Let me go through them one by one −
First, we have included the Results annotation. A Results annotation is a collection of results.
Under the results annotation, we have two result annotations. The result annotations have the name that correspond to the outcome of the execute method. They also contain a location as to which view should be served corresponding to return value from execute()
The next annotation is the Action annotation. This is used to decorate the execute() method. The Action method also takes in a value which is the URL on which the action is invoked.
Finally, I have used two validation annotations. I have configured the required field validator on name field and the integer range validator on the age field. I have also specified a custom message for the validations.
Configuration Files
We really do not need struts.xml configuration file, so let us remove this file and let us check the content of web.xml file −
<?xml version = "1.0" Encoding = "UTF-8"?>
<web-app xmlns:xsi = "http://www.w3.org/2001/XMLSchema-instance"
   xmlns = "http://java.sun.com/xml/ns/javaee"
   xmlns:web = "http://java.sun.com/xml/ns/javaee/web-app_2_5.xsd"
   xsi:schemaLocation = "http://java.sun.com/xml/ns/javaee
   http://java.sun.com/xml/ns/javaee/web-app_3_0.xsd"
   id = "WebApp_ID" version = "3.0">

   <display-name>Struts 2</display-name>

   <welcome-file-list>
      <welcome-file>index.jsp</welcome-file>
   </welcome-file-list>

   <filter>
      <filter-name>struts2</filter-name>

      <filter-class>
         org.apache.struts2.dispatcher.FilterDispatcher
      </filter-class>

      <init-param>
         <param-name>struts.devMode</param-name>
         <param-value>true</param-value>
      </init-param>
   </filter>

   <filter-mapping>
      <filter-name>struts2</filter-name>
      <url-pattern>/*</url-pattern>
   </filter-mapping>
</web-app>
Now, right click on the project name and click Export > WAR File to create a War file. Then deploy this WAR in the Tomcat's webapps directory. Finally, start Tomcat server and try to access URL http://localhost:8080/HelloWorldStruts2/index.jsp. This will produce the following screen −
Now do not enter any required information, just click on Submit button. You will see the following result −
Enter the required information but enter a wrong From field, let us say name as "test" and age as 30, and finally click on Submit button. You will see the following result −
Struts 2 Annotations Types
Struts 2 applications can use Java 5 annotations as an alternative to XML and Java properties configuration. You can check the list of most important annotations related to different categories −