- Struts 2 Tutorial
- Struts2 - Home
- Struts2 - Basic MVC Architecture
- Struts2 - Overview
- Struts2 - Environment Setup
- Struts2 - Architecture
- Struts2 - Examples
- Struts2 - Configuration
- Struts2 - Actions
- Struts2 - Interceptors
- Struts2 - Result Types
- Struts2 - Value Stack/OGNL
- Struts2 - File Uploads
- Struts2 - Database Access
- Struts2 - Sending Email
- Struts2 - Validations
- Struts2 - Localization
- Struts2 - Type Conversion
- Struts2 - Themes/Templates
- Struts2 - Exception Handling
- Struts2 - Annotations
- Struts 2 Integrations
- Struts2 - Spring
- Struts2 - Tiles
- Struts2 - Hibernate
- Struts 2 Useful Resources
- Struts2 - Questions and Answers
- Struts2 - Quick Guide
- Struts2 - Useful Resources
- Struts2 - Discussion
Struts 2 - Hello World Example
As you have already learnt from the Struts 2 architecture, when you click on a hyperlink or submit an HTML form in a Struts 2 web-application, the input is collected by the Controller which is sent to a Java class called Actions. After the Action is executed, a result selects a resource to render the response. The resource is generally a JSP, but it can also be a PDF file, an Excel spreadsheet, or a Java applet window.
Assuming that you already have built your development environment. Now, let us proceed for building our first Hello World Struts2 project. The aim of this project is to build a web application that collects the user's name and displays "Hello World" followed by the user name.
We would have to create following four components for any Struts 2 project −
| Sr.No | Components & Description |
|---|---|
| 1 | Action Create an action class which will contain complete business logic and control the interaction between the user, the model, and the view. |
| 2 | Interceptors Create interceptors if required, or use existing interceptors. This is part of Controller. |
| 3 | View Create a JSPs to interact with the user to take input and to present the final messages. |
| 4 | Configuration Files Create configuration files to couple the Action, View and Controllers. These files are struts.xml, web.xml, struts.properties. |
I am going to use Eclipse IDE, so that all the required components will be created under a Dynamic Web Project. Let us now start with creating Dynamic Web Project.
Create a Dynamic Web Project
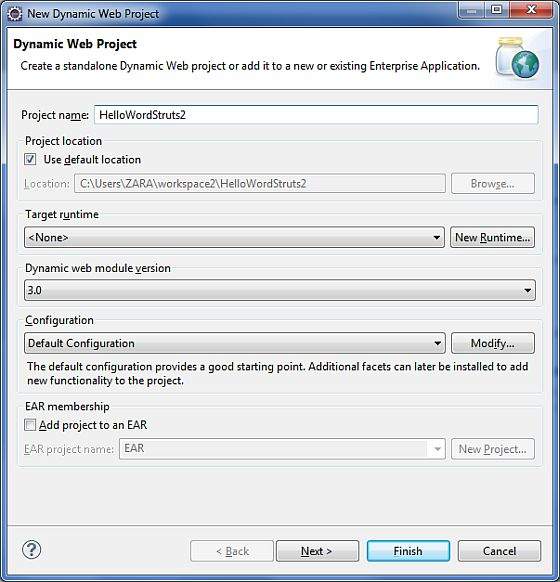
Start your Eclipse and then go with File > New > Dynamic Web Project and enter project name as HelloWorldStruts2 and set rest of the options as given in the following screen −
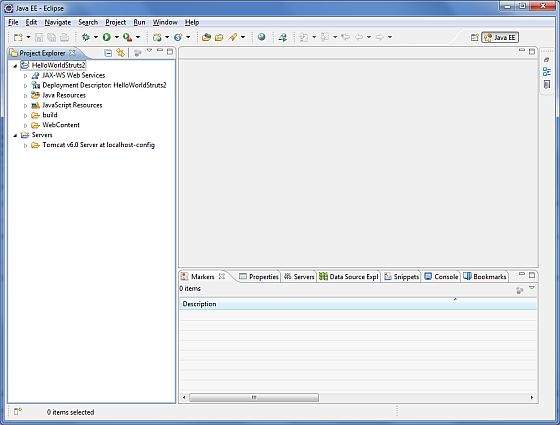
Select all the default options in the next screens and finally check Generate Web.xml deployment descriptor option. This will create a dynamic web project for you in Eclipse. Now go with Windows > Show View > Project Explorer, and you will see your project window something as below −
Now copy following files from struts 2 lib folder C:\struts-2.2.3\lib to our project's WEB-INF\lib folder. To do this, you can simply drag and drop all the following files into WEB-INF\lib folder.
- commons-fileupload-x.y.z.jar
- commons-io-x.y.z.jar
- commons-lang-x.y.jar
- commons-logging-x.y.z.jar
- commons-logging-api-x.y.jar
- freemarker-x.y.z.jar
- javassist-.xy.z.GA
- ognl-x.y.z.jar
- struts2-core-x.y.z.jar
- xwork-core.x.y.z.jar
Create Action Class
Action class is the key to Struts 2 application and we implement most of the business logic in action class. So let us create a java file HelloWorldAction.java under Java Resources > src with a package name com.tutorialspoint.struts2 with the contents given below.
The Action class responds to a user action when user clicks a URL. One or more of the Action class's methods are executed and a String result is returned. Based on the value of the result, a specific JSP page is rendered.
package com.tutorialspoint.struts2;

public class HelloWorldAction {
   private String name;

   public String execute() throws Exception {
      return "success";
   }

   public String getName() {
      return name;
   }

   public void setName(String name) {
      this.name = name;
   }
}
This is a very simple class with one property called "name". We have standard getters and setter methods for the "name" property and an execute method that returns the string "success".
The Struts 2 framework will create an object of the HelloWorldAction class and call the executed method in response to a user's action. You put your business logic inside this method which finally returns the String constant. In other words, for each URL, you would have to implement one action class and either you can use that class name directly as your action name or you can map to some other name using struts.xml file as shown below.
Create a View
We need a JSP to present the final message, this page will be called by Struts 2 framework when a predefined action will happen and this mapping will be defined in struts.xml file. So let us create the below jsp file HelloWorld.jsp in the WebContent folder in your eclipse project. To do this, right click on the WebContent folder in the project explorer and select New >JSP File.
<%@ page contentType = "text/html; charset = UTF-8" %>
<%@ taglib prefix = "s" uri = "/struts-tags" %>

<html>
   <head>
      <title>Hello World</title>
   </head>

   <body>
      Hello World, <s:property value = "name"/>
   </body>
</html>
The taglib directive tells the Servlet container that this page will be using the Struts 2 tags and that these tags will be preceded by s.
The s:property tag displays the value of action class property "name> which is returned by the method getName() of the HelloWorldAction class.
Create Main Page
We also need to create index.jsp in the WebContent folder. This file will serve as the initial action URL where a user can click to tell the Struts 2 framework to call a defined method of the HelloWorldAction class and render the HelloWorld.jsp view.
<%@ page language = "java" contentType = "text/html; charset = ISO-8859-1"
   pageEncoding = "ISO-8859-1"%>
<%@ taglib prefix = "s" uri = "/struts-tags"%>
   <!DOCTYPE html PUBLIC "-//W3C//DTD HTML 4.01 Transitional//EN"
"http://www.w3.org/TR/html4/loose.dtd">

<html>
   <head>
      <title>Hello World</title>
   </head>

   <body>
      <h1>Hello World From Struts2</h1>
      <form action = "hello">
         <label for = "name">Please enter your name</label><br/>
         <input type = "text" name = "name"/>
         <input type = "submit" value = "Say Hello"/>
      </form>
   </body>
</html>
The hello action defined in the above view file will be mapped to the HelloWorldAction class and its execute method using struts.xml file. When a user clicks on the Submit button it will cause the Struts 2 framework to run the execute method defined in the HelloWorldAction class and based on the returned value of the method, an appropriate view will be selected and rendered as a response.
Configuration Files
We need a mapping to tie the URL, the HelloWorldAction class (Model), and the HelloWorld.jsp (the view) together. The mapping tells the Struts 2 framework which class will respond to the user's action (the URL), which method of that class will be executed, and what view to render based on the String result that method returns.
So let us create a file called struts.xml. Since Struts 2 requires struts.xml to be present in the classes folder. Hence, create struts.xml file under the WebContent/WEB-INF/classes folder. Eclipse does not create the "classes" folder by default, so you need to do this yourself. To do this, right click on the WEB-INF folder in the project explorer and select New > Folder. Your struts.xml should look like −
<?xml version = "1.0" Encoding = "UTF-8"?>
<!DOCTYPE struts PUBLIC
   "-//Apache Software Foundation//DTD Struts Configuration 2.0//EN"
   "http://struts.apache.org/dtds/struts-2.0.dtd">

<struts>
   <constant name = "struts.devMode" value = "true" />

   <package name = "helloworld" extends = "struts-default">
     <action name = "hello"
         class = "com.tutorialspoint.struts2.HelloWorldAction"
         method = "execute">
         <result name = "success">/HelloWorld.jsp</result>
      </action>
   </package>
</struts>
Few words which need to be understood regarding the above configuration file. Here, we set the constant struts.devMode to true, because we are working in development environment and we need to see some useful log messages. Then, we define a package called helloworld.
Creating a package is useful when you want to group your actions together. In our example, we named our action as "hello" which is corresponding to the URL /hello.action and is backed up by theHelloWorldAction.class. The execute method of HelloWorldAction.class is the method that is run when the URL /hello.action is invoked. If the outcome of the execute method returns "success", then we take the user to HelloWorld.jsp.
Next step is to create a web.xml file which is an entry point for any request to Struts 2. The entry point of Struts2 application will be a filter defined in deployment descriptor (web.xml). Hence, we will define an entry of org.apache.struts2.dispatcher.FilterDispatcher class in web.xml. The web.xml file needs to be created under the WEB-INF folder under WebContent. Eclipse had already created a skeleton web.xml file for you when you created the project. So, lets just modify it as follows −
<?xml version = "1.0" Encoding = "UTF-8"?>
<web-app xmlns:xsi = "http://www.w3.org/2001/XMLSchema-instance"
   xmlns = "http://java.sun.com/xml/ns/javaee"
   xmlns:web = "http://java.sun.com/xml/ns/javaee/web-app_2_5.xsd"
   xsi:schemaLocation = "http://java.sun.com/xml/ns/javaee
   http://java.sun.com/xml/ns/javaee/web-app_3_0.xsd"
   id = "WebApp_ID" version = "3.0">

   <display-name>Struts 2</display-name>

   <welcome-file-list>
      <welcome-file>index.jsp</welcome-file>
   </welcome-file-list>

   <filter>
      <filter-name>struts2</filter-name>
      <filter-class>
         org.apache.struts2.dispatcher.FilterDispatcher
      </filter-class>
   </filter>

   <filter-mapping>
      <filter-name>struts2</filter-name>
      <url-pattern>/*</url-pattern>
   </filter-mapping>
</web-app>
We have specified index.jsp to be our welcome file. Then we have configured the Struts2 filter to run on all urls (i.e, any url that match the pattern /*)
To Enable Detailed Log
You can enable complete logging functionality while working with Struts 2 by creating logging.properties file under WEB-INF/classes folder. Keep the following two lines in your property file −
org.apache.catalina.core.ContainerBase.[Catalina].level = INFO
org.apache.catalina.core.ContainerBase.[Catalina].handlers = \
   java.util.logging.ConsoleHandler
The default logging.properties specifies a ConsoleHandler for routing logging to stdout and also a FileHandler. A handler's log level threshold can be set using SEVERE, WARNING, INFO, CONFIG, FINE, FINER, FINEST or ALL.
That's it. We are ready to run our Hello World application using Struts 2 framework.
Procedure for Executing the Application
Right click on the project name and click Export > WAR File to create a War file.
Then deploy this WAR in the Tomcat's webapps directory.
Finally, start Tomcat server and try to access URL http://localhost:8080/HelloWorldStruts2/index.jsp. This will give you following screen −
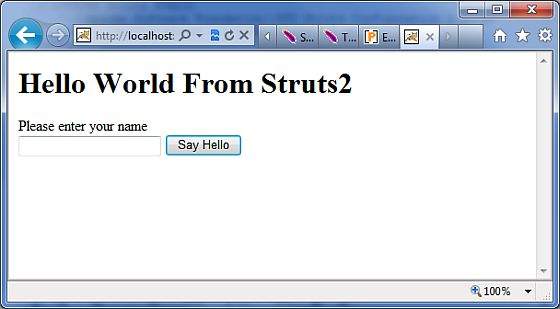
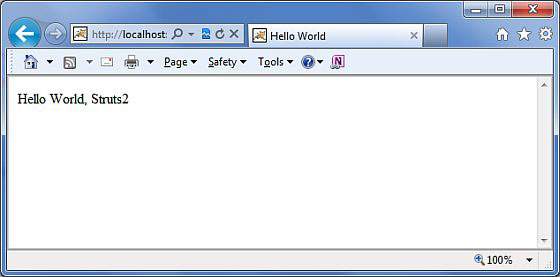
Enter a value "Struts2" and submit the page. You should see the next page
Note that you can define index as an action in struts.xml file and in that case you can call index page as http://localhost:8080/HelloWorldStruts2/index.action. Check below how you can define index as an action −
<?xml version = "1.0" Encoding = "UTF-8"?>
<!DOCTYPE struts PUBLIC
   "-//Apache Software Foundation//DTD Struts Configuration 2.0//EN"
   "http://struts.apache.org/dtds/struts-2.0.dtd">
<struts>
   <constant name = "struts.devMode" value = "true" />
   <package name = "helloworld" extends = "struts-default">

      <action name = "index">
         <result >/index.jsp</result>
      </action>

      <action name = "hello"
         class = "com.tutorialspoint.struts2.HelloWorldAction"
         method = "execute">
         <result name = "success">/HelloWorld.jsp</result>
      </action>

   </package>
</struts>