- SpecFlow Tutorial
- SpecFlow - Home
- SpecFlow - Introduction
- Test Driven Development
- Behaviour Driven Development
- SpecFlow - Visual Studio Installation
- Visual Studio Extension Installation
- SpecFlow - Project Set Up
- Other Project Dependencies
- SpecFlow - Runner Activation
- SpecFlow - HTML Reports
- SpecFlow - Binding Test Steps
- SpecFlow - Creating First Test
- Configure Selenium Webdriver
- SpecFlow - Gherkin
- SpecFlow - Gherkin Keywords
- SpecFlow - Feature File
- SpecFlow - Step Definition File
- SpecFlow - Hooks
- SpecFlow - Background Illustration
- Data Driven Testing with Examples
- Data Driven Testing without Examples
- Table conversion to Data Table
- Table conversion to Dictionary
- Table with CreateInstance
- SpecFlow - Table with CreateSet
- SpecFlow Useful Resources
- SpecFlow - Quick Guide
- SpecFlow - Useful Resources
- SpecFlow - Discussion
SpecFlow - Quick Guide
SpecFlow - Introduction
SpecFlow is an open-source test automation tool built on BDD model. It is mostly used to build automation tests for projects built in .NET. This tutorial will provide knowledge on SpecFlow and its features.
Spec-Flow is primarily developed to build, monitor, and run human-readable acceptance test cases. It is created with Gherkin, which is a plain-text language. SpecFlow has the Gherkin parser which can run over 70 languages. We can execute our tests via SpecFlow’ s in-built test runner and SpecFlow+ Runner.
Components
SpecFlow's primary task is to bind Feature files written in Gherkin. SpecFlow+ Runner is the test runner which has the execution capabilities and reports generation. This also comes without cost and we need to create a SpecFlow account for it.
SpecFlow+ LivingDoc is a group of tools that keeps the Gherkin Feature File in a readable format. This can be shared with the stakeholders in the team who are not well versed with tools like Visual Studio.
SpecFlow+ LivingDoc Generator is a group of plugins and tools for SpecFlow to produce documentation from the Gherkin Feature File. This does not require an account to be created and can be easily shared with others.
SpecFlow+ LivingDoc Azure DevOps allows output to be viewed in the Azure DevOps/TFS. Any user who has the system access can see the specifications when required. It is free but requires a SpecFlow account.
Editing Features in Visual Studio Extension
Besides, SpecFlow has the Visual Studio Extension that gives additional functionalities as described below −
Intellisense (auto-completion) for Steps and Keywords
For easy usage of SpecFlow, intellisense provides the feature to find as we type to restrict the suggestion list. Intellisense is available for Gherkin Files, its keywords and code files as well.
In the Visual Studio, click on Edit, then select Intellisense to get the various options.
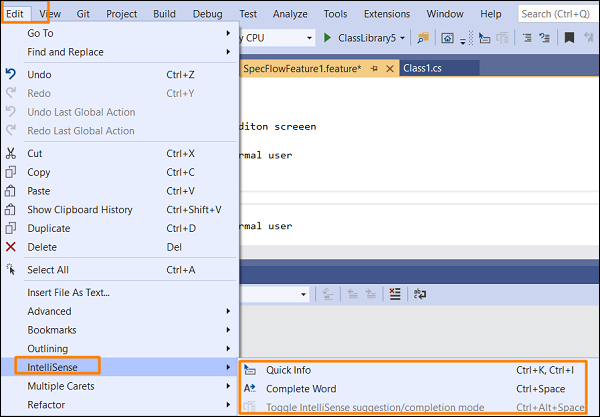
The below image shows Intellisense in the Gherkin File.

Gherkin Syntax Highlighting
To highlight the keywords, tags, comments, unbounded (purple colour) steps, bounded(black) steps, bounded steps parameter(grey italics).
Feature Files Outline and Comments
In Visual Studio, most of the items in the Edit menu can add value to the Feature files in SpecFlow. We can comment and uncomment specific lines with # character, or with in-built shortcuts like the CTRL+K CTRL+V or CTRL+K + CTRL+V.
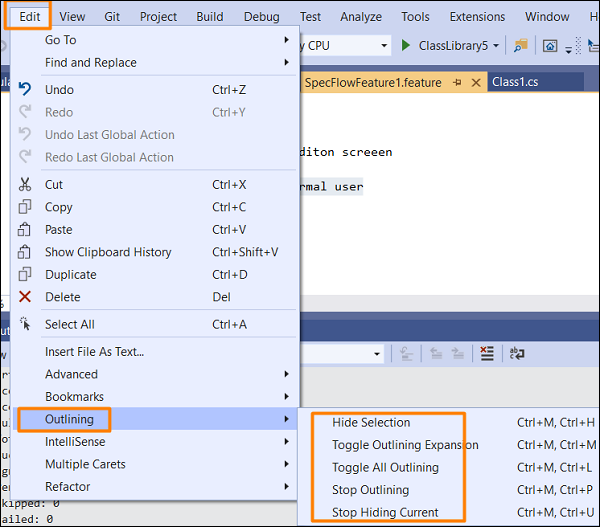
There are multiple options from the Edit menu to customize various sections of the Feature file.
Click on Edit, then select the option Outlining.
We can define our own feature file template to open when creating a new test case.
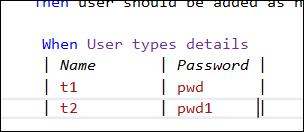
Formatting Tables
We can modify the table size and format it automatically as we type the names of the column and enter its values.
But SpecFlow is not confined to Visual Studio only, it can be used with Mono and VSCode also.
SpecFlow - Test Driven Development
A Test-Driven Development is also known as the TDD. It consists of the below steps to be followed one-by-one −
Step 1 − Create a Test.
Step 2 − Verify if the test fails.
If the test passes, create the second test.
If the test fails, then move to Step 3.
Step 3 − Fix the test to make it pass.
If the test passes, move to Step 4.
If the test fails, then jump to Step 3.
Step 4 − Start code refractor and redo all the above steps till the development is done.
Benefits of TDD
The benefits of TDD are listed below −
The developer is required to apprehend the requirements to know what the outcome of a scenario should be and how to test it.
The implementation for a module is done only if all the test cases pass and code refactoring is complete. Thus, verification and refactoring should be done prior to moving it to the next test.
After refactoring is done, the unit test suite is to run.
The unit tests can be used as a live documentation.
If a bug is found, a test is created to get the details of the bug. The script is updated, to pass the tests. Simultaneously, the other tests are also executed to ensure that existing features are not broken by the fix.
A developer can participate in design decisions and improve it anytime during the test execution stage to ensure the application is working correctly. This is done to increase the maintainability of the product.
A developer is sure of making any modifications. This is because if that affects any existing feature, it shall be reflected by executing the tests. This way bugs can be addressed quickly.
On running the tests in succession¸ all the prior bug fixes are also verified, and the similar bugs can be avoided.
Since major testing is conducted during the development phase, the test duration required prior to delivery is short.
Drawbacks of TDD
The drawbacks of TDD are listed below −
The developers find it difficult to decide when to start testing.
The developers get confused on what to test.
The developers do not know if all the requirement specifications are being covered.
The developers are unsure if their code is adding business values.
Myths Around TDD
The myths around TDD are listed below −
Myths |
Facts |
|---|---|
TDD is only concerned with testing with automation. |
TDD is a development technique following the Test First method. |
TDD does not consist of design. |
TDD has a thorough research and design depending on the requirements. The design is completed during the development phase. |
TDD is done only for unit testing. |
TDD is done for system and integration testing as well. |
TDD cannot be adopted for orthodox test projects. |
TDD is used for Agile development. But it can be adopted for conventional test projects as well. |
TDD is considered a tool. |
TDD is a development technique and post every new unit test pass, it is clubbed with the automation suite which is run whenever there is a modification in the code and post refactoring activity. |
SpecFlow - Behaviour Driven Development
Behaviour Driven Development also known as BDD has the features listed below −
Gives a shared method and tools which help to establish interaction with the developers, business analyst, and other stakeholders to work together for the product development.
Ensures that the delivered product adds the necessary business value.
Finds out the capabilities of the system and how it should be developed.
Ensures that the product is presentable and has a good structure.
Checks the functionalities of the software and ensures that the end user expectations are met.
BDD Methodologies
The primary methodologies adopted by BDD are listed below −
Specification By Example
It utilizes examples in interactions to describe the software characteristics and its business scenarios. This methodology helps to remove any knowledge gap on the business requirements among the developers, testers, product owners, business analysts and all other stakeholders in the team.
Test Driven Development
In the reference to BDD, Test Driven Development converts examples to plain text and executable specifications. The developers refer to this as a document while implementing the new features. It helps to develop a proper code base along with a regression suite. Thus, the overall maintenance cost lowers throughout the complete product lifecycle.
BDD Tool
SpecFlow is one of the BDD tools that is open source. It contains a Feature file which follows the Gherkin syntax. The source code of SpecFlow is hosted on GitHub. It is mostly used to build automation tests for projects built in .NET. It is similar to Cucumber in its functionalities.
Structure of a Feature file in SpecFlow −
It consists of the Feature, Background scenario, and two Scenarios. The Feature File consists of the acceptance standard for a Feature in the application.
SpecFlow - Visual Studio Installation
In this chapter, we shall see the process of installation of Visual Studio and project configuration.
Installation
Navigate to the link − https://www.visualstudio.com/en-us/downloads/download-visual-studio-vs.aspx
For the Community version of Visual Studio, click on Free download under the Community section.

An .exe file gets downloaded to our system. Double-click on it.

Visual Studio Installer pop-up comes up. Click on Continue. Download and installation process begins.
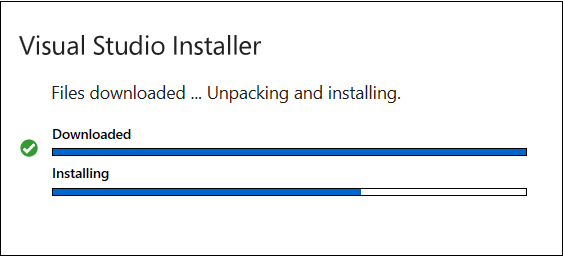
Once installation is done, select the option .NET desktop development. Then click on Install.
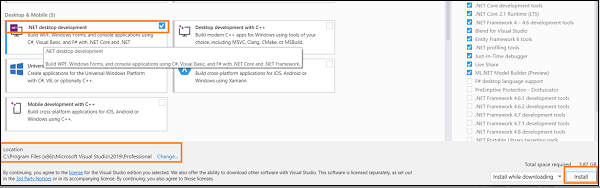
Download and installation of packages get started.
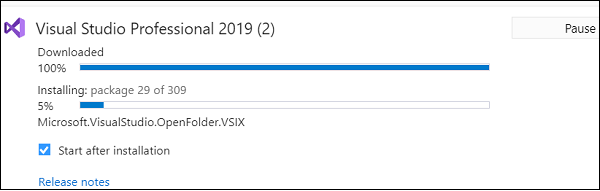
Once done, click on Restart.

From the start menu, type Visual Studio.

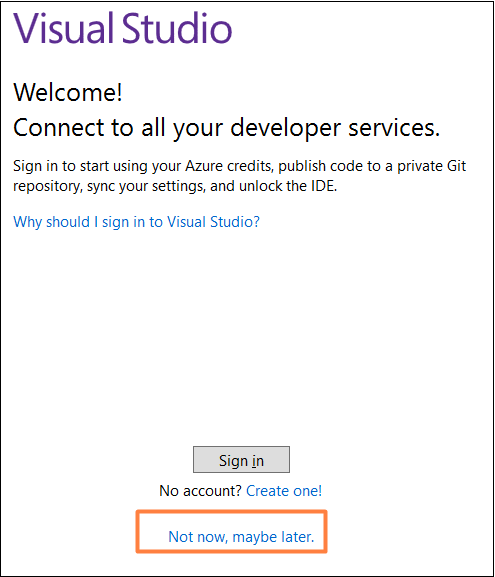
Click on Visual Studio, the welcome screen appears.

Along with it, Visual Studio pop-up appears. If you do not have an existing
account, click on Not now, may be later link and proceed.
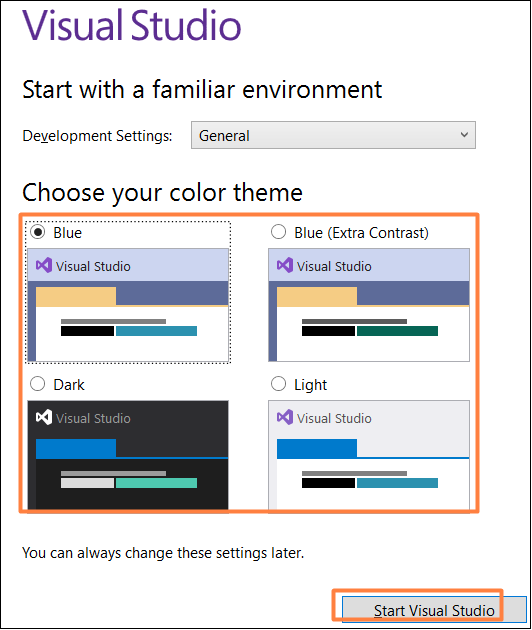
Select a colour for theme and click on Start Visual Studio.
Project Configuration
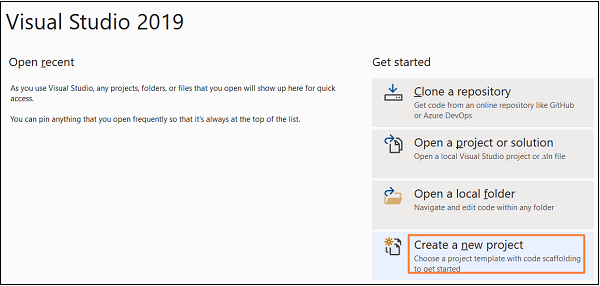
Once the Visual Studio landing page gets opened, click on Create a new project.
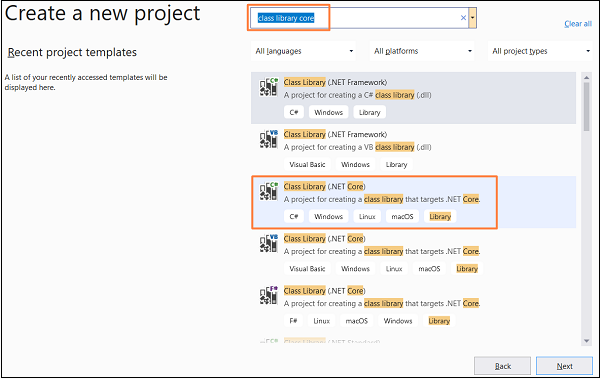
We shall create a new C# class library. Enter class library core in the search box. Choose the option Class Library (.NET Core) and click Next.
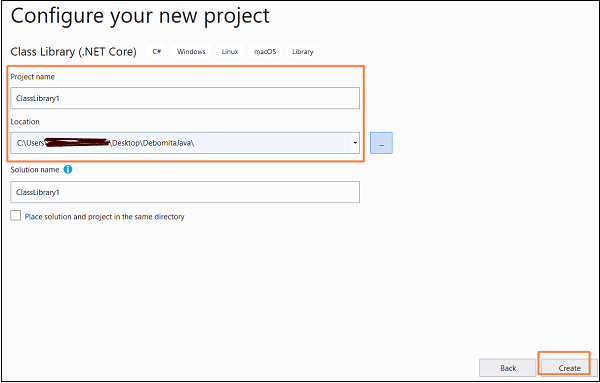
Give a project name and location and then click on Create.
Code Implementation for Project
using System;
namespace ClassLibrary2 {
   public class Class1 {
      public int Number1 { get; set; }
      public int Number2 { get; set; }
      public int Subtraction() {
         throw new NotImplementedException();
      }
   }
}
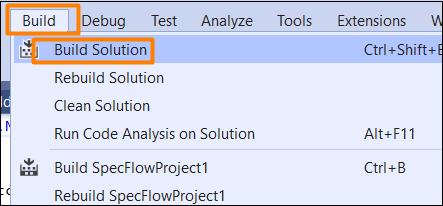
To build this solution, go to the Build menu, then select Build Solution.
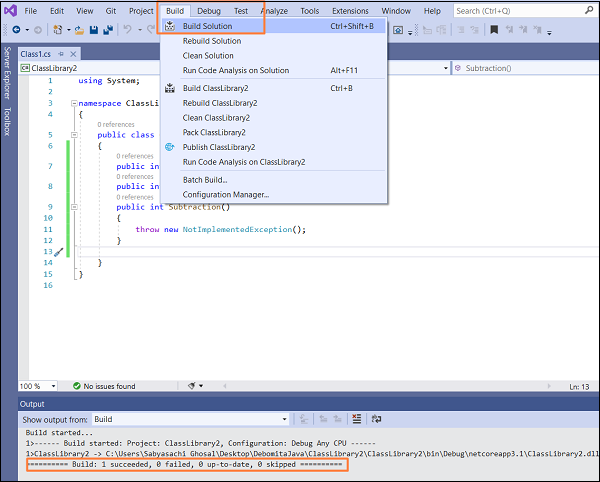
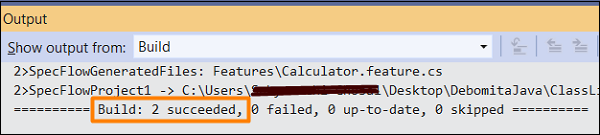
Build success message gets displayed and we have successfully created a project in Visual Studio.
SpecFlow - Visual Studio Extension Installation
As mentioned earlier, Visual Studio extension allows a lot of added features required for test automation. This extension is available for Visual Studio 2017 and 2019.
Installation
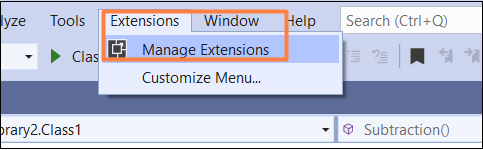
Open Visual Studio and navigate to Extensions menu, then click on Manage Extensions option.
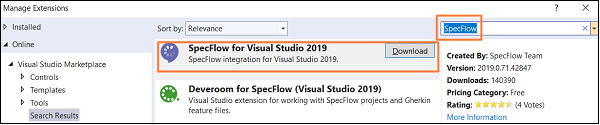
Manage Extensions pop-up comes up. Type SpecFlow in the search box. Once the search results get populated. Click on Download.
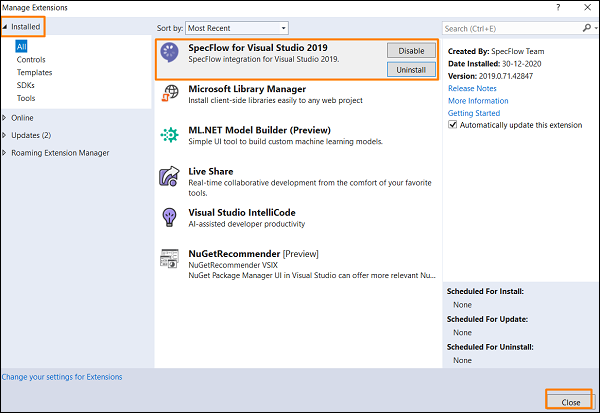
Once the download is completed, we need to restart Visual Studio. As the installation is done, if we again go to the Manage Extensions pop-up, we can find this extension within the Installed tab.
Also, we can find the options to Disable and Uninstall now for the SpecFlow. Click on Close to exit.
SpecFlow - Project Set Up
Now, we shall create a SpecFlow project within the same project we have built earlier.
Project Creation
Right-click on the Solution Explorer section. Click on the Add option. Then choose New Project.
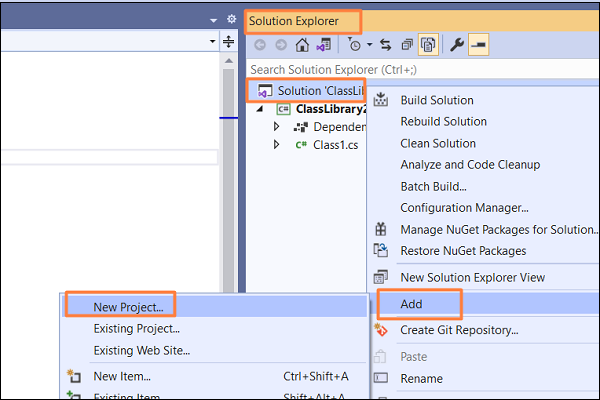
Type SpecFlow within the search box, SpecFlow Project gets displayed because of search results. Click on Next to proceed.

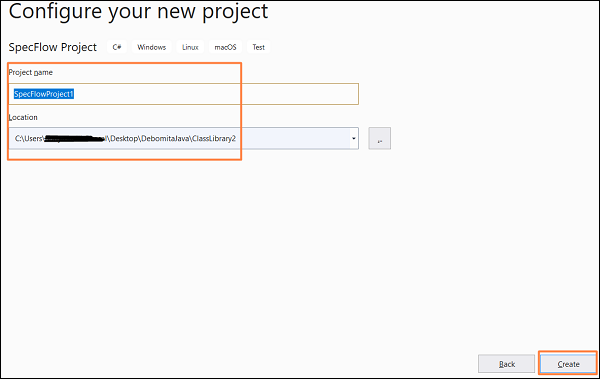
Enter the project name and location and then click on Create.
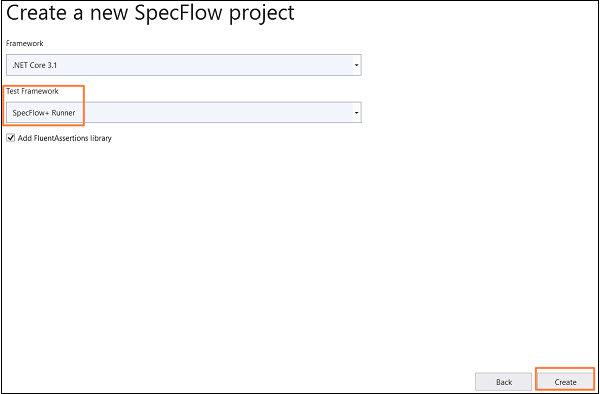
Select SpecFlow+ Runner option under the Test Framework dropdown from the Create a new SpecFlow project pop-up. Then click on Create.
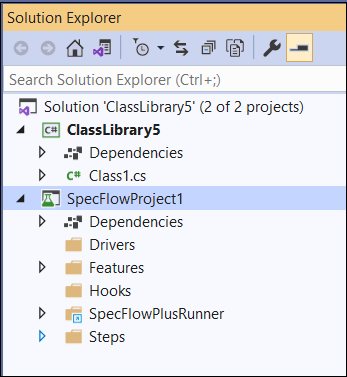
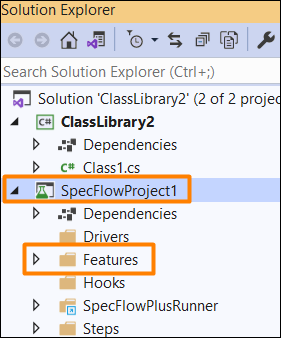
The Solution Explorer shall now have a new project called the SpecFlowProject1 created.
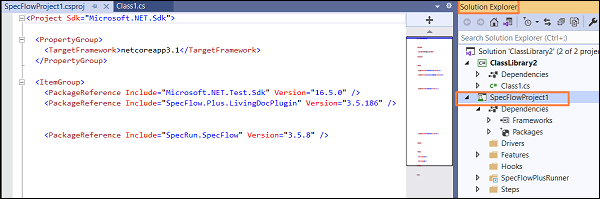
Project Folder
As the SpecFlow project is created, we shall also find a well-defined folder structure created for the project consisting of the Drivers, Dependencies, Features, Hooks, and so on.
SpecFlow - Other Project Dependencies
We need to have a project reference to the class library we have created for the SpecFlow project. This is important for testing the class within the class library in the project.
Add Project Dependencies
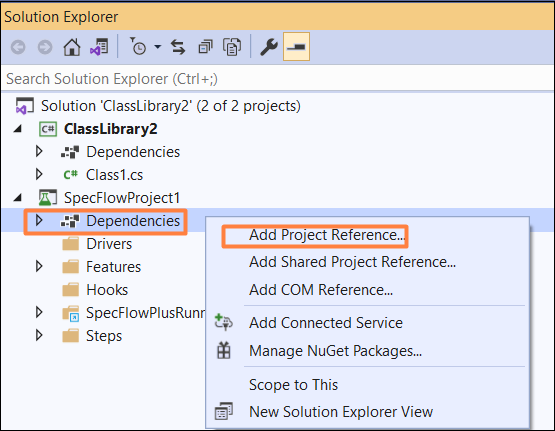
Click on the project SpecFlowProject1 within Solution Explorer. Then right-click the folder Dependencies. Choose the option Add Project Reference.
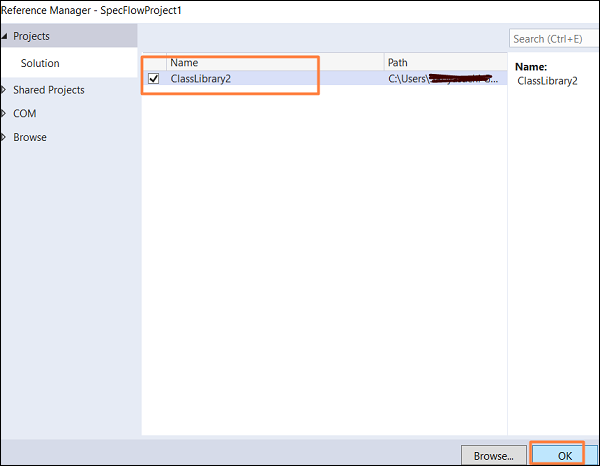
The Reference Manager pop-up opens. Select the checkbox for the class library and then click on OK.
Building and Running Tests
Next, go to the Build menu and select Build Solution. We should get Build succeeded message as output.

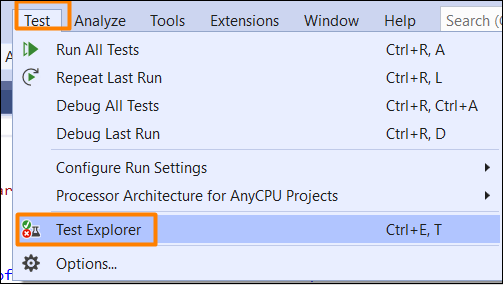
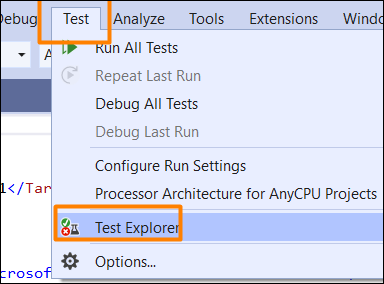
Navigate to the Tests menu and choose the Test Explorer option.
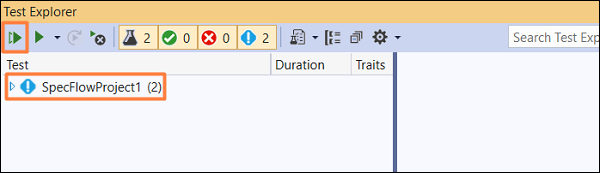
We should be able to find the Features added to the SpecFlow project. Execute them via the Run All Tests in View option. The status of the execution shows as Not Run as the tests have still not been executed.
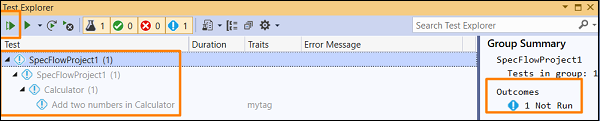
The exclamation symbol before a Feature suggests, test execution is pending for that Feature.
SpecFlow - Runner Activation
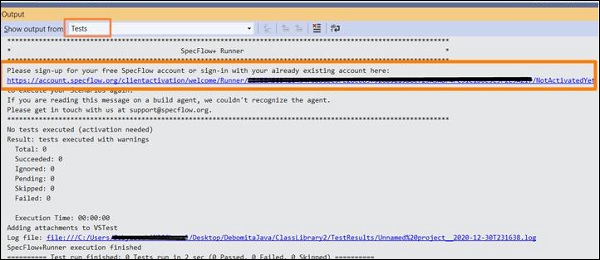
We have to perform the activation of SpecFlow + Runner. Navigate to View menu, then select the option Output.

Then choose Tests in the Show output from − dropdown.
We should obtain the test output along with the activation link of the runner. We should have this link available only if we have chosen SpecFlow+ Runner at the time of project set up.
Activate Link
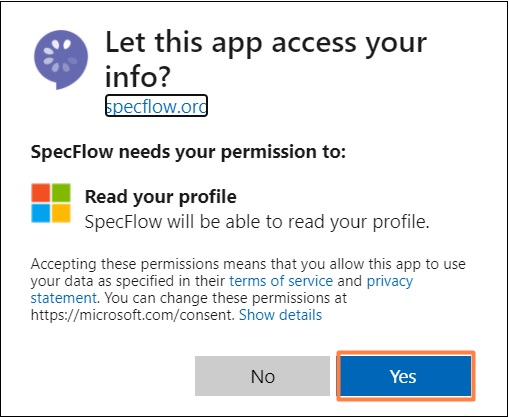
Open the activation link on a browser. We should get navigated to the SpecFlow landing page. Click on Sign in with Microsoft.

Click on Yes for letting Microsoft to access our SpecFlow account.
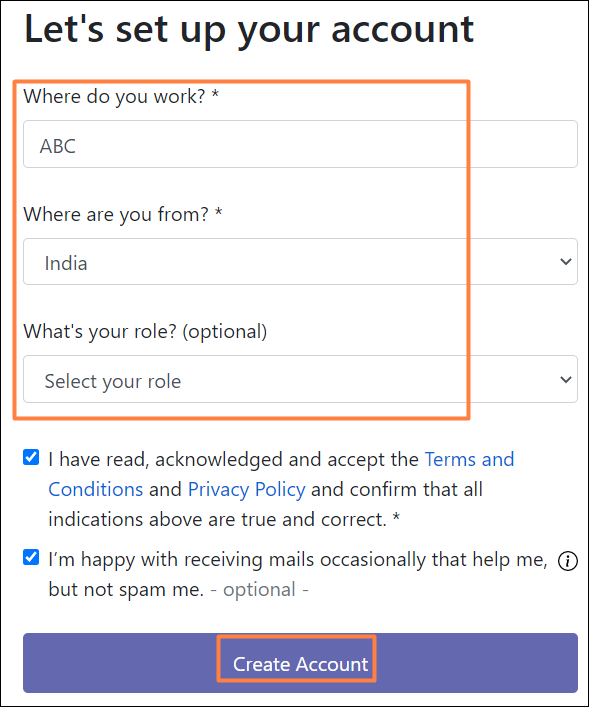
For setting up the account, provide the information needed. Then click on Create Account.
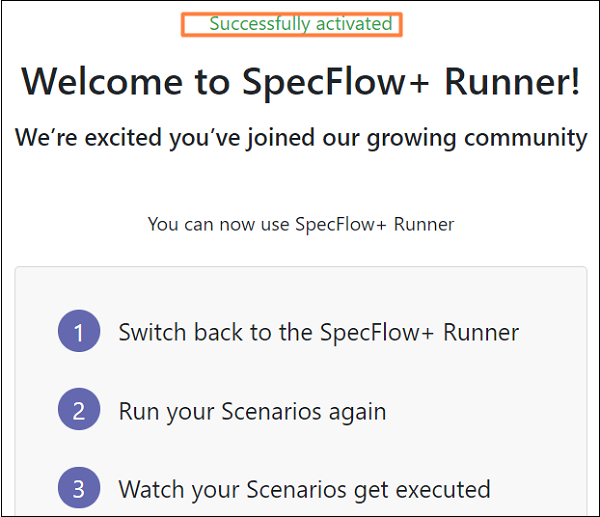
We shall now have the SpecFlow account successfully activated.
Now, if we again execute the test from the Text Explorer, it will display the proper results.
SpecFlow - HTML Reports
SpecFlow generates reports when all your tests completed executing and which includes breakdown of the test results.
Test Run from Explorer
To build a solution, navigate to the Build menu, then click on Build Solution.
We should get a build success message.
Navigate to the Tests menu and choose the Test Explorer option.
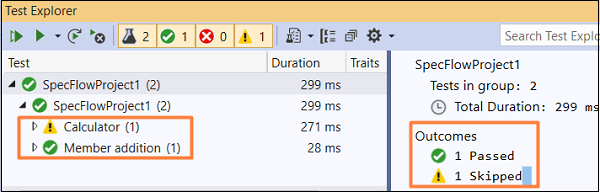
We should be able to find the Features added to the SpecFlow project. Execute that via the Run All Tests in View option.
The result is displayed as highlighted in the image below.
Report Generation
Go to the Output menu and select Tests from the Show output from − dropdown.

The total execution results get displayed in the Output Console. It contains information about the count of the test cases, total succeeded, ignored, skipped, failed, and so on. The user and machine names where the execution happened are also captured.
Also, the execution duration is displayed along with the link to the HTML report and the log file path.

Copy the Report file path and open it on the browser. We shall get a detailed HTML report with the project name, configuration, execution start time, duration, number of threads, and so on.
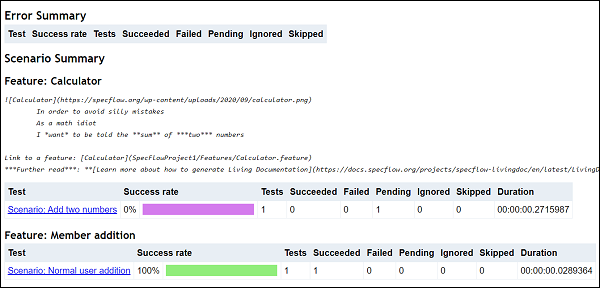
It shall describe the Results, Test Timeline Summary and the complete Feature Summary.
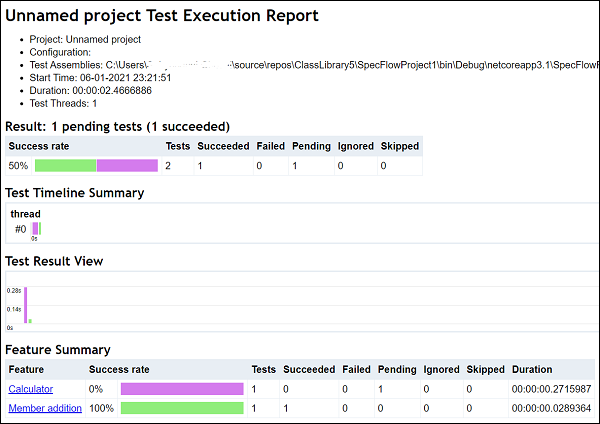
The report also consists of the Error Summary and Scenario Summary as well. It contains the Success Rate for each test. To know the details of a particular Feature, we can click on the Scenario Name(provided as a link).
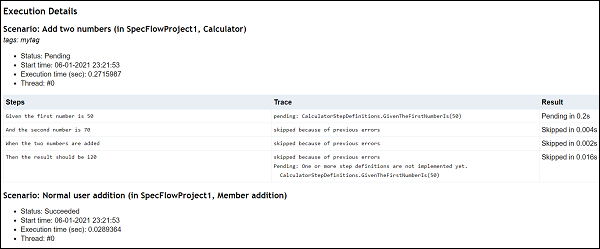
Next, the Execution Details are captured for every step. Each step details are displayed with Trace and Result.

SpecFlow - Binding Test Steps
Test Steps in Feature File
To access the steps in the Feature File, go to the SpecFlow project within the Solution Explorer. Then click on the Features folder. The Feature File shall be displayed.

A Feature File is useful for documenting the expected characteristics of an application in a format which is in plain text and can also be used for automation. The keywords Given, Then, When, and so on are used in SpecFlow to describe scenarios in Gherkin language.
Test Step Binding
The above Feature file has been added by default by the SpecFlow project. It also produces test methods that shall run scenarios defined within the feature file. Right-click on any line on the after the Scenario keyword. Then click on the Go To Definition option.

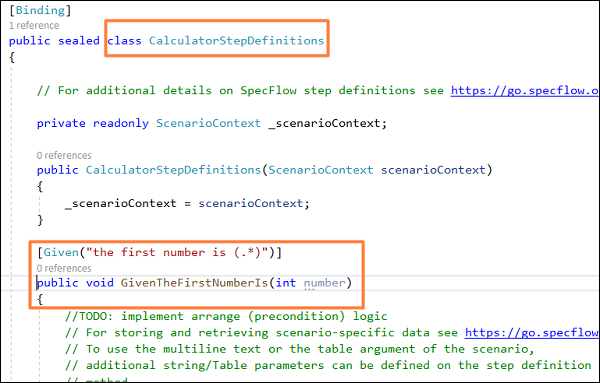
Visual Studio identifies the corresponding step definition to this step. In this example, it opens the class CalculatorStepDefinitions and moves to the GivenTheFirstNumberIs method.
SpecFlow - Creating First Test
We shall now create a file in the class library which performs subtraction of two numbers.
using System;
namespace ClassLibrary2 {
   public class Class1 {
      public int Number1 { get; set; }
      public int Number2 { get; set; }
      public int Subtraction(){
         return Number1 - Number2;
      }
   }
}
Feature File Implementation
Step Definition File Implementation
The corresponding Step Definition file of the above Feature file, along with usage of Class1 to perform subtraction.
using ClassLibrary2;
using FluentAssertions;
using TechTalk.SpecFlow;
namespace SpecFlowCalculator.Specs.Steps {
[Binding]
   public sealed class CalculatorStepDefinitions {
      private readonly ScenarioContext _scenarioContext;

      //instantiating Class1
      private readonly Class1 _calculator = new Class1();
      private int _result;
      public CalculatorStepDefinitions(ScenarioContext scenarioContext) {
         _scenarioContext = scenarioContext;
      }
      [Given("the first number is (.*)")]
      public void GivenTheFirstNumberIs(int number){
         _calculator.Number1 = number;
      }
      [Given("the second number is (.*)")]
      public void GivenTheSecondNumberIs(int number){
         _calculator.Number2 = number;
      }
      [When("the two numbers are subtracted")]
      public void WhenTheTwoNumbersAreSubtracted(){
         _result = _calculator.Subtraction();
      }
      [Then("the result should be (.*)")]
      public void ThenTheResultShouldBe(int result){
         _result.Should().Be(result);
      }
   }
}
Executing the Test
Build the above solution, then execute the test after we obtain the build succeed message from Test → Test Explorer.
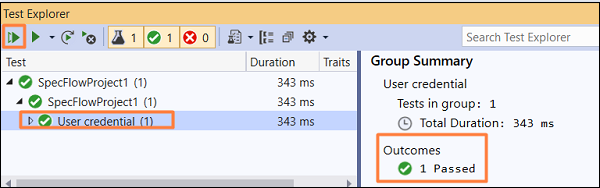
Select the SpecFlowProject1 feature and click on Run All tests in View.
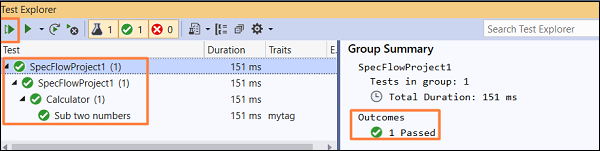
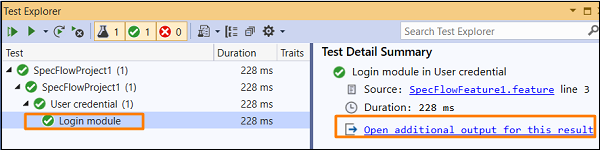
The result shows as 1 Passed along with execution duration. Click on the option Open additional output for this result to get result details.

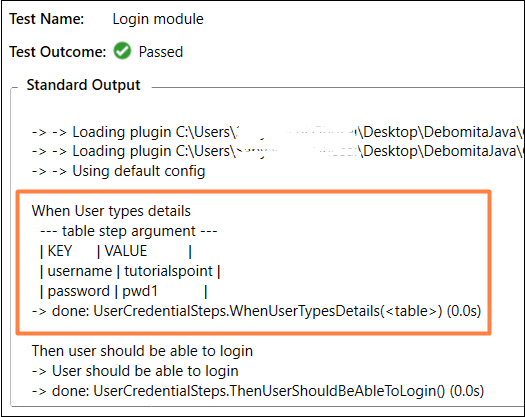
The execution result for each test step is displayed.
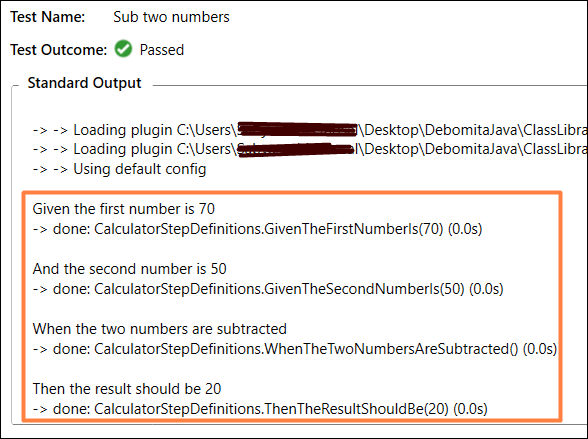
All the steps in the Feature File get executed along with status as done. Also, the corresponding methods in the Step Definition File get displayed with the execution duration.
SpecFlow - Configure Selenium Webdriver
To configure Selenium Webdriver in Visual Studio, we shall take the help of NUnit framework. This framework allows to run Selenium tests in C#.
Configure NUnit Framework
We shall first create a NUnit project.
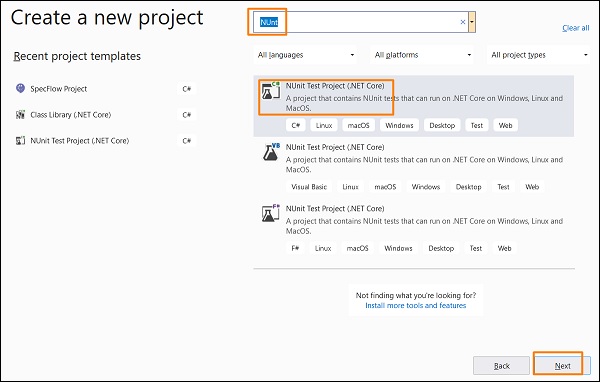
Once the Visual Studio landing page gets opened, click on Create a new project.

Type NUnit in the search box appearing in Create a new project pop-up. Select NUnit Test Project(.NET Core) from the search results. Click on Next.
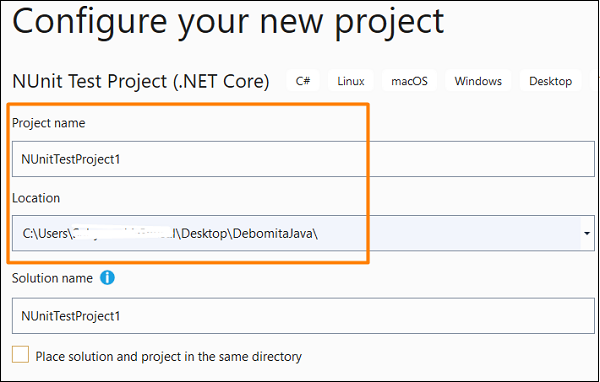
Enter project name and location. Then click on Create to proceed.
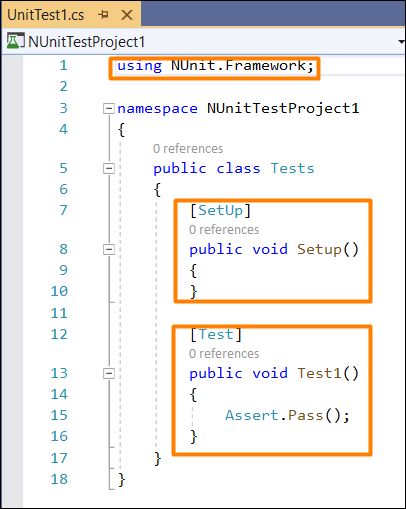
As the project is set up on NUnit(.Net Core), the Setup and Test methods shall be defined by default. Also, the statement using NUnit.Framework should reflect at the top. This shall prove that NUnit Framework has been successfully configured.
Configure Selenium WebDriver
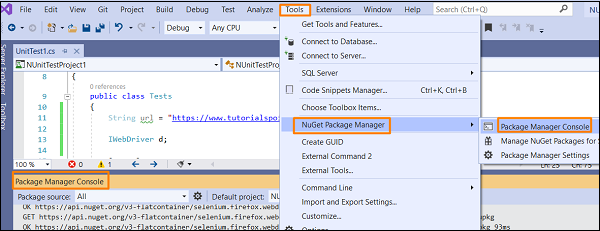
Once the NUnit framework is set, navigate to the Tools menu, select NuGet Package Manager, and then click on Package Manager Console.
We must execute the required Package Manager commands for installation of Selenium Webdriver and NUnit.
For Selenium installation, run the below commands in Package Manager Console −
Install-Package Selenium.WebDriver
Install-Package Selenium.Firefox.WebDriver
For NUnit installation, run the below commands in Package Manager Console −
Install-Package NUnit
Install-Package UUnit3TestAdapter
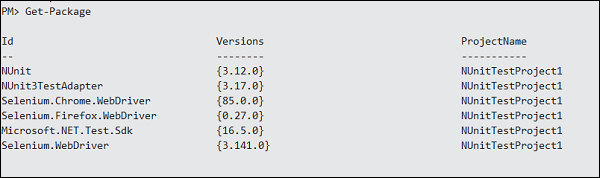
To check the installation status, run the command in Package Manager Console −
Get-Package
Implementation with Selenium WebDriver in C#
using NUnit.Framework;
using OpenQA.Selenium;
using OpenQA.Selenium.Firefox;
using System;
namespace NUnitTestProject1{
   public class Tests{
      String u = "https://www.tutorialspoint.com/index.htm";
      IWebDriver d;
      [SetUp]
      public void Setup(){
         //creating object of FirefoxDriver
         d = new FirefoxDriver();
      }
      [Test]
      public void Test1(){
         //launching URL
         d.Navigate().GoToUrl(u);
         Console.WriteLine("Url launched");
      }
      [TearDown]
      public void close_Browser(){
         d.Quit();
      }
   }
}
Execution & Output
Run the above code from Test->Test Explorer. The output in Test Explorer is −
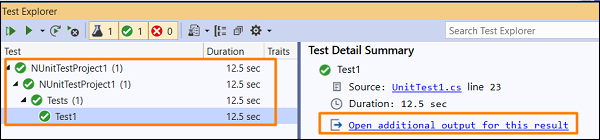
Click on Open additional output for this result link, we should get the Test Outcome and Standard Output.
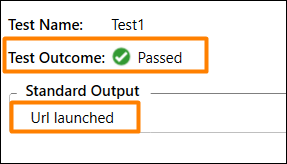
Url launched is obtained as an output as implemented with Console.WriteLine method in the code.
SpecFlow - Gherkin
A Gherkin is a group of important keywords to build a meaningful architecture for specifications. Every keyword is converted to plain spoken languages like English.
Rules in Gherkin
Some of the rules in Gherkin are listed below −
A document in Gherkin begins with keywords.
Comments can be added at the beginning of the new line in the Feature File. They start with or without spaces followed by # symbol and text. However, block comments cannot be added till now in SpecFlow.
To indent the code, spaces or tabs can be used. It is recommended to have two spaces for indentation.
The content after the keyword for each step has a corresponding block of code. This is known as the Step Definition.
Gherkin Example
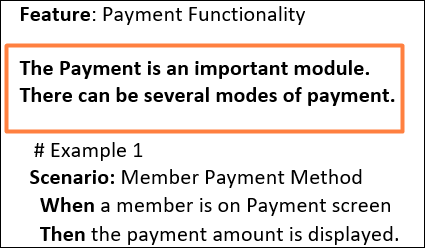
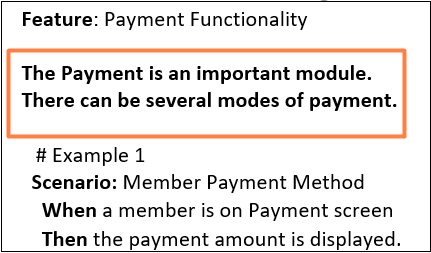
Following is the Gherkin example −
Feature: Payment Functionality

# Example 1
   Scenario: Member Payment Method
      When a member is on Payment screen
      Then the payment amount is displayed.

# Example 2
   Scenario: Member Payment Dues
      When a member is on Payment Due screen
      Then the payable amount is displayed.
In the above example, Feature, Scenario, Given, When, and Then are known as the Gherkin keywords.
SpecFlow - Gherkin Keywords
The main Gherkin keywords are −
- Feature
- Scenario
- Rule(till Gherkin 6)
- Example or Scenario
- Background
- Scenario Outline
- Examples
- | for Data table
- """ for Document Strings
- @ for Tags
- # for Comments
- Given
- When
- Then
- But
- And
Gherkin uses localization for multiple languages and each of the above keywords has its equivalent terms in respective languages.
Let us explore some of the important Gherkin keywords −
Feature
A Feature is added to have an overall description of the features of the applications and to club connected scenarios. This is the most important keyword in a Gherkin document.
A Feature is followed by a colon: symbol and then a small description on the feature. We can add multiple lines for more description. These are not considered by SpecFlow at execution but are added in the html reports.
Once the description of a Feature is completed, we should begin a new line with keywords Background, Example, and so on. We can add tags above Feature to club similar features, irrespective of the structure of file or directory.
Tags
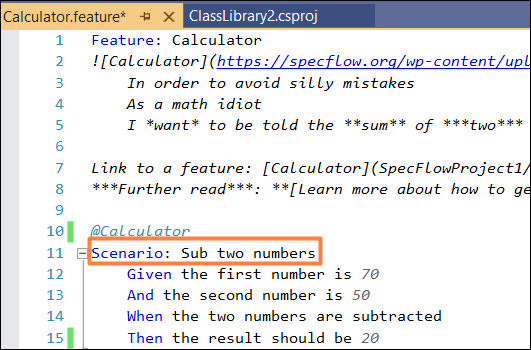
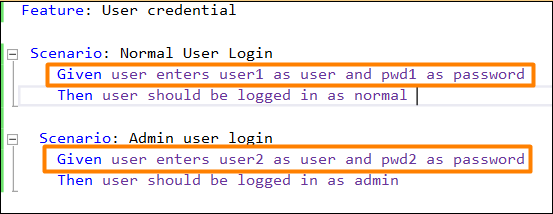
Tags are markers added to Scenarios or Features. Giving a tag to a Feature is like marking that tag to every Scenario within that Feature file. A tag name is mentioned after the @ symbol.
We can filter and club tests to be run with the tags. For instance, we can tag an urgent test with @important and run it quite often. SpecFlow considers the @ignoretag as an important one and produces an ignored unit test method out of the Scenarios with this tag.
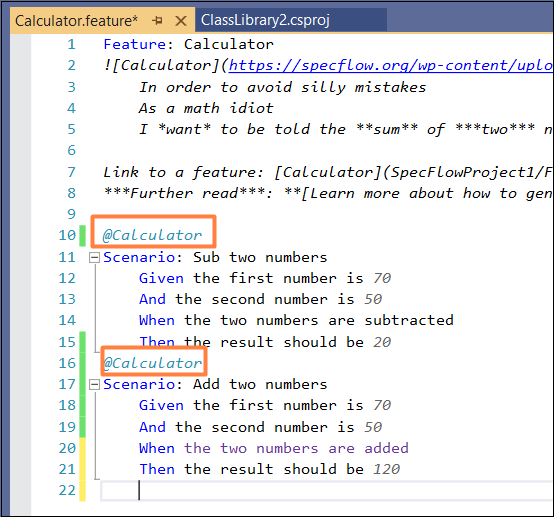
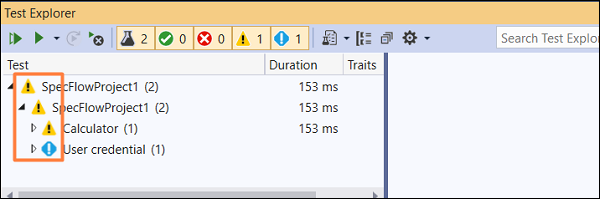
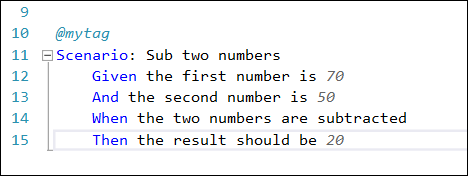
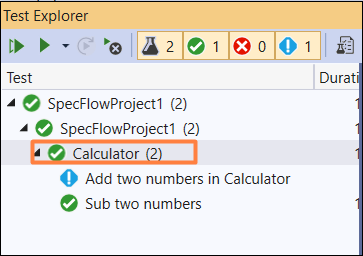
Here, the Feature File contains two scenarios with @Calculator tag. The same shall also be reflected in the Test Explorer, to pick and choose the test to be run.
Scenario
Scenario is a complete instance that describes a business logic. It has multiple steps. It is often considered a synonym of keyword Example. A Scenario does not have a fixed number of steps. But it is recommended to have 3 to 5 steps per Scenario.
If there are too many steps, it may lose its value to be used as specification and documentation. A Scenario is like a test in a development lifecycle. Also, it can be divided into a precondition, test step and verification.
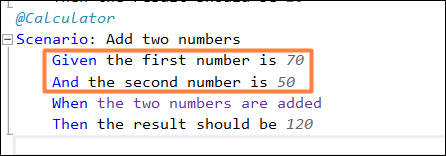
Given
Given are steps used for describing the pre-existing condition of the system. It typically deals with the events that have occurred in the past. As a Given step is executed, it shall set the objects, test data in the database and put the system in a proper state.
Thus, the Given step helps to define the system in a known condition prior to the interaction of the user with the system. We can have multiple Given steps. Two or more Given steps can be used with And keyword. In short, it is used to have the preconditions defined.
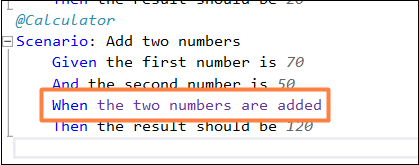
When
When is a step used for describing an action or an incident. This can either be an interaction of the person with the system or an incident caused by another system. It is a good practise to have a single When step in a Scenario.
If we are forced to have multiple When steps, we should ideally break the Scenario into smaller ones.
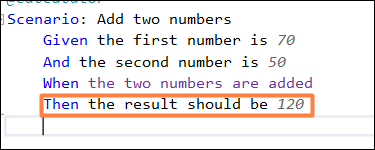
Then
Then is a step used for describing an expected result. The corresponding step definition of a Then step should have an assertion to verify actual result against the expected result.
Thus, it basically deals with the output obtained from the tests (message, report, and so on) and not on the internal characteristics of the system, for instance a database record. In other words, it is used for an outcome that is noticeable from the end user perspective.
But, And
If we have repeated Given, When and Then steps, then we can make the Scenarios more organized by replacing the consecutive Given, When, Then steps with And, But steps.
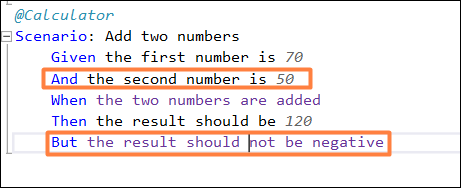
The above example shows the usage of And and But.
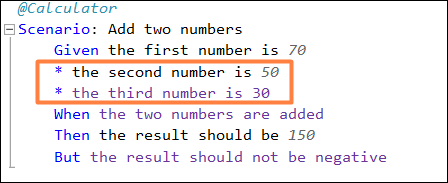
The * symbol
The * symbol is used in place of another step keyword. This can be used for steps that represent a list of items. It is more like a bullet point. For the below example, two And steps have appeared one after the other.
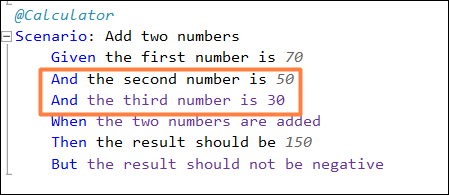
The consecutive And steps should be represented like this −
Background
Sometimes, we may require repeating the same steps for all Scenarios within the Feature file. We may shift these steps to the backdrop by clubbing them under the Background segment.
It helps to add context to a scenario. It can have more than one Given step. Thus, it shall execute prior to execution of each Scenario, but post any Before hooks.
A Background is kept prior to the first Example or Scenario, at the similar indentation level. In short, Background is used for declaring the common steps to all the tests.

In the above example, having two Scenarios, the Background steps shall run once before execution of each of these scenarios.
Scenario Outline
Scenario Outline is used to replicate the same Scenario with a different data set. Writing the same tests with different values is cumbersome and time taking. For instance,
We can club the above two scenarios with the Scenario Outline.
Thus, we see that a Scenario Outline should be accompanied with keyword Examples. A Scenario Outline is executed once for each of the rows appearing below the Examples segment.
Also, we have seen that the Given step has the <> delimiter. It points to the header of the Examples table. SpecFlow shall put the values within this table prior to the task of matching a step with a Step Definition.
Data Table
Data Table is used to send a group of values in the form of a list to the Step Definition file. It is useful to deal with large data sets. SpecFlow has a rich API for table manipulation in the Step Definition File.
SpecFlow Assist Helpers packages are used to work on tables. Also, we have to add namespace TechTalk.SpecFlow.Assist to our code.
SpecFlow - Feature File
The SpecFlow test execution begins from the Feature File. Here all the Features and their corresponding Scenarios are explained in plain text. It has a dual role of serving as an automation element as well as for documentation. A Feature File consists of one or more Scenarios in form of a list. The extension for a Feature File should always be .feature.
A Feature is added to have an overall description of the features of the applications and to club connected scenarios. This is the most important keyword in a Gherkin document.
A Feature is followed by a colon: symbol and then a small description on the feature. We can add multiple lines for more description. These are not considered by SpecFlow at execution but are added in the html reports.
Once the description of a Feature is completed, we should begin a new line with keywords Background, Example, and so on. We can add tags above Feature to club similar features, irrespective of the structure of file or directory.
Feature File Creation
Once a SpecFlow project is created, go to the Solution Explorer, and expand it.
Right-click on Features folder. Click on Add, then select the option New Item.
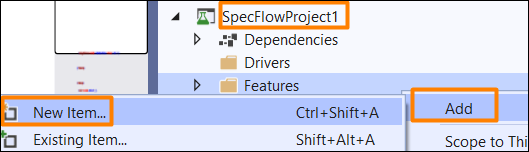
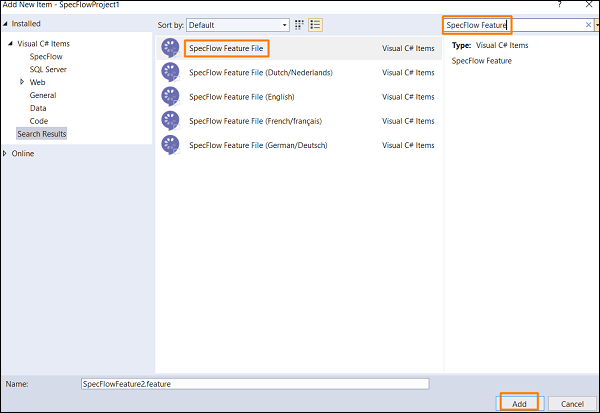
Add New Item pop-up comes up. Type SpecFlow Feature in the search box. Select the option SpecFlow Feature File from the search results. Click on Add and proceed.
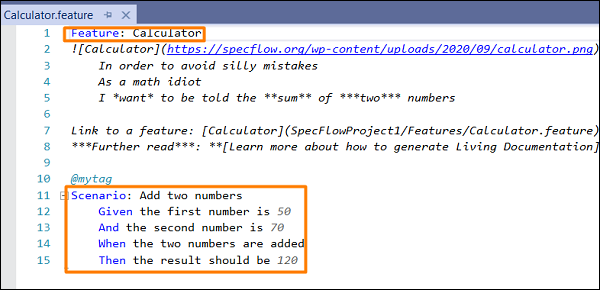
The Feature File gets generated with few steps created by SpecFlow by default.
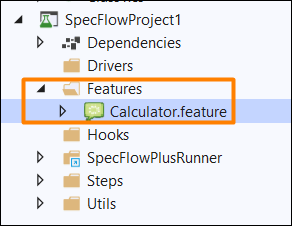
Project Folder after Feature File Creation
Following is the project folder after the feature file is created.
A Feature File is mainly composed of the Gherkin Keywords to take a form of a Feature having one or multiple Scenarios.
SpecFlow - Step Definition File
To execute the Feature file, we must add the implementation logic for each of the steps. To add the definition of the step in SpecFlow, the C# language is used. Thus, a Step Definition File contains methods developed in C# within a Class.
The methods have annotations along with a pattern to connect the Step Definition to every matching step. The SpecFlow shall run the code to execute the keywords in Gherkin.
A Step Definition file is a link between the application interfaces and Feature File. For providing readability features, the Step Definition File can have parameters. This signifies that it is not required to have a step definition for each step that has a minor difference.
For instance, Given Login to admin application and Given Login to payment application steps can be automated with one step definition by passing admin and payment as parameters. The regular expression (.*) is used to declare parameters for a method.
Rules for Regular expressions
The rules for regular expressions are listed below −
It is matched with the complete step, even though we are not using the markers ^ and $.
The capturing groups in the regular expression describe the parameters for the method in order.
Rules for Step Definition Methods
The rules to be followed for Step Definition methods are listed below −
It should have a [Binding] attribute and reside within a public class.
It can either have a static or non-static method. If it is a non-static method, an object should be instantiated once for every scenario of the class where it resides.
It should not have ref or out parameters.
It cannot have a return type.
Step Definition File Creation
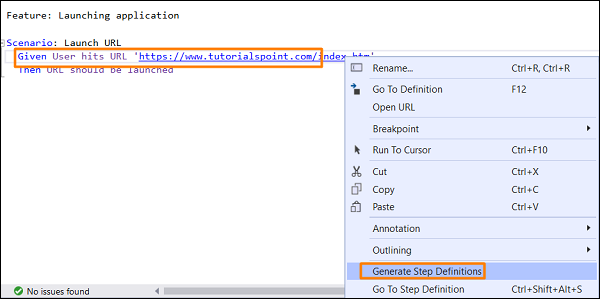
Right-click on any step of the Feature File, then click on Generate Step Definitions option.
The details of how to create a Feature File is discussed in detail in the Chapter − Feature File.
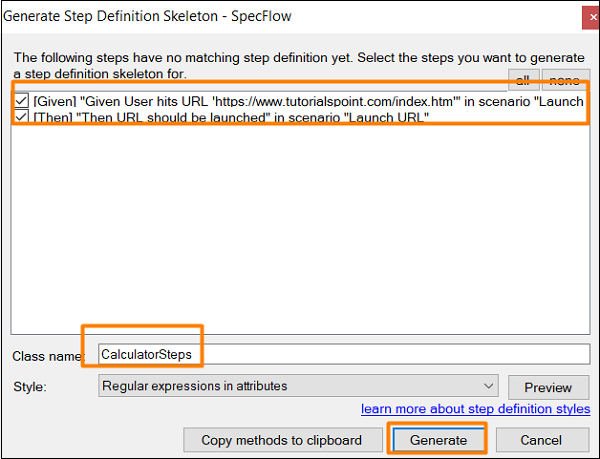
In the Generate Step Definition Skeleton pop-up, check the steps for which we want to generate the implementation. Add a Class Name, then click on the Generate button.
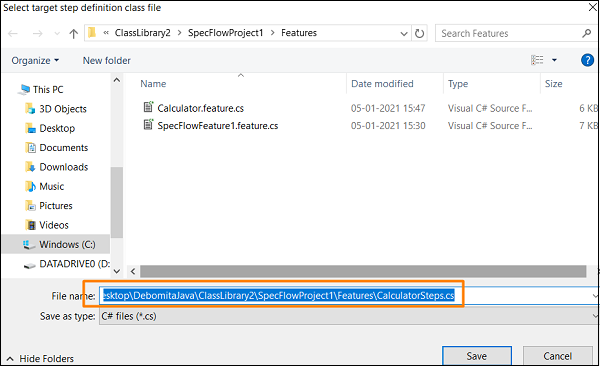
Give the location of saving the Step Definition File and then click on Save.
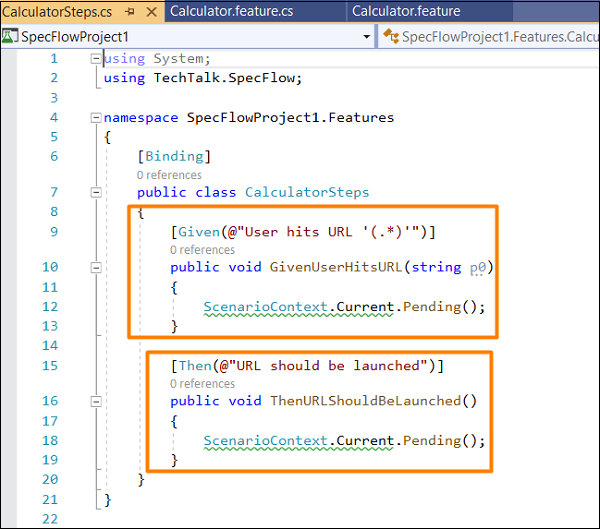
The Step Definition File gets opened with for all the matching steps in the Feature File. It also contains regular expression attributes.
Project Folder after Step Definition File Creation
Following is the project folder after the step definition file is created −
SpecFlow - Hooks
Hooks are event bindings to add more automation logic at certain steps. For example, for any step which is needed to be run prior to a specific Scenario. To introduce, hooks in the code we have to add the [Binding] attribute.
Hooks have global access. But it can be made available to a Features and Scenarios by declaring a scoped binding. The scoped binding can be filtered with the tags.
SpecFlow+ Runner Limitations
If we are executing tests from more than one thread with SpecFlow+ Runner, the After and Before hooks like the BeforeTestRun and AfterTestRun are run only once for each thread.
Hook Attributes
The Hook attributes are listed below −
BeforeTestRun/AfterTestRun − This is used to run an automation logic prior/post to the complete test execution. The method it is applicable to should be static.
BeforeFeature/AfterFeature − This is used to run an automation logic prior/post to individual Feature execution. The method it is applicable to should be static.
BeforeScenario or Before/AfterScenario or After − This is used to run an automation logic prior/post to individual Scenario or Scenario Outline execution.
BeforeScenarioBlock/AfterScenarioBlock − This is used to run an automation logic prior/post to individual Scenario block execution. (in between the When and Given steps).
BeforeStep/AfterStep − This is used to run an automation logic prior/post to individual Scenario step execution.
Hook Execution Sequence
The hooks of similar type, for example two AfterScenario hooks, are run in a random sequence. To make execution in a specific sequence, we have to add the Order property in the hook attribute.
Example
[AfterScenario(Order = 1)]
public void CloseBrowser() {
   // we require this method to execute first...
}
[AfterScenario(Order = 2)]
public void VerifySessionIdAfterBrowserClose() {
   // ...so we require this method to execute after the CloseBrowser //method is run
}
The number signifies order which means that the hook with the lowest number is run first. If the number is omitted, the default value is 10000. It is not a good practise to depend on it and rather mention the order for individual hooks.
Also, if an unhandled exception is thrown, all the following hooks of similar type will be skipped. In order to prevent that, we should handle all the exceptions.
SpecFlow - Background Illustration
Background keyword is applied to replicate the same steps before all Scenarios within a Feature File. We may shift these steps to the backdrop by clubbing them under the Background segment.
It helps to add context to a scenario. It can have more than one Given step. Thus, it shall execute prior to execution of each Scenario, but post any Before hooks.
A Background is kept prior to the first Example or Scenario, at the similar indentation level. In short, it is used for declaring the common steps to all the tests.
In the above example, having two Scenarios, the Background steps shall run once before execution of each of these scenarios.
Background Rules
Let us describe some of the rules while applying Background −
It should be used for defining simple steps unless we are forced to bring the application to a state which requires complicated steps to be carried out. As requested by the stakeholders of the project.
It should be brief and realistic.
All the Scenarios should also be short and to the point.
Background Example
Let us see an example where we have used Background steps to be executed before all the tests in the Feature File. For instance, to add a normal and admin user for an application, we require the below steps to be run before the execution of the Scenario Normal user addition −
Launch the application URL.
Submit the username and password
Step 1: Create a Feature File
The details of how to create a Feature File is discussed in detail in the Chapter − Feature File.
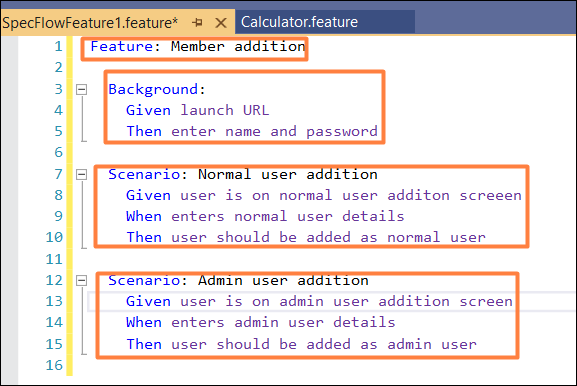
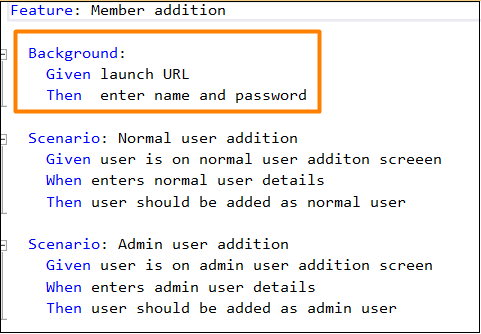
Feature: Member addition

   Background:
      Given launch URL
      Then enter name and password

   Scenario: Normal user addition
      Given user is on normal user addition screen
      When enters normal user details
      Then user should be added as normal user

   Scenario: Admin user addition
      Given user is on admin user addition screen
      When enters admin user details
      Then user should be added as admin user
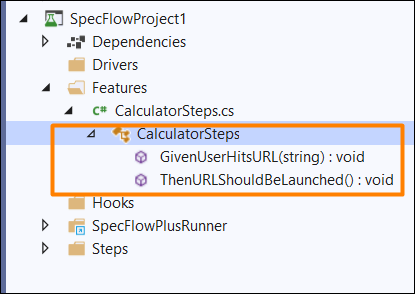
Step 2: Create a Step Definition File
The details of how to create a Step Definition File is discussed in detail in the Chapter − Step Definition File.
using System;
using TechTalk.SpecFlow;
namespace SpecFlowProject1.Features{
   [Binding]
   public class MemberAdditionSteps{
      [Given(@"launch URL")]
      public void GivenLaunchURL(){
         Console.WriteLine("Url launched");
      }
      [Given(@"user is on normal user additon screeen")]
      public void GivenUserIsOnNormalUserAdditonScreeen(){
         Console.WriteLine("User is on normal user addition screen");
      }
      [Given(@"user is on admin user addition screen")]
      public void GivenUserIsOnAdminUserAdditionScreen(){
         Console.WriteLine("User is on admin user addition screen");
      }
      [When(@"enters normal user details")]
      public void WhenEntersNormalUserDetails(){
         Console.WriteLine("User enters normal user details");
      }
      [When(@"enters admin user details")]
      public void WhenEntersAdminUserDetails(){
         Console.WriteLine("User enters admin user details");
      }
      [Then(@"enter name and password")]
      public void ThenEnterNameAndPassword(){
         Console.WriteLine("User enters name and password");
      }
      [Then(@"user should be added as normal user")]
      public void ThenUserShouldBeAddedAsNormalUser(){
         Console.WriteLine("User should be added as normal user");
      }
      [Then(@"user should be added as admin user")]
      public void ThenUserShouldBeAddedAsAdminUser(){
         Console.WriteLine("User should be added as admin user");
      }
   }
}
Step 3: Execution & Results
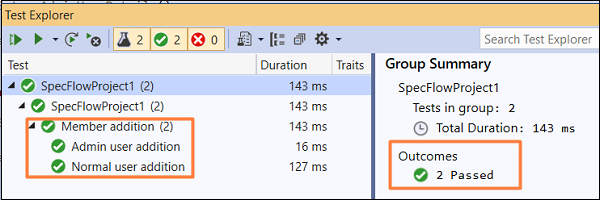
Select SpecFlowProject(2), then click on Run All Tests in View.
Select Normal user addition Scenario, then click on Open additional output for this result link.

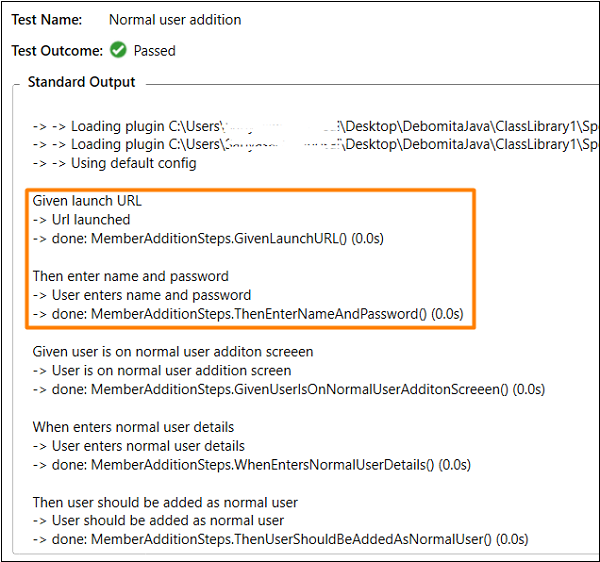
In the above output, the Background steps − Given Url launched and Then enter name and password got executed prior to the actual normal user Scenario.
Select Admin user addition Feature, then click on Open additional output for this result link.
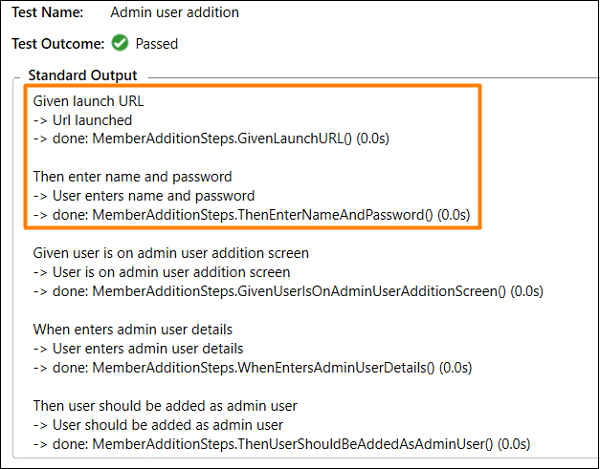
In the above output as well, the Background steps − Given Url launched and Then enter name and password got executed prior to the actual admin user Scenario.
SpecFlow - Data Driven Testing with Examples
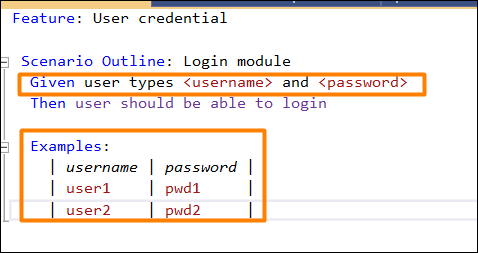
We can perform data driven testing with the help of keyword Examples. We shall also take the help of keyword Scenario Outline to execute the same Scenario over multiple values.
The data sets to be taken into consideration shall be passed below the Examples section one after another separated by | symbol. So, if there are three rows, we shall have three test cases executed from a Single scenario.
Scenario Outline is used to replicate the same Scenario with a different data set. Writing the same tests with different values is cumbersome and time taking. For instance,

We can club the above two scenarios with the Scenario Outline.

Thus, we see that a Scenario Outline should be accompanied with keyword Examples. A Scenario Outline is executed once for each of the rows appearing below the Examples segment.
Also, we have seen that the Given step has the <> delimiter. It points to the header of the Examples table. SpecFlow shall put the values within this table prior to the task of matching a step with a Step Definition.
To verify a Login module, we require the below steps to be executed −
User types the username and password.
Verify users should be able to login.
We shall incorporate the above steps to the Feature File.
Step 1: Create a Feature File
The details of how to create a Feature File is discussed in detail in the Chapter − Feature File.
Feature: User credential
Scenario Outline: Login module
   Given user types <username> and <password>
   Then user should be able to login
   Examples:
   | username       | password |
   | tutorialspoint1| pwd      |
   | tutorialspoint2| pwd1     |
Step 2: Step Definition File
The details of how to create a Step Definition File is discussed in detail in the Chapter – Step Definition File.
using System;
using TechTalk.SpecFlow;
namespace SpecFlowProject1.Features{
   [Binding]
   public class UserCredentialSteps{
      //regular expression used to point to data
      [Given(@"user types (.*) and (.*)")]
      public void GivenUserTypesUserAndPwds(string username, string password){
         Console.WriteLine(username);
         Console.WriteLine(password);
      }
      [Then(@"user should be able to login")]
      public void ThenUserShouldBeAbleToLogin(){
         Console.WriteLine("User should be able to login");
      }
   }
}
Step 3: Execution & Results
Select User credential(2), then click on Run All Tests in View.

Select Login module, tutorialspoint1 Scenario, then click on Open additional output for this result link.

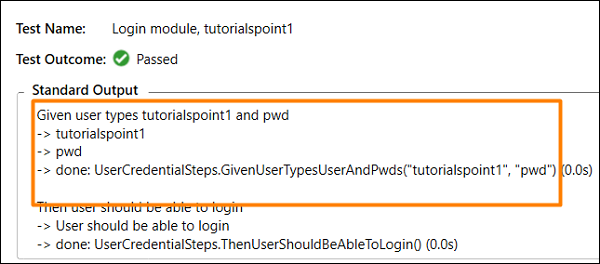
The Scenario got executed with username − tutorialspoint1 and password − pwd as specified in Examples(1st row).
Select Login module, tutorialspoint2 scenario, then click on Open additional output for this result link.

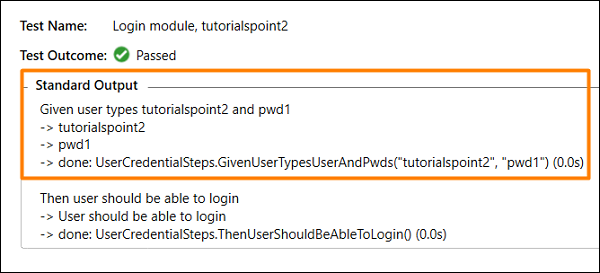
The test got executed with username − tutorialspoint2 and password − pwd1 as specified in Examples(2nd row).
SpecFlow - Data Driven Testing without Examples
We can perform data driven testing without the help of keyword Examples. This can be done by passing the data directly to the steps within the Feature File enclosed in (''). It will then be provided as an input to the Step Definition File.
Let us verify a module, for which the below steps need to be executed −
- User launches URL
- URL should open
Step 1: Create a Feature File
The details of how to create a Feature File is discussed in detail in the Chapter − Feature File.
Feature: Launching application

Scenario: Launch URL
   Given User hits URL 'https://www.tutorialspoint.com/index.htm'
   Then URL should be launched
Step 2: Create a Step Definition File
The details of how to create a Step Definition File is discussed in detail in the Chapter – Step Definition File.
using System;
using TechTalk.SpecFlow;
namespace SpecFlowProject1.Features{
   [Binding]
   public class LaunchingApplicationSteps{
      [Given(@"User hits URL '(.*)'")]
      public void GivenUserHitsURL(string url){
         Console.WriteLine(url);
      }
      [Then(@"URL should be launched")]
      public void ThenURLShouldBeLaunched(){
         Console.WriteLine("URL should be launched");
      }
   }
}
Step 3: Execution & Results
Select Launching Application Feature, then click on Run All Tests in View.
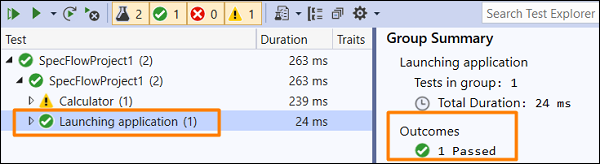
Select Launch URL Scenario, then click on Open additional output for this result link.

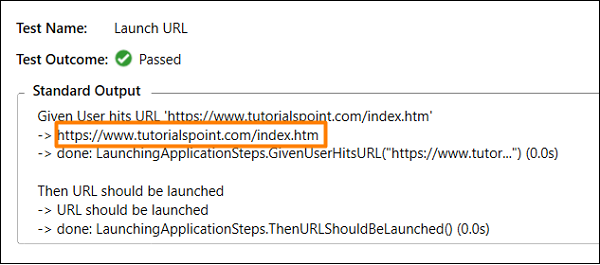
In the above output, the url (https://www.tutorialspoint.com/index.htm) is obtained which is passed directly from the Feature File within the Given step.
SpecFlow - Table Conversion to Data Table
A Table is often confused with a Scenario Outline. While a Scenario Outline is applicable for the complete test, a Table is only for a single step under which it is defined.
However, a programming logic needs to be built to comprehend the data and then it can be incorporated in our test. An Examples keyword is used for a Scenario Outline, but no keywords are required for Data Table.
There are multiple methods available in Table in SpecFlow, let us see how to convert a Table to Table via Table headers.
Table is used to send a group of values in the form of a list to the Step Definition file. It is useful to deal with large data sets. SpecFlow has a rich API for table manipulation in the Step Definition File.
SpecFlow Assist Helpers packages are used to work on tables. Also, we have to add namespace TechTalk.SpecFlow.Assist to our code.
Step 1: Create a Feature File
The details of how to create a Feature File is discussed in detail in the Chapter − Feature File.
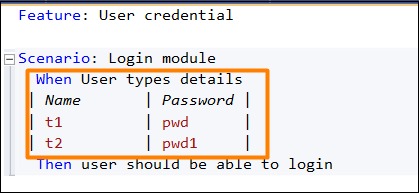
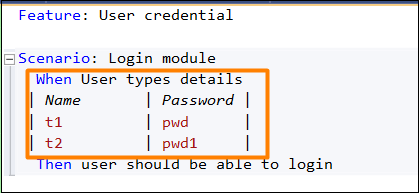
Feature: User credential

Scenario: Login module
   When User types details
   | Name | Password |
   | t1   | pwd      |
   | t2   | pwd1     |
Then user should be able to login.
Step 2: Create C# File to access Table Data
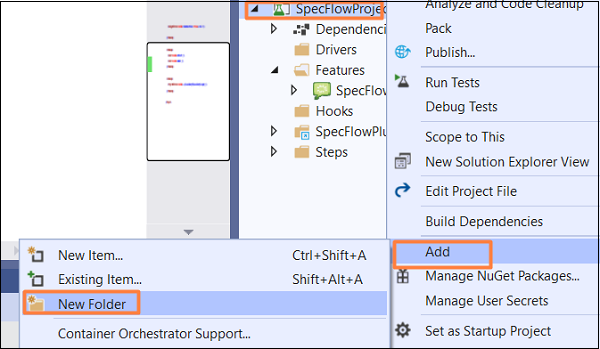
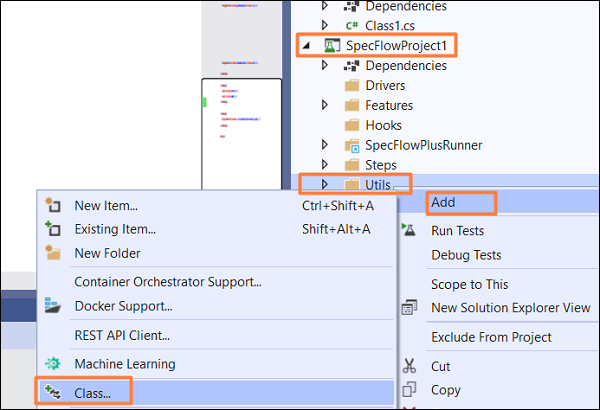
We must convert a Table to a Data Table via System.Data package. We shall create a new folder within the project and have a C# file in it. Right-click on the SpecFlow Project, then click on Add.
Select the option New Folder.
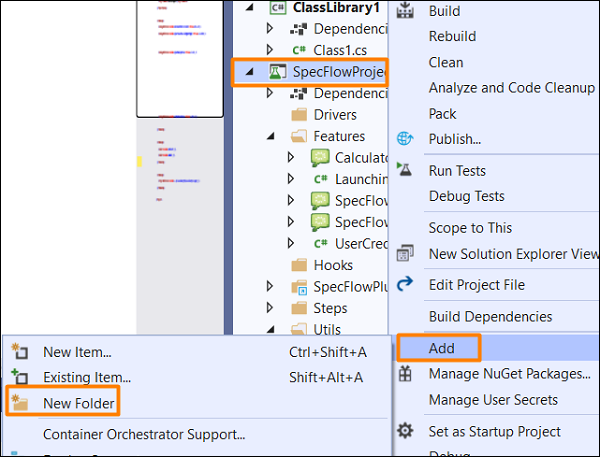
Give the name Utils to the folder.
Right-click on the new Folder created, then select the option Add. Click on Class.
Type C# Class in the search box and search. Select the option Class from the search result and then click on Add to proceed.

Project Folder Structure
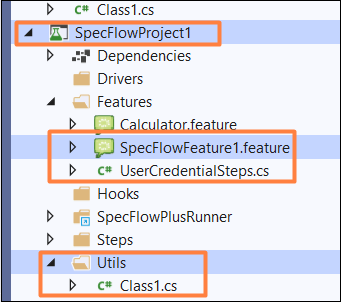
C# Class Implementation
using System;
using System.Collections.Generic;
using System.Text;
using System.Data;
using TechTalk.SpecFlow;
namespace SpecFlowProject1.Utils {
   class Class1 {
      public static DataTable DT(Table t) {
         var dT = new DataTable();
         foreach (var h in t.Header) {
            dT.Columns.Add(h, typeof(string));
         }
         // iterating rows
         foreach (var row in t.Rows) {
            var n = dT.NewRow();
            foreach (var h in t.Header) {
               n.SetField(h, row[h]);
            }
            dT.Rows.Add(n);
         }
         return dT;
      }
   }
}
Step 3: Create a Step Definition File
The details of how to create a Step Definition File is discussed in detail in the Chapter − Step Definition File.
using System;
using System.Data;
using TechTalk.SpecFlow.Assist;
using TechTalk.SpecFlow;
namespace SpecFlowProject1.Features {
   [Binding]
   public class UserCredentialSteps {
      [When(@"User types details")]
      public void WhenUserTypesDetails(Table t) {
         //Accessing C# class method from Step Definition
         var dTable = Utils.Class1.DT(t);

         //iterating rows
         foreach (DataRow r in dTable.Rows) {
            Console.WriteLine(r.ItemArray[0].ToString());
            Console.WriteLine(r.ItemArray[1].ToString());
         }
      }
      [Then(@"user should be able to login")]
      public void ThenUserShouldBeAbleToLogin() {
         Console.WriteLine("User should be able to login");
      }
   }
}
Step 4: Execution & Results
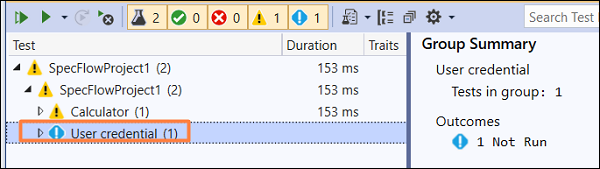
Select User credential(1) Feature, then click on Run All Tests in View.
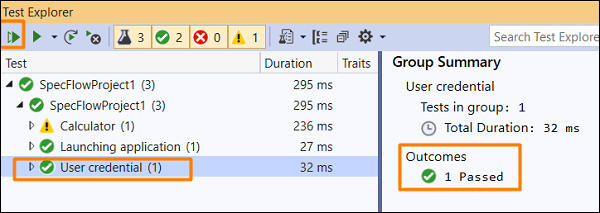
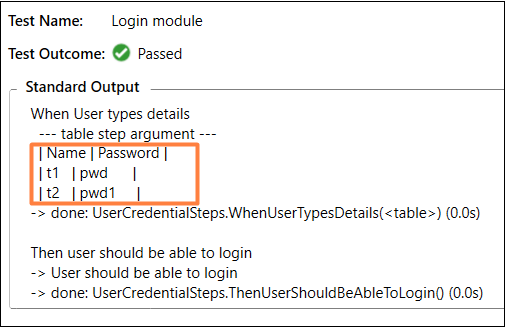
Select Login Module Scenario, then click on Open additional output for this result link.

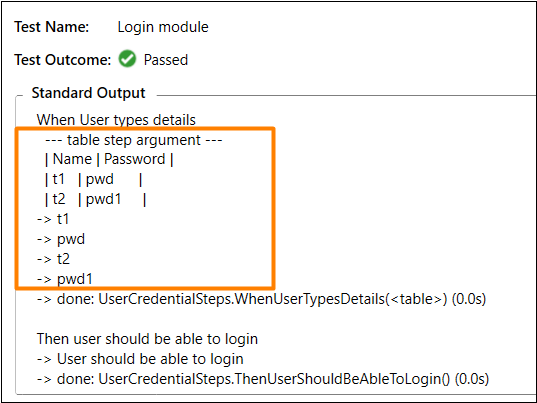
The Scenario got executed with data passed from a Table (converted to a Data Table) in the Feature File within the When step.
SpecFlow - Table Conversion to Dictionary
Tables can hold data in a horizontal and vertical direction in the Feature File. With a Dictionary object, we shall see how to access data in the Feature File vertically in a key-value pair.
Step 1: Create a Feature File
The details of how to create a Feature File is discussed in detail in the Chapter − Feature File.
Feature: User credential
Scenario: Login module
   When User types details
   | KY       | Val            |
   | username | tutorialspoint |
   | password | pwd1           |
Then user should be able to login
Step 2: Create C# File to Access Table Data
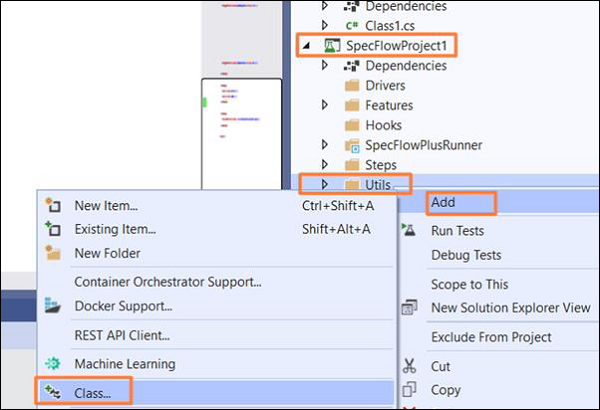
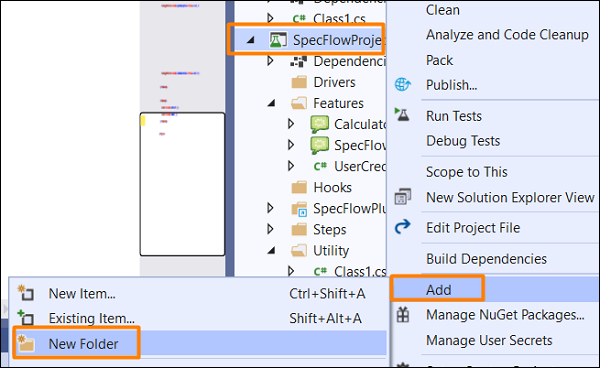
We must convert a Table to a Dictionary via System.Collections.Generic package. We shall create a new folder within the project and have a C# file in it. Right-click on the SpecFlow Project, then click on Add.
Select the option New Folder.

Give the name Utils to the folder.
Right-click on the new Folder created, then select the option Add. Click on Class.

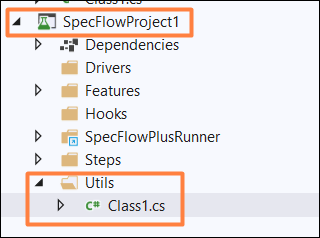
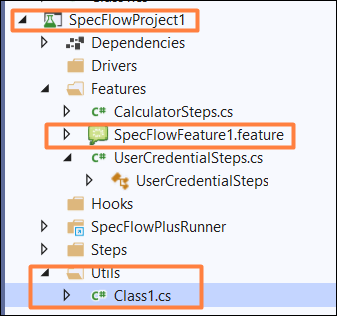
Project Folder Structure
C# Class Implementation
using System;
using System.Collections.Generic;
using System.Text;
using System.Data;
using TechTalk.SpecFlow;
namespace SpecFlowProject1.Utils {
   class Class1 {
      public static Dictionary<string, string> ToDT(Table t) {
         var dT = new Dictionary<string, string>();

         // iterating through rows
         foreach (var r in t.Rows) {
            dT.Add(r[0], r[1]);
         }
         return dT;
      }
   }
}
Step 3: Create a Step Definition File
The details of how to create a Step Definition File is discussed in detail in the Chapter − Step Definition File.
using System;
using TechTalk.SpecFlow;
namespace SpecFlowProject1.Features {
   [Binding]
   public class UserCredentialSteps {
      [When(@"User types details")]
      public void WhenUserTypesDetails(Table t) {

         //Accessing C# class method from Step Definition
         var dict = Utils.Class1.ToDT(t);
         Console.WriteLine(dict["username"]);
         Console.WriteLine(dict["password"]);
      }
      [Then(@"user should be able to login")]
      public void ThenUserShouldBeAbleToLogin() {
         Console.WriteLine("User should be able to login");
      }
   }
}
Step 4: Execution & Results
Select User credential(1) Feature, then click on Run All Tests in View.
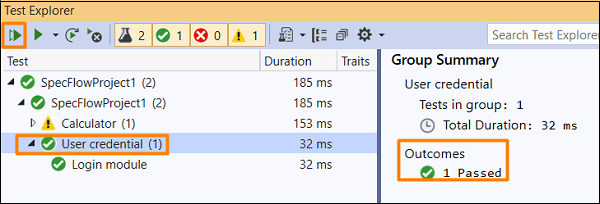
Select Login Module Scenario, then click on Open additional output for this result link.

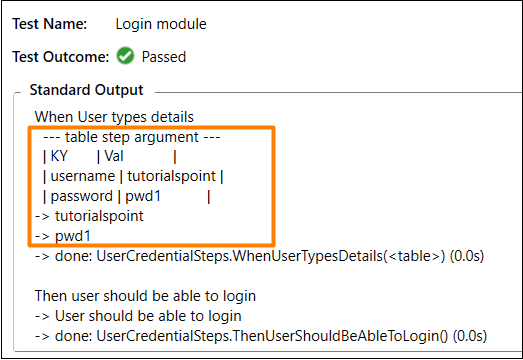
The Scenario got executed with data passed from a Table (converted to a Dictionary) in the Feature File within the When step.
SpecFlow - Table with CreateInstance
CreateInstance<T> is an extension of the Table method. It transforms the data in the Table to an object. It is one of the popular techniques to have parameterization of data in a vertical alignment.
The SpecFlow Assist Helpers package is used to work on tables. Also, we have to add namespace TechTalk.SpecFlow.Assist to our code.
The Table headers in the Feature File can be of any name, for example: KEY, VALUE. However, the first column should point to the name of the property and the second column should point to its corresponding value.
Step 1: Create a Feature File
The details of how to create a Feature File is discussed in detail in the Chapter − Feature File.
Feature: User credential

Scenario: Login module
   When User types details
   | KEY      | VALUE          |
   | username | tutorialspoint |
   | password | pwd1           |
Then user should be able to login
Step 2: Create C# File to access String Objects
We shall create a new folder within the project and have a C# file in it. Right-click on the SpecFlow Project, then click on Add.
Select the option New Folder.
Give the name Utils to the folder.
Right-click on the new Folder created, then select the option Add. Click on Class.

Type C# Class in the search box and search. Select the option Class from the search result and then click on Add to proceed.

Project Folder Structure
C# Class Implementation
using System;
using System.Collections.Generic;
using System.Text;
namespace SpecFlowProject1.Utils {
   class Class1 {
      public class Input {
         //Declaring string objects
         public string Input1 { get; set; }
         public string Input2 { get; set; }
      }
   }
}
Step 3: Create a Step Definition File
The details of how to create a Step Definition File is discussed in detail in the Chapter − Step Definition File.
using System;
using TechTalk.SpecFlow;
using TechTalk.SpecFlow.Assist;
namespace SpecFlowProject1.Features {
   [Binding]
   public class UserCredentialSteps {
      [When(@"User types details")]
      public void WhenUserTypesDetails(Table t) {
         //access data with CreateInstance method using C# class method
         var i = t.CreateInstance<Utils.Class1.Input>();
         Console.WriteLine(i.Input1);
         Console.WriteLine(i.Input2);
      }
      [Then(@"user should be able to login")]
      public void ThenUserShouldBeAbleToLogin() {
         Console.WriteLine("User should be able to login");
      }
   }
}
Step 4: Execution & Results
Select User credential(1) Feature, then click on Run All Tests in View.
Select Login Module Scenario, then click on Open additional output for this result link.
The Scenario got executed with data passed from a Table in the feature file within the When step using CreateInstance method.
SpecFlow - Table with CreateSet
CreateSet<T> is an extension of the Table method. It transforms the data in the Table to a group of objects. It is one of the popular techniques to have parameterization of data in a horizontalalignment.
We can handle one or many rows of data with this method. The SpecFlow Assist Helpers package is used to work on tables. Also, we have to add namespace TechTalk.SpecFlow.Assist to our code.
The CreateSet<T> method obtains an IEnumerable<T> depending on the matched data in the Table. It has values for all the objects. It makes sure to have the correct type conversions from string to a linked property.
Step 1: Create a Feature File
The details of how to create a Feature File is discussed in detail in the Chapter − Feature File.
Feature: User credential

Scenario: Login module
   When User types details
   | Name | Password |
   | t1   | pwd      |
   | t2   | pwd1     |
Then user should be able to login
Step 2: Create C# File to access String Objects
We shall create a new folder within the project and have a C# file in it. Right-click on the SpecFlow Project, then click on Add.
Select the option New Folder.
Give the name Utils to the folder.
Right-click on the new Folder created, then select the option Add. Click on Class.
Type C# Class in the search box and search. Select the option Class from the search result and then click on Add to proceed.

Project Folder Structure

C# Class Implementation
using System;
using System.Collections.Generic;
using System.Text;
namespace SpecFlowProject1.Utils {
   class Class1 {
      public class Input {
         //two string objects declared
         public string Input1 { get; set; }
         public string Input2 { get; set; }
      }
   }
}
Step 3: Create a Step Definition File
The details of how to create a Step Definition File is discussed in detail in the Chapter − Step Definition File.
using System;
using TechTalk.SpecFlow;
using TechTalk.SpecFlow.Assist;
namespace SpecFlowProject1.Features {
   [Binding]
   public class UserCredentialSteps {
      [When(@"User types details")]
      public void WhenUserTypesDetails(Table t) {

         //access Table data with CreateSet method
         var i = t.CreateSet<Utils.Class1.Input>();

         //iterate over rows
         foreach (var r in i) {
            Console.WriteLine(r.Input1);
            Console.WriteLine(r.Input2);
         }
      }
      [Then(@"user should be able to login")]
      public void ThenUserShouldBeAbleToLogin() {
         Console.WriteLine("User should be able to login");
      }
   }
}
Step 4: Execution & Results
Select User credential(1) Feature, then click on Run All Tests in View.
Select Login Module Scenario, then click on Open additional output for this result link.

The scenario got executed with data passed from a Table in the feature file within the When step using CreateSet method.
To Continue Learning Please Login