- Ruby on Rails Tutorial
- Ruby on Rails - Home
- Ruby on Rails - Introduction
- Ruby on Rails - Installation
- Ruby on Rails - Framework
- Ruby on Rails - Directory Structure
- Ruby on Rails - Examples
- Ruby on Rails - Database Setup
- Ruby on Rails - Active Records
- Ruby on Rails - Migrations
- Ruby on Rails - Controllers
- Ruby on Rails - Routes
- Ruby on Rails - Views
- Ruby on Rails - Layouts
- Ruby on Rails - Scaffolding
- Ruby on Rails - AJAX
- Ruby on Rails - File Uploading
- Ruby on Rails - Send Emails
- Ruby on Rails Resources
- Ruby on Rails - References Guide
- Ruby on Rails - Quick Guide
- Ruby on Rails - Resources
- Ruby on Rails - Discussion
- Ruby Tutorial
- Ruby Tutorial
Ruby on Rails - Send Emails
Action Mailer is the Rails component that enables applications to send and receive emails. In this chapter, we will see how to send an email using Rails. Let’s start creating an emails project using the following command.
tp> rails new mailtest
This will create the required framework to proceed. Now, we will start with configuring the ActionMailer.
Action Mailer - Configuration
Following are the steps you have to follow to complete your configuration before proceeding with the actual work −
Go to the config folder of your emails project and open environment.rb file and add the following line at the bottom of this file.
config.action_mailer.delivery_method = :smtp
It tells ActionMailer that you want to use the SMTP server. You can also set it to be :sendmail if you are using a Unix-based operating system such as Mac OS X or Linux.
Add the following lines of code at the bottom of your environment.rb as well.
config.action_mailer.smtp_settings = {
   address:              'smtp.gmail.com',
   port:                 587,
   domain:               'example.com',
   user_name:            '<username>',
   password:             '<password>',
   authentication:       'plain',
   enable_starttls_auto: true
}
Replace each hash value with proper settings for your Simple Mail Transfer Protocol (SMTP) server. You can take this information from your Internet Service Provider if you already don't know. You don't need to change port number 25 and authentication type if you are using a standard SMTP server.
You may also change the default email message format. If you prefer to send email in HTML instead of plain text format, add the following line to config/environment.rb as well −
ActionMailer::Base.default_content_type = "text/html"
ActionMailer::Base.default_content_type could be set to "text/plain", "text/html", and "text/enriched". The default value is "text/plain".
The next step will be to create a mailer
Generate a Mailer
Use the following command to generate a mailer as follows −
tp> cd emails
emails> rails generate mailer Usermailer
This will create a file user_mailer.rb in the app\mailer directory. Check the content of this file as follows −
class Emailer < ActionMailer::Base
end
Let's create one method as follows −
class UserMailer < ApplicationMailer
   default from: 'notifications@example.com'

   def welcome_email(user)
      @user = user
      @url  = 'http://www.gmail.com'
      mail(to: @user.email, subject: 'Welcome to My Awesome Site')
   end

end
default Hash − This is a hash of default values for any email you send from this mailer. In this case we are setting the :from header to a value for all messages in this class. This can be overridden on a per-email basis
mail − The actual email message, we are passing the :to and :subject headers in.
Create a file called welcome_email.html.erb in app/views/user_mailer/. This will be the template used for the email, formatted in HTML −
<html>

   <head>
      <meta content = 'text/html; charset = UTF-8' http-equiv = 'Content-Type' />
   </head>

   <body>
      <h1>Welcome to example.com, <%= @user.name %></h1>

      <p>
         You have successfully signed up to example.com,your username is:
         <%= @user.login %>.<br>
      </p>

      <p>
         To login to the site, just follow this link:
         <%= @url %>.
      </p>

      <p>Thanks for joining and have a great day!</p>

   </body>
</html>
Next we will create a text part for this application as follow −
Welcome to example.com, <%= @user.name %>
===============================================

You have successfully signed up to example.com,
your username is: <%= @user.login %>.

To login to the site, just follow this link: <%= @url %>.

Thanks for joining and have a great day!
Calling the Mailer
First, let's create a simple User scaffold
$ bin/rails generate scaffold user name email login
$ bin/rake db:migrate
Action Mailer is nicely integrated with Active Job so you can send emails outside of the request-response cycle, so the user doesn't have to wait on it −
class UsersController < ApplicationController
   # POST /users
   # POST /users.json
   def create
   @user = User.new(params[:user])

      respond_to do |format|
         if @user.save
            # Tell the UserMailer to send a welcome email after save
            UserMailer.welcome_email(@user).deliver_later

            format.html { redirect_to(@user, notice: 'User was successfully created.') }
            format.json { render json: @user, status: :created, location: @user }
         else
            format.html { render action: 'new' }
            format.json { render json: @user.errors, status: :unprocessable_entity }
         end

      end

   end
end
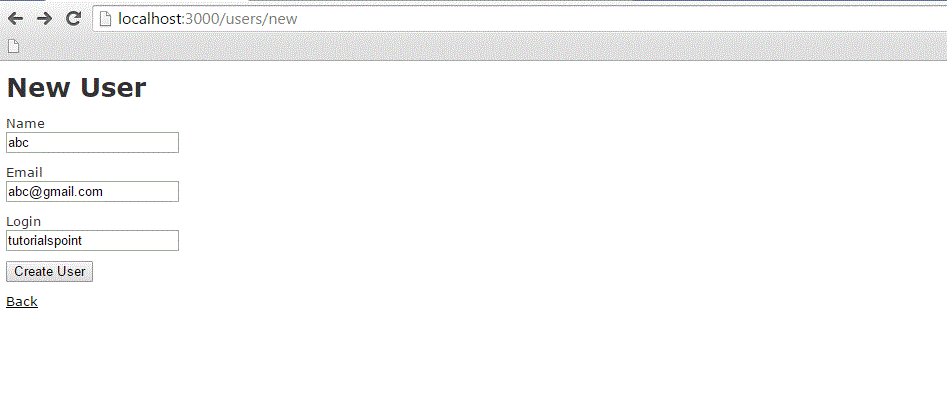
Now, test your application by using http://127.0.0.1:3000/users/new. It displays the following screen and by using this screen, you will be able to send your message to anybody.
This will send your message and will display the text message "Message sent successfully" and output as follow −
sent mail to kittuprasad700@gmail.com (2023.Sms)
[ActiveJob] [ActionMailler::DeliveryJob] [2cfde3c-260e-4a33-1a6ada13a9b] Date: Thu, 09 Jul 2015 11:44:05 +0530
From: notification@example.com
To: kittuprasad700@gmail.com
Message-Id: <559e112d63c57_f1031e7f23467@kiranPro.mail>
Subject: Welcome to My Awesome Site
Mime-Version: 1.0
Content-Type: multipart/alternative;
boundary="--mimepart_559e112d601c8_f1031e7f20233f5";
charset=UTF-8
Content-Transfer-Encoding:7bit
For more information on how to send emails using Rails, please go through ActionMailer.